Have you ever tried to view a planet or constellation and thought, “Why can’t I see anything?”
If you’re interested in viewing space objects, you’ve probably heard that you should make use of a telescope filter to help to enhance what you see.
These are said to bring out more colors and details in the planets and stars, and are a must to purchase when you’re just starting out with astronomy because they will totally change your experience of it.
What, exactly, are telescope filters?
Telescope filters basically block unwanted wavelengths of light from entering the telescope and reaching your eyes as that can distort the view.
There are many types of filters and they have different functions. With that in mind, let’s look at some of the most common types of telescope filters and what they can do for you.
Do You Need A Telescope Filter If You’re A Beginner?
If you’ve just purchased a telescope, chances are you think that you don’t need a filter.
For the time being you probably don’t because you’ll likely be starting out in your astronomy journey by looking at the bright moon and stars, and the brightest ones in the sky are really easy to view without much equipment.
But, as you progress, moving deeper into the night sky, you will find that you will be at a disadvantage if you don’t make use of filters. Telescope filters can really help you to see more objects and their spectacular details.
Basically, you need to ensure you have three important elements when viewing the sky’s treasures. These are contrast, sharpness, and how much light you have at your disposal to see the celestial objects.
The latter will depend on the telescope aperture you have, but you can certainly improve the contrast and sharpness of your views with the use of filters, which all have one important thing in common: they reflect some of the light and block out the rest, therefore bringing celestial objects into sharper, clearer view.
Let’s consider an example. The use of a telescope filter is similar to stepping outside into a bright day and trying to look at a bird on a wall. When you don’t shield your eyes with your hand, it’s hard to see the bird.
You might see that it’s a bird and perhaps some of its coloring, but you’ll be missing out on its other features. When you shield your eyes with your hand, you cut out the sun’s glare and this immediately brings the bird into better focus so that you can spot more of its details.
That’s essentially what a telescope filter does: it blocks out some of the light and glare so that you can have a less obstructed view of the stars and planets.
The Main Types Of Telescope Filters
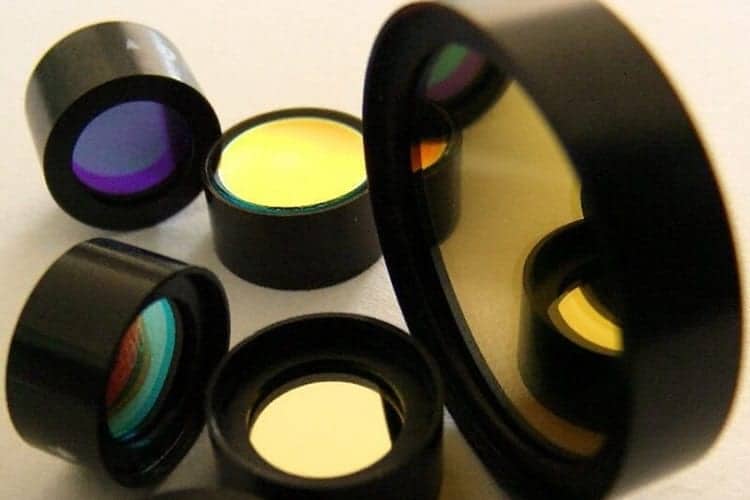
There are a range of telescope filters available for night-sky viewing. Here are the main types that every beginner astronomer should know about.
Solar Filters
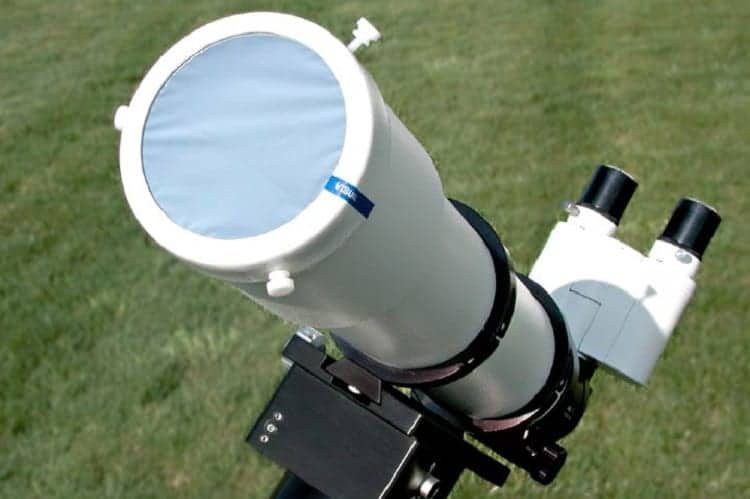
As their name suggests, these filters enable you to look at the sun. However, it’s important to choose the best ones – full-aperture filters.
These are safer than other solar filters because they’re made of a flexible film or glass that covers the end of the telescope so that the ultraviolet radiation, heat, and light from the sun which enters the telescope will be significantly reduced.
That said, you are trying to look at the sun so you should still be careful when using these (and any) solar filters! Looking straight at the sun is always dangerous, even if you only do so for a split-second by mistake.
Another valuable solar filter to try is the H-alpha (hydrogen-alpha) filter. This helps you to see more activity in the sun.
White light solar filters will let you see the sunspots on the surface of the sun and are useful for checking out solar eclipses, but H-alpha filters are better because they transmit one wavelength of light, which is a deep red color that gets released by hydrogen atoms.
An H-alpha filter will enable you to see the sun’s chromosphere, which is a layer where temperatures can rise to 20,000 drees Celsius! Here, hydrogen emits reddish light, and you’ll be able to see it. You can also use the H-alpha filter to better see bright nebula as well as solar eclipses.
In fact, using this type of telescope filter to view the eclipse is fantastic. Since it only allows light with a wavelength of 656 nanometers, this prevents the dangerous light from the sun from being in view (via Astronomy).
Lunar Filters
These types of telescope filters help you to see the moon by lowering the amount of light on all visible wavelengths.
There are two main types of lunar filters: a neutral density filter that darkens a large or small amount of the moon’s surface and a variable moon filter that allows you to change how much light moves through it by adjusting one of its polarisers.
A variable moon filter is a great choice if you want to have views of the moon during its various phases because you can increase the amount of light when the moon is in its crescent phase and then decrease the light when it’s in its gibbous phase.
You can find some lunar filters that are green in color which help to reduce the amount of glare you see when you look at the moon.
Using a moon filter is useful, not just when it comes to helping you better see the moon’s details but also to make your viewing more comfortable – the moon is bright and, therefore, can be painful to look at sometimes!
Color Filters
These are fantastic filters to use when you want to view the planets.
You will find these in a single color, such as violet or blue, and they basically filter the color out of what you’re viewing, except for the color of the filter. This means that your images will have better contrast, and this will enhance the details that you see in the sky.
The use of different colors when viewing certain planets will help you to see clearer details of it, but you need to know which filter to choose for which planet because they don’t come standard.
For example, using a red filter will help you to see details in the markings that are on Mars’s surface.
Here are other color filters that will be useful depending on the planet you wish to view so you don’t have to wonder how on earth to figure out which one you should use.
- To see Mercury: you should use a #25 Red filter. This will enhance the planet’s disk, and it enables you to view Mercury at twilight, bearing in mind that it’s a good idea to try to view Mercury just after sunset.
- To see Venus: you should use a #47 Violet filter. This will reduce the extreme brightness that can cause the image to be overexposed, or too bright.
- To see Mars: you should make use of multiple filters, depending on what you want to see. For example, #21 Orange will help you to reduce the glare so you can see more details, while #15 Deep Yellow will help to bring out the polar caps.
- To see Jupiter: opt for #80A, #58, and #21 filters. These will help to put its cloud bands on better display for you.
- To see Saturn: you want a #15 Deep Yellow to bring out its details. This filter is also a fantastic way to sharpen your astrophotography images.
To use a color filter, you just need to screw the filter into the barrel of the eyepiece. It’s really easy, just like all the other filters, and you can stack them – but more on that later on in this article!
Light Pollution Filters
Artificial light, such as that produced by houses and streetlights, can seriously get in the way of your night-sky views. A light pollution filter works to reduce it so that the sky will be darker. This helps to reveal celestial bodies such as nebulae.
It’s a misconception to think that light pollution filters will make nebulae brighter – they actually make them dimmer. However, boosting the contrast is what’s important so that details in them can be better captured, such as around their periphery.
An example of a light pollution filter is the narrowband filter.
What is a narrowband filter?
This filter is ideal for deep-sky views, such as when you want to capture the nebulae. How it works is that it only allows certain emissions – namely Oxygen III and Hydrogen Beta – through and it blocks the rest. The result?
The sky darkens without reducing the quality of the celestial object you’re keen to view. This also works well to enhance the level of contrast you need for dim celestial objects.
Narrowband filters are quite versatile because they will work even in areas where you’re experiencing a moderate amount of air pollution and with a medium magnification.
How To Make Your Own Solar Filter
If the thought of a DIY solar filter for your telescope sounds exciting, you’ll be pleased to know that you can make one that’s safe to use. It’s also a really easy DIY project. Here’s what you need to make a telescope (or camera) solar filter.
What you’ll need
- Solar mylar film
- Epoxy
- Can
- Can opener
- Scissors
How to make your own solar filter
- Remove the label from the can and clean it properly before using it.
- Then, use your can opener to cut out both ends of your can so that you only have the body of it.
- Mix your epoxy, then dip one end of the can into it. It’s a good idea to set it on a surface, such as cardboard so that you can move the can all around. You want its edges to be covered by epoxy.
- Take your solar film and place it on a table so that its dark side is facing you.
- Put the can’s end that has the epoxy on it onto the solar film. Press it hard.
- Wait five minutes for the epoxy to dry.
- Once it has dried, you need to ensure that no light is entering the solar film. So, hold the can in front of a bright window to ensure that it remains dark. You shouldn’t see any pinpricks of light entering the can.
- When you’re satisfied with it, you can cut away the excess solar film, and you’re good to go!
Tips:
Remember that you need to measure your telescope, as the solar filter will have to be put on the end of the telescope that points up to the sky. If the can is too loose, it will cause light to enter the telescope.
So, make sure you measure not only the outside diameter of the telescope’s tube but also the widest distance of the telescope. Measure the scope from the outside of its casing all across the center and to the outside of the casing on the other side in order to get the right measurements.
Be careful when handling solar film. It’s delicate, and your fingerprints can easily damage it so that it won’t work as well to eliminate the light.
Wear gloves when touching it. If it happens that you do damage a piece of film, throw it out – you don’t want to risk using it and damaging your eyes!
Are Telescope Filters Safe?
You don’t want to damage your telescope. You spent your hard-earned money on it and don’t want to have to replace or repair it. So, you might wonder if using a filter on it is safe.
The good news is that it is. However, if you’re interested in using a solar eyepiece filter, then you should be warned that these are not a good idea. They are dangerous to the eyepiece and – more importantly – your eyes.
These filters are usually made of dark glass that screws into the telescope’s eyepiece, but they’re best avoided because they can shatter from the intense heat of the sun.
That concentrated heat is strong enough to burn through the filter! You should avoid using anything on your eyepiece, even a DIY solar filter because you need to cover the end of the telescope that points to the sky.
How To Use A Filter – And Stack Them!
When you want to attach a filter to your telescope, all you need to do is remove the eyepiece and then thread the filter to fit inside the bottom of the barrel of the eyepiece. Finally, put the eyepiece back. There you go!
What about stacking filters? Can you stack them?
You can do this if you want to use more than one filter at the same time. But why would you want to, you ask?
There are a few instances when it can prove very useful to use more than one filter.
For example, you could use a light yellow filter to bring out details when viewing planets, but it could also be a good idea to try it with a neutral density filter so that you reduce glare and enhance the level of contrast.
Another example is to stack together more than one color filter, as this can sometimes work well.
For example, if you want to reduce the brightness you see when trying to spot Venus, you could stack together #58 Green and #80A Medium Blue. These decrease the twinkling effect so you can see it with more clarity.
Related Questions
Can light pollution filters remove all types of light?
Although they’re useful, they won’t remove everything, such as light that’s cast directly onto buildings, light from car headlights, or that of incandescent bulbs.
Do all nebulae benefit from the use of a filter?
A narrowband filter will only work well for emission nebulae (which are nebulae that release their own light from gas atoms). Reflection nebulae, which shine due to reflected starlight, won’t work well with these filters.
Conclusion
If you want to see things in the night sky in a clearer, crisper way, you should purchase some telescope filters. These are easily installed and removed and give you many options for improving your views.
From color filters to light pollution filters, this article has provided you with more information about the main types of telescope filters so you can choose the best ones for what celestial objects you want to capture.
Pingback: Can I See Pluto And Other Dwarf Planets With A Telescope? -