Table of Contents
- What Are the Zodiacal Light, Gegenschein, and the Zodiacal Band?
- The Physics Behind the Glow: Dust, Scattering, and the Opposition Surge
- When and Where to See Zodiacal Light: Seasons, Latitudes, and Timing
- How to Tell Zodiacal Light from the Milky Way, Airglow, and Light Domes
- Planning an Observation: Moon Phases, Sky Quality, and Weather
- Naked‑Eye and Binocular Techniques for Tracing the Zodiacal Glow
- Astrophotography of Zodiacal Light and Gegenschein: Settings and Workflow
- Why It Matters: What These Glows Reveal About the Solar System
- Frequently Asked Questions
- Final Thoughts on Observing Zodiacal Light and Gegenschein
What Are the Zodiacal Light, Gegenschein, and the Zodiacal Band?
The zodiacal light is a broad, softly luminous cone that rises along the ecliptic just after evening twilight or before morning twilight. It is not a galaxy or a cloud and certainly not a light dome from a city. Instead, it is sunlight scattered by a vast, diffuse disk of interplanetary dust centered on the Sun and roughly aligned with the plane of the planets. When conditions are right—dark, transparent skies far from artificial light—you can spot this shimmering cone reaching up from the horizon for 30–60 degrees or more. Its color is subtly warm, echoing the solar spectrum that illuminates it.
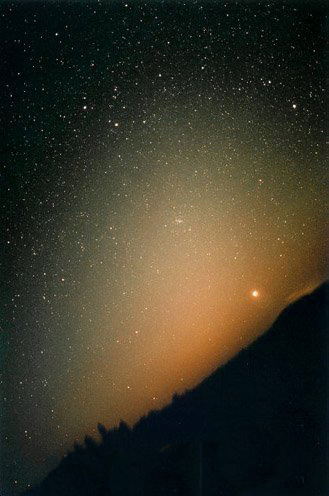
This photo was taken facing east before the beginning of twilight on a morning in August 2000. The zodiacal light is passing through the constellation of Cancer (Venus was in Cancer at this time).
The gegenschein (German for “counter-shine”) is a fainter, oval patch of light located at the point in the sky directly opposite the Sun—the antisolar point. Unlike the zodiacal cone, which is brightest near the Sun’s direction and tapers upward, the gegenschein appears as a localized brightening on the ecliptic around midnight. On pristine nights, observers can trace a continuous zodiacal band—a faint ribbon of glow along the entire ecliptic—that connects the evening cone, arcs across the sky through the gegenschein, and descends as the morning cone. Seeing the full band frames Earth inside a luminous dust disk spanning the inner solar system.
Collectively, these phenomena are the visible manifestations of the interplanetary dust cloud. The dust grains, typically a few micrometers to a few tens of micrometers in size, originate from comets shedding material as they warm near the Sun and from collisions among asteroids. Grains spiral slowly inward under the influence of solar radiation and drag forces, replenishing the innermost regions near Earth’s orbit. The cloud is thicker along the ecliptic, so that is where the light concentrates.
Understanding these glows enriches an evening under the stars. Knowing where to look and how to distinguish them from the Milky Way will transform what many newcomers mistake for “faint haze” into one of the sky’s most ethereal sights. If you want to jump straight to planning details, see Planning an Observation: Moon Phases, Sky Quality, and Weather. If you’re curious about the physics behind this light, head to The Physics Behind the Glow.
The Physics Behind the Glow: Dust, Scattering, and the Opposition Surge
At its core, the zodiacal light arises from sunlight scattering off dust. The geometry of scattering determines what we see. Two regimes dominate:
- Forward scattering is brightest when the angle between the Sun, a dust grain, and your eye is small—that is, when you’re viewing dust located near the Sun’s direction in the sky. This is why the evening and morning zodiacal cones are luminous near the horizon just after twilight ends or just before it begins.
- Backscattering with an opposition surge occurs when you look almost exactly opposite the Sun. In that configuration, shadows cast by dust grains are hidden behind the grains themselves, enhancing reflectivity in a phenomenon called the opposition effect. The result is the gegenschein—an oval or circular patch centered near the antisolar point along the ecliptic.
These effects are controlled by grain size, composition, and structure. Dust in the zodiacal cloud is large compared to visible wavelengths for the purposes of scattering—this is called Mie scattering. Mie scattering tends to be more directional than Rayleigh scattering (the latter is what makes Earth’s sky blue), giving rise to the strong forward-scattering lobe that brightens the cones.
Grain sizes, composition, and color
Interplanetary dust grains largely span micrometer sizes, which makes them efficient scatterers of visible light. Their composition includes silicates, carbonaceous material, and sometimes organic-rich coatings (the latter can condense onto grains or be intrinsic to cometary particles). Because these grains reflect and scatter sunlight with relatively modest reddening, the zodiacal light often appears slightly yellowish or neutral-white to the eye, especially when compared to the cooler, bluish-white appearance of the Milky Way star fields. In photographs, color balance can vary with processing; a natural calibration tends to render the zodiacal glow close to solar color with a hint of warm tone.
Why the ecliptic shines: geometry of the dust disk
The interplanetary dust cloud is densest near the Sun and thins with distance from the ecliptic plane. The ecliptic—the projection of Earth’s orbital plane onto the sky—marks the midplane of this disk. Planets and many small bodies orbit near this plane, so their debris remains concentrated there. When you trace the zodiacal light, you are literally tracing the geometry of the solar system’s dust disk across the night sky. The seasonal visibility of the cone depends on how steeply the ecliptic meets your horizon after dusk or before dawn, which changes over the year with the Sun’s apparent path.
The opposition surge that reveals the gegenschein
Gegenschein is a faint brightening of the night sky in the region of the ecliptic directly opposite the Sun, caused by the reflection of sunlight by interplanetary dust in the Solar System. The Gegenschein is seen in this image as a band running diagonally from the top left to lower right. The image was obtained by Yuri Beletsky in October 2007 using a digital camera equipped with a 10-mm wide-angle lens and installed on a portable equatorial mount. The total exposure time was about 45 min. The weather conditions during the observations were excellent: the sky transparency was close to perfect, which allowed Yuri to capture very faint details of the Gegenschein and reveal its fine structure.
The gegenschein is subtler because it relies on a delicate backscattering enhancement. Near zero phase angle (Sun–dust–observer angle), multiple physical mechanisms boost reflectivity: shadow-hiding (micro-shadows on grain surfaces or within aggregates disappear when viewed backlit) and coherent backscatter (constructive interference among multiply scattered light paths). Together, these produce a roughly circular brightening at the antisolar point that keen observers can see under very dark skies. The enhancement is strongest when you observe around local midnight near the date when the antisolar point lies among dark, star-sparse regions of the sky, away from the brightest clouds of the Milky Way.
Dust dynamics: how grains drift and persist
Dust grains do not simply sit in place. Solar radiation exerts pressure that can nudge grains outward, while another effect—Poynting–Robertson drag—causes them to lose orbital energy and spiral slowly toward the Sun as they reradiate absorbed sunlight. Collisions grind larger particles into smaller ones, and sublimation can destroy ices as grains approach the Sun. To maintain the population we see, dust must be replenished continually. Jupiter-family comets and asteroidal collisions are prime suppliers. Near Earth’s orbit, evidence suggests cometary dust makes a large contribution, with asteroid-born debris also present.
Interestingly, Earth’s gravity creates a subtle overdensity of dust in a ring structure that co-orbits with our planet—a resonant feature faintly detectable in precise measurements and carefully processed images. While you won’t see that ring visually, it underscores that the zodiacal light is not uniform; it is a living, structured component of the inner solar system.
When and Where to See Zodiacal Light: Seasons, Latitudes, and Timing
Because the zodiacal light follows the ecliptic, seasonality is all about the angle that the ecliptic makes with your horizon at the times you can observe it. The rule of thumb is simple: you want the ecliptic to be as steep as possible over the relevant horizon.

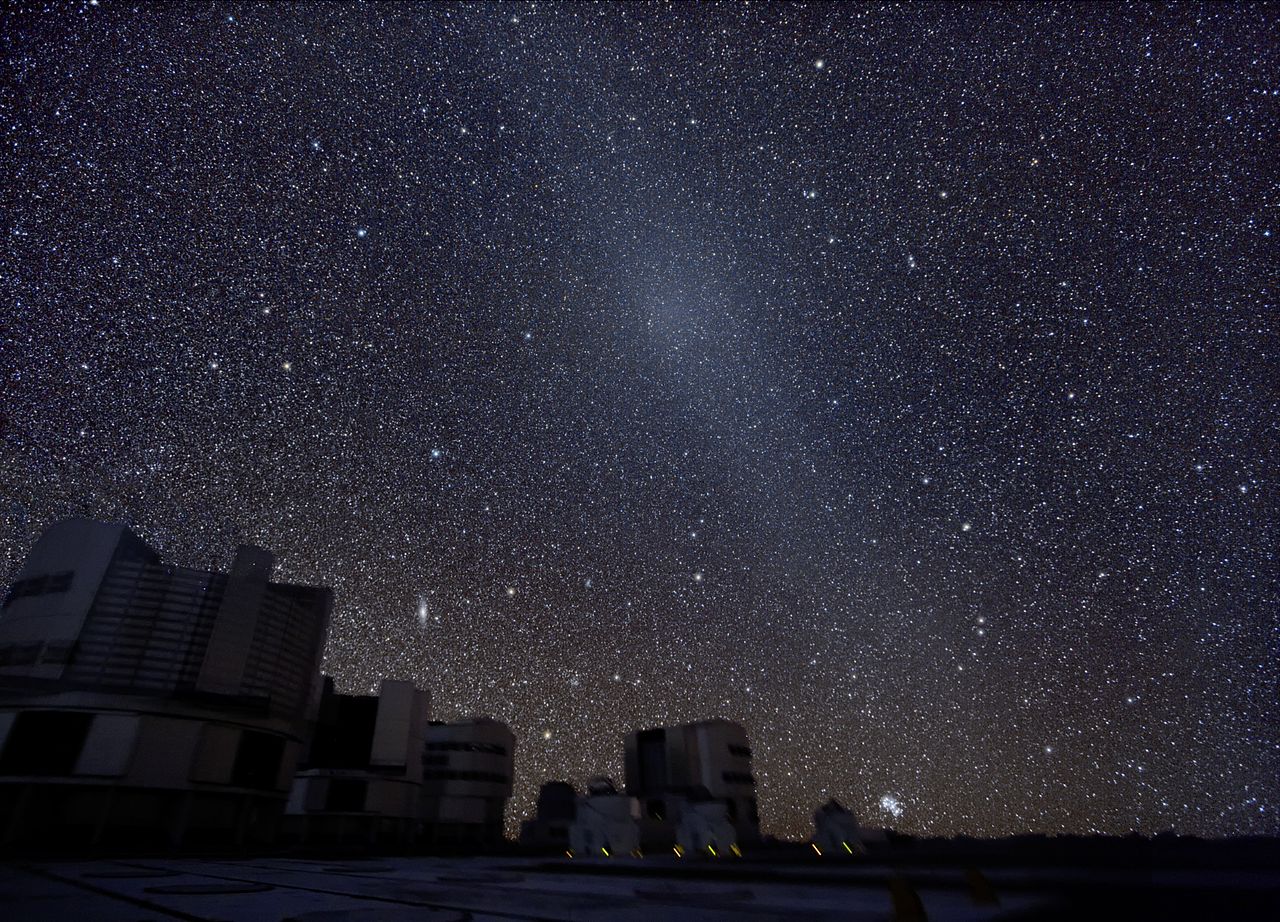
Photo of the morning sky above the Paranal Residencia taken by ESO astronomer Yuri Beletsky. The Milky Way is nicely seen along with its numerous dark dust lanes and amazing nebulae. The Zodiacal light – sunlight reflected by interplanetary dust – is clearly visible as the band of light that is inclined with respect to the Milky Way by about 40-50 degrees. The planet Venus is also visible in this photo, just above the Residencia.
Northern Hemisphere: best months and directions
- Evenings (after dusk): Late winter to early spring—roughly February through April—offers the best visibility after sunset. During this season, the ecliptic stands steep over the western horizon, and the zodiacal cone can reach high into the sky. Look due west to west-northwest about 60–90 minutes after sunset, when astronomical twilight has ended and the Sun is more than 18° below the horizon.
- Mornings (before dawn): Late summer to early autumn—roughly August through October—is prime time before dawn. The ecliptic rises steeply in the east before sunrise. Head out 60–90 minutes before dawn, facing east to east-southeast.
Southern Hemisphere: shifting the calendar
- Evenings (after dusk): Late summer to early autumn—approximately August through October—provides the steepest ecliptic in the west after twilight. The calendar flips relative to the north.
- Mornings (before dawn): Late winter to early spring—about February through April—delivers excellent pre-dawn opportunities in the east.
Equatorial observers: almost year-round
Near the equator, the ecliptic often makes a healthy angle with the horizon both after dusk and before dawn. This means the zodiacal light can be visible for much of the year in both the evening and morning skies, weather and Moon permitting. The trade-off is frequent haze in some low-latitude regions; transparency remains crucial.
High latitudes and seasonal darkness
At high latitudes, long twilight in summer can overwhelm the faint zodiacal glow. In winter, long nights and frequent darkness help, but weather and auroral activity can complicate matters. In aurora-prone regions, keep an eye on geomagnetic forecasts; bright auroral arcs can wash out faint, diffuse glows like the gegenschein. See Planning an Observation for tips on handling aurora and airglow.
Best times of night
- Zodiacal light (cones): The hour to two hours immediately after the end of evening astronomical twilight or immediately before the start of morning astronomical twilight. The base of the cone hugs the horizon near the Sun’s direction.
- Gegenschein: Centered on the antisolar point around local midnight. The antisolar point is opposite the Sun: roughly where your shadow would point if the Sun were up. As a quick approximation, its ecliptic longitude is 180° from the Sun’s, and in equatorial coordinates it lies near RA = RA(sun) + 12h, Dec ≈ −Dec(sun). Exact values vary with ecliptic obliquity and your date/time.
Whichever you chase, avoid moonlight. A bright Moon makes the faint, low-contrast zodiacal glow nearly impossible to see. The darker the sky, the better, especially for the gegenschein. Aim for a new Moon window, plus or minus a few days.
How to Tell Zodiacal Light from the Milky Way, Airglow, and Light Domes
Sky newcomers often confuse the zodiacal cone with the Milky Way or a distant city’s light dome. Disentangling them becomes easy once you learn a few cues. As you read the tips below, consider cross-referencing the techniques and astrophotography sections for visual and imaging checks.
Zodiacal light vs. the Milky Way

This impressive photograph, taken at the site of ESO’s Very Large Telescope (VLT) at Paranal Observatory in Chile, shows, towards the centre left, the Milky Way — with its share of nebulae, stars, and gas clouds — rising above the VLT Unit Telescopes. To the right, competing for attention as it arcs above the horizon, a beautiful, almost triangular band of diffuse light lies along the ecliptic, which is the apparent path of the Sun in the sky as seen from the Earth. This glow originates in the scattering of sunlight by dust located between the planets that are spread through the plane of the Solar System. This coincides in the sky with the band known as the Zodiac, which extends for eight degrees of arc on either side of the ecliptic and contains the traditional zodiacal constellations.
- Orientation: Zodiacal light aligns with the ecliptic, the path on which you find the planets and the zodiac constellations. The Milky Way aligns with the galactic plane, which slices through Cygnus, Scutum, Sagittarius, and beyond. If bright planets sit in the glow, that’s a big hint you’re looking at the zodiacal cone.
- Texture: The zodiacal glow is smooth and diffuse, without embedded star clouds. The Milky Way, even in light-polluted skies, shows mottling, dark dust lanes, and star enrichments when you stare carefully.
- Color: To a dark-adapted eye, the Milky Way appears cooler or more bluish-white; the zodiacal light can look slightly warmer. In photos with neutral processing, the zodiacal light trends toward solar color.
- Seasonal timing: The galaxy’s bright band in the northern summer arches high in the south; the zodiacal cone in the north’s spring dominates the west after dusk. Learn both cycles to reduce confusion.
Airglow and faint atmospheric bands
Airglow is real, natural emission from our upper atmosphere. It can appear as uniform greenish or reddish veils or as structured bands. It can mislead photographers who later see large-scale gradients in images. Two keys:
- Motion over time: Airglow bands drift slowly and change structure over tens of minutes to hours. The zodiacal light’s shape is fixed by the ecliptic and Earth’s rotation, evolving predictably.
- Spectral content: Airglow has narrow emission features (e.g., the green oxygen line). While your eyes won’t separate spectra, certain filters attenuate airglow more than the zodiacal continuum. In practice, visual observers will simply note that the zodiacal cone’s color and shape are steady, while airglow drifts and undulates.
Light domes vs. zodiacal cone
- Location: Light domes sit above known towns or cities and often have a distinct azimuth. The zodiacal cone tracks with the ecliptic and moves with the seasons, not with urban geography.
- Color cast: Light domes often look sodium-orange or LED-blue/white. The zodiacal light appears more neutral-warm and far more diffuse.
- Sharpness: Urban domes have hard edges and may show beam-like features; the zodiacal glow feather-blends gracefully into the sky.
If in doubt, pull up a star map that plots the ecliptic. If the glow’s axis follows the ecliptic line, you’ve found the real thing. Also, use the planet test: if Venus or Jupiter sits embedded near twilight along the same axis, you’re likely seeing the zodiacal light. For more planning aids, see Moon Phases and Sky Quality.
Planning an Observation: Moon Phases, Sky Quality, and Weather
Success hinges on three factors: no Moon, dark, transparent air, and a steep ecliptic over the right horizon. Here is how to stack the deck in your favor.
Moonlight management
- New Moon window: Target a stretch from about three days before new Moon to three days after. The exact window widens or narrows with your latitude, the season, and the object you’re chasing (evening cone vs. morning cone vs. gegenschein).
- Moonset and moonrise timing: Even outside the strict new Moon, if the Moon sets early (for evening) or rises late (for morning), you may win a useful gap of dark sky. Aim for at least 90 minutes of Moon-free darkness near twilight for the cones, and Moon-free midnight hours for the gegenschein.
- Illumination vs. altitude: A crescent Moon low on the horizon can still wash out the faintest details if the atmosphere is hazy. Combine lunar phase and altitude estimates to judge whether the illumination will harm your view.
Sky quality: Bortle class and transparency
- Bortle scale: For the zodiacal cone, Bortle 1–3 skies are ideal; Bortle 4 may still suffice if transparency is excellent and the cone stands high. The gegenschein typically requires Bortle 1–2 and superb transparency.
- Transparency vs. seeing: You can ignore “seeing” (steadiness) for diffuse glows; what you need is transparency—clean, dry air with low aerosol load. High humidity and particulate haze attenuate low-contrast features near the horizon.
- SQM measures: If you have a sky quality meter (SQM), readings with the Milky Way absent from zenith of 21.3 mag/arcsec² or darker boost your chances for the gegenschein. The zodiacal cone is more forgiving but still benefits from darker numbers.
Weather and environmental factors
- Clouds: Even thin cirrus can smear light and kill contrast. Wait for nights forecast with minimal high cloud cover.
- Wind and dust: Windborne dust or smoke elevates scattering at low angles; pick nights after a front has swept the air clean.
- Geomagnetic activity: In auroral latitudes, high activity can brighten the sky. Check aurora forecasts and pick calm nights for gegenschein hunts.
Quick planning checklist
- Choose the right season for your hemisphere and decide if you want evening or morning light—or the midnight gegenschein.
- Confirm a Moon-free window of at least 90 minutes near your target time.
- Pick a site with an unobstructed horizon in the relevant direction (west for evening, east for morning).
- Monitor transparency forecasts and avoid smoke/haze events.
- Have a printed or offline star chart showing the ecliptic and current planet positions.
- Give your eyes 20–30 minutes to adapt to the dark; use a dim red flashlight only when needed.
Tip: If you can see the winter zodiacal light in the Northern Hemisphere after dusk, also look higher for the Pleiades and the V-shape of Taurus. The cone often points directly through these landmarks, emphasizing its ecliptic alignment.
A sample observing plan (pseudocode)
# Goal: Evening zodiacal light (Northern Hemisphere, March)
- Date: Choose within ±3 days of new Moon
- Time: Arrive 45 minutes before sunset to set up; observe 75–120 minutes after astronomical twilight ends
- Location: Western horizon open, Bortle 2–3 site, elevation > 1000 m if possible
- Checks:
  - Transparency forecast: clear of cirrus, dry air
  - Planet positions: Venus/Jupiter near horizon along ecliptic help orientation
- On site:
  - Dark adapt: 30 minutes
  - Block stray lights with hood or portable screen
  - Scan west-to-northwest upward ~30–60° along ecliptic line
Naked‑Eye and Binocular Techniques for Tracing the Zodiacal Glow
Part of the challenge is learning how to look at faint, extended objects. Fortunately, the techniques are simple and translate well to galaxies, nebulae, and other low-contrast sights.
Dark adaptation and averted vision
- Dark adapt: Avoid white lights for at least 20–30 minutes. Use a dim red light for charts and notes. Consider a hood or hat brim to block side glare.
- Averted vision: Look slightly to the side of the region where you expect the bright core of the cone or gegenschein. Your peripheral retina is more sensitive to faint diffuse light.
- Sweep and re-center: Sweep your gaze along the expected axis—low on the horizon upward for the cone, or along the ecliptic through the antisolar point for the gegenschein—then re-center on bright patches you detect.
Use the ecliptic as a guide rope
The ecliptic is your best friend. If you can identify two or three zodiac constellations—Pisces, Aries, Taurus, Gemini in the evening spring sky for northerners, for example—you can draw a mental line that points right up the cone. Planets clinch the alignment. This cross-check also helps avoid confusion with light domes and the Milky Way.
Binocular assists
- Binocular type: Handheld 7×50 or 8×42 binoculars with good coatings enhance low-contrast gradients without narrowing your field excessively. They don’t make the cone dramatically brighter but can help you trace the zodiacal band across sparse star fields.
- Technique: Sweep along the ecliptic at low power, pausing every few degrees. Try covering and uncovering the objective lenses to note subtle background differences; alternating the view can make gradients apparent.
- Filters: Skip narrowband filters. The zodiacal light is continuum sunlight; most filters darken the view uniformly and provide little benefit for this target. For accurate color in photography, filters are generally unnecessary; see Astrophotography.
Expectations: brightness and extent
Under excellent conditions, the evening cone may extend 60° or more above the horizon, tapering in brightness with height. The lower 10–20° can be surprisingly bright when Venus is nearby, but that also coincides with residual twilight and horizon murk. The gegenschein is larger than many expect: a soft oval perhaps 10–20° across, with extremely low contrast. You won’t see sharp edges; think of it as the ghost of a halo hovering on the ecliptic near midnight.
Astrophotography of Zodiacal Light and Gegenschein: Settings and Workflow

The sky is full of optical phenomena that can make it tricky to get a clear view of the cosmos. These present a frustrating challenge to astronomers, but for astrophotographers they can provide a real feast for the eyes! This stunning image shows the centre of the Milky Way crossed by the eerie glow of zodiacal light, and is full of dust-induced features that obstruct scientific observations — but they look so beautiful it’s difficult to mind too much. In this image, the centre of the Milky Way appears to be full of inky black gas. In fact, the dark swirling patches are simply the absence of visible light, because huge clouds of dust are obscuring the light from more distant stars. However, just as dust can give the illusion of darkness, it can also give the illusion of light. This is the case with zodiacal light, a fuzzy band of light that we see projected along the constellations of the zodiac. It is caused when sunlight is scattered by the disc of cosmic dust surrounding the inner Solar System. Particularly observant viewers may notice intricate structures within the band of light — notable here is the phenomenon of Gegenschein, the faint elliptical glow at the antisolar point towards the left of the frame. To the right, the bright column of zodiacal light, or “false dawn”, swells up from the horizon. This image was captured over the course of a night and is the result of sophisticated imaging by ESO Photo Ambassador Petr Horálek, who sought to capture the structure of zodiacal light in a ground-based image like never before. It was taken at ESO’s La Silla Observatory in Chile. Petr Horálek won the title of “Czech Astrophotography of the Month” in January 2017 for his photo. The title is offered by the Czech Astronomical Society and the Czech Astronomical Institute.
Photographing the zodiacal glow is rewarding because a camera can accumulate light over seconds and minutes, revealing subtle bands and even the full zodiacal arc. That said, capturing a natural rendition—free from false gradients and color casts—requires mindful technique.
Recommended gear
- Camera: Any modern interchangeable-lens camera with good high-ISO performance. Full-frame sensors offer wider views and lower noise, but APS-C and Micro Four Thirds can work well.
- Lenses: Fast wide-angles (14–35 mm full-frame equivalent) at f/1.4–f/2.8. Ultra-wides emphasize the cone; 24–35 mm frames the gegenschein elegantly against star fields.
- Tripod and remote: A sturdy tripod and a remote shutter or intervalometer to avoid shake. A star tracker is optional and can complicate gradient handling because the foreground blurs; consider static tripod shots for a natural horizon context.
Exposure recipes
- Evening/morning cone (static tripod): ISO 1600–6400, f/1.8–f/2.8, 6–20 seconds depending on focal length and tolerance for star trailing. The classic “500 rule” (500 divided by focal length in mm for full frame) gives a rough upper bound in seconds; many prefer 400 or 300 to keep stars tighter.
- Gegenschein (static tripod): ISO 3200–6400, f/1.4–f/2.0, 10–25 seconds. Compose with the ecliptic centered and avoid the densest Milky Way patches to let the oval shine by contrast.
- Stacking: Shoot sequences of 10–50 frames for stacking. Stacking boosts signal-to-noise and clarifies gentle gradients without aggressive noise reduction.
White balance and color fidelity
- Set a neutral baseline: Use daylight or a fixed Kelvin temperature around 4800–5200 K on location. Avoid auto white balance; it can swing colors based on the scene’s brightness distribution.
- Reference the solar color: The zodiacal light is sunlight. In post, a neutral calibration that makes bright solar twins and the general starfield look natural will leave the zodiacal band close to solar color with a slight warm tilt.
Gradient control and post-processing
- Flat-fielding: Dust on your sensor and lens vignetting can masquerade as sky gradients. If your workflow allows, capture flat frames at the same focal length and aperture to correct vignetting.
- Background modeling: Use careful background extraction to remove lens vignetting and light pollution gradients. Mask the zodiacal region so you don’t subtract the very signal you want to show. Most astro software supports polygonal masks.
- Stacking and alignment: For static tripod shots, align on stars. If you include foreground, consider blending a shorter foreground exposure with a stacked sky.
- Color restraint: Avoid extreme saturation that turns the zodiacal band neon orange or the airglow lime green. Subtlety communicates reality.
Composition ideas
- Evening cone and landmarks: Frame the cone rising above a quiet landscape—coastal headlands, desert ridgelines, or alpine silhouettes. A modest foreground scale preserves the sky’s dominance.
- Gegenschein amid constellations: Center the antisolar point and include constellations that help viewers orient, like Aquarius or Virgo, depending on season. Plan the composition using the ecliptic line on a chart.
- Full zodiacal band: Stitch a panorama: evening cone through the zenith to the gegenschein and down to the morning cone. This can require 8–20 frames and patient gradient work, but the result is a sweeping portrait of the dust disk.
Note: Light pollution suppression filters have limited value here, because the zodiacal light is broadband continuum. If your aim is faithful color and brightness of the glow itself, shoot unfiltered and control gradients in post. For emission-line targets, filters help; for interplanetary dust, they usually don’t.
Why It Matters: What These Glows Reveal About the Solar System
Beyond their beauty, the zodiacal light and the gegenschein are windows into the composition and evolution of our solar system’s small-body population. Observations, including spacecraft measurements and sky surveys, provide constraints on dust sources, sinks, and spatial structure.
Tracing dust sources: comets vs. asteroids
Jupiter-family comets shed copious dust as they pass near the Sun. Over time, this material spreads along their orbits, gradually mixing into the zodiacal cloud. Asteroidal collisions provide another channel, producing debris belts that grind down in size as particles collide and fragment. Near Earth’s orbit (around 1 AU), evidence points to a substantial cometary fraction of dust, with asteroidal contributions also present. The relative share varies with particle size and heliocentric distance. These distinctions matter because they tie the zodiacal light to the broader story of how primitive bodies deliver material to planets.
Poynting–Robertson drag and dust lifetimes
PR drag acts like a weak brake on orbiting dust. As a grain absorbs sunlight and reradiates it in the infrared, a small component of radiation pressure removes angular momentum, causing the grain to spiral sunward. The timescale depends on grain size: micrometer-scale particles can drift inward over 10^4 to 10^6 years. This steady inward flux helps maintain dust density near 1 AU, provided sources continually replenish material.
Grain temperature and infrared emission
Aside from scattering visible light, dust grains emit strongly in the thermal infrared. Around Earth’s orbit, typical grain temperatures are a few hundred kelvin. Space-based infrared observatories have mapped this thermal emission, which complements visible observations to constrain particle sizes and spatial density. The same dust that paints the zodiacal cone visually also creates a luminous “zodiacal foreground” in IR datasets—a key consideration for space telescopes targeting faint extragalactic or exoplanetary signals.
Earth’s resonant ring and structures in the dust cloud
Earth’s gravity shapes a subtle ring of dust in a 1:1 resonance, a halo of slightly enhanced density that trails and leads the planet along its orbit. Similar resonant structures can arise from interactions with other planets. While these overdensities elude naked-eye detection, they show that the zodiacal cloud is not perfectly smooth. For exoplanet studies, analogous exozodiacal dust around other stars may signal small bodies and planetary influences in those systems.
Micrometeoroid influx and planetary surfaces
Interplanetary dust does not just float serenely; some of it intersects Earth. As our planet plows through the dust cloud, it accumulates micrometeoroids—tiny particles that ablate in the upper atmosphere or settle as cosmic dust. Estimates suggest Earth collects on the order of tens of tons of such material daily, though the exact value depends on size distribution and methodology. This flux contributes to the chemistry of the upper atmosphere and delivers primitive material that offers clues about early solar system conditions.
Opposition effect beyond dust: a unifying theme
The opposition surge that illuminates the gegenschein is not unique to the zodiacal cloud. Astronomers see similar brightening near zero phase angle on the Moon’s surface, asteroids, and icy moons. Its presence in diverse contexts hints at universal surface and aggregate physics—shadow hiding and coherent backscatter—playing out at different scales.
Exozodiacal dust and the hunt for exo-Earths
In other planetary systems, dust belts close to the host star—exozodiacal clouds—pose both an opportunity and a challenge. They trace the presence of comets and asteroids and may betray unseen planets that shepherd debris. But they also form a bright foreground haze that can obscure the faint reflected light from Earth-like exoplanets. Understanding our own zodiacal cloud’s distribution and variability helps engineers and scientists design future observatories and data-processing strategies to tease out exoplanetary signals against a dusty backdrop.
If the inner solar system’s dust can shape the detectability of worlds around other stars, the faint glow you see near dusk or at midnight turns out to be more than a sky curiosity; it is a guide to planetary system architecture. For a more practical payoff, remember that these scientific insights also inform when and where to look for the best visual experiences.
Frequently Asked Questions
Can I see the zodiacal light from suburban skies?
It depends on how bright your suburbs are and how transparent the air is. In a typical suburban environment (roughly Bortle 5–6), the zodiacal cone is often lost in skyglow, especially low on the horizon. However, under exceptionally transparent conditions—after a cold front, at higher elevation, or when humidity is low—you might glimpse the cone’s lower portion during the best seasons when the ecliptic stands steep. To improve your odds, find a site with a dark western (for evenings) or eastern (for mornings) horizon shielded from local lights. The gegenschein, by contrast, is very unlikely from suburban skies; reserve that challenge for Bortle 1–2 locations.
How do I find the antisolar point to locate the gegenschein?
The antisolar point is opposite the Sun in the sky. A quick method is to use a planetarium app or star chart to mark the Sun’s ecliptic longitude, then add 180°; plot that on the ecliptic for your date and time. If you prefer equatorial coordinates, an approximate relation is RA(antisolar) ≈ RA(Sun) + 12 hours, Dec(antisolar) ≈ −Dec(Sun). This approximation is close enough for visual scouting. On a clear, dark midnight near new Moon, center that spot in binoculars, sweep along the ecliptic, and look for a very gentle oval brightening. Avoid regions of the sky cluttered by the densest Milky Way star clouds; contrast with the background is the key.
Final Thoughts on Observing Zodiacal Light and Gegenschein
Seeing the zodiacal light and the gegenschein for the first time changes how you read the night sky. What once looked like vague haze becomes a celestial fingerprint of our solar system’s dust disk—an elegant, physical connection between your eyes and the materials that built the planets. The recipe for success is straightforward: choose the right season when the ecliptic stands steep, pick a truly dark site, avoid the Moon, and give your eyes time. Learn to distinguish the glow from the Milky Way and light domes, and be patient with the ultralow-contrast gegenschein.
If you enjoy challenges, try to trace the entire zodiacal band: evening cone up through the zenith, across the gegenschein at midnight, and down toward the morning horizon. Photographers can document this arc with careful panoramas and restrained processing that preserves the glow’s subtlety and color.

Zodiacal Light Seen from Paranal.
Whether you are after a naked-eye triumph or a photograph that captures the solar system’s faintest brushstroke, these glows reward methodical preparation and clear air. If this guide helped you plan your next dark-sky session, explore our related deep-sky and natural-light articles, and subscribe to our newsletter to receive future observing guides, astrophysics explainers, and seasonal sky highlights.