Table of Contents
- What Is a Dobsonian Telescope? Design, Origins, and Use Cases
- Choosing Aperture and Focal Ratio for Dobsonians
- Primary Mirror Materials, Coatings, and Optical Quality
- Mounts, Bearings, Balance, and Ergonomics
- Solid Tube vs Truss Dobsonian: Portability Trade-offs
- Collimation Tools and Thermal Management
- Eyepieces, Finders, Filters, and Essential Accessories
- What You’ll See: Planetary, Lunar, and Deep-Sky Performance
- Light Pollution, Narrowband Filters, and Dark-Sky Strategy
- Push-to Encoders, Digital Setting Circles, and GoTo Upgrades
- Maintenance, Cleaning, and Long-Term Care
- Budget Tiers and Market Overview: What to Expect
- Step-by-Step Setup and Alignment in the Field
- Frequently Asked Questions
- Final Thoughts on Choosing the Right Dobsonian Telescope
What Is a Dobsonian Telescope? Design, Origins, and Use Cases
Dobsonian telescopes are a class of Newtonian reflectors mounted on simple, alt-azimuth bases. Popularized by John Dobson in the late 20th century, they emphasize large aperture, affordability, and ease of use. The formula is straightforward: a parabolic primary mirror collects light, a flat secondary directs the image sideways to a focuser, and the entire assembly rides on a low-friction, ground-based mount that tilts up and down (altitude) and swivels left to right (azimuth).

Attribution: The original uploader was Tmoore at English Wikipedia.
The result is a “light bucket” that delivers bright, detailed views of faint deep-sky objects while remaining relatively simple to build, transport, and operate. Today, Dobsonians span from ultra-compact 6–8 inch beginner models to 20-inch and larger truss systems used by serious observers. If you’re weighing a Dobsonian against refractors or catadioptric designs, the value proposition is clear: you’ll generally get more aperture per dollar in a Dob.
- Core strength: unmatched aperture-per-dollar for visual astronomy.
- Typical users: deep-sky observers, outreach organizers, beginners who want intuitive point-and-look operation, and experienced amateurs pursuing faint targets.
- Common limitations: manual tracking (unless upgraded), collimation requirements, and bulk at larger sizes.
In this guide, we’ll detail how to choose the right Dobsonian for your goals. You’ll learn about aperture and focal ratio trade-offs, optical quality, mount ergonomics, portability differences in solid-tube vs truss designs, and practical collimation and cooling. We’ll also cover accessories, performance expectations, and how to set up and care for your scope for years of rewarding observing.
Choosing Aperture and Focal Ratio for Dobsonians
The first questions buyers ask often revolve around mirror size (aperture) and focal ratio (f/number). These factors determine not only what you’ll see, but also how the telescope behaves in the field.
Aperture: How Much Light Do You Need?
Aperture sets the light-gathering power and the theoretical resolving power. Larger mirrors collect more photons and can reveal finer detail under steady atmospheric conditions. Angular resolution is limited by diffraction and atmospheric seeing, but a useful theoretical estimate is the Dawes limit:
Dawes limit (arcsec) ≈ 116 / D(mm)
For example, an 8-inch (203 mm) mirror has a Dawes limit of about 0.57 arcseconds, while a 12-inch (305 mm) mirror has around 0.38 arcseconds. In practice, atmospheric seeing often ranges from 1–3 arcseconds or worse, so larger scopes benefit most under steady skies.
- 6 inches (150 mm): Compact, cools quickly, great for beginners and grab-and-go backyard sessions.
- 8 inches (200 mm): A sweet spot for value; shows significant deep-sky detail from dark sites.
- 10–12 inches (250–300 mm): Noticeable step up in globular cluster resolution, planetary detail, and faint galaxies.
- 14–16 inches (350–400 mm): Serious deep-sky capability; requires careful planning for transport and setup.
- 18+ inches: Premium observing; truss designs and thoughtful ergonomics become essential.

Attribution: Morn
Focal Ratio: Speed, Field, and Eyepiece Friendliness
Focal ratio (f/number) is the focal length divided by the aperture. It sets the optical “speed” and impacts image scale, field curvature, coma visibility, and ease of collimation.
- f/4 to f/4.5: Very wide fields; compact tubes; benefits from a coma corrector and precise collimation.
- f/5 to f/6: A balanced range offering manageable coma, forgiving eyepiece requirements, and comfortable eyepiece heights.
- f/7+: Long focal lengths, narrower fields, easier on inexpensive eyepieces; tubes get long and less portable.
Exit pupil and magnification also depend on focal ratio and eyepiece choice:
- Magnification:
Mag = Telescope focal length / Eyepiece focal length - Exit pupil:
Exit pupil (mm) = Eyepiece focal length (mm) / f-ratio
For dark-sky deep-sky viewing, exit pupils around 3–5 mm are often ideal. For lunar and planetary work, smaller exit pupils (0.5–2 mm) boost contrast, assuming steady seeing. When pairing a telescope with eyepieces, consider the focal ratio carefully; you’ll optimize your eyepiece set differently for an f/4.5 Dob than for an f/7.
Not sure where to start? Many observers find an 8-inch f/6 or a 10-inch f/5 Dobsonian offers excellent balance of aperture, portability, and optical friendliness. For more on eyepiece selection, jump to Eyepieces, Finders, Filters, and Essential Accessories.
Primary Mirror Materials, Coatings, and Optical Quality
Not all mirrors are created equal. Beyond diameter and focal ratio, mirror substrate and optical figure influence thermal behavior and image quality. Understanding these elements helps you evaluate a Dobsonian beyond the headline aperture.
Mirror Substrates and Thermal Performance
- Soda-lime glass (BK7 and similar): Common in mass-market scopes. Affordable, adequate performance, moderate thermal expansion.
- Borosilicate glass (e.g., Pyrex-style substrates): Lower thermal expansion than BK7, better stability as temperature changes, often used in mid- to premium mirrors.
- Fused silica/quartz: Very low thermal expansion; premium option with superb stability during cooldown.
Thermal stability matters because as your mirror cools to ambient temperature, warm air layers and mirror deformations can blur fine detail. Fans and proper cooldown time can mitigate this; see Collimation Tools and Thermal Management.
Optical Figure and Quality Control
The optical figure—the precise shape of the parabolic surface—determines how accurately the mirror focuses light. Quality is often expressed via Strehl ratio or wavefront error estimates. While published specs can help, real-world performance depends on consistent figuring and quality control.
- Mass-market mirrors today can be quite good. Expect occasional variability; star testing is a pragmatic way to assess performance.
- Premium mirror makers offer tighter tolerances and test documentation, typically at higher cost. Benefits are seen in snap focus, contrast, and high-power planetary detail under good seeing.
Mirror Coatings: Reflectivity and Durability
- Standard aluminum: ~88–92% reflectivity when fresh; protected by a thin overcoat.
- Enhanced aluminum: ~94–96% reflectivity; slightly brighter views; often a worthwhile upgrade for larger apertures.
- Dielectric coatings: Common for diagonals; for primaries and secondaries, enhanced aluminum is the frequent choice.
Coatings degrade slowly with time, environmental exposure, and cleaning frequency. Many observers recoat primaries every 10–20 years, depending on conditions. In coastal or dusty climates, shorter intervals may be needed. The secondary mirror also contributes to overall throughput; a well-coated secondary preserves contrast.
When comparing options, weigh the marginal brightness gains of enhanced coatings against cost, and consider the telescope’s total reflectivity: primary × secondary reflectivity.
Mounts, Bearings, Balance, and Ergonomics

The Dobsonian mount is deceptively simple, but small design details make a big difference in how smoothly the telescope moves and how well it holds position. Ergonomics determine whether your scope is a pleasure to use during long sessions.
Altitude and Azimuth Bearings
- Materials: Traditional pairings include Teflon on textured laminate (often cited historically as “Ebony Star” style laminates). Modern scopes use various low-friction plastics and engineered surfaces.
- Diameter: Larger altitude bearings yield better balance and smoother motion with heavy eyepieces or finder scopes.
- Adjustability: Some mounts include tension knobs or adjustable friction pads to fine-tune motion and hold position at different elevations.
Test motion by nudging the scope in both axes and verifying that it starts and stops smoothly without stick-slip. If motion is jerky, fine planetary tracking will be harder. Balance also matters—heavy eyepieces can tip the tube forward unless bearings are large, adjustable, or counterweighted.
Rocker Box and Ground Board
The rocker box supports altitude bearings; the ground board interfaces with the azimuth bearing. Consider:
- Material: Plywood is common; premium builders use high-quality Baltic birch. Some commercial bases are MDF; heavier but acceptable if properly sealed.
- Stiffness: A rigid structure minimizes vibration and helps collimation hold through altitude changes.
- Size and weight: Larger apertures require substantial bases; ensure you can lift and fit components through doors and into vehicles.
Ergonomics: Eyepiece Height, Observing Chairs, and Steps
Comfort equals productivity. If you’re straining to reach the eyepiece, you won’t observe as long or as carefully. Shorter focal ratios reduce eyepiece height at zenith; truss Dobs allow mirror boxes to sit lower.
- Observing chairs: Adjustable astronomy chairs help maintain steady posture at high magnification.
- Step stools: Required for large truss Dobs; choose stable, wide steps and set up on level ground.
- Finder placement: Keep reflex or optical finders within easy reach; balance convenience with balance considerations.
Consider how accessories affect balance. A heavy 2-inch eyepiece, finder scope, and coma corrector can shift the center of gravity. Some Dobs include magnetic counterweights or sliding altitude bearings to compensate. These small design details dramatically influence usability during a session. For portability and balance comparisons, see Solid Tube vs Truss Dobsonian.
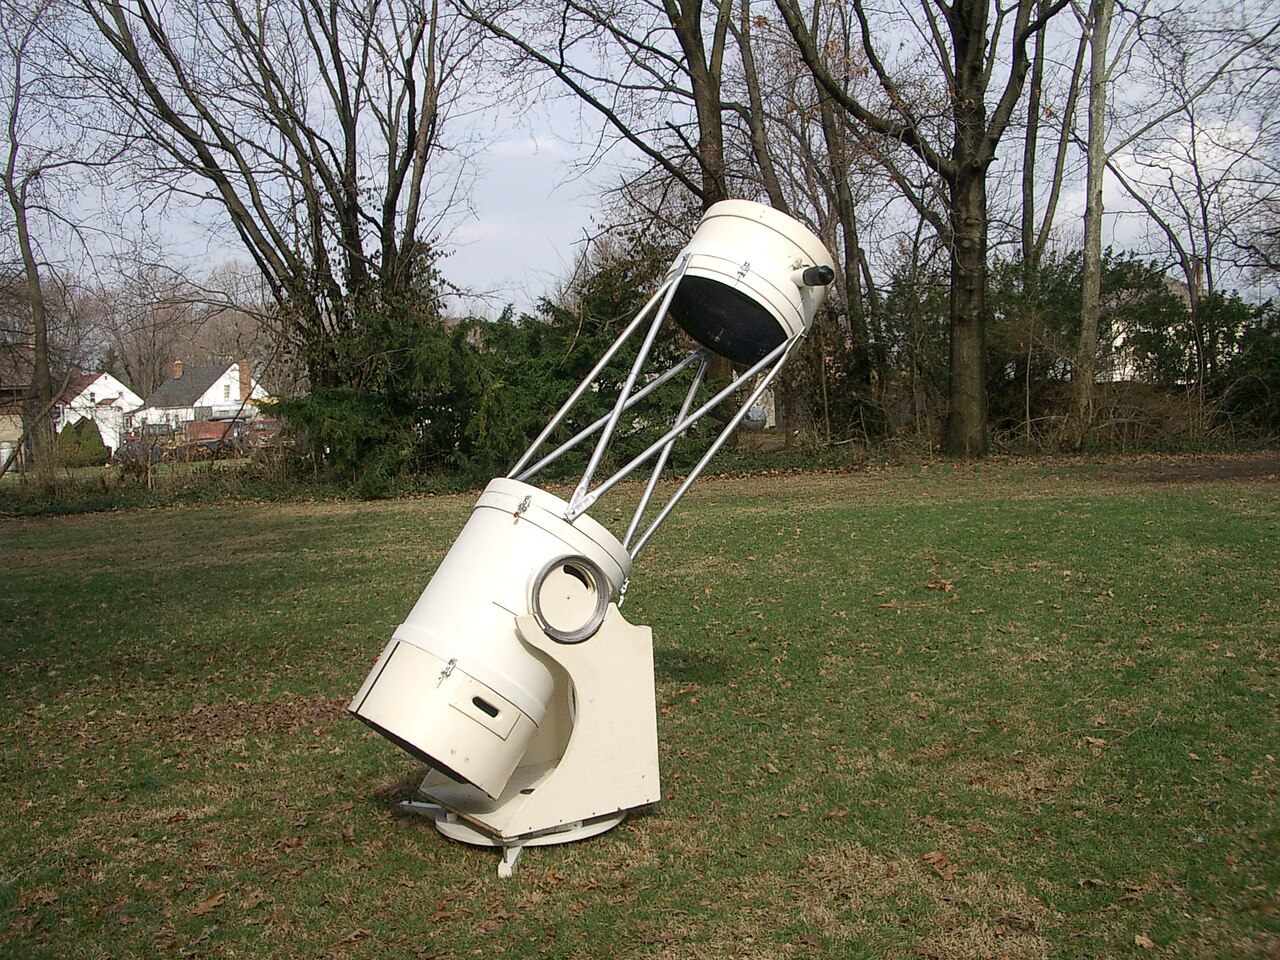
Solid Tube vs Truss Dobsonian: Portability Trade-offs
Two structural styles dominate Dobsonian designs: solid-tube and truss. Both deliver excellent views, but their practical differences matter when packing a car or walking up stairs.
Solid-Tube Dobsonians
- Pros: Simple, robust, minimal setup, better baffling against stray light, typically lower cost.
- Cons: Long tubes at 10–12 inches become unwieldy; larger diameters are heavier; tube flex can increase with size.
- Best use: 6–10 inch sizes where tube dimensions remain manageable.
Solid tubes often cool slower because the tube traps air. However, they shield the light path from wind and stray light effectively. If you observe in suburban yards with neighbors’ lights, this can be a meaningful advantage.
Truss Dobsonians
- Pros: Break down into compact components, lighter structures, customizable ergonomics, easier to manage at 12 inches and up.
- Cons: Assembly time, need for a shroud to block stray light, potential for collimation shift if connections aren’t robust.
- Best use: 12 inches and larger, or whenever transport constraints rule out a long solid tube.

Attribution: Rob Teeter
A good truss system preserves collimation during altitude changes and across sessions thanks to rigid connectors and well-engineered mirror and secondary supports. Always use a light baffle or shroud to improve contrast and mitigate dewing on the secondary. For the thermal side of the equation, read Collimation Tools and Thermal Management.
Collimation Tools and Thermal Management
Newtonian reflectors rely on precise alignment for optimum performance. Good collimation turns a “pretty good” view into a crisp one, while thermal equilibrium ensures the mirror isn’t fighting temperature gradients.
Collimation: Tools and Techniques
- Cheshire/sight tube combo: Reliable, doesn’t require power, great for aligning secondary and primary.
- Laser collimator: Fast, especially handy for quick touch-ups in the field; verify the laser itself is collimated.
- Autocollimator: High-precision tool for tightening residual errors; often used by advanced observers.
Basic steps:
- Center and rotate the secondary under the focuser with a sight tube.
- Adjust secondary tilt to aim the focuser axis at the primary’s center mark.
- Adjust primary mirror tilt to return the beam (or Cheshire reflection) precisely to the center.
Finish by star testing at high magnification on a moderately bright star, using defocus to confirm symmetry. A well-collimated scope will exhibit concentric diffraction rings on both sides of focus.
Cooling and Thermal Equilibrium
Thermal issues can mimic bad seeing. Warm mirrors produce boundary layers—thin films of warm air that degrade images. Solutions include:
- Primary mirror fans: Gentle airflow speeds cooldown and scrubs boundary layers from the mirror surface.
- Rear and side fans: In larger scopes, side fans can flush the light path and accelerate equilibrium.
- Time: Allow 30–90 minutes for mirrors to reach ambient temperature, depending on drop rate and mirror thickness.
Use insulating covers sparingly—helpful in very cold locations to slow overcooling—but ensure you’re not trapping heat. Pay attention to dew on the secondary; see Finders and dew mitigation for practical gear suggestions.
Eyepieces, Finders, Filters, and Essential Accessories
The right accessories profoundly shape your observing experience. For Dobsonians, consider these categories first: eyepieces, finders, collimation tools, and filters. Then add comfort items and small upgrades.
Eyepiece Strategy and Exit Pupil Planning
Build an eyepiece set that covers low, medium, and high power with sensible exit pupils. Example for a 10-inch f/5 (1250 mm focal length):
- Low power (finder view, large exit pupil ~5 mm): 25–30 mm eyepiece gives ~42–50×. Excellent for large nebulae and framing star clouds.
- Medium power (general purpose, exit pupil ~2–3 mm): 12–14 mm gives ~90–105×. Ideal for open clusters, many galaxies, and planetary nebulae.
- High power (fine detail, exit pupil ~1 mm): 5–6 mm gives ~210–250× on steady nights for lunar and planetary detail, tight doubles, cores of globulars.
Fast Dobsonians (f/4–f/5) reveal off-axis coma—stars look like little comets at the field edge. A coma corrector can significantly improve edge performance, especially with wide-field eyepieces. If you prefer simple, narrow-field eyepieces, you can save cost—just know edge performance will vary by design and focal ratio.
Barlows and Coma Correctors
- Barlow lens: Effectively increases focal length and slows the system’s f/ratio, giving higher magnifications with comfortable eye relief. A 2× Barlow doubles your magnification options.
- Coma corrector: Especially useful at f/5 and faster; improves off-axis star images. Some designs require precise spacing to perform optimally.
Finders: Reflex vs Optical
- Reflex (red-dot or multi-reticle): Lightweight, easy for initial pointing using naked-eye stars.
- RACI optical (Right-Angle, Correct-Image): Comfortable, magnified view for star-hopping in crowded fields.
Many observers pair a reflex finder with a RACI finder to get the best of both worlds—quick acquisition followed by precise star-hopping. If you plan to add encoders and a digital setting circle system later (see Push-to Encoders, Digital Setting Circles, and GoTo Upgrades), you may rely less on star-hopping but a good finder remains valuable.
Filters: Nebula, Planetary, and Light Pollution
- UHC (Ultra High Contrast): Narrowband filters improve nebula visibility by passing O-III and H-β while reducing broadband skyglow.
- O-III: Useful for planetary nebulae and supernova remnants; often gives a dramatic contrast boost under light pollution and at dark sites.
- H-β: Specialized for certain emission nebulae; dimmer but effective on targets like the California Nebula.
Note that filters generally don’t help galaxies; they benefit emission nebulae most. For strategies under city skies, see Light Pollution, Narrowband Filters, and Dark-Sky Strategy.
Comfort and Utility Add-ons
- Adjustable observing chair: The most cost-effective upgrade for steadier, longer sessions.
- Dew control: Secondary dew heater, eyepiece heater bands, and dew shields as needed.
- Shroud (for truss scopes): Blocks stray light and improves contrast; reduces dew and wind effects.
- Counterweights: Magnetic or sliding weights to compensate for heavy accessories.
- Flocking or baffles: Internal tube darkening to reduce stray light, especially in bright environments.
What You’ll See: Planetary, Lunar, and Deep-Sky Performance
A well-collimated, thermally stabilized Dobsonian can deliver superb visual performance. What you’ll see depends on aperture, sky quality, and target type.
Lunar and Planetary
High-resolution views demand good seeing. On steady nights, an 8–10 inch Dob can render lunar rilles, craterlets, and mountain shadows with striking relief. Planetary observing benefits from:
- Precision collimation and cooled optics.
- Moderate to high magnification with good eye relief (barlowed eyepieces often shine here).
- Neutral density or variable polarizing filters for the Moon to reduce glare.
On Jupiter, look for subtle color variations in belts, festoons, and the Great Red Spot’s edge detail. Saturn’s Cassini Division becomes razor-sharp at high power, and Titan plus several smaller moons are often visible. Mars rewards patience—albedo features and polar caps are within reach, especially during favorable oppositions.
Double Stars
Dobsonians are excellent for double-star observing, where resolution and contrast matter. Small exit pupils and high magnifications reveal tight pairs. Be mindful that manual tracking at 300× requires smooth motions and a steady hand; good bearings and an observing chair aid greatly.
Deep-Sky Objects (DSOs)
This is the Dobsonian’s home turf. Larger apertures resolve globular clusters into pinpoint stars, render dust lanes in bright galaxies under dark skies, and show structure in planetary nebulae. Key considerations:
- Dark skies transform the view; aim for observing sites with low sky brightness for galaxies and faint nebulae.
- Narrowband filters enhance emission nebulae even in suburban skies.
- Focal ratio sets field width; f/5 and faster provide expansive fields with suitable eyepieces and coma correction.
If you’re deciding between apertures, consider this rule of thumb: each step up (e.g., 8 to 10 inches) yields a noticeable but not night-and-day difference; accumulating multiple steps (e.g., 8 to 12 inches) is more dramatic. For mitigating bright skies, see Light Pollution, Narrowband Filters, and Dark-Sky Strategy.
Light Pollution, Narrowband Filters, and Dark-Sky Strategy
Urban and suburban skyglow reduces contrast, especially for galaxies and reflection nebulae. Dobsonians remain effective under city skies for the Moon, planets, the brightest clusters and nebulae, but strategy matters for faint objects.
Site Choice and Timing
- Choose a location with minimal local lights. Shield from streetlamps using fences or tarps.
- Observe when the target transits (highest in the sky) to minimize atmospheric extinction.
- New Moon periods are best for faint nebulae and galaxies.
Filter Strategy
- Narrowband (UHC) and O-III filters significantly improve emission nebula contrast by rejecting broadband glow.
- H-β is specialized; reserve it for objects known to respond.
- Broadband “LPR” filters provide limited benefit for galaxies; dark sites are more effective.
Observing Technique
- Use averted vision to engage more sensitive rod cells.
- Shield your eyes from stray light; use a hood or cloth if necessary.
- Allow full dark adaptation (20–30 minutes) and avoid bright screens; use red lights sparingly.
For gear that supports urban observing—comfy chairs, app-based charts, and encoders—see Push-to Encoders, Digital Setting Circles, and GoTo Upgrades and Eyepieces, Finders, Filters, and Essential Accessories.
Push-to Encoders, Digital Setting Circles, and GoTo Upgrades
Dobs are traditionally manual, but modern options add digital assistance without sacrificing the classic feel.
Push-to and Digital Setting Circles (DSC)
Encoder kits add sensors to altitude and azimuth axes. Connected to a hand unit or mobile app, they display where the scope is pointing and guide you to targets by showing arrows or real-time offsets. You still push the scope manually, but you skip complex star-hopping.
- Pros: Fast acquisition, lightweight, retains smooth Dobsonian feel.
- Cons: Requires careful alignment, relies on correct time/location input and a good initial star alignment.
GoTo Dobsonians
Motorized Dobs can slew automatically to targets and track them, excellent for outreach or high-power planetary work. Consider weight, power requirements, and complexity.
- Pros: Keeps planets centered at high magnification; efficient object locating during short windows.
- Cons: Heavier, more expensive, needs power, and setup procedures can be more involved.
If you anticipate frequent public events or long planetary sessions, GoTo can be worthwhile. For minimalist, battery-free operation, push-to encoders strike a great balance.
Maintenance, Cleaning, and Long-Term Care
Dobsonians are rugged, but well-chosen maintenance keeps optics clean and mechanics smooth. The guiding principle is minimal intervention: clean only when necessary and make changes deliberately.
Optical Cleaning
- Primary mirror: Dust rarely affects views. Rinse gently with distilled water when visibly dirty; use a mild solution with a drop of dish soap if needed. Avoid rubbing; if necessary, use medical-grade cotton with feather-light pressure.
- Secondary mirror: Similar care; it dews more often, so consider gentle cleaning more frequently.
- Focuser and eyepiece optics: Use blower bulbs and lens tissue sparingly; avoid aggressive wiping.
Always remove mirrors for cleaning only if you’re comfortable with disassembly and reassembly. Mark collimation bolt positions if helpful. After cleaning, re-collimate carefully.
Mechanical Care
- Bearings: Keep dust and grit off friction surfaces. If motion becomes sticky, inspect for contamination before modifying materials.
- Fasteners: Check truss clamps, spider vanes, and mirror cell bolts periodically for tightness.
- Wood care: Seal exposed edges on MDF or plywood; store in a dry place to prevent swelling or warping.
Storage and Transport
- Store covered to minimize dust. Keep temperature swings moderate; avoid hot attics and damp sheds.
- Transport with padded supports; mirrors should not rattle. Consider mirror box covers for truss scopes, and cap both ends of solid tubes.
Never point the telescope near the Sun without a proper, securely mounted solar filter designed for front-aperture use. Permanent eye damage and equipment damage can result. Solar observing with a Dob is possible and rewarding with correct full-aperture filters, but always follow manufacturer guidance.
Budget Tiers and Market Overview: What to Expect
Dobsonians exist across a broad price spectrum. Align your budget with realistic expectations about optics, mechanics, and included accessories.
Entry-Level (6–8 inches)
- What you get: Solid optical performance, simple bases, basic finders and eyepieces, often f/6 to f/8 on the 6-inch, f/5 to f/6 on the 8-inch.
- What to add: A better finder (RACI), a medium-power eyepiece, a 2× Barlow, and a collimation tool. A comfortable chair transforms the experience.

Attribution: Wutthichai Charoenburi
Mid-Range (8–12 inches)
- What you get: Smoother bearings, better focusers (2-inch Crayford or dual-speed), optional push-to encoders, and sometimes truss options at 12 inches.
- What to add: Coma corrector (if f/5 or faster), narrowband filter, enhanced organizer for eyepieces, dew control as needed.
Premium and Large-Aperture (12–20+ inches)
- What you get: Premium mirrors with documentation, large altitude bearings, feather-touch focusers, rigid truss structures, shrouds, and thoughtful ergonomics. Often modular for travel.
- What to add: Secondary dew heater, boundary-layer fans, custom counterweights, and potentially digital setting circles or GoTo if not included.
Used markets can be excellent for value. Inspect mirrors for coating condition, check bearing smoothness, and verify rigidity (no flex with gentle pressure). Ensure the included accessories match your needs to avoid hidden upgrade costs. For portability decisions in the larger sizes, revisit Solid Tube vs Truss Dobsonian.
Step-by-Step Setup and Alignment in the Field
Consistency beats speed. A repeatable setup routine avoids missed steps and ensures top performance every night.
Solid-Tube Dobsonian Setup
- Place the ground board on level ground; align feet for stability.
- Set the rocker box on the ground board; verify smooth azimuth motion.
- Lift the tube into the cradle and engage altitude bearings; attach any tube rings or clamps securely.
- Attach finder(s) and check alignment during twilight using a distant object.
- Install fan power if available; start cooling early.
- Perform rough collimation with a Cheshire or laser; refine after cooldown under the stars.
Truss Dobsonian Setup
- Place ground board and rocker box; verify azimuth motion.
- Position mirror box; secure it to the rocker using the designed pivots.
- Attach trusses and upper tube assembly (UTA) in the recommended order;
dobsonian telescope built using a truss tube design
Attribution: JamesStewart669
- Install shroud and light baffles; attach finders and dew control cables.
- Power fans and begin cooldown; check balance with your heaviest eyepiece and corrector installed.
- Collimate using preferred tools; fine-tune collimation with a star test once stabilized.
Alignment for Push-to/GoTo
- Level is nice but not critical; follow the manufacturer’s alignment routine.
- Use well-separated alignment stars at similar altitude for accurate solutions.
- Input precise location and time; a GPS-enabled device or app keeps errors minimal.
Observing Workflow Tips
- Start the night with wide-field objects while optics equalize; move to high power later.
- Keep a checklist: scope, eyepieces, filters, finder batteries, power, chair, charts, dew gear.
- Log observations. Noting magnifications and best eyepiece choices accelerates learning for future sessions.
If you’re unsure about which accessories to prioritize for your first session, see Eyepieces, Finders, Filters, and Essential Accessories and make a short list that suits your sky conditions.
Frequently Asked Questions
Is a Dobsonian good for astrophotography?
Dobsonians excel at visual observing. Long-exposure deep-sky imaging usually requires equatorial tracking to counter Earth’s rotation consistently. That said, you can capture quick snapshots of the Moon and planets using high-frame-rate “lucky imaging” techniques with a planetary camera or even a smartphone adapter. For deep-sky imaging with a Dob, equatorial platforms can provide tracking for short to moderate exposures, but complexity rises. If your primary goal is traditional deep-sky astrophotography, an equatorial-mounted scope is typically more practical.
How important is collimation, and how often should I do it?
Collimation is crucial for achieving sharp, high-contrast views. Fast systems (f/4–f/5) are especially sensitive and benefit from routine checks. Many observers do a quick collimation touch-up before every session, then refine with a star test after cooldown. With practice, the process becomes fast and intuitive. For tools and techniques, revisit Collimation Tools and Thermal Management.
Final Thoughts on Choosing the Right Dobsonian Telescope
Choosing a Dobsonian comes down to honest reflection about how and where you’ll observe. Aperture is addictive, but portability and ergonomics determine whether the telescope sees regular starlight. An 8–10 inch scope often provides the best blend for beginners and intermediates; larger truss designs reward dedicated observers with remarkable deep-sky performance.
Focus on fundamentals: a smooth, stable mount; a well-figured mirror; consistent collimation; and sensible thermal management. Round out your kit with a small, purposeful set of eyepieces, a reliable finder, and at least one quality narrowband filter. From there, your technique—patient observing, dark adaptation, and logging—will unlock increasingly subtle details in the night sky.
If this guide helped you clarify priorities, explore related topics in our archive, and consider subscribing to our newsletter for future deep dives into telescope gear, observing strategies, and night-sky planning. Clear skies and happy hunting.