Table of Contents
- What Is a Dobsonian Telescope and Why It Matters
- Aperture vs. Portability: Picking the Right Size
- Mount Mechanics and Smooth Motions
- Optics, Focal Ratios, and True Field of View
- Collimation Demystified: Quick, Accurate Alignment
- Essential Accessories: Eyepieces, Finders, and Filters
- What You Can See by Aperture and Sky Quality
- Light Pollution Strategies and Dark-Sky Planning
- Maintenance, Cooling, and Storage
- Upgrades and Popular Mods for Dobsonians
- Budget, Used Market, and Value Considerations
- Frequently Asked Questions
- Final Thoughts on Choosing the Right Dobsonian
What Is a Dobsonian Telescope and Why It Matters
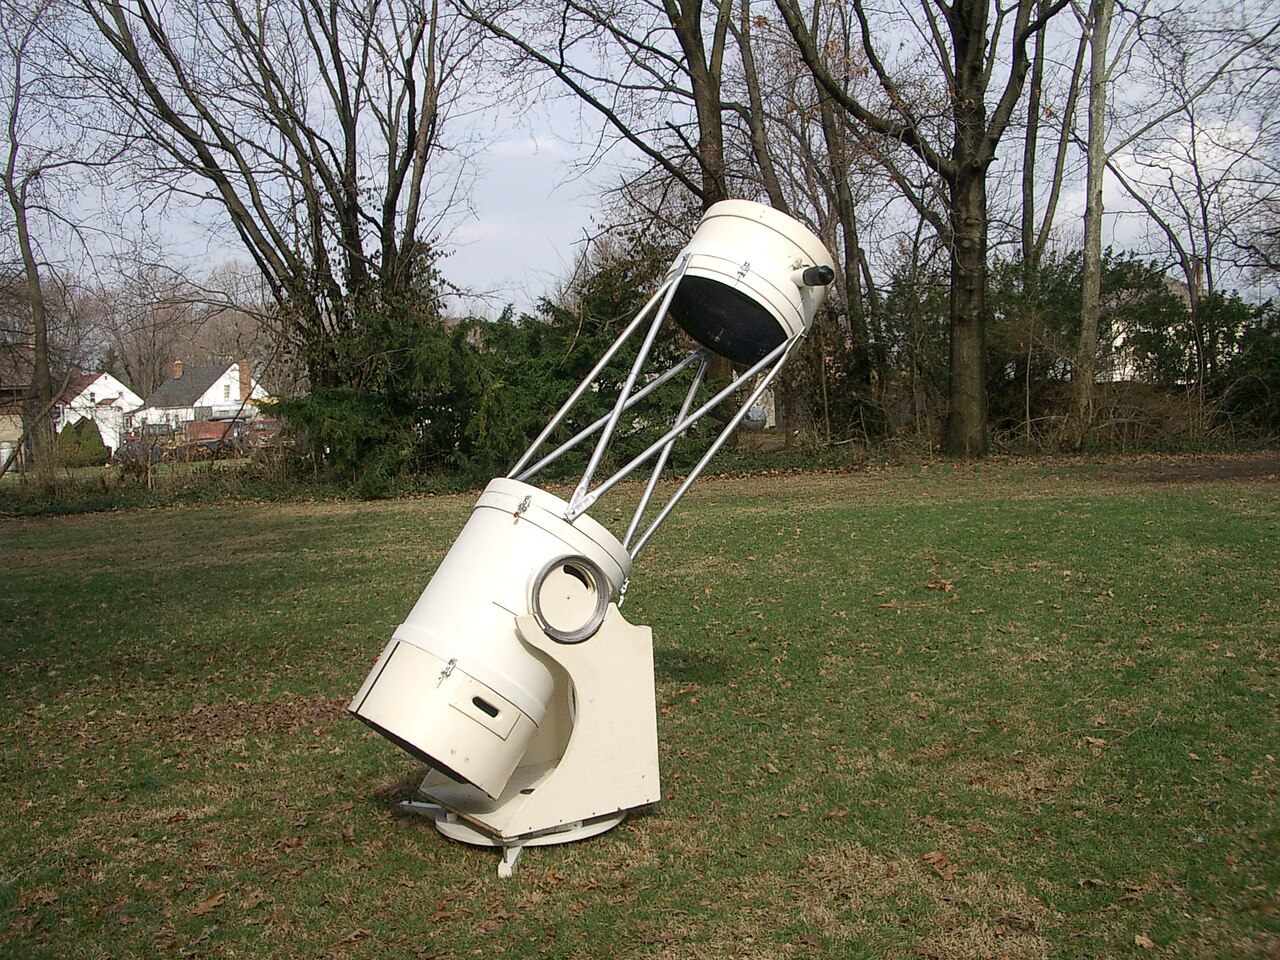
A Dobsonian telescope is a Newtonian reflector optical tube mounted on a simple, ground-hugging altitude-azimuth (alt-az) base. That terse description understates why it transformed amateur observing: Dobsonians maximize aperture per dollar and per unit of effort. They put a large primary mirror in a stable, intuitive mount so observers see more—fainter galaxies, richer star clusters, more detailed lunar features—without complex electronics or a steep learning curve.

Popularized in the late 20th century, Dobsonian designs emphasize simplicity and light grasp. The large mirror collects light, the secondary mirror redirects it to the side of the tube for comfortable viewing, and the mount’s low center of gravity makes nudging the scope across the sky feel natural. With nothing more than smooth bearings and balanced motions, you can manually track planets at high magnification or pan across the Milky Way at low power. If you’re stepping into backyard astronomy and want the most celestial detail for your budget, a Dobsonian is often the best first telescope.
Three big ideas explain the appeal:
- Aperture wins: For visual astronomy, the diameter of your primary mirror (aperture) most strongly determines what you can see. More aperture means more light and higher resolving power.
- Simple alt-az mount: Dobsonian bases use basic materials—wood, Teflon or similar pads, laminates—to deliver smooth, controlled motion without a complex equatorial head.
- Low overhead: Less setup, fewer cables, easier maintenance. Your time is spent observing, not troubleshooting.
This guide explains how to choose the right Dobsonian for your observing goals, how to keep it precisely aligned with quick collimation steps, and which eyepieces and accessories bring out the best in your scope. We’ll also tie choices to your sky conditions with light pollution strategies so your new instrument performs at its peak.
Aperture vs. Portability: Picking the Right Size
Choosing aperture is the most consequential decision you’ll make. A larger mirror reaches fainter magnitudes and can resolve finer detail, but it also means a heavier tube and base, longer cool-down times, and more storage space. The sweet spot depends on where you observe, what you like to view, and whether you must carry the scope up stairs or into a small car.
Common sizes and what they mean

- 4.5–6 inch (114–150 mm): Compact and light, great for kids, apartments, and quick-look sessions. Shows lunar detail, planetary bands and rings, bright star clusters, and brighter nebulae. Limited reach on galaxies from light-polluted areas.
- 8 inch (200 mm): The classic beginner-to-intermediate size. Still manageable in a sedan, typically a one-person lift for most observers, and a major step up on faint DSOs (deep-sky objects). A staple recommendation for an all-around instrument.
- 10 inch (254 mm): Noticeably more reach than 8-inch. Dimmer galaxies begin to show texture, globular clusters start to “granulate” into stars. Heavier and bulkier; consider your transport plan.
- 12 inch (305 mm) and up: Deep-sky powerhouses. Truss-tube designs improve portability, but setup effort and cool-down times increase. Amazing under dark skies; may be overkill for tight urban apartments.
For many observers, the 8-inch Dobsonian hits a practical balance of aperture, cost, and convenience. If you have easy yard access and can lift slightly more weight, a 10-inch is a strong step up. If you need hands-off portability, a compact 6-inch may be the best everyday scope you actually use.
Tubes vs. truss designs
Dobsonian optical tubes come as solid-tube models or truss-tube designs. Solid tubes are simpler: fewer parts, faster setup, better stray-light control out of the box. Their downside is physical length and bulk at larger apertures. Truss scopes break down into shorter pieces for transport; they require assembly each session and usually benefit from light shrouds.
Consider your vehicle and doorways. If you can’t easily move the scope to the observing site, you won’t use it often. A solid 8-inch tube typically fits across most back seats; a 12-inch solid tube can be awkward for one person. Truss designs start to shine at 12 inches and above.
Weight, ergonomics, and the “observe more” principle
The best telescope is the one that gets used. If your life includes tight schedules, stairs, or late-night curiosity checks, favor ergonomics and speed. A lighter telescope encourages impromptu sessions: the Moon between clouds, a quick swing to Saturn, a Milky Way sweep after dinner. That usage translates to more experience under the stars, which improves what you can see as much as aperture does.
Mount Mechanics and Smooth Motions

The Dobsonian mount is a low-profile alt-az base with two motions: altitude (up-down) and azimuth (left-right). Smooth, predictable motion is essential for high-power observing and the “spacewalk” feeling at low power.
Bearings and materials
- Altitude bearings: Usually semi-circular or large-radius disks attached to the optical tube. Larger bearings increase frictional control and reduce the tendency to drift when changing eyepieces.
- Azimuth bearing: The ground board rotates on the rocker box using pads (often PTFE/Teflon or similar) against a laminate surface. The combination sets the mount’s “stiction” and glide.
- Springs and counterweights: Some designs use springs, clutches, or magnetic counterweights to balance heavy accessories and maintain smooth altitude motion.
Terms you’ll encounter include stiction (initial resistance to motion) and static vs dynamic friction. Ideally, these are close enough that nudging the scope produces a silky glide without the object jumping in the eyepiece. If motions are jerky, you can adjust pad placement or upgrade the laminate; see Upgrades and Popular Mods.
Alt-az simplicity vs equatorial tracking
An alt-az Dob tracks targets by periodic nudges. Equatorial heads can provide continuous tracking aligned to Earth’s rotation, but they’re heavier and more complex. Many Dob owners prefer the clean simplicity of manual tracking—especially at low to mid power for deep-sky sweeps. For high-power planetary work, good balance and smooth bearings are the secret; a small nudge every few seconds becomes natural.
Push-to and digital setting circles (DSC)
Some Dobsonian bases accept optical encoders and a handheld or smartphone interface, sometimes called “push-to” or digital setting circles. You push the scope until on-screen readouts hit zero. This keeps the Dob’s simplicity while boosting object-finding speed. It’s a useful middle ground between totally manual and a fully motorized go-to system, without adding weight or complexity overbearing for beginners.
Optics, Focal Ratios, and True Field of View
A Dobsonian’s heart is a parabolic primary mirror. Two aspects matter most for visual observers: aperture (diameter) and focal ratio (the f-number). The focal ratio influences image brightness per unit area at the focal plane, the width of the true field of view with a given eyepiece, and tolerances for collimation and eyepiece aberrations.
Focal ratios in practice

- f/4–f/5: Compact tubes with wide potential fields of view. They demand more accurate collimation and generally benefit from better-corrected eyepieces to control edge astigmatism and coma. A coma corrector is commonly used by advanced observers.
- f/6–f/7: Longer tubes that relax collimation tolerance and are more forgiving with budget eyepieces. Narrower maximum field for a given eyepiece compared to faster scopes.
There’s no universally “best” focal ratio; it’s a trade-off. Fast scopes are compact and excel at sweeping large nebulae with a widefield eyepiece; slower scopes reward with pinpoint stars across more of the field using simple eyepieces. For a first Dobsonian, f/5–f/6 is an approachable range.
True field of view (TFOV) and exit pupil
Two simple calculations help you predict what you’ll see through a given eyepiece:
- Magnification (M) = Telescope focal length / Eyepiece focal length.
- Exit pupil (mm) ≈ Eyepiece focal length / Telescope f-number.
- Approximate TFOV ≈ Eyepiece apparent field of view (AFOV) / Magnification (a good approximation for many eyepieces).
Exit pupil is especially useful. Around 0.5–1 mm exit pupil suits high-power planetary and lunar detail. About 2–3 mm is a sweet spot for many deep-sky objects, balancing brightness and contrast. A 5–6 mm exit pupil maximizes brightness for large diffuse nebulae under dark skies but can waste light if your fully dilated iris is smaller than the exit pupil.
Mirror quality and cooling
Most modern Dobsonian mirrors provide solid performance. The real-world bottlenecks are often thermal equilibrium and atmospheric seeing, not just mirror figure. Allow the mirror to reach ambient temperature by ventilating the tube and using a small rear fan (see Maintenance, Cooling, and Storage). Good thermal control frequently improves planetary detail more than buying a slightly better mirror in the same aperture.
Collimation Demystified: Quick, Accurate Alignment

Collimation aligns your primary and secondary mirrors so light is focused precisely. It sounds intimidating, but with two or three simple tools, it becomes a fast, repeatable routine. Good collimation is the gateway to crisp planetary detail, sharp double stars, and tight star images across the field.
Tools you can trust
- Collimation cap: A peep-hole cap that comes with many scopes. It’s basic but works for quick checks.
- Cheshire/sight tube: Combines a peep sight and reflective Cheshire target to center and tilt the mirrors accurately.
- Laser collimator: Fast and intuitive, especially for primary tilt. A barlowed laser method can improve accuracy by making the return pattern less sensitive to laser tilt.
Any of these can get you aligned well enough for sharp views. The keys are consistency and understanding what each adjustment does.
Two-step logic: secondary then primary
You first set the secondary mirror’s placement under the focuser and its tilt to aim the focuser axis at the primary. Then you adjust the primary tilt to center the reflected axis back up the focuser. Repeat small iterations as needed.
Think of collimation as aiming two axes so they overlap. Once you nail the geometry, a quick check at the start of each session is usually all that’s needed—especially if you transport the scope over bumpy roads.
Fast reference checklist
Print, save on your phone, or jot these steps so you can run through collimation in a few minutes:
Dobsonian Collimation (Quick Reference)

1) Daylight prep
   - Remove dust caps; ensure center spot on primary is visible.
   - Insert Cheshire or collimation cap.

2) Secondary placement
   - Rack focuser until you see the full secondary edge.
   - Adjust secondary fore-aft and rotation so it looks circular and centered.

3) Secondary tilt
   - Aim the focuser axis to the primary center spot (Cheshire crosshair or laser on the spot).

4) Primary tilt
   - Adjust primary collimation screws to center the reflection in the Cheshire target
     (or center the donut shadow with a barlowed laser).

5) Star test (optional, night)
   - Defocus a bright star at high power; intra/extra-focal diffraction rings should look concentric.
If you’re tempted to skip collimation, don’t. Precise alignment is the simplest way to maximize your telescope’s potential. As your speeds improve, this becomes a 2–5 minute step in setup.
Essential Accessories: Eyepieces, Finders, and Filters
Dobsonians are wonderfully capable immediately after unboxing, but a few well-chosen accessories expand your range and enhance comfort. It’s better to buy a small set of good tools than a large set of compromises.
Eyepieces: build a balanced set
Start with three focal lengths to cover most targets:
- Low power, wide field: Maximum field for large nebulae and star clusters (e.g., 25–32 mm in f/6 or 24 mm in f/5 with a wide AFOV). Aim for a 4–6 mm exit pupil under dark skies.
- Medium power, all-around: Your workhorse for galaxies, nebulae, and clusters (e.g., 12–14 mm). A 2–3 mm exit pupil provides contrast and brightness balance.
- High power, planetary and lunar: For detail on Saturn, Jupiter, the Moon, and double stars (e.g., 5–7 mm). Around 0.7–1.2 mm exit pupil is common in steady seeing.
If budget is tight, pair two eyepieces with a quality 2x Barlow lens to double your options. With faster focal ratios (f/4–f/5), better-corrected eyepieces provide cleaner edges; at f/6–f/7, simpler designs perform well across most of the field.
Finders: aim with precision and comfort
- Red-dot or reflex finder: Projects a red dot or ring that appears to sit on the sky, great for initial pointing and star hopping.
- Right-angle correct-image (RACI) finder: A small, low-power telescope that matches the view on charts and saves your neck. Excellent for fine star-hopping.
- Telrad/rigid reflex units: Large projected rings make star-hopping patterns easy to visualize. Pair with a RACI finder for speed and precision.
Many observers mount both a reflex finder and a RACI finder. Use the reflex to “get close,” then switch to the RACI to confirm patterns before looking in the main eyepiece.
Filters: contrast where it counts
- Moon filter or variable polarizer: Tames lunar glare, enhancing contrast and comfort.
- UHC/nebula filter: Boosts contrast on emission nebulae (e.g., Orion Nebula, Lagoon). Useful in both suburban and dark skies.
- O III filter: Excellent for planetary nebulae and supernova remnants, dramatically darkening the background to reveal structure.
Note that broad “light pollution reduction” filters have limited effect on galaxies, which emit broad-spectrum light. For galaxies, the best “filter” remains darker skies; see Light Pollution Strategies.
Comfort and practicality
- Observing chair: Sitting steadies your body, improving fine detail detection—arguably the best accessory you can buy.
- Dew control: Dew shield or gentle heat for finders and eyepieces in humid climates.
- Red flashlight: Preserves night vision for reading charts and adjusting gear.
What You Can See by Aperture and Sky Quality
Expectations shape satisfaction. Under light-polluted skies, bright targets—Moon, planets, double stars, open clusters—deliver reliable joy. Under darker skies, the same Dobsonian reveals expansive nebulae and textured galaxies. Think of the Bortle scale (1 = darkest, 9 = inner-city bright) as a quick shorthand for what the night offers.
Planetary and lunar detail
- 6-inch: Lunar craters and rilles pop; Saturn’s rings and Cassini Division in steady seeing; Jupiter’s belts, festoons, and the Great Red Spot when prominent; Mars shows dark albedo features and polar caps near opposition.
- 8-inch: More contrast on Jupiter’s turbulent edges, subtler planetary detail, tighter double stars split more reliably. Lunar features appear razor-sharp in good seeing.
- 10–12-inch: Further resolution and higher brightness support useful magnification on steady nights; fine details like planetary ovals or delicate rilles stand out.
Atmospheric seeing, not aperture, often limits planetary observing. Learn to wait for steady moments—brief clarity where detail “locks in.” Thermal management also matters; see Cooling.
Deep-sky objects (DSOs)
- Open clusters: Beautiful from most sites. Larger apertures loosen faint outliers, adding depth to well-known clusters like the Double Cluster or M35.
- Globular clusters: Start granular in 6–8 inch; 10–12 inch can partially or largely resolve outer regions into countless stars.
- Emission nebulae: From suburbs, a UHC filter on an 8-inch shows the Orion Nebula’s wings and structure; in dark skies, large objects like the North America Nebula become expansive fields with the right low-power eyepiece.
- Planetary nebulae: Compact and high surface brightness; O III filters help reveal shells and central star visibility under darker conditions.
- Galaxies: Sensitive to sky darkness. From urban areas, the brightest (M31, M81/82) show cores and hints of structure. Under dark skies, even an 8-inch reveals dust lanes and spiral hints in many Messiers.
Catalogs like Messier, Caldwell, and various observing lists provide structured goals. Pair them with charts or a smartphone atlas and a finder combination you like.
Build a simple observing plan
Before your session, pick 5–10 targets by altitude (higher is better), object type, and moon phase. Note the eyepieces and filters you intend to use. A tiny bit of structure avoids the “what now?” moment and helps you learn the sky.
Observing Plan (Template)

Date/Time: ____________  Site (Bortle): ________  Transparency: ___  Seeing: ___

Targets:
1) _____________________________________  EP: ____  Filter: ____  Notes: __________
2) _____________________________________  EP: ____  Filter: ____  Notes: __________
3) _____________________________________  EP: ____  Filter: ____  Notes: __________
4) _____________________________________  EP: ____  Filter: ____  Notes: __________
5) _____________________________________  EP: ____  Filter: ____  Notes: __________
Light Pollution Strategies and Dark-Sky Planning
Light pollution dims the sky background, washing out faint structures—especially in galaxies. Even so, you can optimize your strategy. A few practices deliver outsized gains, with or without filters.
Maximize contrast where you are
- Shield and adapt: Block direct lights with portable screens or use a hood. Give your eyes 20–30 minutes to dark-adapt, and avoid white light. A dim red light is your friend.
- Choose targets wisely: Urban: Moon, planets, doubles, open clusters, bright planetary nebulae. Suburban: add brighter galaxies, diffuse nebulae with a UHC. Dark sites: go big with faint nebulae and galaxy groups.
- Time your sessions: Aim for moonless hours and post-midnight observing when local lighting decreases. Observe targets when they’re highest above the horizon to reduce atmospheric extinction.
Filters that help
For emission nebulae, a UHC filter increases contrast by passing key wavelengths while blocking much of the background. An O III filter can dramatically enhance planetary nebulae and certain supernova remnants. For galaxies, filters are generally less helpful—focus on darker sites and good technique instead.
Plan a dark-sky trip
- Pick a Bortle 3 or darker site if practical. Bring extra layers, dew control, and a printed or offline map app.
- Carry your list of large, low surface-brightness objects that are poor city targets—California Nebula, Veil Nebula (with O III), large dark nebulae.
- Observe first, optimize later: Don’t spend the best hours tweaking gear; settle, collimate (quick check), and start observing. Add refinements after the first hour.
Even one or two dark-sky trips per year transform your Dobsonian experience—your 8-inch becomes a new instrument under pristine skies.
Maintenance, Cooling, and Storage
Dobsonians are low-maintenance, but a few habits protect performance. Temperature management, cleanliness, and careful storage keep your views sharp and your motions smooth.
Cool-down and thermal control
- Ventilation: Remove caps and open the back to allow warm air to escape. A small, quiet fan behind the primary accelerates equilibrium.
- Boundary layer: Warm air hugging the mirror surface softens images. Gentle airflow helps scrub this layer for finer planetary detail.
- Acclimation time: Large mirrors need more time. A 6–8 inch might settle in 20–40 minutes; 10–12 inch may take 45–90 minutes depending on temperature differences.
Cleaning optics sparingly
Mirrors don’t need frequent cleaning. Dust has surprisingly little effect on visual contrast. Clean only when a bright light reveals significant film or debris and you can’t blow or brush it away gently. Follow established methods: distilled water, a few drops of mild detergent, cotton balls for gentle drag, and thorough rinse with distilled water. Let it dry vertically. Avoid touching or rubbing hard.
Storage and transport
- Dry, temperate area: Avoid prolonged humidity and heat. Use desiccant packs if storing in a damp climate.
- Secure the tube: Prevent bounces and vibration during transport. Soft blankets or foam help; keep the primary cell supported.
- Protect accessories: Eyepieces and filters in a padded case; caps on both ends.
Keep your mount hardware snug but not overtightened. If motions stiffen, inspect bearing surfaces and pads for contamination; a careful clean and re-lube of appropriate surfaces restores smoothness.
Upgrades and Popular Mods for Dobsonians
Dobsonians invite tinkering because the design is open and modular. Many improvements are inexpensive and focused on comfort, balance, and stray-light control. Always start with good collimation and thermal management; they deliver the biggest gains.
Low-cost improvements
- Flocking opposite the focuser: A strip of light-absorbing material in the tube reduces internal reflections and improves contrast on bright targets.
- Light shroud (for truss scopes): Blocks stray light and helps with dew control; use breathable fabric to minimize trapping heat.
- Better altitude balance: Magnetic counterweights or adjustable bearings keep motions consistent as you change eyepieces.
- Finder ergonomics: Upgrade to a RACI finder and add a reflex unit for star hopping efficiency.
- Smooth azimuth bearing: Ensure pads and laminate are clean; some builders upgrade bearing materials to fine-tune stiction and glide.
Optical refinements
- Coma corrector: Helps fast scopes (e.g., f/4–f/5) produce tight stars near the field edge. More impactful with wide AFOV eyepieces.
- Primary mirror fan: Moves air behind the mirror to accelerate cool-down and reduce boundary layer. Often powered by small battery packs.
- Secondary heater: In dew-prone climates, a gently warmed secondary prevents dew formation without significantly disturbing seeing.
Structure and ergonomics
- Tube handles: Add carry handles for safer transport and easier setup.
- Upgraded focuser: A smooth dual-speed Crayford or rack-and-pinion focuser helps snap to focus at high power.
- Digital setting circles (DSC): Adds push-to object location without sacrificing the Dobsonian ethos of simplicity.
Upgrade deliberately. If you observe from a city balcony, a UHC filter and a comfortable chair likely beat a premium coma corrector for practical gains. If you travel to dark sites, the widefield edge performance from a corrector and a 2-inch low-power eyepiece can be transformative.
Budget, Used Market, and Value Considerations
An honest budget includes more than the tube and mount. Factor in essential accessories, a chair, and perhaps a filter or two. The used market can stretch funds if you evaluate condition carefully.
Where your money matters most
- Aperture first: Within reason, prioritize mirror size and usable weight. An 8-inch Dob with a solid mount often outperforms a smaller scope with premium accessories for most targets.
- Eyepiece core set: One good widefield, one medium, one high power. Add a Barlow if it helps cover gaps affordably.
- Comfort and basics: Observing chair, red light, simple dew control. These boost your observing time and quality.
New vs used
Dobsonians are robust, making them good candidates for the used market. Inspect for:
- Mirror condition: Evenly reflective surface, no flaking coatings, no severe scratches. A dusty mirror is usually fine.
- Mechanical integrity: Smooth focuser travel, stable secondary holder, intact spider vanes, and snug collimation screws.
- Mount motion: Try altitude and azimuth movements. They should be smooth and consistent without binding or excessive free play.
- Completeness: Caps, finder, base hardware, and any included eyepieces. Missing parts add cost.
Negotiate fairly and ask for a quick star test if you can meet at night. If buying sight unseen, request photos of the primary at an angle to inspect coatings and ask about storage conditions.
Aperture upgrades vs site quality
If you’re oscillating between a bigger scope or more trips to darker skies, remember that sky quality frequently trumps a modest aperture jump. A well-cooled, well-collimated 8-inch under dark skies outperforms a 12-inch under heavy light pollution on many faint targets. Balance gear with opportunity.
Frequently Asked Questions
Do I need a coma corrector for a fast Dobsonian?
Coma is an off-axis aberration intrinsic to parabolic mirrors; stars near the edge of the field in fast scopes (f/4–f/5) can look like small comets. A coma corrector significantly sharpens edge stars, especially with wide apparent field eyepieces. Whether you need one depends on tolerance, eyepiece choice, and observing style. If you mostly view planets at high power (small true field) or use narrower AFOV eyepieces, you may not feel the need. If you love sweeping large nebulae with 68°–100° eyepieces, a corrector often becomes a favorite upgrade. For f/6 and slower, coma is milder and many observers are content without correction.
Is an 8-inch Dobsonian a better first scope than a 6-inch?
For many beginners, yes—an 8-inch strikes a superb balance of capability and portability. It shows substantially more on deep-sky objects and gives higher-resolution views of planets and the Moon than a 6-inch. That said, the best scope is the one you’ll use often: if weight, storage, or carrying distance is a concern, a 6-inch might be the practical choice. Your observing site matters too; if you’re confined to high light pollution, the difference between 6 and 8 inches is more modest on galaxies but still valuable for clusters and planetary detail.
Final Thoughts on Choosing the Right Dobsonian
Dobsonian telescopes deliver an unmatched mix of aperture, simplicity, and value. If you want to see more celestial detail without wrestling complex gear, they’re hard to beat. Start by honestly assessing where you’ll observe and how much you can comfortably carry. An 8-inch is a classic all-rounder; a 6-inch excels at spontaneity; a 10–12 inch deepens your reach when conditions cooperate.
Keep setup simple: collimate (fast routine), allow time for cooling (thermal control matters), and use a small, thoughtful set of eyepieces and filters. Add dark-sky trips to experience the full potential of your instrument. With a little practice, you’ll navigate the sky intuitively, extracting delicate detail from planetary atmospheres and teasing out faint galaxies and nebulae whose light left long before you were born.
If you enjoyed this guide, consider subscribing to our newsletter for practical observing tips, gear walk-throughs, and sky previews. We publish hands-on articles to help you observe more and see better—no matter what the sky throws at you.