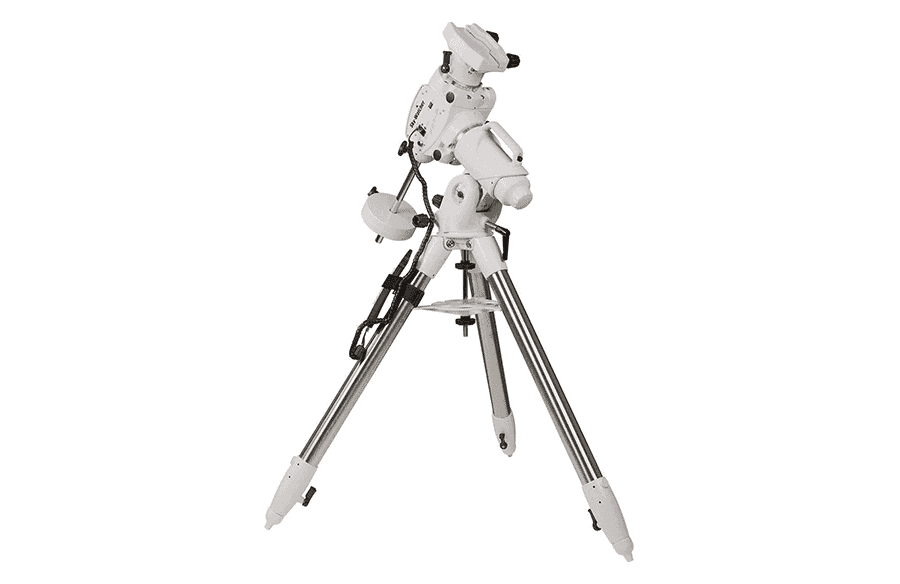
The Skywatcher EQ6-R-Pro is a Go-to German Equatorial mount that finds itself in something of a price and weight-bearing sweet spot. It’s relatively affordable in a hobby that will never be cheap, but expensive enough an investment that you won’t want to replace it for many years.
It’s a well-known true-ism in astrophotography circles that you should always buy a better mount than you think you will need. You will get better results from cheap OTA on an excellent mount than from amazing optics sitting on a cheap wobbly mount.
The EQ6-R then is a popular mount at a popular price point which will support the vast majority of kit that you may want to load it with, from small refractors to large Schmidt Cassegrains with camera equipment on top.
But what is it like to live with and use, both for photographic and visual use? I spent time going through as many functions and scenarios as I could to give you a better idea of whether this is the mount for you. And a few small niggles aside, I think it may well be.
FEATURES: 44lbs max load bearing, Equatorial GoTo mount with built-in USB PC control, and Polar-alignment scope
BENEFITS
- Go-to mount with Synscan handset included - over 42,000 objects can be found and locked onto in seconds
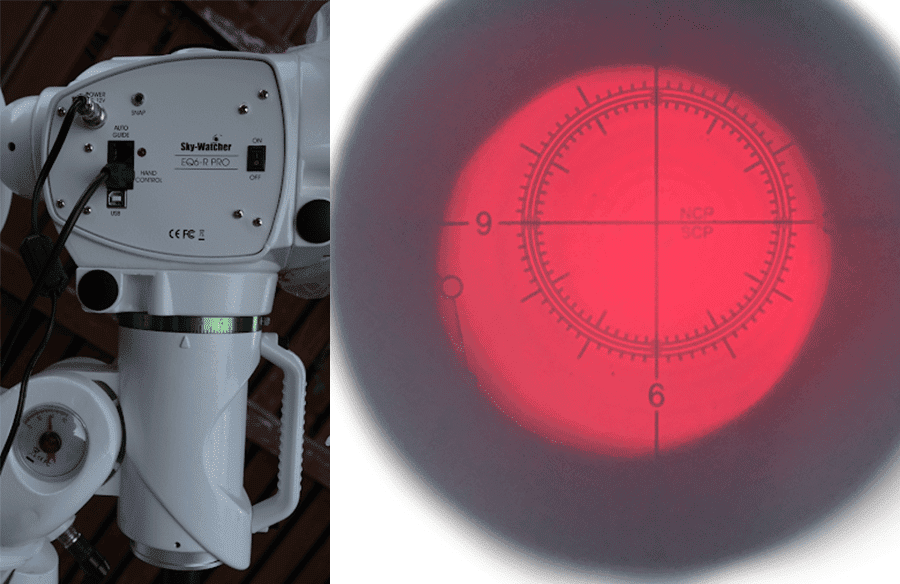
- Built-in illuminated polar-alignment scope. Offers the flexibility to polar align anywhere without the need for a computer.
- Synchronous belt-drive. Reduces backlash and gives more stable tracking
- Control the mount from your computer via the RS232 port. The appeal of standing next to your telescope for hours in the dead of a cold night can quickly wear off. So disconnect the hand controller and control everything from the comfort of the house (or shed!)
What We Like About the EQ-6R
- Heavy duty powerful mount that can support a very wide range of telescopes and other equipment with its 20kg payload capacity for astrophotography
- Integrated carry handle and retractable counterweight bar- whilst I would never describe this as a portable mount, these features make life much easier when you do have to move the mount.
- Supplied steel tripod is sturdy enough to stay put in permanent setups. All but the most determined of passing toe kicks, will not budge this mount on its tripod.
- Quiet stepper motors that are only audible at full speed, and even then your neighbors are unlikely to hear anything at all.
What We Don’t Like
- The generally good polar alignment scope is marred by a cumbersome altitude adjustment system. Maybe it was just my copy or my technique, but I often struggled to engage with the thread to adjust the altitude smoothly.
- Only supplied with 2x 5kg counterweights. On the one hand, Skywatchers boasts about the EQ-6-r’s generous payload capacity; on the other, they leave owners to buy more counterweights if they want to utilize more of that capacity!
- I really don’t like the small, smooth plastic dovetail saddle securing knobs. I found myself needing to wear rubber gloves to tighten/loosen them in cold weather. A rubberized or more rugged ˜grippy’ shaped finish would be better. (3rd party upgrades are available).
Substitutes to the EQ6-R
If you don’t think the EQ6-R is quite what you’re after, you may want to consider similar products.
iOptron CEM40 Center Balanced Equatorial GoTo Mount. A lighter-weight option that addresses some of the weaknesses of the EQ6-R, but at a higher price. Somehow this mount manages to pull off the trick of a similar payload capacity (40lb / 18kg) whilst weighing only 15.8lb / 7.2kg. Included in the package is a similar handset controller, but the choice of tripod is left up to you at an additional cost.
There is a very impressive roster of features, including a far simpler and more effective altitude control and a built-in ˜I-polar’ electronic polar alignment scope, which works even when Polaris is obscured by clouds! Other convenience features, such as extra large clutch levers and an integrated cable management system, make this mount a serious competitor to the EQ6-R.
Sky-Watcher EQ5 Pro Go-to Astronomy Mount. If portability is more important to you than rock-solid immovability, then this may be a good option that provides many of its bigger brother’s benefits without the weight. Of course, this does come at the cost of payload capacity, which tops out at only 6.5kg for photos and 9kg for visual.
You still get accurate tracking, built-in polar alignment scope, the synscan hand controller, slew rates from 0.5x to 800x, and full Ascom compatibility for PC control, and a tripod is also included. The overall weight is 11.1kg, excluding counterweights.
Weight Capacity
Photographic; 44lbs / 20kg
The weight capacity for the EQ6-r of 44lb/20kg is for photographic use. I’ve seen it stated that you can get away with a bit more for visual use, but I wouldn’t risk overloading the motors and shortening their life. Received wisdom is that for best accuracy, you should aim for half or two-thirds (the wisdom varies!) payload capacity.
But I do not see why you cannot use anything up to and including 20kg. You’ll soon know (as I found out) if you’re overdoing things.
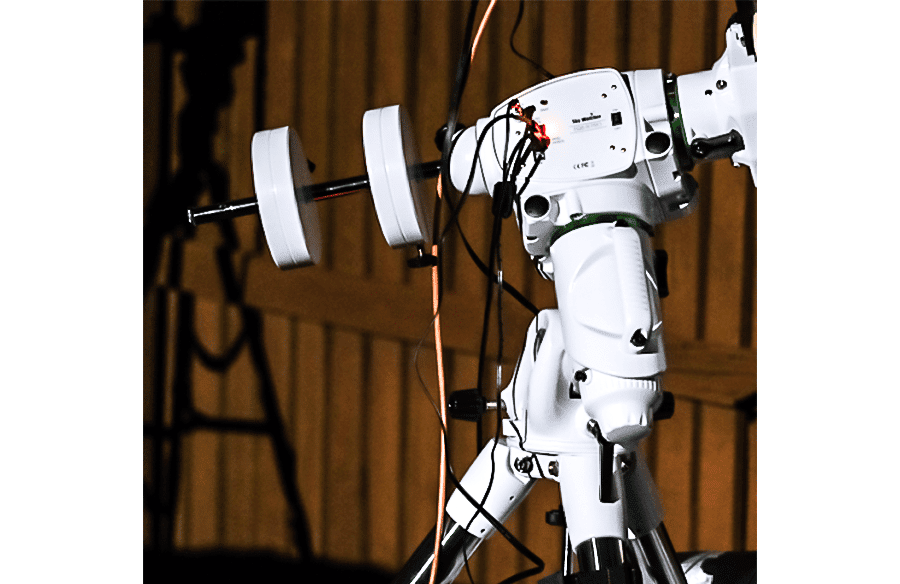
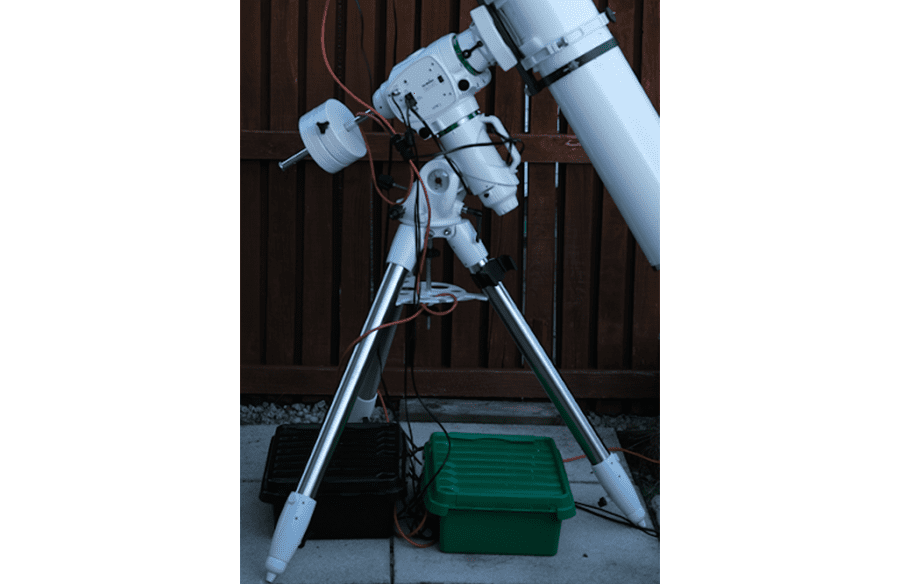
The mount itself is very heavy, especially sitting atop the 7.5kg 2-inch steel tripod. Unless you work out daily, you will, at the very least, want to remove the counterweights before moving the mount. By the time you add on a payload of up to 20kg things get seriously weighty.
All this is, of course, very good news for an astrophotography setup. After a painstaking polar alignment, you really do not want anything to budge when you stub your toe on the tripod, or the family pet brushes past during an imaging session.
It’s less good news if you require some degree of portability or you like to take your imaging gear away to dark sites.
Polar Alignment with the EQ6-R
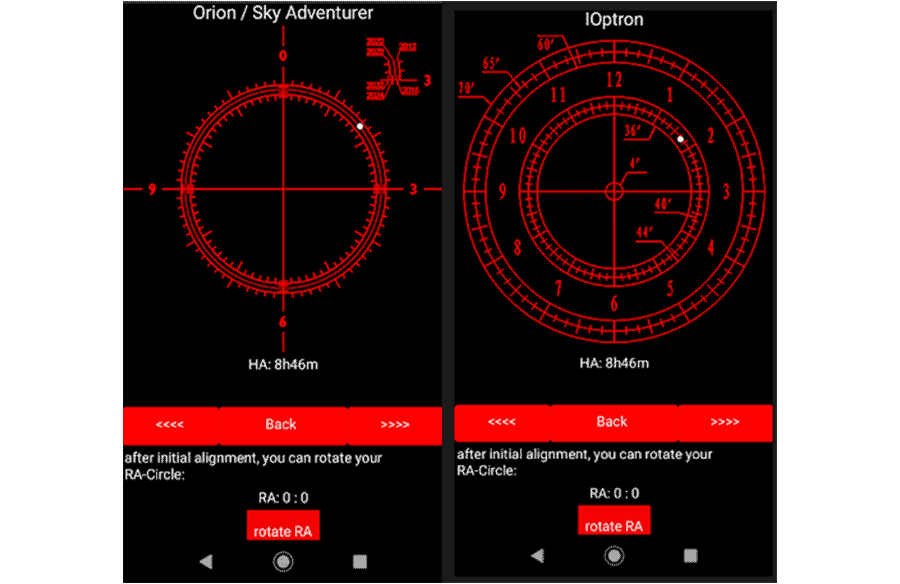
The first thing you have to do with any mount, once it is assembled, is to polar align it. There are a few ways to polar align a mount; two common methods are to use a built-in physical polar alignment scope or to use software-based alignment. The latter uses some sort of star-drift or star-position alignment method.
There is a similar method, using a 4-star asterism for southern hemispherians
The software method is worthy of an article on its own, so I will only talk here about the method you can use with the built-in tools that are supplied with the mount.
This takes a bit of getting used to, and you will have to choose a phone app that you find works for you, but once you know what you are doing, polar aligning with the built-in scope is a breeze.
Good polar alignment is the bedrock of using any mount successfully. The easier the mount makes it to carry out this task, the more enjoyment you’ll get out of using it. To this end, the EQ6R has its own built-in illuminated polar alignment scope.
It’s as well made as the rest of the mount with a lovely smooth focus control. I will, however, mention at this point one of the best mount accessory investments you can make;
Buy a right-angle eyepiece. Just do it – you can thank me later! Trust me, if you are any older than a teenager, trying to orientate yourself in the correct position to look through a straight polar scope is uncomfortable, if not painful.
If you live at lower latitudes, this becomes less of an issue as the pole will be lower down in the sky, meaning that the eyepiece will be higher up, but at my latitude of 56 degrees north – well, just look at the photos below and try to work out where I have to put my head!
Apart from that, alignment is theoretically simple. Just turn the nearby alt/az controls back and forth until Polaris (in the northern hemisphere), matches the position shown on a polar alignment app such as Polar aligner Pro, at your location and time.
In the southern hemisphere, it’s even easier- move the controls whilst looking through the scope until the real sky matches what you can see in the reticle. To that end, an engraving of the constellation of Octans is built into the reticle.
One setup issue I had, was trying to work out the correct position to set the declination axis to so that you can see through the declination shaft. Yes, it should be horizontal so that the gap in the shaft is fully open. Still, just ˜horizontal’ seems a bit vague to me, and the physical position will affect the position of Polaris/Octans in relation to the real sky, thereby affecting accuracy. Just something to be aware of.
Another issue is the altitude handle. It’s a kind of spring-loaded thing which has to catch onto an internal shaft/thread, then you have to loosen or tighten the knob at the other end to move the mount. There must be a better way! This is fiddly in the extreme and will account for the majority of your polar alignment time with this mount.
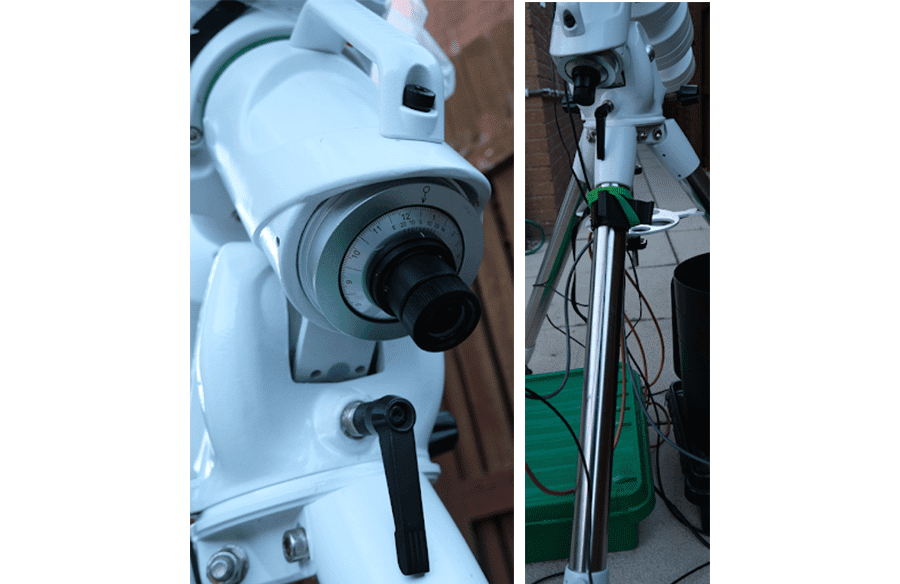
Right. The view through the polar alignment eyepiece showing the ˜clock face’ and Octans to the left.
Mount Performance
After several months of testing, I found the mount to be mostly flawless in operation. I say mostly because the only issue I encountered was when I came close to, or perhaps a touch over, the recommended weight limit for photographic use; I was using a comically large OTA as a guide scope, piggy-backed on the OTA.
I found that the tracking was becoming erratic, with the target progressing gradually across the frame over an hour or two’s exposures instead of being rock-solid locked to the center of the frame.
Perhaps I just needed to balance the axis better- the closer you get to the maximum weight, the more critical balance becomes. Either way, avoid overloading the mount, and this issue will not occur.
With the above issue excepted, the mount performs very well- slewing is fast, quiet, and accurate; unless you have your ear to the mount, you will only hear the motors at full slew speed.
Tracking accuracy is also very respectable, assuming you are guiding and you are accurately polar aligned. I was using PHD2 for my guiding and I was, on a good windless night, obtaining graphs that were pleasingly smooth and flat at 2px resolution or RMS error of around 0.4.
This was just me during one session, so do not take such figures as gospel- you may do better or worse! What constitutes good guiding figures is also a matter of debate, but suffice to say, using my Celestron C925 at its full focal length of 2350 mm I can easily obtain hours’ worth of subs where the target remains rock-solid glued to the one spot in the field of view – first captured image to one 4 hours later – no movement.
I think this is all you can ask of a mount at this price point. You only need greater accuracy if you are using much longer focal lengths.
Unguided, some drift did become apparent while tracking solar system objects, though never enough for something the size of the moon to leave the field of view, even over several hours. It just wouldn’t be centered anymore.
Remember, though, that there are various mount-training routines that can be performed to iron out periodic errors that all mounts suffer from to some degree. So do not let a little unguided drift put you off.
The EQ6-R for Astrophotography
This mount is really made for astrophotography. An example of this is the provision of a ˜Snap port’, which is a connection for connecting to a camera’s shutter control port. The SynScan hand control can control a camera to take pictures automatically via this interface, thus avoiding touching the camera and causing shaking.
For more sophisticated astrophotography control, you will, however, probably want to link up to a PC to open up the world of ASCOM-controlled software. For much of my testing, this was the method I used.
I found that everything works as expected- the mount, once connected, strays connected, which is what you want when spending hours imaging, often unattended. The mount ˜disappears’ in the system, just quietly getting on with its job and not requiring intervention.
Third-party wifi attachments are available for a more wireless experience. Many people may also use the popular ZWO ASI Airplus astrophotography controller. I did not get a chance to test such products with the EQ6-R.
While I have no doubt of the validity of the experiences of many satisfied users of such products, I tend to believe that you can’t beat physical cables (assuming they are of decent quality and are arranged so as not to snag) when you need something to work dependably. Nobody wants to waste precious dark nights on wifi connectivity issues.
Used with a USB connection to my Windows laptop then, the mount carried out all its object location, centering, and plate-solving tasks without issue. I mainly use N.I.N.A. for deep sky and Sharpcap for planetary and its wonderful array of set-up/calibration tools. I also found that the mount connected without issue to Cartes du Ciel for cartography target acquisition and, of course, PHD2 for guiding.

The EQ6-R for Visual Observing
This mount may be slight overkill if you will only ever be using it for visual astronomy. An Alt-azimuth mount will do that job just fine. It is, however, still suitable for visual use when you crave those photons firing directly into your retina or want to show off your scope’s capabilities to an audience.
Nothing inspires an interest in astronomy better than seeing the planets or bright deep sky objects ˜live’ in the eyepiece. For visual use, you must use the hand controller for the simple reason that there are no physical slow-motion controls built into the mount.
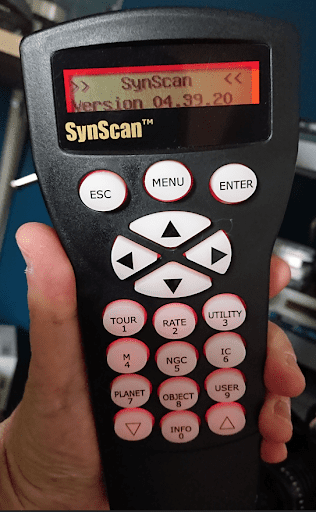
People either love or hate these hand controllers. I hate it because they have not really been updated much in appearance or function since the 1990s. To me, however using the hand controller is infinitely better than trying to control it manually from a phone or computer’s virtual buttons.
Using the 1/2/3 star alignment process
Firstly a recommendation. For a variety of reasons, I do not think that the supplied finderscope or similar devices that magnify are suited for manual star alignment. Buy a red-dot finder or, better still, something like a Telrad or Rigel finder. These stick onto your scope and have no magnification offering you a better chance of seeing the alignment star in the field of view.
I won’t go into detail here about how to carry out a star alignment- the method is the same across any number of mounts with a handset. However, I’ll just say that the process is painless with the EQ6-R
You can control the speed (using ˜rate’ on button 2 of the handset). The main thing to know in the context of this review is that the EQ6-R moves at a beautifully constant rate regardless of which speed you choose. Faster rates to move the star when it’s way out from the center, slower rates to fine-tune the centering. Even well-machined, fully manual slo-mo control knobs would struggle to be this smooth.
Storage
Telescope mounts are heavy and take time to polar align, so if you do not have indoor storage options or an observatory dome, it should be fine to leave it set up as long as properly protected from the elements. I recommend the Telegizmos 365 range of all-weather covers.
Many people in damp climates use reusable desiccant bags hung off the mount to keep the localized air space around the mount relatively dry.
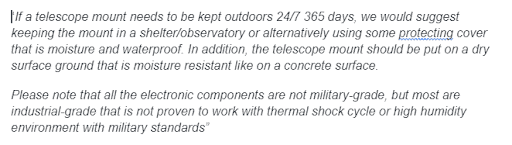
Be aware that Skywatcher makes no claims of weather or even moisture-proofness for the EQ6-R mount. I queried the suitability of leaving the mount outdoors with them and they stated the following (spelling and grammar as per email!)
There is a carry bag available which you may want to store the mount in if you are not going to be using it for a while or if you are taking it to darker skies on holiday.
Sky Watcher EQ6-R Pro Specs
Final Thoughts on the EQ6-R Pro
The EQ6-R Pro is a fantastic mount, but not without its issues. Most of these issues relate to design issues of parts that most users will only use occasionally. If you keep your equipment set up on a semi/permanent basis, either in an observatory or outdoors undercover, these issues won’t bother you during daily usage.
It’s very heavy, which is good for stability but not so good if you tend to put everything away at the end of a session. I found it performs its stated functions very well, and it looks great with an unfussy finish that is nonetheless perfectly functional.
So whether or not I can give the EQ6-R a glowing endorsement depends on how you use it. Permanent set-ups – absolutely recommended. More portable requirements- you may want to consider alternatives.