Celestron’s StarSense Explorer line is the latest in Celestron’s revolving door of low-cost, oddly designed and often computerized beginner telescopes.
Celestron has previously tried to make using a telescope as easy as possible in the form of the NexStar telescopes (which sadly lost their extremely simple Level North alignment feature in a patent lawsuit, and barely work with the SkyAlign feature meant to replace it), the SkyProdigy and StarSense (expensive and plagued by software troubles), the Inspire line of refractors, and now their newest product lines, the StarSense Explorer and Astro-Fi. Both of these telescope lineups are unique in that they prominently rely on your smartphone as the key to their lower cost and technological innovations.
What’s unique about the StarSense Explorer design is that the only electrical or computerized component is, in fact, your smartphone. Everything else is merely some basic analog hardware and downloadable software to make it all work together.
The model in the StarSense Explorer lineup we are reviewing here is the StarSense Explorer DX (Deluxe) 102 refractor. Celestron offers other telescopes with the StarSense Explorer tech including a 114mm Bird-Jones reflector and 80mm refractor, neither of which we recommend due to poor quality optics and mechanics.
A 130mm Newtonian reflector is offered with the exact same mount and accessories as the StarSense Explorer DX 102, and we recommend it with similar caveats to the 102. Outside of the US Celestron also offers their 5” and 6” Schmidt-Cassegrains on the StarSense Explorer DX mount; the 5” unit has no real advantages over the 130mm Newtonian and the 6” optical tube is a bit unstable on the DX mount, though it’s a good scope in itself. This all being said, the StarSense Explorer DX 102 is probably our favorite of the lineup thanks to its simplicity, wide field of view, and fairly good optical quality.
FEATURES: f/6.5 focal ratio, 660mm focal length 1.25" Rack-and-Pinion, Alt-Azimuth mount, and 240x highest magnification
BENEFITS
- Compatible with any 1.25” or 2" eyepiece
- 102mm (4.02") telescope aperture and 660mm focal length allows for a wide field of view
- StarSense Explorer technology assists in locating targets
What We Like
- Good optics
- Wide field of view
- Fairly easy to use and low-maintenance
- StarSense Explorer technology assists in locating targets
What We Don’t Like
- Chromatic aberration
- Not the largest aperture
- Mediocre accessories
How the StarSense Explorer DX 102 compares to other products
- Sky-Watcher Heritage 130P – The 130P has more aperture than the StarSense Explorer DX 102, a collapsible tube, and a simple tabletop mounting. It’s quicker to set up, more portable, and will show you more, but it needs a table. There are also a few quirks that go with the open and collapsible tube.
- Celestron StarSense Explorer DX 130 – The DX 130 has the same optics as the Heritage 130P in a solid tube riding the StarSense Explorer DX mount. It’s got a bit more light-gathering ability than the StarSense Explorer DX 102, and being a Newtonian reflector there’s no chromatic aberration. The focal length is the same, so you’ll get basically the same magnifications with a given eyepiece and a similarly wide field of view.
- The Sky-Watcher Heritage 150P has significantly more aperture than the StarSense Explorer DX 102 or a 130mm reflector and is still quite portable and easy to use. As with the 130P, though, you need a table and a collapsible Newtonian reflector requires a bit more setup time than a refractor.
- The Orion StarBlast 6 has more aperture than the StarSense Explorer DX 102 and can be upgraded to or purchased as the 6i model, which has a computerized aiming assist system similar to the StarSense Explorer tech but with a keypad instead of your phone and slightly higher accuracy.
The Optical Tube Assembly

The StarSense Explorer DX 102’s optical tube is a 102mm (4”) f/6.5 refractor with a focal length of 650mm; Celestron and other companies have marketed this same tube with a variety of different mount and accessory options. A 4” f/6.5 refractor has a fair amount of chromatic aberration or false color visible on bright targets like the Moon, planets, and bright stars; this manifests itself as a purple blurry halo around them.
However, sharp views of these objects at high magnifications are still possible if you can ignore the annoying purple rings. The lens cell on the StarSense Explorer DX 102 isn’t collimatable, but this isn’t a huge concern. There is little to no plastic in the optical tube. The scope attaches to its mount with a fixed, aluminum Vixen-style dovetail bar attached to the side of the tube. Thanks to this interchangeable dovetail, you could theoretically put it on another mount, but doing so could put the focuser and finder bracket sideways, and the provided mount is fine as-is.
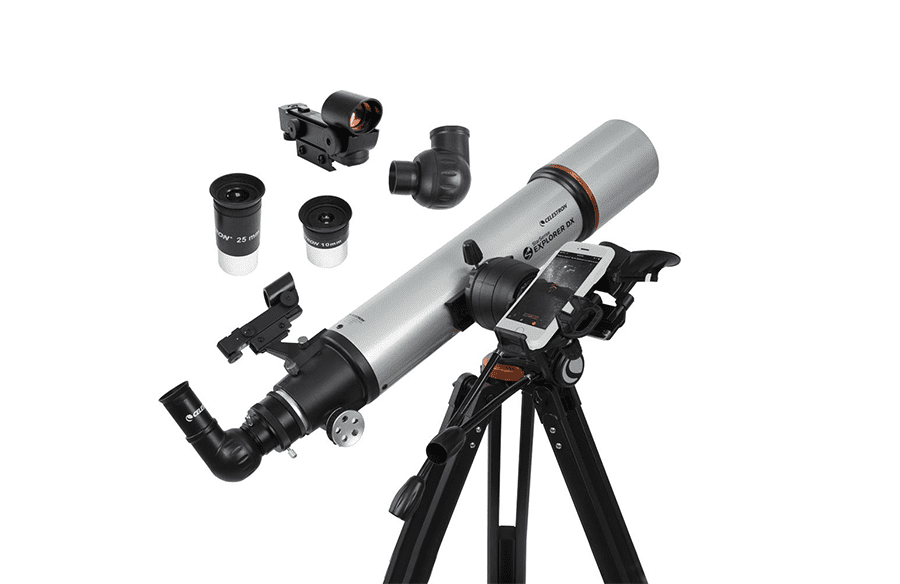
The finder bracket is built into the focuser on the StarSense Explorer DX 102, and a 2” to 1.25” adapter is provided for use with 1.25” accessories such as the stock ones provided with the telescope.
The StarSense Explorer DX 102’s focuser is a 2” rack-and-pinion unit, so in theory, you could use it with a 2” diagonal and 2” wide-angle eyepieces. However, these accessories would cost nearly as much as the StarSense Explorer DX 102 package itself, and the alt-azimuth mount provided with the scope is not meant to hold several additional pounds. Furthermore, the short dovetail rail provided doesn’t give enough ability to slide the scope forward to make it balance with such heavy accessories.
The Mount

The actual StarSense Explorer DX mount is relatively basic; it’s an alt-azimuth mount with gears for incremental slow-motion adjustments and flexible cables provided to do so, and attaches to the optical tube sideways with a Vixen-style dovetail clamp. A mount like this is meant to be roughly aimed at a target and then the slow-motion cables are used to fine-tune your aim as well as provide fine enough adjustments to manually track the target at high magnification. The slow-motion gears have a lot of backlash and are far from perfect, but they do the job, as does just gently nudging the telescope tube instead.
There are no clutches or locks on either the altitude or azimuth axis; you can adjust them with a socket wrench if you must, but for the most part, the friction is how it came from the factory. This can be problematic if you’re trying to balance the scope with heavy eyepieces (i.e. pretty much anything better than the stock ones), as even a slight balance difference may cause the scope to slowly lean downward or backward.
The tripod is a simple aluminum affair with adjustable legs and a usable, if basic, aluminum accessory tray in the middle.
Of course, the main feature here is the StarSense Explorer tech, which is simply a bracket that attaches to the side of the mount with a small mirror and a clamp to hold your phone. The mirror is for your phone’s camera so that it can aim downwards, and thus you can see the screen while pointing the telescope skyward.
The real action is happening inside your smartphone. The StarSense Explorer technology is actually based on a remarkably old technology known as plate solving; your phone takes a snapshot of the sky and compares it to databases of star patterns in the app internally. It then can figure out where you’re pointed. However, taking exposures constantly would be time-consuming and drain your battery, so the software takes an occasional snapshot and then uses your phone’s gyroscopes, GPS, and compass to fill in the blanks.
As a result, the accuracy of the StarSense Explorer at pointing your telescope is somewhat dependent on your phone’s internal hardware and camera (your light pollution also plays a role). Under poor conditions with a poor-quality phone, you’re going to be lucky to get the target in the field of view at low power (about 1.5 degrees wide).
A good phone and some good luck can produce accuracy a bit better than a quarter degree, or half the width of the full Moon. For comparison a typical cheap but well-aligned GoTo telescope or digital setting circles can place the target within a few arcminutes of the center of the field of view, which is about five times more accurate than the StarSense Explorer at its absolute best. The good news is that with a small telescope and a huge field of view, accuracy is not as big of a concern.
The StarSense Explorer app is relatively easy to use, but somewhat lacking in targets; even a 4” refractor can show a lot more objects than the app has in its database. Additionally, there’s no way to turn your phone screen red from within the app to preserve your dark adaptation; you’ll need to do that in your phone’s settings on your own.
Celestron actually makes a point in their advertising about the colorful arrows that guide you to your target within the app, which seems to imply that dark adaptation wasn’t even a consideration – ironic since the entire point of the StarSense Explorer is to help with finding faint and often fuzzy deep-sky objects like nebulae, star clusters, and galaxies, which require your eyes to be adapted to total darkness to be able to see them clearly.
Celestron doesn’t offer the StarSense Explorer app with additional objects nor do they offer it as a standalone accessory; this has upset people who are forced to buy an entire low-priced telescope to stick the bracket on their own instrument. Celestron’s logic for this is that uninformed people would try to fit the bracket on low-quality telescopes and then blame the StarSense Explorer tech for their shoddy viewing experience, which is understandable.
Additionally, the limitations of the pointing technology mean that the StarSense Explorer is arguably more of a neat curiosity than a useful tool. The vast majority of the things it will help you find are bright targets which you could probably figure out how to aim the telescope at yourself with a few minutes of effort. This isn’t to say that the StarSense Explorer technology is entirely useless, but whether or not it’s worth the compromise of less telescope for more money is debatable, and somewhat dependent on external factors such as your smartphone, the quality of your skies, and your budget.
Accessories

The StarSense Explorer telescopes all include two 1.25” eyepieces: a 25mm Kellner providing 26x with the DX 102 and a 10mm providing 65x. The 10mm eyepiece is actually a “reverse Kellner” or RKE optically, and provides sharp images, which is impressive for a bottom-tier eyepiece with an entirely plastic housing that you can frequently find on AliExpress for less than five dollars. It’s also got more eye relief than a conventional Plossl or Kellner making it easy to look through without jamming your eyeball into the lens. The 25mm is not as good; it has some issues with internal reflections, though it’s still acceptable and easy to use.
Being a refractor the StarSense Explorer DX 102 also needs to have a star diagonal for you to use it comfortably; in this case Celestron has provided their standard cheap Amici erecting prism. The Amici prism is a design that provides a corrected left-right view, which is somewhat helpful if you’re cross-referencing your phone screen constantly, but this comes at the expense of an annoying spike of light being produced on some stars and the planets, as well as some internal reflections.
The prism is also undersized, and will vignette with anything with a wider field stop than the stock 25mm Kellner, so you cannot use something like a 32mm or 40mm Plossl or a 25mm wide-angle eyepiece for a wider field of view.
Lastly, a red dot finder is provided, which attaches to the bracket built into the StarSense Explorer DX 102’s focuser. You really only need the finder if you don’t plan on using the app to aim the telescope, though it is nice in a pinch if your phone’s battery is low. For aiming a small telescope like the DX 102 refractor, a red dot finder is really all you need.
Given the fairly high price of the StarSense Explorer DX 102, the less-than-optimal set of provided accessories is a bit of a disappointment. However, upgrading is easy and we’d recommend it. A better star diagonal will greatly improve sharpness and contrast; a wide-angle low-power eyepiece will give richer views of star clusters and nebulae, and something like a 6mm “gold-line” eyepiece (108x) would be ideal for getting the best possible views of the Moon, planets, double stars, and globular clusters with the StarSense Explorer DX 102.
This scope can handle up to about 180x magnification on small and bright targets when atmospheric conditions permit, and powers above 100x are again ideal for many of them, particularly on the planets.
Celestron StarSense Explorer DX 102 Specs Table
What Can You See With Celestron StarSense Explorer DX 102?
The StarSense Explorer DX 102 is not a huge scope; a 4” refractor is comparable to a 4.5” reflector in light-gathering ability and resolution. You’re limited to the brighter deep-sky objects, the Moon, and the planets. If you have severe light pollution, you are going to be limited on deep-sky stuff too.
Depending on the time of year and your location, the planets might not be located high enough in the sky to get clear and sharp views of, or they might only do so at very inconvenient hours late in the night. So do keep this in mind. The good news with deep-sky objects is that the StarSense Explorer DX 102 is quite a portable instrument that can be carried assembled in one piece and fits in almost any vehicle, so you can easily bring it to dark skies for observing if need be. Setting up the whole telescope and the StarSense Explorer smartphone app is also quite a speedy process, taking just a few minutes altogether from start to finish.
You’ll be able to see the phases of Mercury and Venus with the StarSense Explorer DX 102, though don’t expect much else – Mercury can be a challenge to even resolve at times. The Moon looks magnificent, showing details just a few miles across, such as craters, ridges, mountains, and valleys.
The StarSense Explorer DX 102 can show you the moons of Jupiter with ease, as well as the giant planet’s colorful cloud belts and the Great Red Spot, which can be a little hard to see at times. The moons are just within the resolving power of the DX 102 and on a steady night you should be able to see their tiny disks transiting across Jupiter’s face, with their more contrasting black shadows easily visible behind them.
Saturn’s rings are easy to see, and high magnification with an aftermarket eyepiece should reveal the Cassini Division within them and some cloud banding on Saturn itself in a variety of colors. Saturn’s moons are a bit harder to see than Jupiter’s; Titan and Rhea are the most easily spotted, followed by Tethys and Dione. Iapetus and Enceladus can be seen, but are quite a challenge. Uranus and Neptune are bluish star-like dots – their icy moons are too faint to see with the StarSense Explorer DX 102 even under perfect conditions, and the tiny angular sizes of both distant ice giant planets means they’re barely distinguishable from stars, if at all, given the meager resolving power of a 4” telescope.
The StarSense Explorer DX 102’s performance on deep-sky objects is heavily dependent on the quality of your night skies. If you can’t see the Milky Way overhead at all, don’t expect much fun on anything besides star clusters and the brightest nebulae.
The DX 102 is just barely able to resolve the outer members of globular star clusters like M13. High magnification produces the best results. Smaller and dimmer globulars may be hard to resolve even under good conditions, and may be invisible entirely with this telescope under light-polluted skies. Open star clusters fare better.
The stars in most open clusters are quite bright compared to globulars, and as such they’re still pretty easy to see under light pollution, though they do tend to lose some of their luster. The StarSense Explorer DX 102’s wide field of view at low magnification makes it great for open star clusters, and the sharp optics of a refractor mean the stars will appear as perfect pinpoints free of diffraction spikes. M45 (the Pleiades), M35, and the Double Cluster in particular, look fantastic with this telescope.

Emission nebulae like the Orion Nebula (M42) and the Swan (M17) look fantastic under all but the brightest skies. However, dark skies and/or a nebula filter will lend themselves to the most spectacular views of these and other nebulae. The Veil Nebula supernova remnant looks great under dark skies with a good UHC nebula filter, and the Crab Nebula (M1) can be seen as well, though it’s little more than a disappointingly small smudge. Planetary nebulae like the Ring (M57) and Dumbbell (M27) look great even under so-so skies; unfortunately, smaller planetaries are just a bit too dim and tiny to see as much more than fuzzy star-like patches with the DX 102 even under perfect conditions.
Galaxies are the most affected by light pollution of all the deep-sky objects, and the StarSense Explorer DX 102 is rather small to show much of them in the first place. Under dark skies, you can start to see the dust lanes in M31 (the Andromeda Galaxy), M82, and M64.
The spiral arms in galaxies like M51 might be vaguely apparent as smudges, but the DX 102 just lacks the light-gathering and resolving power to present them clearly. The Virgo Cluster shows a couple dozen members under good skies and is quite an impressive sight, if dim. Andromeda’s two companions M32 and M110 are visible. However, under light-polluted skies, seeing the brightest galaxies at all is a bit of a struggle, and the dust lanes in even M82, perhaps the most easily spotted galactic detail, are hard to spot.
Final Thoughts on Celestron StarSense Explorer DX 102
While not the best value for the money, the StarSense Explorer DX 102 is a great telescope in a convenient package, if somewhat less-than-optimal. The bundled StarSense Explorer technology is great for locating deep-sky objects with ease, even though the small aperture of the telescope itself may not excel in showing you them. The scope is convenient, portable, lightweight, and simple. There’s no alignment, collimation, or cooldown time required here.
But if aperture is what you’re looking for, this scope isn’t it. Likewise, if you want full computerized pointing and tracking, you’re better off with something else like Celestron’s Astro-Fi telescopes or the NexStar 6SE.