Table of Contents
- What Is a Dobsonian Telescope? A Practical Definition and Why It Matters
- Dobsonian vs. Refractors, SCTs, and Maksutovs: Which Fits Your Goals?
- Aperture, Focal Ratio, and Optical Design Choices in Dobsonians
- Mount Design, Bearings, and Motions: How Dobsonians Stay Smooth
- Eyepieces, Finders, and Essential Accessories for Dobsonian Owners
- Collimation, Cooling, and Routine Maintenance for Reflectors
- Observing Techniques for Deep-Sky Success with a Dobsonian
- Can You Do Astrophotography with a Dobsonian? Realistic Paths
- Recommended Sizes and Buying Guide: 6″ to 12″+
- Step-by-Step Setup and Your First Light Checklist
- Frequently Asked Questions
- Final Thoughts on Choosing the Right Dobsonian Telescope
What Is a Dobsonian Telescope? A Practical Definition and Why It Matters
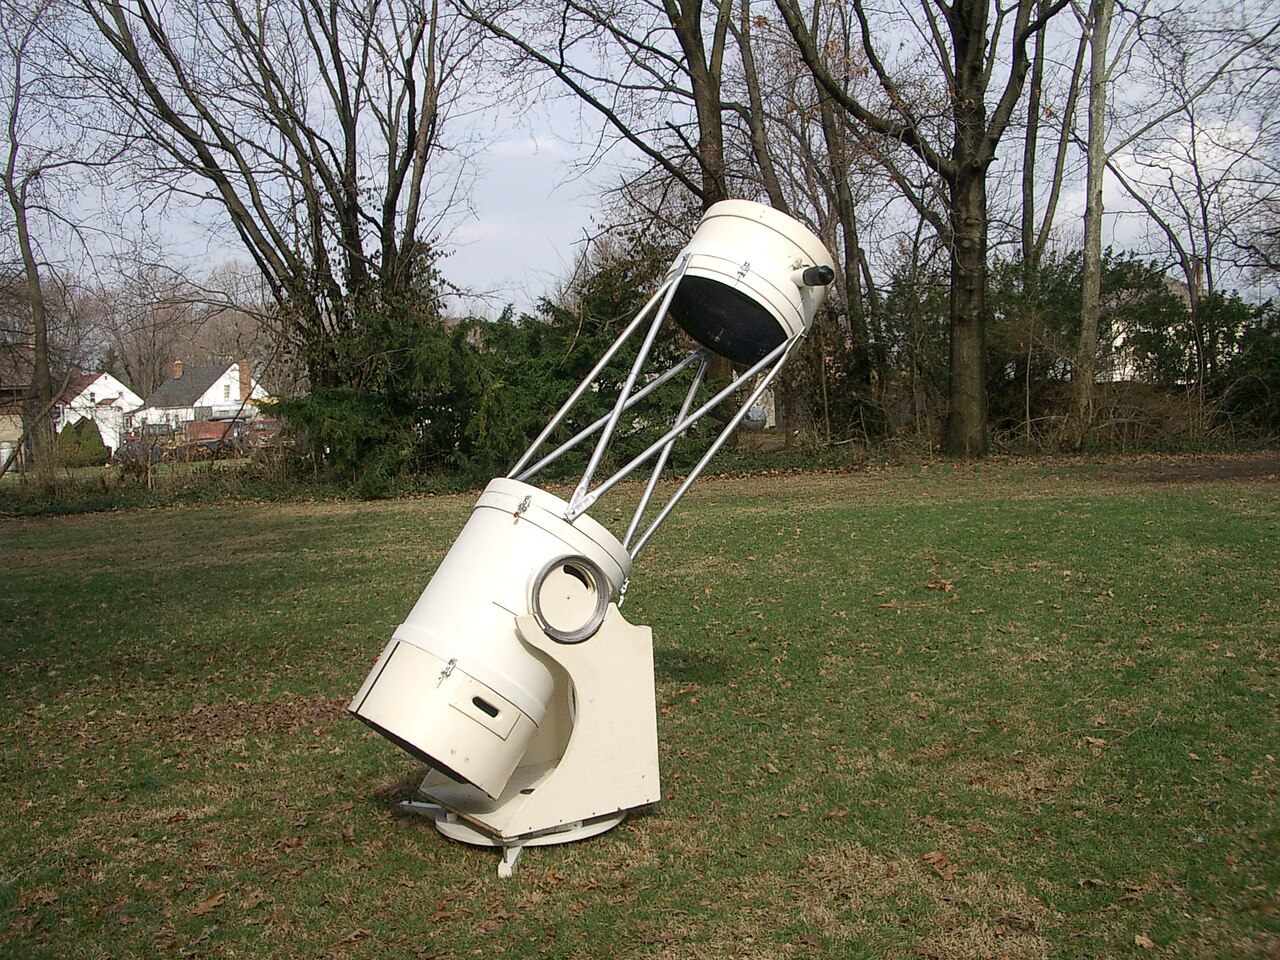
A Dobsonian telescope is a Newtonian reflector mounted on a simple, low-cost, alt-azimuth base. The optical tube uses two mirrors—one large primary mirror at the rear and a small secondary mirror near the front—to gather and reflect light to an eyepiece on the side of the tube. The mount pivots up-down (altitude) and left-right (azimuth), and is typically made from plywood or composite panels with friction bearings that allow smooth, manual tracking. This minimalist, highly stable design prioritizes aperture per dollar, which is why Dobsonians are commonly called “light buckets.” They excel at revealing faint galaxies, nebulae, and star clusters, especially under dark skies.

Credit: first uploaded on the English-speaking Wikipedia under the same filename
The design was popularized by John Dobson in the late 20th century to help amateur astronomers build large, affordable telescopes. His community-centered approach emphasized that a simple, sturdy mount paired with a large mirror could deliver stunning views without the complexity and cost of precision-machined equatorial mounts. Today, Dobsonians are available from small tabletop models to large truss-tube instruments exceeding 20 inches of aperture, offering a wide range of options for beginners and experienced observers alike.

Artist: AlanJWylie at English Wikipedia
Why does this matter for you? If your observing goals include deep-sky objects such as the Andromeda Galaxy, the Orion Nebula, the Hercules Cluster, or the faint reaches of the Virgo Cluster, then aperture is king. The Dobsonian’s cost-effective design lets you buy a larger mirror than most other configurations at the same budget. You’ll see richer detail and more targets. For planetary and lunar observing, Dobsonians also perform very well, often limited more by atmospheric seeing and telescope cooling than by inherent optical capability.
Throughout this guide, we’ll explore how to choose the right size, what accessories matter most, how to maintain collimation, and practical tips for observing. When you see a reference to collimation and cooling, eyepiece selection, or observing technique, follow those internal links for deeper detail.
Dobsonian vs. Refractors, SCTs, and Maksutovs: Which Fits Your Goals?
Every telescope design represents a set of trade-offs. Understanding how Dobsonians compare with refractors, Schmidt-Cassegrains (SCTs), and Maksutov-Cassegrains (Maks) will help you choose a scope that aligns with your observing style, storage constraints, and travel plans.

Artist: OpenStax
Dobsonian Advantages
- Aperture value: For a given budget, Dobsonians typically offer more aperture than refractors or compound telescopes. More aperture means brighter, higher-resolution views, especially beneficial for faint deep-sky objects.
- Simplicity and stability: The alt-az base is stable, with low center of gravity. There are no electronics or complex gears required for visual use. This reduces setup time and potential maintenance headaches.
- Manual learning: Star-hopping and manual tracking encourage you to learn the sky, reinforcing your sense of orientation among constellations and deep-sky catalogs.
Dobsonian Limitations
- Bulk and portability: Solid-tube Dobsonians, especially 10 inches and above, can be bulky. Truss-tube models mitigate this but add setup steps.
- Collimation required: Reflector optics need periodic alignment. Fortunately, collimation is straightforward with the right tools; see Collimation, Cooling, and Routine Maintenance.
- Astrophotography constraints: The alt-az base isn’t designed for long-exposure imaging due to field rotation. Planetary imaging and electronically assisted astronomy (EAA) are more feasible; see Astrophotography with a Dobsonian.
How Refractors Compare
Refractors use lenses instead of mirrors. They tend to offer contrasty, high-clarity views, have sealed tubes that are less prone to dew and dust, and require almost no collimation. However, they become expensive quickly as aperture increases. Chromatic aberration can affect achromatic models at short focal ratios, while apochromatic triplets minimize color fringing but at significantly higher cost. Refractors shine for quick looks, lunar/planetary, double stars, and wide-field sweeping—yet for deep-sky brightness, a Dobsonian’s aperture usually wins on a budget.
How SCTs and Maks Compare
Compound catadioptric telescopes fold the light path to offer longer focal lengths in compact tubes. Equipped with GoTo mounts, they can automate finding targets. They’re excellent for high-resolution lunar and planetary observing and can be configured for deep-sky astrophotography when mounted equatorially. Downsides include longer cool-down times, potential dew on the corrector plate, and higher cost per inch of aperture compared to Dobsonians.
If your priority is pure visual deep-sky performance and you value manual, hands-on observing, a Dobsonian is often the most efficient choice. If you want plug-and-play GoTo and compactness, an SCT may suit you better. If you want minimal maintenance and crisp wide fields without collimation, a refractor might be ideal. Your observing goals—and your skies—should decide.
Aperture, Focal Ratio, and Optical Design Choices in Dobsonians
Understanding the key optical parameters will clarify how different Dobsonians behave at the eyepiece. Three concepts are essential: aperture (mirror diameter), focal length, and focal ratio (f/number).
Aperture: The Light-Gathering Engine
Aperture determines how much light your telescope collects. A larger aperture increases limiting magnitude (the faintest stars you can see) and resolution (fine detail) under good seeing. Common Dobsonian sizes include 6-inch (150 mm), 8-inch (200 mm), 10-inch (250 mm), and 12-inch (300 mm). Each step up gathers significantly more light—for example, a 10-inch mirror collects nearly three times the light of a 6-inch mirror because light-gathering scales with area.
Focal Length and Focal Ratio
Focal length is the distance (in mm) over which the mirror brings light to focus. The focal ratio, written f/number, is calculated as:
focal ratio (f/#) = focal length / aperture

Artist: Fernly at English Wikibooks
For example, a 200 mm aperture with a 1200 mm focal length has an f/6 focal ratio. Faster systems (f/4–f/5) provide wider fields and lower magnifications with a given eyepiece but have a shorter depth of focus and more coma, a seagull-like distortion at the edges. Slower systems (f/6–f/8) are more forgiving of collimation and eyepiece quality, with less coma and easier focusing.
Magnification, Exit Pupil, and True Field of View
- Magnification (power):
magnification = telescope focal length / eyepiece focal length. A 1200 mm telescope with a 25 mm eyepiece yields 48x. - Exit pupil:
exit pupil (mm) = eyepiece focal length / focal ratio. A 25 mm eyepiece at f/6 gives a 4.2 mm exit pupil—good for many deep-sky objects. - True field of view (TFOV): Approximate as
TFOV ≈ eyepiece AFOV / magnification, where AFOV is the eyepiece’s apparent field (e.g., 50°, 68°, 82°). Wider AFOV eyepieces provide larger windows on the sky at the same magnification.
For general deep-sky use, aim for a low-power eyepiece that provides a ~4–5 mm exit pupil, a mid-power around 2–3 mm for galaxy detail and smaller nebulae, and a high power ~1 mm or less for planetary, lunar, and double stars. See Eyepieces, Finders, and Essential Accessories for recommendations.
Parabolic Mirrors, Coma, and Collimation Tolerance
Most Dobsonians use parabolic primary mirrors to bring on-axis light to a sharp focus. Off-axis, a Newtonian exhibits coma—stars appear stretched near the edges, more noticeable at faster f/ratios. Many observers accept some coma at f/5–f/6, while fast scopes (f/4–f/4.5) often benefit from a coma corrector. Collimation becomes more critical as the focal ratio gets faster because the “sweet spot” (depth of focus) shrinks. Accurate collimation maintains sharp, high-contrast images and prevents optical aberrations from dominating the view.
Solid-Tube vs. Truss-Tube
- Solid-tube: Durable, simple, and faster to set up. The tube shields the light path well and is resistant to dew and stray light. The downside is bulk—longer tubes can be cumbersome in cars or small apartments.
- Truss-tube: Breaks down into smaller pieces for transport, enabling larger apertures. Requires assembly, a shroud to block stray light, and careful collimation each session. Offers scalability for big-aperture aspirations.
Artist: JamesStewart669
Mount Design, Bearings, and Motions: How Dobsonians Stay Smooth
A Dobsonian’s hallmark is its simple, smooth, and stable mount. The engineering is elegant: rather than precision gears, it uses wide bearing surfaces and friction materials to produce controlled, fluid motion. This makes manual tracking of planets and deep-sky objects intuitive and satisfying.
Altitude and Azimuth Bearings
- Altitude (up-down): Large side bearings or semicircular cutouts support the tube. The bigger the bearing, the more stable the motion and the less sensitive it is to balance changes when swapping eyepieces.
- Azimuth (left-right): The base rotates on a central pivot with bearing pads. Common materials include PTFE (Teflon) pads riding on textured laminate (often called Formica). The micro-texture helps tune friction for smooth starts and stops.
Friction, Stiction, and Balance
“Stiction” describes the force required to start moving the mount from rest. Too much stiction makes it hard to nudge the scope smoothly; too little makes it difficult to stop precisely. Proper bearing materials, pad placement, and weight distribution balance stiction and kinetic friction. Accessories like adjustable tension springs, counterweights, or magnet weights help compensate for heavy eyepieces or finder scopes.
Lazy Susan Bearings, Roller Kits, and Alternatives
Some bases add a ring of ball bearings (“lazy susan”) for azimuth rotation. This can reduce friction but may introduce low stiction—resulting in overshoot. Many observers prefer the classic PTFE-on-laminate feel for fine control, but it’s a matter of preference and tuning. Replacing stock pads with higher-grade PTFE or upgrading the laminate surface can noticeably improve motion.
GoTo and Tracking Options
While classic Dobsonians are manual, some models incorporate digital setting circles (DSCs) or full GoTo systems with motorized tracking. DSCs use encoders and a hand controller or smartphone app to guide you to targets while retaining manual motion. GoTo Dobsonians can track objects automatically, beneficial for outreach and high-power planetary observing. If motorized systems interest you for planets, see Astrophotography with a Dobsonian for planetary imaging considerations.
Eyepieces, Finders, and Essential Accessories for Dobsonian Owners
Eyepieces determine magnification, field of view, and comfort. Finders help you aim. A few essential accessories can greatly improve your experience.
Eyepiece Focal Lengths and Sets
- Low power (24–32 mm in f/6): For panning star fields and large nebulae. Targets include the Pleiades, North America Nebula (with filters), and open clusters.
- Medium power (12–18 mm): Versatile for galaxies, globular clusters, and nebula detail. Excellent for general use.
- High power (5–9 mm): For planetary, lunar, double stars, and small planetary nebulae. Seeing (atmospheric steadiness) sets the limit more than the telescope.
Consider eyepieces with a comfortable eye relief and wide apparent fields (68°–82°) to make manual tracking easier. At f/5 and faster, premium eyepiece designs maintain edge correction better, but many mid-range eyepieces perform very well at f/6 and slower.
1.25-inch vs 2-inch Focusers
Dobsonians often include a 2-inch focuser with an adapter for 1.25-inch eyepieces. A 2-inch low-power, wide-field eyepiece can reveal large nebulae and sprawling star clouds. Make sure your focuser is smooth and robust; dual-speed (10:1) focuser knobs help achieve critical focus at high power.
Barlow Lenses and Coma Correctors
- Barlow lens: Multiplies magnification by 2x–3x, extending the range of your eyepiece set.
- Coma corrector: Reduces off-axis coma in fast Newtonians (often f/5 and faster), improving edge sharpness. You’ll still need precise collimation for best results.
Finders: RACI, Reflex, and Finder Scopes
- Reflex (zero-power): Projects a red dot or bullseye; excellent for initial pointing.
- RACI (Right-Angle Correct-Image) finder: A small telescope (e.g., 8×50) that shows a right-side-up view, helpful for star-hopping without neck strain.
- Combination: Many observers use a reflex finder for rough aim and a RACI finder for precise star-hopping, cross-checking with charts or apps.
Filters for Nebulae and Planets
- UHC (Ultra High Contrast) and O III: Narrowband filters suppress light pollution and enhance emission nebulae like the Veil or Orion. O III is particularly effective on planetary nebulae and supernova remnants.
- Neutral density or variable polarizer: Useful for moderating lunar brightness and enhancing contrast without color cast.
- Color filters for planets: Optional; some observers find subtle improvements in contrast for features on Jupiter, Saturn, or Mars, but results are subjective.
Comfort and Stability Accessories
- Observing chair: A stable, adjustable-height chair improves steadiness and comfort, letting you observe longer and see more.
- Dew control: Dew shields for the secondary and finders, plus gentle heat if necessary, prevent water droplets that degrade views.
- Red-light flashlight: Preserves night vision while consulting charts or adjusting equipment.
Collimation, Cooling, and Routine Maintenance for Reflectors
Collimation—the alignment of your telescope’s mirrors—is essential for sharp, high-contrast images. Thermal equilibrium (cooling) and occasional cleaning also matter. Fortunately, these tasks are manageable and become quick with practice.
Essential Collimation Tools
- Cheshire/sight tube combo: A passive tool for aligning secondary and primary mirrors.
- Laser collimator (quality matters): Useful for quick tweaks, but verify that the laser itself is collimated. Combine with a barlowed laser method for primary alignment.
- Primary mirror center spot: A small donut or marker that aids precise alignment. Many mirrors ship with one; if not, carefully add one using a template.
Basic Collimation Workflow
- Center the secondary under the focuser: Using a sight tube, ensure the secondary mirror looks centered and round. Adjust secondary position and rotation as needed.
- Aim the focuser axis: Use a laser or Cheshire crosshairs to point the optical axis to the primary’s center spot by adjusting secondary tilt screws.
- Align the primary: Using a Cheshire (or barlowed laser), center the primary’s reflection by adjusting the primary collimation knobs. Re-check the secondary tilt if needed.
At fast focal ratios (f/5 and below), precise collimation significantly improves star images and planetary detail. Always perform a quick check before high-power observing. For deeper insight into how collimation affects sharpness at different focal ratios, revisit Aperture, Focal Ratio, and Optical Design.
Cooling and Thermal Management
Mirrors take time to reach ambient temperature. Warm mirrors generate tube currents and a boundary layer that blur images. Strategies:
- Allow cool-down time: Set the scope outside 30–60 minutes before high-power viewing, longer for thicker mirrors or larger apertures with big temperature differentials.
- Use fans: A rear mirror fan accelerates equilibration; side fans can disrupt boundary layers. Gentle airflow is usually enough.
- Avoid heat sources: Observe away from roofs, concrete, or sun-warmed surfaces that radiate heat and degrade seeing.
Cleaning Mirrors and General Care
Primary mirrors rarely need cleaning. Dust alone has minimal effect on performance. Clean only when you notice significant haze, pollen, or spots impacting contrast.
- Gentle rinse: Remove the mirror cell if the design allows. Rinse with distilled water; use a mild solution and clean, soft tissue with extremely light pressure for stubborn areas.
- Avoid scratches: Never scrub. Rinse away particles before any contact. Finish with distilled water and tilt-dry to minimize spotting.
- Protect from dew and dust: Use caps, shrouds for truss-tubes, and store the scope in a dry area.
Observing Techniques for Deep-Sky Success with a Dobsonian
Seeing more with a Dobsonian is less about exotic hardware and more about technique, patience, and conditions. Adopt the following habits to maximize what your mirror can show.
Dark Adaptation and Averted Vision
- Dark adaptation: Your eyes need 20–30 minutes to fully adapt to darkness. Avoid bright white lights and use a dim red light for charts. Cover one eye when checking a screen.
- Averted vision: Look slightly away from the object so the more sensitive parts of your retina detect faint light. Rock the telescope gently to stimulate motion detection.
Star-Hopping and Charts
Star-hopping is the art of navigating from a bright, known star to a faint target using patterns visible in your finder and eyepiece. With a reflex finder and a RACI, use iterative steps: place the reflex dot on a starting star, then match star patterns in the RACI to your chart or app, hopping from asterism to asterism. This skill becomes second nature and is part of the fun of Dobsonian observing. For a finder setup overview, see Eyepieces, Finders, and Essential Accessories.
Exit Pupil Targeting
Match exit pupil to target type and sky conditions. In light-polluted areas, smaller exit pupils (2–3 mm) can improve contrast for galaxies. Under very dark skies, larger exit pupils (5–6 mm) reveal more nebulosity with filters. Calculate it using the formula in Aperture, Focal Ratio, and Optical Choices.
Use Filters Strategically
- UHC: Excellent first nebula filter, enhancing emission nebulae against light pollution or moonlight.
- O III: Maximizes contrast on planetary nebulae and supernova remnants. Works best at moderately low powers.
- Planetary filters: Consider a variable polarizer for the Moon and experiment with mild color filters for planets if desired.
Dew, Wind, and Comfort
- Dew control: Keep finders capped when not in use. Use small dew heaters if necessary.
- Wind management: Truss scopes benefit from a snug shroud; position your body upwind as a windbreak.
- Ergonomics: An observing chair can dramatically improve the steadiness of your eye at high power and reduce fatigue.
Tip: Observe the same object at multiple magnifications and exit pupils. Faint galaxy arms may pop at mid power, while low power reveals the broader halo. For planetary nebulae, sweeping through powers can reveal the central star and subtle shell structure.
Can You Do Astrophotography with a Dobsonian? Realistic Paths
Dobsonians are optimized for visual observing on manual alt-az mounts. Long-exposure deep-sky astrophotography typically requires an equatorial mount that compensates for Earth’s rotation and allows guiding. That said, there are realistic ways to capture the night sky with a Dobsonian.
Planetary and Lunar Imaging
High-magnification imaging of the Moon and planets is the Dobsonian’s strong suit. The technique usually involves capturing thousands of short video frames with a high-speed planetary camera, then stacking and sharpening the best frames to overcome atmospheric turbulence (seeing). Manual tracking is possible for short captures, but motorized tracking (add-on drives or GoTo Dobsonians) improves ease. A quality Barlow helps reach the desired image scale, often at an effective focal ratio of f/15–f/20 depending on camera pixel size.
Electronically Assisted Astronomy (EAA)
EAA uses sensitive cameras and short exposures to deliver near-real-time, live-stacked views of deep-sky objects. Because exposures are brief and stacked, alt-az mounts are workable for many targets, and field rotation is less limiting at short total integrations. EAA is an excellent option for urban observers who want to see more live detail on galaxies and nebulae than the eye alone can capture.
Equatorial Platforms
An equatorial platform is a motorized base that sits under the Dobsonian and tracks the sky for several minutes at a time by approximating the motion of an equatorial mount. This setup enables longer exposures and steady high-power planetary observations without converting to a full equatorial mount. Platforms require polar alignment but preserve the Dobsonian’s simplicity and ergonomics.
Short-Exposure Deep Sky
With a sensitive camera and careful technique, you can experiment with “lucky imaging” for bright deep-sky objects using many short sub-exposures. Results won’t match dedicated long-exposure rigs on equatorial mounts, but it’s a fun, incremental step into imaging using your existing scope.
If imaging is your primary goal, consider a separate setup for deep-sky astrophotography. If your main interest is visual observing with occasional planetary or EAA imaging, a Dobsonian remains an excellent choice.
Recommended Sizes and Buying Guide: 6″ to 12″+

Artist: Morn
This section focuses on how to choose the right size and features for your circumstances. Rather than prescribing specific brands, we’ll outline practical considerations and common configurations in today’s Dobsonian market.
6-Inch (150 mm): Compact and Capable
- Use case: Beginners, small spaces, light travel. Tabletop variants exist but require a sturdy surface or portable pier.
- Pros: Light, easy to move, cools quickly. Reveals bright deep-sky objects and excellent lunar/planetary detail in good seeing.
- Cons: Less reach on faint galaxies and small planetary nebulae compared to larger apertures.
8-Inch (200 mm): The Sweet Spot for Many
- Use case: Balanced size and performance; commonly recommended as a first serious telescope.
- Pros: Substantially more light than 6-inch, manageable weight, and broad capability across deep-sky and planets.
- Cons: Bigger and heavier than 6-inch; storage and car transport require more planning.
10-Inch (250 mm): Deep-Sky Powerhouse
- Use case: Observers seeking more galaxy structure, globular cluster resolution, and nebula detail.
- Pros: Noticeable brightness increase over 8-inch; still manageable for many observers.
- Cons: Bulkier tube; staircase or apartment dwellers may prefer a collapsible or truss design.
12-Inch (300 mm) and Larger: Aperture Ambition
- Use case: Serious deep-sky enthusiasts with access to dark skies who can store and transport larger gear.
- Pros: Dramatic gain in light-gathering and resolution. Faint structures become more obvious under good conditions.
- Cons: Transport, setup time, and cooldown increase. Truss-tube designs are common and require shrouds and frequent collimation.
Focal Ratio Choices by Size
- f/6 (typical in 6–8 inch): Forgiving collimation, less coma, and comfortable with a wide range of eyepieces.
- f/5 (common in 8–12 inch): Wider fields and compact tubes; collimation and eyepiece quality become more important.
- f/4 to f/4.5 (often in large truss scopes): Maximizes compactness; coma corrector recommended; tight collimation required.
Build Features and Upgrades
- Mirror cell: Robust support improves star tests and collimation stability.
- Focuser: Dual-speed Crayford focusers are precise and a joy to use.
- Bearings: Larger altitude bearings aid balance; high-quality azimuth pads improve motion.
- Cooling fan: A simple addition that shortens wait time to sharp views.
- Shroud for truss scopes: Blocks stray light and dew; essential in urban settings.
Budgeting and the Total Cost of Ownership
Remember to budget for eyepieces, a finder upgrade, collimation tools, and an observing chair. These components can transform the experience. An 8-inch Dobsonian with a thoughtful eyepiece set and a comfortable chair often outperforms a larger, poorly equipped setup in practice.
Step-by-Step Setup and Your First Light Checklist
Getting your Dobsonian from box to first photons is straightforward. This checklist helps you avoid common errors and ensures a satisfying first night out.
Assembly and Alignment
- Assemble the base: Follow the manual to bolt together the side panels and ground board. Verify that the azimuth pads are correctly placed and that the pivot bolt is snug but not binding.
- Install the tube: Place the tube into the cradle or on the side bearings. Balance with your typical eyepiece and finder attached. If altitude motion is too loose or tight, adjust the tensioners or springs.
- Attach the finder: Align it during the day. View a distant terrestrial object through the main scope and center it; then adjust the finder so the same object is centered.
Before Dark
- Collimate: Do a quick collimation check and tweak.
- Cool down: Place the scope outside to equilibrate with outdoor temperatures. Turn on the fan if installed.
- Prepare charts: Plan targets suitable for your sky conditions and Moon phase. Include a mix of showpieces and new challenges.
First Light Routine
- Start easy: Aim for the Moon (if up), Jupiter, Saturn, or bright star clusters. Practice focusing and tracking.
- Dial in balance: Swap eyepieces and verify altitude motion stays smooth. Add a small counterweight if the front end dips with your heaviest eyepiece.
- Explore: Move to a bright nebula or galaxy. Try different magnifications to see how detail changes with exit pupil.
- Record notes: Keep a simple log: date, conditions, targets, eyepieces used, and impressions. This builds skill and helps guide future purchases.
Pro move: Use an observing chair from day one. Comfort reveals detail. A steady, relaxed observer sees more than a hurried, neck-craned one.
Frequently Asked Questions
How hard is collimation, really?
With a Cheshire or quality laser and a little practice, collimation usually takes just a few minutes. The first sessions may feel unfamiliar, but the process is systematic. Align the secondary under the focuser, aim the focuser axis to the primary’s center spot, then tweak the primary to bring everything into alignment. At f/6, the system is fairly forgiving; at f/5 and faster, accuracy matters more. See Collimation, Cooling, and Routine Maintenance for a step-by-step outline.
What can I expect to see from suburban skies?
Under light-polluted skies, the Moon and planets are excellent, and many star clusters are still rewarding. Bright nebulae like Orion respond well to a UHC filter. Galaxies will be more challenging; you’ll often see their cores and some halo, with structure appearing under better transparency and with larger aperture. Travel to darker skies when possible—a Dobsonian’s extra aperture pays dividends there. For techniques to improve results at home, see Observing Techniques.
Final Thoughts on Choosing the Right Dobsonian Telescope
A Dobsonian telescope offers one of the most direct paths to extraordinary visual astronomy. Its simplicity hides considerable capability: large aperture gathering starlight, smooth bearings translating your touch into precise motion, and a modular system you can refine with eyepieces, filters, and thoughtful upgrades. If your goal is to see more of the universe with your own eyes—to sweep the Milky Way’s star clouds, to resolve globular clusters into countless suns, to trace nebula filaments—then choosing a Dobsonian is a sound, time-tested decision.
For many newcomers, an 8-inch f/6 represents an ideal starting point—portable enough for frequent use, powerful enough to reveal hundreds of deep-sky objects and deliver crisp lunar/planetary views. Larger apertures deepen the experience further if you can support the weight, storage, and cool-down demands. Regardless of size, invest in good eyepieces, a comfortable observing chair, and the habit of quick collimation. Practice observing techniques like averted vision and exit pupil tuning (see deep-sky techniques) to extract maximum detail.
In short: keep it simple, keep it comfortable, and keep observing. If you found this guide helpful, explore our other telescope guides, share it with a friend, and subscribe to our newsletter for future articles on equipment, observing strategies, and seasonal sky tours.