Table of Contents
- What Is a Dobsonian Telescope and Why It Matters
- Aperture, Focal Ratio, and Optical Performance Explained
- Rocker Box Mounts, Bearings, and Ergonomics
- Collimation, Cooling, and Mirror Maintenance
- Finding Objects: Star Hopping, Push-To, and GoTo
- Eyepieces, Finders, and Essential Accessories
- 6-inch vs 8-inch vs 10-inch vs 12-inch Dobsonians
- Field Use Tips and a Night-Under-the-Stars Checklist
- Budget, Value, and When to Upgrade
- Frequently Asked Questions
- Final Thoughts on Choosing the Right Dobsonian Telescope
What Is a Dobsonian Telescope and Why It Matters
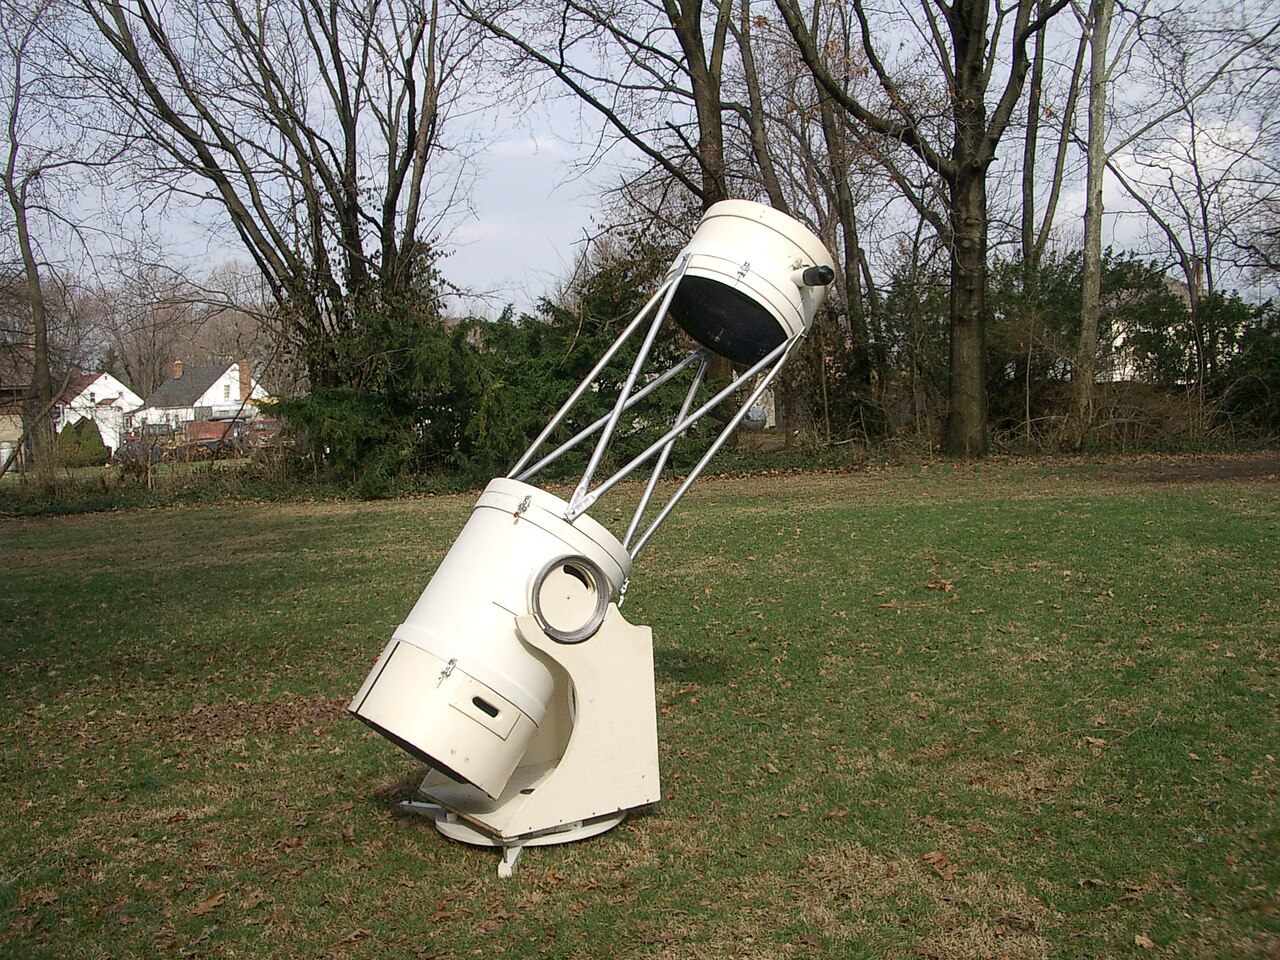
A Dobsonian telescope is a Newtonian reflector placed on a simple, ground-mounted, alt-azimuth base. It was popularized by John Dobson for its emphasis on large aperture, low cost, and ease of use. If you’ve ever looked through a large, boxy telescope that swivels up-down and left-right on a lazy-susan-like base, you’ve likely met a Dobsonian.

Credit: first uploaded on the English-speaking Wikipedia under the same filename
The magic of the Dobsonian design is how efficiently it converts budget into aperture. Aperture—the diameter of the primary mirror—governs light grasp and theoretical resolution. By using a simple wooden or composite base, a tube or truss structure, and a parabolic primary mirror, the design maximizes photon collection while keeping setup straightforward. For visual astronomy, especially at dark sites, this can be transformative.
Key characteristics that define a Dobsonian:
- Optical design: Newtonian reflector with a parabolic primary mirror and a flat secondary mirror.
- Mount type: Alt-azimuth rocker box with low-friction bearings for smooth manual motion.
- Portability emphasis: Solid-tube for smaller apertures; truss or collapsible designs for larger apertures.
- Cost-effectiveness: More mirror for the money compared with equatorial-mount reflectors or refractors.
Because of this balance, Dobsonians are staples for deep-sky observing—galaxies, nebulae, globular clusters—yet they also perform well on lunar and planetary targets when properly cooled and collimated. If your goal is to see spiral arms in galaxies from dark skies or split tight double stars, a well-tuned Dobsonian is a powerful companion.
In this guide, we’ll dive into the factors that determine how a Dobsonian performs, from aperture and focal ratio to mount ergonomics, collimation and cooling, and how to find objects via star hopping or digital aids. We’ll also compare popular sizes in 6-inch through 12-inch models and wrap with practical tips and a checklist for your first night out.
Aperture, Focal Ratio, and Optical Performance Explained
When choosing a Dobsonian, two numbers dominate the conversation: aperture (e.g., 6, 8, 10, 12 inches) and focal ratio (e.g., f/5, f/6, f/8). Understanding their roles helps you pick the right balance of performance, size, and accessory needs.

Artist: Anonymous
Aperture: Light Grasp and Resolution
Increasing aperture increases the telescope’s ability to gather light. A 10-inch mirror collects roughly 2.78 times as much light as a 6-inch mirror, because light grasp scales with the area of the mirror: area ∝ diameter². More light means fainter galaxies, richer globular clusters, and brighter nebulae.
Aperture also improves theoretical angular resolution, according to the Rayleigh criterion. In practice, atmospheric seeing often limits high magnification, but on steady nights, larger mirrors can reveal finer lunar and planetary detail.
Focal Length and Focal Ratio (f/number)
The focal length is the distance from the primary mirror to the focal plane. The focal ratio f/number is:
focal ratio (f/number) = focal length / apertureAt the eyepiece, three practical consequences follow.
- Magnification is determined by the eyepiece focal length:
magnification = telescope focal length / eyepiece focal length. For a given eyepiece, longer focal length telescopes produce higher magnification. - Field of view depends on the eyepiece’s apparent field and the magnification. A handy approximation:
true field ≈ apparent field / magnification. - Exit pupil is the beam of light leaving the eyepiece:
exit pupil = eyepiece focal length / f/number. Many observers aim for exit pupils between ~0.5 mm (high power) and ~6 mm (rich-field views), adjusting per target and eye.
Faster focal ratios (f/4 to f/5) offer wider fields for a given eyepiece and keep tubes shorter—great for portability and sweeping the Milky Way. Slower systems (f/6 to f/8) typically show less off-axis aberration and are more forgiving for eyepiece performance and collimation precision.
Coma and Eyepiece Considerations
Newtonian reflectors exhibit coma—off-axis star images elongate into comet-like shapes, more noticeable at fast focal ratios. At f/5 and faster, many observers use a coma corrector for sharper edge-of-field stars, especially with wide-angle eyepieces. Slower scopes (e.g., f/6–f/8) show less coma and may not need correction, depending on your sensitivity and eyepiece collection.
Because fast systems present steeper light cones, budget eyepieces can show more edge astigmatism and field curvature. If you plan a fast Dobsonian, factor in higher-quality eyepieces or a coma corrector in your budget. We discuss eyepiece strategy in Eyepieces, Finders, and Essential Accessories.
Central Obstruction and Contrast
All Newtonians have a secondary mirror that introduces a central obstruction. This slightly reduces contrast compared to an unobstructed refractor of smaller aperture. In practical visual use, the Dobsonian’s raw light grasp and resolution more than compensate, especially for deep-sky observing, and high-contrast planetary views are attainable with good optics, precise collimation, and thermal equilibrium.
Optical Materials and Cooling
Common mirror substrates include plate glass and borosilicate (e.g., low-expansion glass), with some premium mirrors using fused silica. Lower thermal expansion helps mirrors reach and maintain figure during temperature changes. Regardless of substrate, active cooling via rear fans improves performance by reducing tube currents and boundary layers. We cover practical cooling in Collimation, Cooling, and Mirror Maintenance.
Rocker Box Mounts, Bearings, and Ergonomics
The Dobsonian mount is deceptively simple: a rocker box with altitude (up-down) and azimuth (left-right) motions. The best mounts track smoothly with gentle pushes and stay put when you stop.
Bearings and Friction
Classic Dobsonians use Teflon pads riding on textured laminate (often called FRP or Formica) for controlled friction. Many modern designs employ large altitude bearings for better balance and smoothness. Look for:
- Large altitude bearings: These broaden the contact area, improving stability and balance when switching heavy eyepieces.
- Adjustable friction or tension: Helpful if you add a finder scope or a Barlow and need to fine-tune balance.
- Stable azimuth motion: A smooth, consistent azimuth bearing is crucial for high-power planetary tracking.
Solid-Tube vs Truss or Collapsible Designs
Dobsonians come in two broad flavors:
- Solid-tube: Simpler, often more affordable, and faster to set up. In sizes up to 8–10 inches, they’re manageable in most cars. They shield optics from stray light and dew better than open trusses.
- Truss or collapsible: Break down into compact components for easier transport at larger apertures (10–16 inches and beyond). They require more setup, shrouds, and attention to collimation stability.
Artist: JamesStewart669
If you anticipate regular travel to dark sites, a truss design can make a 12-inch or larger mirror practical. If you prefer minimal setup, a solid-tube 6–8 inch is hard to beat.
Eyepiece Height and Observer Comfort
Ergonomics matter. The best telescope is the one you actually use, night after night.
- Eyepiece height at zenith: This dictates whether you’ll need a chair or step stool. A chair is highly recommended for steady views.
- Balance with accessories: Large finders, binoviewers, or heavy eyepieces shift the center of gravity. Adjustable altitude bearings or counterweights help.
- Base weight and carry points: Look for handholds, detachable bearings, or bases that split for easier transport.
Pro tip: Pair your Dobsonian with an adjustable observing chair. Comfort extends your observing sessions and noticeably improves what you see at the eyepiece.
Remember to cross-reference ergonomics with your planned aperture in 6-inch vs 8-inch vs 10-inch vs 12-inch Dobsonians, where we quantify portability and use cases.
Collimation, Cooling, and Mirror Maintenance
Newtonian reflectors reward small adjustments. Good collimation and proper thermal management can make your scope perform a class above what its price tag suggests.
Essentials of Collimation
Collimation aligns the optical elements so that the optical axis is straight and focused. For a Dobsonian, this involves: centering the secondary under the focuser, adjusting secondary tilt to point at the primary’s center mark, and setting the primary’s tilt so the focal plane sits square to the focuser.
Helpful tools:
- Collimation cap or sight tube: Simple, budget-friendly, and effective with practice.
- Cheshire eyepiece: Enhances visibility of the primary center mark and secondary alignment.
- Laser collimator: Fast and intuitive; consider the “Barlowed laser” technique for accurate primary mirror tilt.

Artist: Morn
Always collimate with the scope near the altitude at which you’ll observe, especially for larger truss scopes where gravity can flex structures slightly. If you’re new to the process, practice during the day. For deep-sky visual use, a few minutes of careful alignment pays major dividends.
Thermal Equilibrium and Cooling Fans
Mirrors and tubes radiate heat, creating turbulent air currents that soften images—often mistaken for poor optics. A small rear fan pulling or pushing air reduces the boundary layer over the mirror and helps it reach ambient temperature. Open truss designs exchange heat faster; solid tubes may benefit from front vents or side fans in larger apertures.
- Allow cool-down time: Plan at least 30–60 minutes for 8–10 inch mirrors if the outdoor temperature differs significantly from indoors.
- Use a gentle fan: Low vibration is essential. Rubber isolation mounts help.
- Shield from wind: Wind shakes images. Use a windbreak or observe on calmer nights for high-power planetary viewing.
Cleaning and Protecting Mirrors
Primary mirrors typically carry aluminum coatings with a protective overcoat. They don’t need frequent cleaning—only when dust and films noticeably reduce contrast. When you do clean:
- Remove the mirror carefully from its cell, noting orientation and supports.
- Rinse with distilled water to remove dust.
- Gently wash with a mild detergent solution and clean cotton balls lightly dragged across the surface.
- Rinse thoroughly with distilled water; allow to air dry tilted.
Store the telescope with caps on, use a shroud for truss designs, and consider a dew heater or shield if you observe in humid environments. Dew control also applies to finders and eyepieces.
For specific maintenance intervals and accessory decisions, see Eyepieces, Finders, and Essential Accessories and the practical advice in Field Use Tips and a Night-Under-the-Stars Checklist.
Finding Objects: Star Hopping, Push-To, and GoTo
One of the joys of a Dobsonian is the hands-on star-hopping experience—sweeping the sky and learning constellations. But digital aids can dramatically reduce the time it takes to land on faint targets.
Star Hopping
Star hopping uses naked-eye or finder patterns to guide you from a known star to your target. It cultivates sky familiarity and requires minimal electronics.
- Finder types: A red-dot finder (RDF) or reflex sight is ideal for the initial aim; a right-angle correct-image (RACI) optical finder excels for the fine hop.
- Charts and apps: Printed atlases and mobile apps both work. Dim your device to preserve night vision.
- Dark adaptation: Give your eyes time to adapt; an observing hood or shroud helps block stray light.
Push-To (Digital Setting Circles)
Push-to systems mount encoders on the altitude and azimuth axes and connect to a handheld controller or smartphone app. After a brief alignment, you select a target, and the display shows arrows indicating where to push the scope.
Advantages over pure manual use:
- Rapid acquisition of faint or obscure targets in light pollution.
- No motors—preserves the silent, low-power Dobsonian experience.
- Integrates with star charts and observing lists.
GoTo Dobsonians
GoTo variants motorize both axes for automatic slewing and tracking. Tracking keeps objects centered at high power, which is valuable for planetary and double-star observing or for outreach. Trade-offs include higher cost, greater complexity, and reliance on power.
Consider your observing style: If you relish manual control and simplicity, stick with classic or push-to. If you want automated pointing and tracking, GoTo can be compelling—just budget for a battery and learn the alignment routine.
Weigh these choices alongside optical and ergonomic factors discussed in Aperture, Focal Ratio, and Optical Performance and Rocker Box Mounts, Bearings, and Ergonomics.
Eyepieces, Finders, and Essential Accessories
An eyepiece set matched to your focal ratio unlocks your Dobsonian’s potential. While you can start with one or two eyepieces, a small, well-chosen set covers low, medium, and high power.
Planning an Eyepiece Set
Build around exit pupil and magnification steps. Many observers aim for roughly 1.4–1.6× spacing in magnification. A practical trio:
- Low power wide-field: For framing large nebulae and star fields. Exit pupil ~4–6 mm.
- Medium power: For galaxies, clusters, and general purpose. Exit pupil ~2–3 mm.
- High power: For planetary, lunar detail, and splitting doubles on steady nights. Exit pupil ~0.5–1 mm.
Use the formula from Aperture, Focal Ratio, and Optical Performance to translate exit pupils into eyepiece focal lengths for your scope:
eyepiece focal length ≈ exit pupil × f/numberExample: At f/6, a 30 mm eyepiece yields a 5 mm exit pupil (30/6). A 12 mm eyepiece gives ~2 mm, and a 6 mm gives ~1 mm.
Apparent Field and Eye Relief
Wider apparent fields make manual tracking more comfortable, especially at high power. Eye relief matters for comfort, particularly if you wear glasses. At fast focal ratios, better-corrected eyepieces maintain sharpness near the edge; at f/6–f/8, many mid-priced eyepieces perform well.
Barlows, Coma Correctors, and Filters
- Barlow lens: Doubles or triples magnification using your existing eyepieces—cost-effective for high power.
- Coma corrector: Valuable at f/5 and faster for edge sharpness with wide fields. Tune spacing per manufacturer guidance.
- Narrowband and UHC filters: Enhance nebula contrast under light pollution. An OIII filter can be transformative for planetary nebulae and some supernova remnants.

Artist: DrCruse
Finders and Aiming Aids
A reflex sight aligns the scope with a naked-eye star. A RACI finder lets you star hop with a right-side-up, left-right correct view, matching charts. Many observers mount both: use the reflex to land in the neighborhood, then the RACI to hop precisely.
Other Essentials
- Observing chair: Enhances steadiness and comfort.
- Dew control: Dew shields or gentle heaters for finders and eyepieces; truss shrouds to reduce stray light and dew.
- Red flashlight: Maintains night vision while reading charts.
- Cooling fan: As discussed in Collimation, Cooling, and Mirror Maintenance, reduces thermal turbulence.
- Collimation tools: Cap, Cheshire, or laser to keep optics tuned.
6-inch vs 8-inch vs 10-inch vs 12-inch Dobsonians
Selecting aperture is the central decision for most buyers. The following comparisons describe common use cases and trade-offs. Keep in mind local conditions: light pollution, seeing, storage, transport, and your back.
6-inch (150 mm)
A 6-inch f/8 solid-tube Dobsonian is a classic beginner’s scope: light, fast to set up, and forgiving. It resolves the moons of Jupiter, Saturn’s rings, the lunar terminator in striking detail, and shows bright Messier objects from suburban skies. At dark sites, it reveals structure in brighter nebulae and some galaxies.
- Pros: Easy to carry, cools quickly, inexpensive, minimal collimation fuss, forgiving of eyepieces.
- Cons: Limited reach on faint galaxies and small planetary nebulae; you’ll crave more aperture under dark skies.
8-inch (200 mm)
An 8-inch Dobsonian is arguably the best all-around first scope. It represents a meaningful step up in light grasp from 6 inches and still fits across a back seat. f/6 is common, balancing portability, eyepiece performance, and coma.
- Pros: Excellent deep-sky capability; still manageable by one person; supports higher magnifications for lunar/planetary detail on good nights.
- Cons: Heavier base and tube than a 6-inch; may require a small cart for longer carries.
10-inch (250 mm)
At 10 inches, galaxies and globulars take on a new life, with spiral structure more often visible in dark skies and many more NGC objects within reach. Cooling and collimation become more critical, and the base grows heavier. f/5 is common, which invites consideration of a coma corrector for wide-field work.
- Pros: Substantial deep-sky performance; open clusters sparkle; planetary views impress when seeing cooperates.
- Cons: Bulk and weight may limit spontaneous observing; more sensitive to eyepiece quality and collimation precision.
12-inch (300 mm)
A 12-inch is a doorway to serious deep-sky observing. Truss or collapsible designs mitigate size; solid tubes are bulky. This aperture begins to show intricate detail in many galaxies, resolves more stars in globular clusters, and reveals subtle planetary nebula structures. Thermal management and balance are important.
- Pros: Dramatic step up in faint-object reach and resolution; a lifetime visual instrument for many observers.
- Cons: Transport and storage require planning; setup time increases; eyepiece height may call for a small step at zenith.
When comparing, also revisit Rocker Box Mounts, Bearings, and Ergonomics to ensure the base and bearings suit your observing style, and consider your eyepiece plan from Eyepieces, Finders, and Essential Accessories for the chosen focal ratio.
Field Use Tips and a Night-Under-the-Stars Checklist

Artist: Bin im Garten
The difference between an okay night and a great night often comes down to preparation and a few practical habits. This section distills field-tested guidance.
Before You Go
- Plan targets: Build a list appropriate to your sky and aperture. Include a mix of easy and challenging objects.
- Charge devices: If using push-to or GoTo, charge batteries or bring a power bank. Load charts offline in case of weak signals at dark sites.
- Check conditions: Transparency and seeing differ. Plan high-power planetary work when seeing is steady; chase faint galaxies on transparent nights.
- Pack strategically: Eyepieces in a case, collimation tools, red light, dew gear, chair, shroud (for truss), and fan power.
Setup and Alignment
- Level the base: Especially helpful for push-to and GoTo alignment accuracy.
- Assemble carefully: For truss scopes, hand-tighten hardware consistently to preserve collimation.
- Collimate: Use your preferred tool; aim for repeatable alignment.
- Cool the mirror: Start the fan early; observe bright, low-power objects while the scope equilibrates.
Observing Technique
- Use averted vision: Look slightly off-axis to engage rod cells—crucial for faint fuzzies.
- Vary magnification: Some galaxies pop at low power, others reveal detail when the sky background darkens at higher power.
- Shield stray light: Use a hood or shroud to improve contrast, especially in suburban settings.
- Log observations: Notes and sketches help you see more and track progress; they also inform future target lists.
Checklist: A Minimal Yet Complete Kit
- Dobsonian base and OTA (tube or truss components)
- Collimation tool (cap, Cheshire, or laser)
- Eyepieces covering ~5 mm, ~2–3 mm, and ~1 mm exit pupil
- Optional Barlow and, for fast scopes, a coma corrector
- Reflex finder + RACI optical finder
- Red flashlight with adjustable brightness
- Observing chair
- Dew control (shields/heaters as needed)
- Rear fan and batteries/power source
- Printed atlas or offline app charts
For tuning and ongoing care, cross-reference this list with Collimation, Cooling, and Mirror Maintenance, and keep your upgrade priorities aligned with your goals in Budget, Value, and When to Upgrade.
Budget, Value, and When to Upgrade
Dobsonians are budget champions, but smart allocation still matters. Think in terms of system, not just scope.
Where to Spend
- Aperture first: Within reason, put funds toward the largest scope you will regularly use and can comfortably transport.
- Eyepieces matched to focal ratio: Particularly important for fast scopes; a single well-corrected wide-field eyepiece can transform your experience.
- Finder setup: Reflex + RACI is a highly effective combo for manual users.
- Thermal control: A quiet fan is inexpensive and high-impact.
When to Upgrade
- If you outgrow the aperture: Move from 6 to 8 inches, or 8 to 10/12 inches, especially if dark-sky trips are part of your routine.
- If you struggle to find objects: Add push-to encoders before considering a full GoTo jump.
- If edge sharpness bothers you at f/5 or faster: Invest in a coma corrector and compatible eyepieces.
- If ergonomics limit use: Consider splitting the base, switching to a truss, or adding carry handles and a cart.
Used Market Considerations
Dobsonians are often robust, and the used market can offer great value. Inspect mirrors for coating condition, check smoothness of motion, verify collimation hardware, and ensure truss connectors are solid. Minor base wear is common and usually easy to repair.
Before making any large upgrade, revisit 6-inch vs 8-inch vs 10-inch vs 12-inch Dobsonians and the practical realities in Rocker Box Mounts, Bearings, and Ergonomics.
Frequently Asked Questions
Can a Dobsonian be used for astrophotography?
Dobsonians are optimized for visual observing on alt-azimuth mounts. For long-exposure deep-sky astrophotography, equatorial tracking is typically required to avoid field rotation. However, you can take short-exposure snapshots of the Moon and planets by holding a smartphone to the eyepiece or using a planetary camera and stacking short videos. For extended deep-sky imaging, an equatorial mount with a properly guided refractor or reflector is the more conventional path.
What eyepieces do I need to start?
Start with three: a low-power wide-field eyepiece (4–6 mm exit pupil), a medium-power eyepiece (~2–3 mm exit pupil), and a high-power eyepiece (~0.5–1 mm exit pupil). Use the formula in Eyepieces, Finders, and Essential Accessories to convert to focal lengths for your telescope. A Barlow lens extends your range affordably.
Final Thoughts on Choosing the Right Dobsonian Telescope
Choosing a Dobsonian telescope is about aligning your observing ambitions with a system you’ll use often. Aperture drives what you can see; focal ratio and eyepieces shape how you see it. Smooth bearings and good ergonomics make the experience enjoyable, while collimation and thermal management elevate performance on any night.
If you’re buying your first scope, an 8-inch f/6 solid-tube Dobsonian is a famously strong choice—large enough to dazzle, small enough to use spontaneously. If you’re stepping up, a 10–12 inch with thought-out transport and cooling can become a lifetime visual instrument. Consider whether you prefer classic star hopping, the speed of push-to encoders, or the convenience of tracking with GoTo as outlined in Finding Objects: Star Hopping, Push-To, and GoTo.
Most importantly, start observing. The sky rewards time at the eyepiece—learning targets, experimenting with magnification, logging your impressions. As you grow, upgrade eyepieces, add filters, and tune your setup. For more hands-on guides, performance tips, and deep dives into gear choices, subscribe to our newsletter so you never miss a new article and can continue exploring the universe with confidence.