Table of Contents
- What Is a Dobsonian Telescope?
- Why Choose a Dobsonian for Visual Astronomy?
- Aperture, Focal Length, and Focal Ratio Explained
- Mirror Quality, Materials, Cooling, and Collimation Basics
- Dobsonian Mounts: Bearings, Motions, and Balance
- Solid-Tube vs. Truss Dobsonians and Size Trade-offs
- Eyepieces, Finders, and Must-Have Accessories
- Push-to, GoTo, and Digital Setting Circles
- Step-by-Step Collimation for a Newtonian Dobsonian
- What You’ll See: Planets, Deep-Sky, and Light Pollution
- Choosing by Budget and Experience Level
- Care, Transport, and Long-Term Maintenance
- Frequently Asked Questions
- Final Thoughts on Choosing the Right Dobsonian Telescope
What Is a Dobsonian Telescope?
A Dobsonian telescope is a Newtonian reflector mounted on a simple, stable, alt-azimuth (up-down, left-right) base made of wood or composite materials. The term “Dobsonian” refers primarily to the mounting and practical philosophy—portable, affordable, and easy to use—popularized by amateur astronomer John Dobson in the 1960s and 70s. The optical tube is a Newtonian design with a large primary mirror that gathers light, a small secondary mirror that redirects the beam, and a focuser at the side of the upper tube.

Artist: OpenStax
Dobsonians are beloved because they maximize aperture per dollar. Aperture—the diameter of the primary mirror—directly drives light-gathering power and resolving capability. With a Dobsonian, you can get a much larger mirror for the same budget compared to many other telescope designs. The result is brighter views of faint deep-sky objects and the potential for fine detail on planets when the atmosphere cooperates.
Most Dobsonians are designed for visual observing. They typically range from 6 inches (150 mm) to 16 inches (400 mm) or more in aperture. The mount is friction-based, relying on smooth bearings that allow you to nudge the telescope along as the Earth rotates. This manual approach keeps weight and cost low while delivering a very stable platform. You can add features like push-to encoders, digital setting circles, or motorized GoTo tracking if you want help finding targets or keeping them centered.
If you are new to telescopes, a Dobsonian offers a straightforward path to rewarding views. The basic setup is intuitive: place the base on level ground, drop in the optical tube, add a finder and eyepiece, and you are ready to explore. Later in this guide, we dive into critical considerations—aperture and focal ratio, mirror cooling and collimation, mount bearings, and eyepiece selection—so you can choose a Dobsonian that fits your observing goals.
Why Choose a Dobsonian for Visual Astronomy?
Dobsonians are often recommended as the best first telescope for skywatchers focused on visual observing. Here’s why:
- Value: Compared to refractors or catadioptrics of similar aperture, Dobsonians are generally more affordable, letting you step up in mirror size without stretching your budget.
- Simplicity: The alt-az base with smooth bearings is intuitive. Beginners learn to navigate the sky by hand, building valuable star-hopping skills.
- Stability: The low center of gravity and wide footprint make the view steady at high power, which is essential for lunar and planetary observing.
- Light Gathering: Larger mirrors show more deep-sky objects from dark sites and improve contrast on small, faint targets such as distant galaxies and planetary nebulae.
- Upgradeable: You can gradually add improvements such as better eyepieces, a dual-speed focuser, a cooling fan, or digital setting circles as your needs evolve.
While Dobsonians shine for visual astronomy, keep in mind they are not primarily designed for long-exposure astrophotography of deep-sky objects. The alt-az mount introduces field rotation during long exposures, complicating imaging. That said, they can be excellent for planetary imaging with a high-speed video camera—aperture helps—and for quick snapshots of the Moon. If deep-sky imaging is your main goal, consider an equatorial mount with a small refractor. If your goal is immersive, visual observing, a Dobsonian is hard to beat.
Aperture, Focal Length, and Focal Ratio Explained
Understanding a few optical terms will help you choose the right size and configuration for your Dobsonian. The most important specifications are:
- Aperture (D): The diameter of the primary mirror, typically measured in millimeters or inches (e.g., 203 mm = 8 inches). Larger aperture means more light and higher theoretical resolution.
- Focal Length (F): The distance from the primary mirror to the focal plane. Common Dobsonian focal lengths are 1200 mm (for 8-inch f/6), 1250 mm (for 10-inch f/5), 1500 mm (for 12-inch f/5), etc.
- Focal Ratio (f/number): f = F / D. For example, an 8-inch (203 mm) mirror with 1200 mm focal length is f/5.9 (~f/6). Faster telescopes (smaller f/number) have shorter tubes and wider fields; slower scopes have longer tubes and narrower fields.
Key relationships you’ll use at the eyepiece:
- Magnification (M): M = F_telescope / F_eyepiece. Example: 1200 mm telescope and a 10 mm eyepiece → 120×.
- Exit Pupil (EP): EP = F_eyepiece / f_ratio = D / M. Example: f/6 telescope with a 24 mm eyepiece → 4 mm exit pupil.
- Approximate True Field of View (TFOV): TFOV ≈ AFOV / M, where AFOV is the eyepiece’s apparent field of view (e.g., 52°, 68°). This approximation is typically good enough for choosing eyepieces.
- Theoretical resolving power: Dawes’ limit ≈ 116 / D_mm (arcseconds). Seeing (atmospheric steadiness) often limits practical resolution more than aperture does.
How do these numbers affect your experience?
- 6-inch (150 mm) f/8: Long tube, forgiving collimation, great on the Moon and planets, portable, but limited on faint galaxies and globular clusters compared to larger apertures.
- 8-inch (200 mm) f/6: A balanced choice for beginners—solid planetary and deep-sky performance, manageable size and weight, and commonly available accessories.
- 10-inch (250 mm) f/5: Noticeable jump in deep-sky brightness and resolution; tube and base get larger and heavier. Faster f/ratio demands more precise collimation.
- 12-inch (300 mm) f/5 or f/4.9: Significantly brighter deep-sky views; truss designs improve portability. Accessories like coma correctors and better eyepieces become more valuable.
- 14–16-inch (350–400 mm): Major light grasp for galaxies and resolving globulars; often truss/ultra-compact designs; logistics (transport, cooldown, storage) become central considerations.
Rule of thumb: choose the largest aperture you will comfortably use often. If setup is a chore, you’ll observe less. Frequency of use beats theoretical capability.
Fast focal ratios (f/4–f/5) provide wider fields for large nebulae and star clouds, but eyepieces must handle steeper light cones. Coma, an optical aberration intrinsic to Newtonians, becomes more obvious at lower f/ratios. You can reduce coma at the field edge with a coma corrector. At f/6 or slower, coma is subtler, and simple eyepiece designs still perform well.
Mirror Quality, Materials, Cooling, and Collimation Basics

Artist: The original uploader was Tmoore at English Wikipedia.
The primary mirror sets the optical foundation for your Dobsonian. Here are practical considerations that affect real-world performance:
- Figure and Smoothness: The mirror should be well-figured (parabolic for most Dobsonians) to focus light sharply. Smoothness minimizes scatter. Most modern commercial mirrors deliver good performance, but results vary; star testing at high magnification can assess quality.
- Substrate Material: Common materials include soda-lime plate glass, borosilicate (e.g., Pyrex-like) glass, and quartz. Borosilicate and quartz have lower thermal expansion, helping the mirror reach equilibrium and maintain figure as temperatures change.
- Thickness: Thinner mirrors cool faster and weigh less, but they require well-designed support cells to prevent deformation. Larger apertures increasingly benefit from engineered mirror cells and ventilation.
- Coatings: Aluminum with a protective overcoat is standard. Enhanced aluminum boosts reflectivity modestly. Over time (many years), recoating may be necessary; protect your mirror from abrasion and moisture to extend life.
Cooling matters. A mirror that is warmer than the ambient air will create internal convection currents and boundary layers, degrading contrast. Simple strategies improve performance:
- Use a small, quiet rear fan to pull or push air across the back of the primary mirror to speed cooldown and stabilize images.
- Allow time to equilibrate—often 20–60 minutes for moderate apertures; larger mirrors or big temperature drops can require longer.
- Vent the tube or shroud to encourage airflow while minimizing stray light. Truss scopes with shrouds often benefit from gentle ventilation.
Collimation—the precise alignment of the primary mirror, secondary mirror, and focuser axis—is essential for sharp focus and contrast. Faster focal ratios demand tighter collimation tolerances. You can accomplish accurate collimation with simple tools:
- Collimation cap or sight tube: Basic alignment of secondary and primary centers.
- Cheshire eyepiece: Bright reflective tool for refining primary tilt using the center spot.
- Laser collimator: Convenient, but ensure it’s collimated itself; a Barlow lens can improve primary alignment using the blurred return (Barlowed laser method).
If collimation seems daunting, don’t worry—see the step-by-step collimation guide later in this article. Once you have practiced a few times, it becomes routine and takes only a few minutes.
Dobsonian Mounts: Bearings, Motions, and Balance
The Dobsonian base is central to the observing experience. Smooth, predictable motion is key for high-magnification planetary views and relaxed deep-sky scanning. Focus on the following elements when choosing:

Credit: first uploaded on the English Wikipedia under the same filename
- Altitude Bearings: Large, semicircular bearings provide more friction area and fine control; smaller bearings may feel twitchy at high power. Teflon-on-laminate interfaces are common for buttery movement.
- Azimuth Bearing: The base typically uses Teflon pads gliding on a textured laminate. Some designs add roller or lazy-Susan bearings. Proper friction avoids overshoot when nudging.
- Balance and Springs/Counterweights: Heavy eyepieces and finders can tip the balance. Adjustable tension, springs, or movable bearings help maintain balance without resorting to makeshift counterweights.
- Stiffness and Materials: Plywood or composite panels should resist flexure. Well-braced bases preserve collimation and tracking smoothness.
- Ergonomics: Check the eyepiece height at zenith. Taller bases, adjustable chairs, and rotating upper tubes improve comfort during long sessions.
If you intend to add digital setting circles or GoTo, look for predrilled encoder mounting points or modular upgrade kits from the manufacturer. A solid, square base with consistent friction will make manual star-hopping and manual tracking much more enjoyable.
Solid-Tube vs. Truss Dobsonians and Size Trade-offs
Form factor affects portability, cooldown, and ease of use. Two main configurations dominate the Dobsonian landscape:
Solid-Tube Dobsonians
- Pros: Simple setup (drop-in tube), good light control, robust alignment, often lower cost. Great for 6–10 inches, and manageable for many 12-inch models depending on vehicle space.
- Cons: Tubes become bulky and heavy as aperture increases. A 12-inch solid tube can be long and awkward to maneuver through doorways or up stairs.
Truss or Collapsible Dobsonians
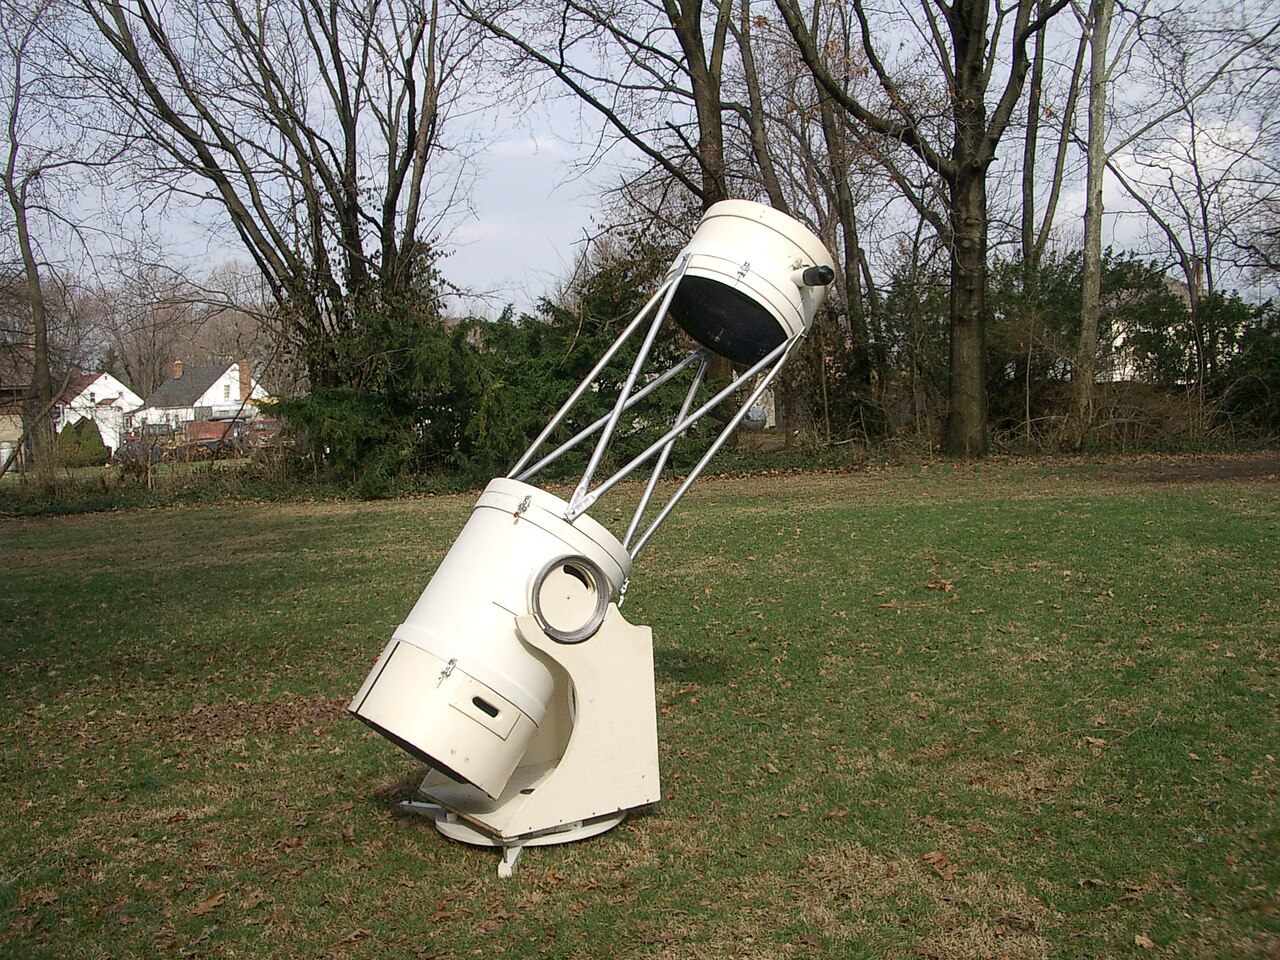
Artist: JamesStewart669
- Pros: Breaks down into compact components for transport; enables very large apertures (14–20 inches and beyond); cools efficiently; eyepiece height moderated by compact designs.
- Cons: More setup steps (trusses, shroud); requires more consistent collimation; may need a light shroud to block stray light and dew.
Think carefully about your observing logistics:
- Vehicle space: Measure trunk openings and seat folds. Truss designs shine for small cars with big apertures.
- Carrying distance: Can you wheel the base and tube to the backyard, or do you climb stairs? A hand truck or wheelbarrow handles helps.
- Storage: Garages are ideal for faster temperature equilibration; indoor storage keeps dust at bay but may lengthen cooldown time outdoors.
- Observing site: If you frequently drive to dark skies, a truss scope may let you go bigger without adding hassle. If you mostly observe at home, a solid-tube scope that rolls out assembled could be perfect.
Eyepieces, Finders, and Must-Have Accessories
Your eyepiece set and finders are as important as the telescope itself. A few well-chosen accessories transform the observing experience.
Core Eyepiece Set
- Low Power, Wide Field (exit pupil ~4–6 mm): Ideal for large nebulae, star fields, and locating targets. Examples: 24–30 mm eyepiece at f/6; 30–40 mm at f/8.
- Medium Power (exit pupil ~2–3 mm): Workhorse eyepiece for galaxies, clusters, and many nebulae. Examples: 12–18 mm at f/6.
- High Power (exit pupil ~0.5–1.5 mm): For lunar/planetary detail and splitting close double stars on steady nights. Examples: 5–10 mm at f/6. Choose short focal lengths with comfortable eye relief if you wear glasses.
A Barlow lens effectively doubles or triples your eyepiece range, preserving eye relief with shorter effective focal lengths. For fast scopes (f/5 or faster), consider eyepieces with well-corrected edges and a coma corrector for the widest fields.
Finders and Aiming Aids
- Unit-Power Finder (red-dot, reflex sight): Aligns the telescope with naked-eye stars for easy star hopping; quick to zero-in on bright targets.
- Optical Finder (6×30, 8×50, or RACI): A right-angle, correct-image (RACI) finder is comfortable and presents a sky view matching star charts; bright enough to show fainter guide stars.
- Telrad or Similar Reticle Finder: Rings at known angular sizes simplify star-hops. Many charts show Telrad-ring overlays for hopping paths.
Additional Useful Accessories
- Dual-Speed Focuser: Fine focus control is invaluable at high power and with fast focal ratios. A 10:1 reduction knob helps nail the critical focus point.
- Cooling Fan: Speeds stabilization of the primary mirror (see mirror cooling).
- Observing Chair: Adjustable seat height improves steadiness at the eyepiece for higher-resolution views.
- Filters: A neutral density or polarizing filter for the Moon; narrowband and OIII filters for emission nebulae; color filters for subtle planetary contrast (optional).
- Dew Control: Dew shield or heater for the secondary and finder; absorbent cloths; keep caps handy.
- Light Shroud (for truss scopes): Blocks stray light, reduces dew, and improves contrast.
- Star Atlas/Apps: Paper atlases and mobile planetarium apps complement push-to systems and manual star hopping.
Push-to, GoTo, and Digital Setting Circles
Traditional Dobsonians are manual, but you can augment them with tools to speed up finding targets and keeping them centered.
Manual Star Hopping
Using a star atlas or an app, you hop from bright stars to fainter waypoints until you reach the target. This approach builds sky knowledge and is both effective and rewarding. Smooth motions and well-aligned finders are essential.
Push-to and Digital Setting Circles (DSCs)
Push-to systems add encoders to the altitude and azimuth axes and a handheld or app-based computer. You select an object, and arrows guide you to push the telescope until you’re on target. This maintains the classic Dobsonian feel while reducing search time under light-polluted skies.
GoTo and Tracking
Motorized GoTo Dobsonians can slew automatically to selected targets and track them as the Earth rotates. Tracking is helpful for public outreach, high-power planetary work, and sharing views. Keep in mind:
- Power: You’ll need a reliable power source (battery, power tank).
- Weight and Complexity: Motors, clutches, and electronics add weight. Alignments add setup time.
- Field Rotation: Alt-az tracking is fine for visual use. For long-exposure imaging, field rotation is a limitation; specialized field derotators or equatorial platforms are niche solutions.
Whether you choose manual, push-to, or GoTo depends on your observing style. If you love learning the sky hands-on, manual/push-to is perfect. If you want to maximize object count per session or share views with groups, a GoTo Dobsonian can be a great fit.
Step-by-Step Collimation for a Newtonian Dobsonian
Accurate collimation ensures crisp, high-contrast images. The process is systematic and repeatable. Here’s a field-friendly sequence using common tools:
Before You Start
- Confirm the primary mirror has a center spot (usually a doughnut sticker). This is your reference for aligning the primary.
- Gather tools: collimation cap or sight tube, Cheshire, and optionally a laser (preferably checked for its own collimation).
- Place the telescope on level ground with good lighting and remove the front cap.
1) Center the Secondary Under the Focuser
Using a sight tube or collimation cap, look down the focuser and center the secondary mirror’s outline under the focuser. This is a mechanical alignment step, adjusting the secondary’s position (fore-aft) and rotation so the entire primary mirror appears evenly framed in the secondary.
- Loosen/tighten the secondary’s center bolt to move it closer/farther from the primary.
- Rotate the secondary so the primary’s mirror clips look evenly placed in the view.
- Tighten gently once centered; don’t worry about tilt yet.
2) Aim the Focuser Axis to the Primary Center Spot (Secondary Tilt)
Adjust the secondary’s tilt screws so the sight-tube crosshairs or laser dot fall exactly on the primary mirror’s center spot. This aligns the focuser axis with the primary center.
- If using a laser, make sure it’s snug and not wobbling in the focuser.
- Small, iterative turns are best; ensure all screws finish snug but not overtightened.
3) Tilt the Primary to Return the Reflection
Use a Cheshire or Barlowed laser to adjust the primary mirror’s collimation bolts until the reflected center spot and Cheshire reference coincide. The goal is to center the reflection so the optical axes converge properly at the focal plane.
- Turn one primary knob at a time, watching how the reflection moves.
- Finish by gently snugging the locking bolts (if present) while maintaining collimation.
4) High-Power Star Test (Optional but Recommended)
On a steady night, defocus a bright star at high magnification and check for concentric diffraction rings inside and outside of focus. Subtle asymmetries may suggest fine adjustments. Don’t chase the seeing; practice improves your judgment.
Once you have the routine down, field collimation takes just a few minutes, particularly if you transport the scope carefully and keep the secondary’s tilt close to correct between sessions.
1. Center secondary under focuser (position/rotation)

2. Secondary tilt: aim focuser axis at primary center spot

3. Primary tilt: center return using Cheshire/Barlowed laser

4. Optional star test: verify concentricity at high power
What You’ll See: Planets, Deep-Sky, and Light Pollution
The views through a Dobsonian depend on aperture, sky conditions, collimation, and thermal equilibrium. Here’s what to expect with common sizes under typical conditions:
Planets and the Moon
- Moon: Even a 6-inch shows abundant detail—rilles, craterlets, and mare textures. High power requires steady seeing and precise collimation.
- Jupiter: 6–8 inches reveal belts, zones, festoons, and transits of the Galilean moons. 10–12 inches can show finer belt structure and subtle color gradients on steady nights.
- Saturn: Rings are obvious in any aperture. A larger Dobsonian reveals the Cassini Division, ring shadow on the globe, and multiple moons when conditions allow.
- Mars: During favorable oppositions, larger apertures (8–12 inches) show albedo features and polar caps; seeing and dust storms influence results.
Deep-Sky Objects (DSOs)
- Open clusters: Sparkling star fields benefit from wide-field eyepieces and darker skies; 8–12 inches resolve fainter members.
- Globular clusters: Aperture is transformative—8 inches begins resolving outer stars; 10–12 inches push resolution deeper; 14–16 inches present grainy cores in many clusters under dark skies.
- Galaxies: From suburban skies, bright Messier galaxies are visible but low in contrast. Dark sites unlock spiral structures in larger apertures; galaxy groups and faint companions emerge with 12–16 inches.
- Nebulae: Narrowband and OIII filters significantly improve contrast on emission and planetary nebulae. Aperture plus filters reveal texture and structure across many targets.
Light Pollution Reality Check
Light pollution reduces contrast, especially for galaxies and diffuse nebulae. Aperture still helps, but observing from a dark site can be more impactful than upgrading 2 inches of mirror at home. Consider this strategy:
- For frequent backyard use, an 8–10 inch Dobsonian is practical and rewarding on the Moon, planets, clusters, and brighter nebulae (with filters).
- Plan occasional trips to darker skies where the same scope will perform like a different instrument on galaxies and faint nebulae.
- Use filters on emission nebulae and perfect your eyepiece choices (exit pupil 2–4 mm often gives pleasing deep-sky contrast).
Atmospheric steadiness (seeing) typically limits high-power views more than optics do. On nights of poor seeing, enjoy low-medium power targets, double stars with wider separations, and expansive star fields. On steady nights, capitalize on planetary and double-star observing with higher magnifications.
Choosing by Budget and Experience Level
Rather than focus on specific brands or models, it’s useful to think in tiers of aperture and features. Your observing goals, storage, and vehicle capacity should guide you as much as your budget does.
Entry-Level and Budget-Conscious (6–8 inches)

Artist: Wutthichai Charoenburi
- 6-inch f/8: Lightweight, extremely forgiving of collimation errors, excellent planetary starter scope. Low total cost and quick cooldown.
- 8-inch f/6: The classic all-rounder. Good mirror area for deep-sky, manageable base and tube, and abundant accessory support. A smart first “serious” telescope.
- Features to prioritize: Smooth bearings, a 2-inch focuser (for wide-field eyepieces), and a decent optical finder or RACI. A simple rear fan is a bonus.
Intermediate Enthusiasts (10–12 inches)
- 10-inch f/5: Notable step up on galaxies and globulars over 8 inches; tube and base become heavier but still one-person manageable for many observers.
- 12-inch f/5: Deep-sky performance becomes impressive under dark skies. Consider truss or collapsible tubes if transport space is limited.
- Features to prioritize: Dual-speed focuser, adjustable altitude bearings/tension, and space for encoders. Better eyepieces pay off.
Advanced and Large-Aperture (14–16 inches and beyond)

Artist: Rob Teeter
- 14–16 inches: Dramatic light grasp; galaxies and planetary nebulae become rich hunting grounds. Expect more attention to transport, setup time, and cooldown management.
- Features to prioritize: Truss design with a sturdy mirror cell, shroud, primary and secondary dew control, large bearings for smooth balance, and possibly GoTo or DSCs to streamline object acquisition.
In all tiers, buy the scope you can deploy easily and often. If you can set up in minutes and observe for an hour after dinner, you’ll see more over the year than with a cumbersome instrument you rarely use.
Care, Transport, and Long-Term Maintenance
Dobsonians are rugged, but a little care goes a long way in preserving optical quality and smooth mechanics.
Transport Tips
- Use padded cases or blankets to protect the tube and base. Avoid placing heavy items on the tube or secondary cage.
- Secure the primary mirror cell for travel if your scope has transport locks. Remove heavy accessories from the focuser.
- Keep caps on both ends and cover the focuser opening to reduce dust.
- Handle bases by strong points; consider a hand truck for longer distances. For truss scopes, label truss poles for repeatable assembly.
Storage and Environment
- Store in a dry location. If kept in a garage, use breathable covers to limit dust. Avoid damp basements without dehumidification.
- Allow the telescope to reach ambient temperature before high-power viewing (see cooling).
- Periodically check the base’s hardware for tightness and the bearings for cleanliness and appropriate friction.
Cleaning Optics
- Avoid frequent cleaning; dust has minimal effect on performance. Clean only when necessary (e.g., pollen film, fingerprints).
- For the primary mirror, remove it carefully from the cell if needed. Rinse with distilled water to lift dust, use a drop of mild dish soap for oily spots, and finish with gentle distilled water rinses. Let air-dry; avoid wiping unless necessary.
- For the secondary mirror, similar principles apply, but extra caution is needed to avoid stressing the holder. Many observers clean the secondary less often.
Upgrades Over Time
- Add a dual-speed focuser to improve fine focus control.
- Install a primary mirror fan with vibration isolation mounts.
- Upgrade to a RACI finder and a high-quality low-power eyepiece.
- Consider a DSC kit for faster object acquisition under light-polluted skies.
Frequently Asked Questions
Is a Dobsonian good for astrophotography?
Dobsonians are optimized for visual observing. The alt-az mount introduces field rotation during long exposures, which complicates deep-sky imaging. You can capture excellent lunar and planetary images using short exposures or high-speed video cameras and stacking software. For deep-sky astrophotography, an equatorial mount with accurate tracking and guiding is a more suitable platform. Some advanced users add equatorial platforms or field derotators to Dobsonians, but these are niche solutions with added complexity.
Do I need a coma corrector?
Coma is an inherent off-axis aberration in Newtonian reflectors and becomes more noticeable at faster focal ratios (e.g., f/5 and below). Whether you need a coma corrector depends on your preferences and eyepiece selection. If you use wide-field eyepieces and enjoy scanning large star fields, a corrector can significantly improve edge performance on f/5 or faster scopes. At f/6 and slower, coma is less obtrusive for many observers, and simpler eyepieces often perform acceptably without correction.
Final Thoughts on Choosing the Right Dobsonian Telescope
A Dobsonian telescope offers a direct, engaging path into the night sky, emphasizing aperture, simplicity, and value. To make a confident choice, start with your reality: where you’ll observe, how you’ll transport and store the instrument, and which celestial targets inspire you. Then apply the key principles in this guide:
- Pick the largest aperture you will use often. An 8–10 inch is a sweet spot for many, while 12–16 inches open up deep-sky riches if you can manage the logistics.
- Match focal ratio to your preferences. Faster scopes give wider fields but demand better collimation and eyepieces; f/6 is a forgiving all-rounder.
- Prioritize smooth, balanced motions. Ergonomics, bearing quality, and adjustable tension matter as much as optics during real observing.
- Make collimation a habit. A few minutes of alignment pays off with crisp, high-contrast images.
- Invest gradually in a focused eyepiece set, finders, and simple upgrades like a cooling fan and observing chair.
With a well-chosen Dobsonian, the Moon and planets become detailed worlds, star clusters turn into diamond fields, and faint galaxies emerge from the background of space—especially under dark skies. If this guide helped clarify your next steps, explore our other in-depth articles on visual observing and equipment, and subscribe to our newsletter to get future guides, observing tips, and seasonal targets delivered to your inbox.