Table of Contents
- What Is a Dobsonian Telescope and Why Choose One?
- Aperture, Focal Ratio, and Optical Performance in 8-Inch Dobs
- Buying Checklist: Mirrors, Mount, Finders, and Focusers
- Setup, Collimation, and Thermal Management for Sharp Views
- Eyepiece and Filter Strategy for an 8-Inch f/6 Telescope
- Finding and Tracking Targets: Star-Hopping, Push-to, and DSCs
- Understanding Dobsonian Mount Motions, Balance, and Upgrades
- Observing Targets and What to Expect: Moon, Planets, and Deep-Sky
- Coping with Light Pollution, Seeing, and Transparency
- Care, Cleaning, and Transport of a Dobsonian
- Can You Do Astrophotography with a Dobsonian? A Reality Check
- Frequently Asked Questions
- Final Thoughts on Choosing the Right 8-Inch Dobsonian Telescope
What Is a Dobsonian Telescope and Why Choose One?
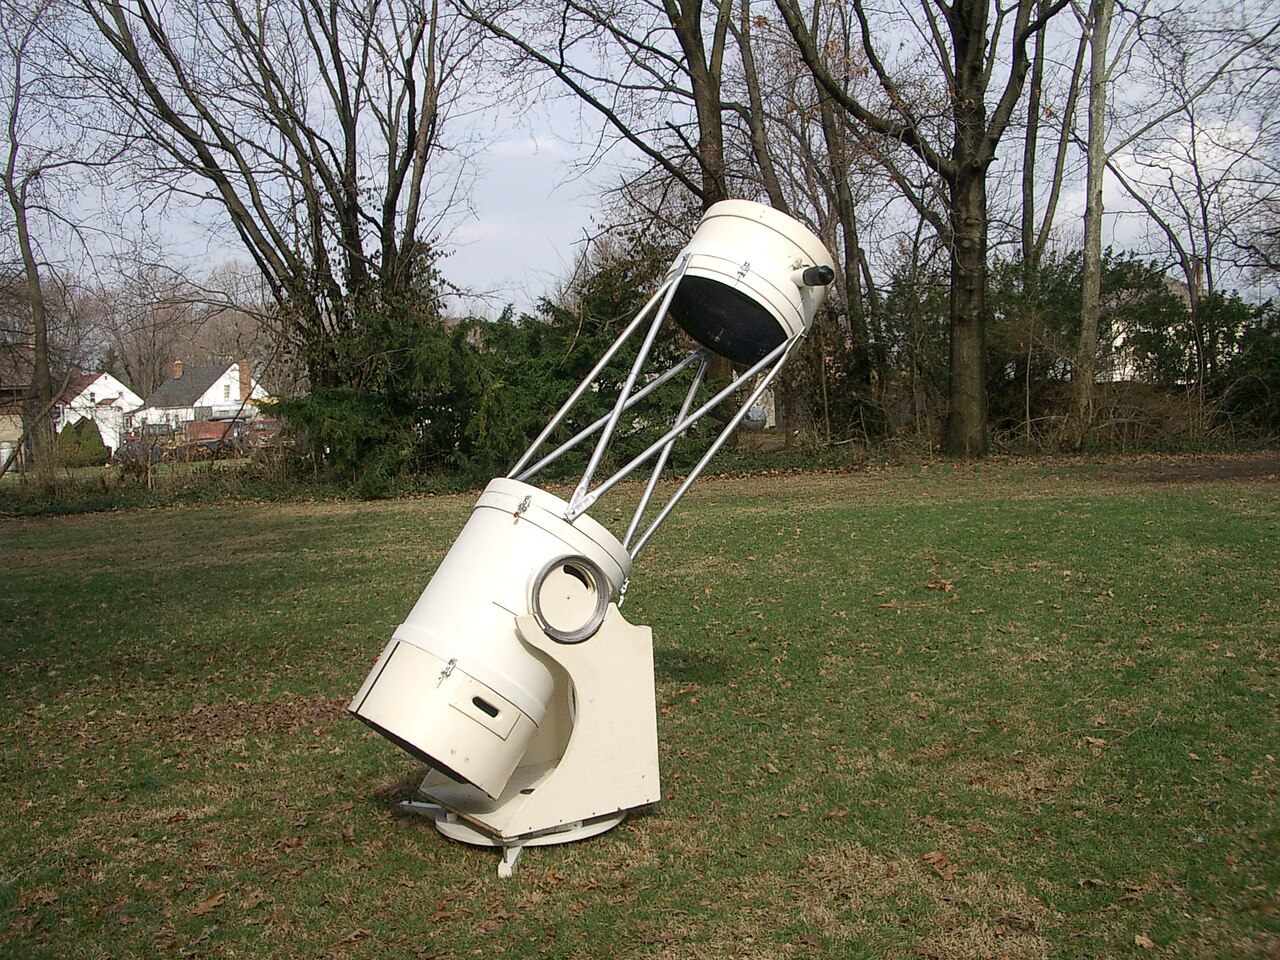
The Dobsonian telescope is a Newtonian reflector mounted on a simple, stable, alt-azimuth base. Popularized by John Dobson in the 1960s and 70s, its design emphasizes large aperture per dollar, ease of use, and portability. The 8-inch (203 mm) Dobsonian is often considered a sweet spot for visual observers: it gathers enough light to make galaxies, nebulae, and star clusters come alive, while remaining compact and affordable enough to be a one-person setup.

At its heart, a Dobsonian uses a parabolic primary mirror to collect light and focus it onto a small flat secondary mirror, which redirects the light to the focuser at the side of the tube. Because the mount is a low, wooden or composite “rocker” box, the scope moves in altitude (up/down) and azimuth (left/right). This manual motion—smooth and intuitive—lets you sweep the sky and track objects with gentle nudges. For many observers, the simplicity of this setup removes friction between the observer and the sky.
Why choose an 8-inch Dobsonian?
- Aperture advantage: An 8-inch gathers roughly four times the light of a 4-inch refractor, revealing faint deep-sky objects (DSOs) that smaller instruments struggle with. This ties directly to the optical performance you can expect.
- Value and versatility: You get impressive lunar and planetary views, detailed double-star splitting, and deep-sky reach in a single, budget-friendly package.
- Ease of use: Setup is fast. There are no power requirements for the mount, no alignment routines, and no firmware to learn.
- Upgradeable: You can add digital setting circles (DSCs), better bearings, a dual-speed focuser, and fans to improve performance over time. See mount motions and upgrades.
Potential trade-offs are important to note:
- Manual tracking: You must keep objects centered by hand. This is easy at low power but more demanding at high magnification.
- Collimation: Reflectors need occasional alignment for best performance. Fortunately, collimation is straightforward with practice (see collimation steps).
- Astrophotography limitations: Visual Dobsonians on alt-az mounts are not optimized for long-exposure deep-sky imaging. However, planetary imaging and electronically assisted astronomy (EAA) are possible with caveats (see astrophotography realities).
If your goal is maximizing what you can see visually—especially from darker skies—an 8-inch Dobsonian is one of the most compelling, practical choices in amateur astronomy.
Aperture, Focal Ratio, and Optical Performance in 8-Inch Dobs
Optical performance in a Newtonian is governed by aperture, focal length, focal ratio, mirror quality, and the state of collimation and thermal equilibrium. Let’s break down what these mean for an 8-inch Dobsonian.

Light-gathering power and brightness
Light-gathering power scales with the area of the primary mirror. Compared to the fully dark-adapted human eye (roughly a 7 mm pupil), an 8-inch (203 mm) mirror has an area over 800 times greater, though central obstruction and reflectivity losses reduce the effective light throughput. Practically, this means:
- Star clusters explode into countless pinpoints.
- Nebulae show structure with the aid of filters (see eyepiece and filter strategy).
- Galaxies become accessible—especially from darker skies (see observing expectations).
Resolution and contrast
Diffraction-limited resolving power is often estimated by the Dawes limit: 116 / D(mm), which for a 203 mm aperture is about 0.57 arcseconds. Atmospheric seeing typically limits real-world resolution to 1–3 arcseconds on many nights, so the telescope’s theoretical resolution far exceeds what the atmosphere permits most of the time. Still, the extra aperture helps by brightening the image at a given magnification, making fine detail more readily visible under steady skies.
Central obstruction from the secondary mirror (often around 20–25% of the primary diameter in Newtonians) slightly reduces contrast at the highest spatial frequencies. In practice, with good collimation and thermal equilibrium, an 8-inch f/6 delivers crisp, high-contrast views of lunar and planetary detail.
Focal ratio and coma
Most 8-inch Dobsonians are around f/6 (approximately 1200 mm focal length). This is a forgiving focal ratio for eyepieces, collimation, and edge-of-field aberrations. At f/6:
- Coma—an off-axis aberration intrinsic to parabolic mirrors—is mild visually and usually not objectionable for visual observers.
- Collimation tolerances are reasonable; simple tools work well (see collimation).
- Eyepiece performance is friendlier than at faster focal ratios (e.g., f/4–f/5), where premium eyepiece designs and coma correctors become increasingly beneficial.
Magnification, exit pupil, and field of view
Key relations:
Magnification = Telescope Focal Length / Eyepiece Focal LengthExit Pupil = Eyepiece Focal Length / f-ratio(equivalently,Aperture / Magnification)True Field ≈ Apparent Field / Magnification(approximate; exact value depends on field stop)
At 1200 mm focal length, typical choices might be:
- 30–32 mm eyepiece ⇒ ~37–40×, ~5 mm exit pupil, sweeping wide fields and large nebulae.
- 18–20 mm ⇒ ~60–67×, ~3 mm exit pupil, excellent for many galaxies and clusters.
- 9–12 mm ⇒ ~100–133×, ~1.5–2 mm exit pupil, a go-to for detailed DSOs and lunar/planetary viewing.
- 5–7 mm ⇒ ~171–240×, ~0.8–1.2 mm exit pupil, for planetary/lunar fine detail on steady nights.
These numbers guide the eyepiece set recommended in eyepieces and filters. Note that the atmosphere sets a practical ceiling on magnification most nights, often around 150–250× for planetary work.
Buying Checklist: Mirrors, Mount, Finders, and Focusers
An 8-inch Dobsonian is simple in concept but varies in execution. Before you buy, evaluate these components and features:
Primary mirror quality
- Figure and polish: Look for a parabolic primary mirror with a smooth figure. Reputable mass-market manufacturers typically meet good optical standards for visual use.
- Substrate: Plate glass is common and performs well when cooled; low-expansion glass (e.g., borosilicate) can be more thermally stable but is not essential for solid-tube 8-inch Dobs.
- Coatings: Standard aluminum coatings with protective overcoat are typical; enhanced reflectivity options exist but are not required for excellent visual performance.
Secondary mirror and spider
- Secondary size: Usually sized to fully illuminate the field for visual use; typical obstruction is around 20–25% of the primary’s diameter.
- Spider: Thin-vane spiders reduce diffraction but must remain rigid. Standard 4-vane designs are robust and common.
Focuser
- Crayford vs. rack-and-pinion: Many 8-inch Dobs ship with 2-inch Crayford focusers for smooth, backlash-free focusing.
- Dual-speed option: A 10:1 fine-focus knob is helpful at high magnifications and for critical planetary focusing.
- Adapters: Ensure you have a 2″ to 1.25″ adapter for common eyepieces and accessories.
Mount and bearings
- Altitude bearings: Large, smooth bearings help maintain balance across a broad range of eyepiece weights. Adjustable tension can be helpful.
- Azimuth motion: Teflon-on-laminate (often known as “Ebony Star”-style laminate) provides smooth rotation with the right stiction. See mount motions for more on friction tuning.
- Base construction: Many mass-market bases are engineered wood (MDF/particle board). They are fine if kept dry; reinforced or sealed edges resist swelling from moisture.
Finders and alignment aids
- Red-dot or reflex finder: Excellent for quick pointing and star-hopping with charts or apps.
- Optical finder: A right-angle correct-image (RACI) 8×50 is popular for comfortable, magnified views that match star charts.
- Combination: Many observers use both a reflex finder for initial pointing and a RACI for fine hops to faint targets (see finding and tracking).
Accessories and tools
- Collimation tools: A collimation cap or Cheshire/sight tube is sufficient for f/6. A well-collimated laser is convenient but should be used carefully (see collimation).
- Cooling fan: A small fan behind the primary speeds thermal equilibration, especially on nights with large temperature swings.
- Eyepieces: Mass-market packages often include a single 25–30 mm eyepiece. Budget for a mid-power and a high-power eyepiece (see eyepiece strategy).
- Shroud/light shield: For open-tube designs or in bright local light, a shield can improve contrast.
Weight and portability
Typical 8-inch solid-tube Dobsonians break down into a tube assembly and a base. Depending on brand and materials, the optical tube often weighs on the order of 9–12 kg (20–26 lb) and the base around 10–15 kg (22–33 lb). Many observers carry the tube and base separately for setup. If you need to navigate stairs or long distances, consider a hand truck or a lighter, truss-style variant. For vehicle transport, a typical 8-inch solid tube fits across the back seat of a sedan and the base in the trunk; always secure with straps.
Support, warranty, and community
- Vendor support: A responsive seller that answers questions and supplies spare parts is valuable.
- Warranty: Mirrors and mechanics should be covered by a reasonable warranty.
- Community: Local astronomy clubs and online forums provide guidance, observing lists, and collimation help.
Setup, Collimation, and Thermal Management for Sharp Views
Getting the most from an 8-inch Dobsonian hinges on proper setup, accurate collimation, and managing temperature differences between the mirrors and ambient air.
Quick setup routine
- Carry the base to the observing spot and level it roughly. Leveling is not critical for operation, but a stable, flat surface improves smooth motion.
- Place the tube in the cradle or on the altitude bearings and secure any clamps or tension knobs.
- Attach a battery pack to the rear fan if you have one. Turn it on for the first 15–30 minutes.
- Insert your lowest-power eyepiece (e.g., 30 mm) and check finder alignment on a distant terrestrial object before dark if possible.
Collimation essentials
Collimation aligns the optical elements. At f/6 it is forgiving, but still worth doing carefully. A typical routine:

- Secondary alignment: Use a sight tube or collimation cap. Center the secondary mirror under the focuser; make it look round. Adjust the secondary’s position (fore/aft and rotation) so the primary mirror appears centered in it.
- Primary tilt: With a Cheshire or a properly collimated laser, adjust the primary mirror’s collimation screws until the reflected center spot (often a donut sticker on the primary) is centered in the tool’s reference.
- Star test check: On a medium-bright star at high power, slightly defocus inside and outside focus. Concentric rings should be centered and similar; if not, tweak the primary tilt gently and recheck.
Tips:
- Always make small adjustments and recheck. Tighten opposing screws as needed to maintain tension.
- Ensure the laser collimator itself is collimated if you use one—some inexpensive units arrive misaligned.
- Collimate after transporting the telescope; solid tubes often hold collimation well for subsequent sessions.
Thermal equilibrium and image quality
When mirrors are warmer than ambient air, convection currents and boundary layers degrade sharpness. To help the telescope reach thermal equilibrium:
- Run the rear fan for 15–45 minutes depending on the temperature delta.
- If your secondary dew-shields easily, consider a small dew heater or light shield in humid conditions.
- Avoid observing above rooftops or heat sources; local seeing can be poor due to rising warm air.
On nights with rapidly dropping temperatures, you may see gradual improvement over the first hour as the scope cools. Patience pays dividends—especially for high-power planetary and double-star work.
Eyepiece and Filter Strategy for an 8-Inch f/6 Telescope
An intentional eyepiece set reveals what your 8-inch can do across the entire sky. You do not need a large collection to see a lot—just a few thoughtfully chosen focal lengths and a couple of filters.
Core eyepiece set
- Low power (30–32 mm, 2-inch): ~37–40×, ~5 mm exit pupil. For large nebulae, Milky Way scanning, big open clusters, and messy star fields.
- Medium power (18–20 mm): ~60–67×, ~3 mm exit pupil. A workhorse for many DSOs—globular clusters start to resolve, galaxies show shape, and nebulae respond to filters.
- Medium-high power (12–14 mm): ~86–100×, ~2 mm exit pupil. Great for contrast on smaller galaxies and planetary nebulae; also lunar detail.
- High power (6–7 mm): ~171–200×, ~1–1.2 mm exit pupil. Planetary belts, lunar rilles, and tight double stars on steady nights.
A 2× Barlow lens can double the effective focal length of each eyepiece (e.g., a 12 mm becomes a 6 mm), reducing how many eyepieces you need. Zoom eyepieces (e.g., 8–24 mm) offer flexibility; pairing a zoom with a 2× Barlow gives you fine coverage of medium to high powers.
Apparent field of view (AFOV) and comfort
Wider AFOV designs (68°–82°) provide space-walk views and more drift time before you need to nudge the scope—useful for manual tracking. Narrower fields (50°–60°) can be sharp and comfortable, often at lower cost. Eye relief matters if you wear glasses; look for long eye relief models if you keep glasses on to correct astigmatism.
Filters: what helps and when
- UHC (Ultra-High Contrast): A narrowband filter that enhances emission nebulae by transmitting strong nebular lines (like O III and H-beta) while rejecting much of the background light. Very effective under both suburban and dark skies.
- O III: An even narrower filter emphasizing doubly ionized oxygen lines, excellent for planetary nebulae and supernova remnants (e.g., the Veil). Often darker than a UHC; use on specific targets.
- Neutral density (ND) or variable polarizer: For comfortable lunar observation, dimming glare without altering color balance.
- Broadband “light-pollution” filters: Limited benefit on galaxies and reflection nebulae; they do not restore dark-sky conditions. For many DSOs, especially galaxies, darker skies and good observing conditions help far more than any filter.
Coma correctors and visual use
At f/6, coma is typically modest for visual observers. A coma corrector can improve edge sharpness with very wide-field eyepieces, but it is optional. If you later pursue imaging paths such as planetary or EAA, correctors or adapters might be part of that toolkit, but start with the basics first.
Finding and Tracking Targets: Star-Hopping, Push-to, and DSCs
Locating objects is part of the joy of using a Dobsonian. Whether you prefer classic star-hopping or modern aids, your 8-inch can get on target quickly with practice.
Align your finder
Before dark, point the scope at a distant terrestrial object and center it in a low-power eyepiece. Then adjust your red-dot or RACI finder to align on that same object. After dusk, refine alignment on a bright star. A combination of a reflex finder and a RACI is practical and fast.
Star-hopping fundamentals
- Use charts/apps: A printed atlas or an astronomy app with a red-light mode lets you plan hops from bright stars to faint targets.
- Break hops into segments: Move from an obvious star to an asterism, then to a smaller pattern near your target.
- Match the view: With a RACI finder, the view is upright and correct left–right, matching typical charts. Use low power in the eyepiece to verify star patterns.
Push-to aids and digital setting circles (DSCs)
Push-to systems add encoders and a handset or app to guide your manual motions. They do not motorize the scope; instead, arrows on a display guide you where to push. This preserves Dobsonian simplicity while speeding up object acquisition—useful during outreach or in light-polluted skies where faint guide stars are scarce. Many aftermarket kits are compatible with common 8-inch bases and can be combined with balance and friction tweaks described in mount motions and upgrades.
Tracking by hand
At low to medium power, objects drift slowly and require only occasional nudges. At high power—especially for planets—develop a light touch:
- Use both hands to nudge smoothly in altitude and azimuth.
- Watch for the moment of best seeing as detail snaps into view.
- Consider a comfortable observing chair; steadier posture reduces overcorrection.
Understanding Dobsonian Mount Motions, Balance, and Upgrades

The classic Dobsonian mount owes its usability to the right balance of friction and smoothness. Properly tuned motions make manual tracking a pleasure.
Bearings, friction, and smoothness
- Azimuth: Teflon pads gliding on a textured laminate are a time-tested pairing. The surface should provide enough stiction to resist wind gusts but not so much that small corrections are jerky.
- Altitude: Large bearings distribute load and keep balance manageable across different eyepiece weights. Adjustable tension springs or clutches help when swapping heavy accessories.
Some users experiment with materials to fine-tune friction. The goal is always the same: smooth starts and stops, no stick–slip, and predictable movement.
Balance and counterweights
Heavy eyepieces, binoviewers, or finder combinations can shift balance forward. Solutions include:
- Adjustable altitude bearing position (if available).
- Sliding counterweights on the tube or magnetic weights on the mirror box.
- Adding small friction via tension knobs to resist nose-diving.
Upgrades to consider later
- Dual-speed focuser: Precise focusing at high power becomes easier.
- DSCs: Accelerate object acquisition during short sessions.
- Cooling fan baffle: Directs airflow across the mirror’s boundary layer to stabilize images faster.
- Wheelbarrow handles or a hand truck: Easier backyard deployment for heavier bases.
- Equatorial platform: Adds tracking for visual comfort and short exposures (see astrophotography).
Observing Targets and What to Expect: Moon, Planets, and Deep-Sky
What can you actually see with an 8-inch Dobsonian? A lot—within the bounds of physics, atmosphere, and sky brightness. Setting realistic expectations makes the first view even more rewarding.
The Moon
Even from bright urban skies, the Moon is spectacular. At 150–200× on steady nights, you can study craters, rilles, domes, wrinkle ridges, and the complex terracing of large impact features. A variable polarizer improves comfort during gibbous and full phases. For subtle low-angle lighting on crater rims, observe near the terminator (the day–night boundary). Try high power with a 6–7 mm eyepiece for razor-sharp detail when seeing cooperates.
Planets
- Jupiter: Cloud belts, festoons, the Great Red Spot (timing helps), and transiting shadows of the Galilean moons. During excellent seeing, barges and subtle texture become apparent at 150–250×.
- Saturn: Ring system with Cassini Division, equatorial banding, and several moons. On the steadiest nights, hints of the Encke minima and delicate ring shading can appear.
- Mars: At favorable oppositions, dark albedo features and polar caps are visible. Atmospheric dust events can obscure detail; patience and repeated observations help.
- Venus and Mercury: Phases are easy; surface detail is not visible visually.
Double stars
An 8-inch resolves many tight pairs in good seeing. Start with classic showcase doubles to refine focusing and judging seeing. High magnification and steady air are key—reference the resolution limits and let the image settle between gentle nudges.
Star clusters
- Open clusters: Glittering asterisms across the Milky Way become showpieces at low and medium powers. A 30–32 mm eyepiece frames many of them beautifully.
- Globular clusters: At 120–200×, many Messier globulars begin to resolve into countless stars with a bright, granular core and a halo of speckled members.
Nebulae
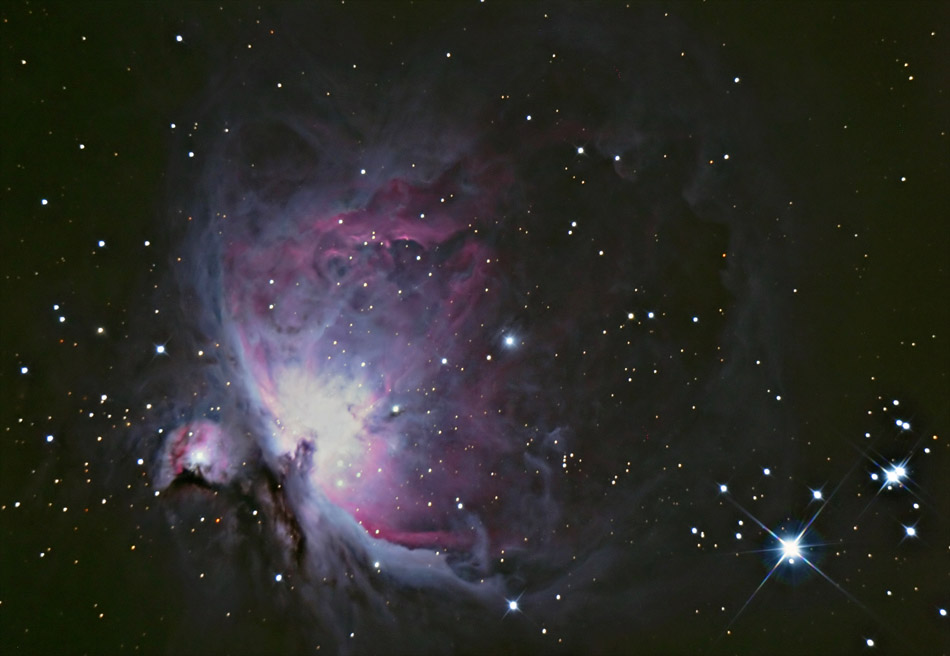
Emission nebulae respond strongly to UHC and O III filters. The Orion Nebula shows intricate wings and dark lanes; the Lagoon and Swan (Omega) glow with structure; planetary nebulae pop against the background, sometimes revealing a central star at high power with steady transparency.
Galaxies
Galaxy observing is where darker skies pay the biggest dividends. From a suburban backyard, you may see core brightening and overall shape in brighter galaxies. At a dark site, an 8-inch reveals spiral structure in some Messier galaxies, dust lanes in edge-ons, and halos of satellite members around prominent hosts. Dark adaptation, averted vision, and gentle sweeping boost your chances to glimpse faint extensions and subtle features.
Seasonal highlights
- Winter: Orion Nebula (M42), the Pleiades (M45), and clusters in Auriga.
- Spring: Galaxy fields in Virgo-Coma and Leo; Markarian’s Chain is a star-hopper’s playground.
- Summer: The Sagittarius–Scutum star cloud brims with nebulae and clusters; the Veil Nebula (O III filter recommended) is a showstopper.
- Autumn: Andromeda (M31) with its companions M32 and M110; the Double Cluster; numerous planetary nebulae.
Coping with Light Pollution, Seeing, and Transparency
Not all nights are equal. Three environmental factors shape your views: light pollution (sky brightness), seeing (steadiness), and transparency (clarity).
Light pollution
Urban skyglow brightens the background, washing out faint DSOs. Strategies include:
- Target bright objects: the Moon, planets, double stars, and robust open clusters thrive in bright skies.
- Use a UHC or O III filter on emission nebulae to boost contrast.
- Shield local lights with portable screens or use your own body to block glare.
- Schedule trips to darker sites when possible; the difference for galaxies is dramatic.
Seeing
Seeing is the atmospheric steadiness that governs high-power detail. Tips:
- Observe when targets are highest in the sky to look through less atmosphere.
- Avoid roofs and pavement that radiate heat after sunset.
- On nights with mediocre seeing, drop magnification; a steady smaller image often shows more detail.
Transparency
Transparency is affected by humidity, haze, thin clouds, smoke, and dust. It impacts the contrast of extended objects like galaxies and nebulae. Clear, dry air improves faint detail. If transparency is poor, focus on brighter, compact targets or lunar/planetary observing until conditions improve.
Time-of-night advantages
- After midnight, traffic and human activity dwindle, sometimes improving local seeing.
- As the night cools, thermal equilibrium between your optics and the air usually improves; revisit high-resolution targets later.
Care, Cleaning, and Transport of a Dobsonian
Dobsonians are robust, but basic care keeps them performing at their peak.
Storage
- Keep the scope covered to minimize dust. A breathable cover avoids trapping moisture.
- Store in a dry, temperature-stable space. Avoid prolonged damp conditions that could affect coatings or swell wood bases.
Cleaning mirrors
Mirrors do not need frequent cleaning—dust has surprisingly little impact on visual performance. Clean only when a bright light reveals obvious films or pollen that won’t blow off. When needed:
- Remove the mirror cell following manufacturer guidance. Mark orientation for reinstallation if needed.
- Rinse gently with distilled or deionized water to float off dust.
- Use a basin with distilled water and a tiny drop of mild dish soap; with clean fingertips, very lightly drag across the surface if necessary.
- Rinse thoroughly with distilled water. Let water sheet off; encourage run-off from one edge.
- Let air dry. A final rinse can minimize spotting; use compressed air carefully only if it’s oil-free and dry.
Minor coating wear is cosmetic. Recoating intervals vary widely with environment and use; many observers go a decade or more before considering it.
Fasteners, bearings, and maintenance
- Check collimation screws and focuser set screws periodically for snugness.
- Inspect Teflon pads and bearing surfaces for debris; keep them clean for consistent motion.
- Protect the base from moisture; seal edges if you assemble it yourself.
Transport and setup ergonomics
- Carry the tube and base separately. Use proper lifting technique to protect your back.
- Use a hand truck or strap-on handles for longer moves. For backyard use, some add small wheels to the base or wheelbarrow handles on larger Dobs.
- Secure the tube in the car with soft straps, and avoid stacking heavy items on the base.
Can You Do Astrophotography with a Dobsonian? A Reality Check
Dobsonians excel at visual observing. For imaging, their alt-az mounts and manual operation impose constraints, but some pathways are viable.
Lunar and planetary imaging
A common approach is “lucky imaging”: capturing thousands of short video frames and stacking the sharpest to beat seeing. An 8-inch aperture is excellent for resolving fine detail on the Moon and planets under good seeing. You can use a dedicated planetary camera and a Barlow to reach an effective focal ratio around f/15–f/20. Manual tracking is challenging but doable for short captures, and an equatorial platform can add tracking if desired.
Electronically assisted astronomy (EAA)
EAA uses short exposures (seconds) with a sensitive camera, live-stacking software, and, often, mild image enhancement to reveal DSOs in near real time. Field rotation in alt-az mounts limits maximum exposure length per frame, but stacked short frames can still produce pleasing real-time views of bright nebulae and clusters. Expect some learning curve for adapters and backfocus; consider a coma corrector for improved edge performance if you go this route.
Long-exposure deep-sky imaging
Traditional, long-exposure deep-sky astrophotography prefers an equatorial mount with tracking and autoguiding. While an equatorial platform can give a Dobsonian tracking over a limited time window, the simplicity and value proposition of the Dob is reduced. If long-exposure imaging becomes a priority, many observers add a separate, purpose-built imaging rig while keeping the Dob for visual observing.
Frequently Asked Questions
How much does an 8-inch Dobsonian weigh, and can one person handle it?
Most 8-inch solid-tube Dobsonians split into a tube and a base. The tube commonly weighs around 9–12 kg (20–26 lb), and the base roughly 10–15 kg (22–33 lb), depending on materials and design. Many observers carry the tube in one trip and the base in another. If you anticipate stairs or long walks, consider a hand truck or dolly, and always lift with care. Truss or collapsible versions can reduce bulk but may require more assembly and frequent collimation checks.
How often should I collimate my 8-inch Dobsonian?
Check collimation each time you set up—especially after transporting the scope. Solid-tube 8-inch Dobs typically hold collimation well once set, so you may only need small tweaks. A quick daylight check with a collimation cap or Cheshire ensures you start close; a high-power star test after dark can verify fine alignment. With practice, the process takes only a few minutes and pays off with sharper views.
Final Thoughts on Choosing the Right 8-Inch Dobsonian Telescope
An 8-inch Dobsonian sits at a compelling intersection of aperture, usability, and cost. It provides genuinely deep views of the universe—bright planets and the Moon in exquisite detail, star clusters sparkling like frost, nebulae responding beautifully to filters, and galaxies emerging with structure under dark skies. The design rewards you for learning a few core skills: gentle motions on the mount, basic collimation, and attention to thermal equilibrium and atmospheric conditions. With just a handful of well-chosen eyepieces and a UHC filter, you can explore a lifetime of targets.
As you gain experience, you can refine the system with small, thoughtful upgrades—dual-speed focusing, push-to encoders, a cooling fan baffle, or an observing chair that keeps you steady at high power. If imaging eventually calls to you, the Dob remains a superb visual companion while you decide whether to add a separate, dedicated imaging setup.
Most importantly, this telescope invites you to spend more time under the stars. Start simple, observe often, and let your eye and technique develop. For more guides, observing lists, and practical tips from the field, explore our related articles and subscribe to our newsletter to stay updated on future installments.