Table of Contents
- What Is an 8-Inch Dobsonian Telescope?
- Why Choose an 8-Inch Aperture: Light-Gathering and Resolution
- Optical Design and Focal Ratios in 8-Inch Dobs
- Mount Mechanics: Alt-Az Bearings, Balance, and Motions
- Essential Accessories and Smart Upgrades
- Collimation and Thermal Management Best Practices
- What You Can See: Planets, Moon, Deep-Sky, and Doubles
- Portability, Storage, and a Fast Setup Workflow
- Star-Hopping and Finding Objects Without Go-To
- Managing Expectations Under Light Pollution
- How 8-Inch Dobsonians Compare to Other Telescope Types
- Frequently Asked Questions
- Final Thoughts on Choosing the Right 8-Inch Dobsonian Telescope
What Is an 8-Inch Dobsonian Telescope?
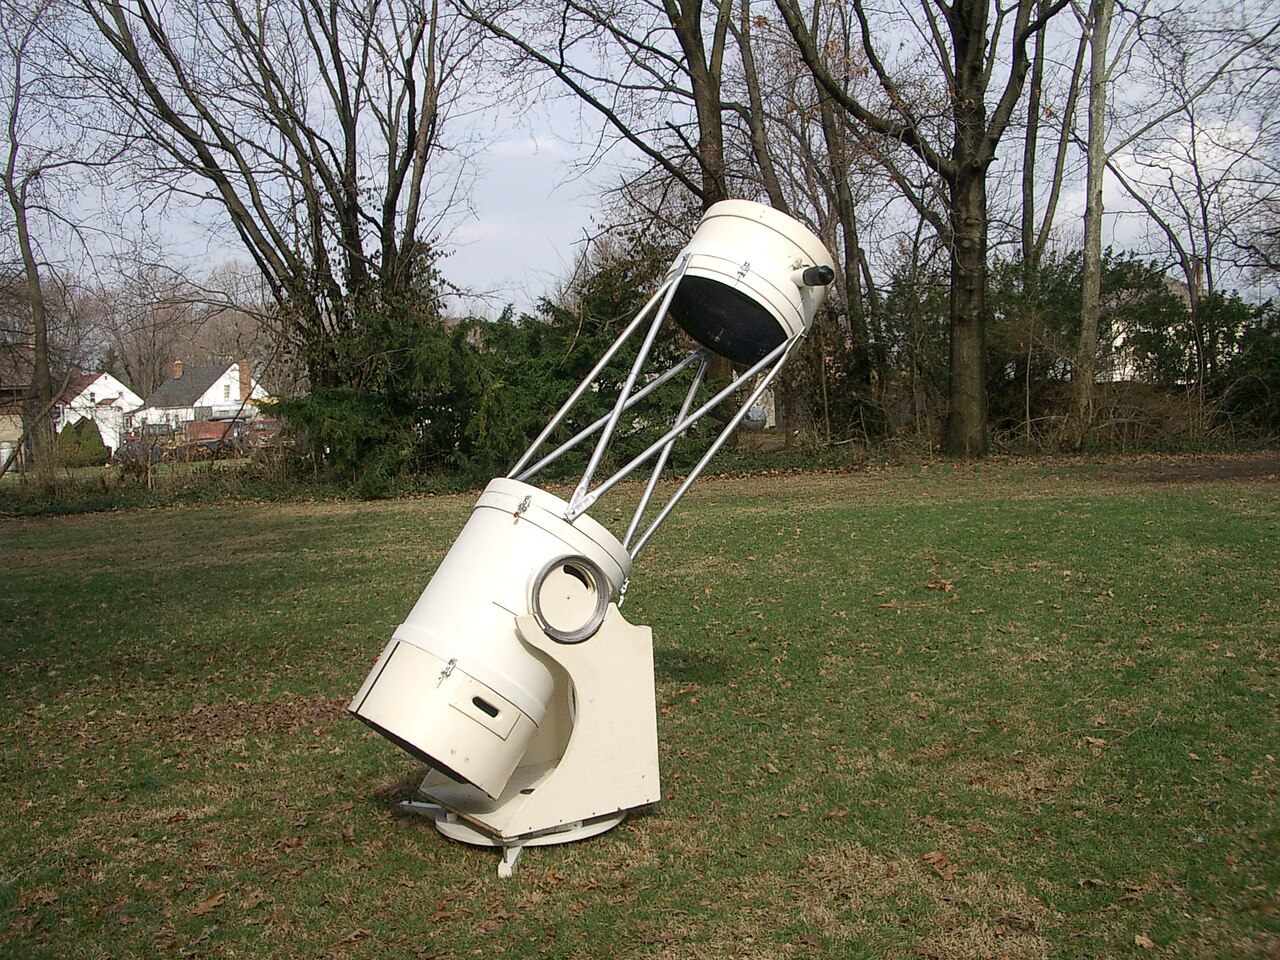
An 8-inch Dobsonian telescope is a Newtonian reflector with a primary mirror 8 inches (about 203 mm) in diameter, mounted on a simple, stable, alt-azimuth “Dobsonian” base. The optical tube gathers and focuses starlight using a parabolic primary mirror and a small flat secondary mirror that directs the image to the focuser on the side of the tube. The distinctive wooden or composite base allows the observer to push the telescope smoothly in altitude (up/down) and azimuth (left/right) to point at targets across the sky.

Artist: James Stewart 669
This design—popularized by the late John Dobson—delivers a blend of generous aperture, affordability, and ease of use that has made it the most recommended “serious first telescope” for many visual observers. An 8-inch aperture is widely considered a sweet spot: it is large enough to reveal rich deep-sky detail and compelling planetary views, yet compact enough to store in a closet, transport in most cars, and carry in two manageable pieces.
In most configurations, an 8-inch Dobsonian has a focal ratio between f/5 and f/6. That corresponds to a focal length around 1000–1200 mm, which is a versatile range for both wide-field scanning and higher magnification on planets and the Moon. If you are new to the Dobsonian concept, think of it as a light bucket on a lazy-Susan-like base—intuitive to point, steady to look through, and forgiving of bumpy ground. As we’ll explore in Why Choose an 8-Inch Aperture, the jump to 8 inches brings dramatic gains in light grasp and resolving power compared to smaller starter scopes.
While some 8-inch Dobsonians include motorized push-to aids or go-to tracking options, the core appeal remains the classic manual Dob: quiet, quick to deploy, and focused on the joy of exploration. If you want to hone your sky navigation skills, a manual 8-inch remains one of the best platforms to learn on, especially in combination with the techniques in Star-Hopping and Finding Objects Without Go-To.
Why Choose an 8-Inch Aperture: Light-Gathering and Resolution
Two facts make aperture matter in visual astronomy: light-gathering power and angular resolution. Light-gathering power scales with the area of the primary mirror, which grows with the square of the diameter. That means doubling the diameter increases the area—and the photon catch—by a factor of four. Moving from a 4-inch to an 8-inch mirror thus offers roughly 4× more light. Compared to the dark-adapted human eye (about 7 mm pupil diameter), an 8-inch telescope collects on the order of hundreds of times more light—approximately (203/7)^2, or about 800–900× before accounting for reflectivity losses and the secondary obstruction.
More light translates directly into fainter limiting magnitudes and brighter views of extended objects. Nebulae and galaxies that appear as faint smudges in smaller instruments begin to show structure, mottling, and in better skies, hints of spiral arms with an 8-inch. Globular clusters start to break into resolved stars, and small planetary nebulae look more disk-like. For stellar targets such as open clusters or double stars, the 8-inch aperture remains particularly rewarding because it combines brightness with the next key factor—resolution.
Angular resolution improves with increasing aperture: larger mirrors can separate closer details when the atmosphere cooperates. The 8-inch class can cleanly split many double stars beyond the reach of smaller scopes and offers sharp, high-contrast planetary views at appropriate magnifications. Under steady seeing, it can support the “50× per inch of aperture” rule of thumb for useful high power, though seeing (atmospheric steadiness) will often set a practical ceiling below that. We’ll discuss choosing magnifications and eyepieces for planets, the Moon, and bright nebulae in What You Can See.
Finally, 8 inches is a pragmatic tipping point for real-world observing. It is large enough to reward trips to dark sites yet is still convenient to load in a car. At home, most observers can carry the base and tube separately without strain. If you expect frequent backyard use and occasional excursions to darker skies, 8 inches makes sense as a first serious telescope and, for many, a lifetime companion instrument.
Optical Design and Focal Ratios in 8-Inch Dobs
All Dobsonians are Newtonian reflectors: a concave parabolic primary mirror reflects light up the tube to a small flat secondary that folds the beam out to the focuser. This simple path maximizes light efficiency and keeps costs lower per inch of aperture than refractors or catadioptrics. The two key specs to understand are aperture (203 mm here) and focal ratio (f/5 to f/6 in most 8-inch models).

Artist: Fernly at English Wikibooks
- Focal length ≈ aperture × focal ratio. For an 8-inch (203 mm) f/6 mirror, focal length ≈ 203 × 6 ≈ 1218 mm. For f/5, ≈ 1015 mm.
- Magnification = telescope focal length ÷ eyepiece focal length.
- Exit pupil = eyepiece focal length ÷ focal ratio = aperture ÷ magnification.
These relationships drive how the scope behaves with different eyepieces. An f/5 system gives wider true fields and lower magnifications for a given eyepiece compared to f/6, while f/6 is slightly more forgiving on eyepiece performance at the edge of the field. At faster focal ratios (smaller f-number), off-axis aberrations like coma become more noticeable, especially with simpler eyepiece designs. Observers sensitive to edge-of-field star shapes sometimes add a coma corrector at f/5, though many are content without one—particularly for central-field planetary viewing or when using eyepieces well-corrected for fast optics.
Secondary obstruction is another design element. A typical 8-inch Dob may have a secondary mirror around 20–25% of the primary’s diameter. The obstruction slightly reduces contrast and light throughput, but in practice, 8-inch Newtonians deliver excellent planetary and lunar performance when well collimated and cooled. For deep-sky targets, the effect is negligible compared to the benefits of the large primary mirror.
Coatings matter for throughput. Aluminum with protective overcoats is standard. Reflectivity per surface is often around 88–93% depending on the coating, so a two-mirror path may transmit ~80–85% before considering the obstruction and losses at the focuser. While enhanced coatings exist, the dominant performance variables you control nightly are collimation, thermal equilibrium, and sky conditions. We break those down in Collimation and Thermal Management Best Practices.
Mount Mechanics: Alt-Az Bearings, Balance, and Motions
The Dobsonian base is engineered to provide smooth, stable motion in two axes: altitude and azimuth. Classic designs use low-friction materials—often PTFE (Teflon) pads riding on textured laminate or polymer bearing surfaces—to achieve a controlled, “buttery” motion. This is what enables precise manual tracking at high power: you push the scope gently, the stars move smoothly, and when you let go, it stays where you left it.

Credit: first uploaded on the English-speaking Wikipedia under the same filename
Key mechanical considerations when evaluating or tuning an 8-inch Dobsonian include:
- Altitude bearings size and placement: Larger semi-circular bearings distribute weight and offer finer control. Their position relative to the tube’s center of gravity defines balance behavior as you swap eyepieces.
- Friction and stiction: You want just enough resistance to avoid drift but little enough that nudging the tube is effortless. Material choice, pad size, and bearing finish all matter.
- Balance management: Heavy eyepieces, finder scopes, or a coma corrector can pull the front down. Solutions include adjustable altitude trunnions, spring tensioners, magnetic counterweights, or sliding balance weights.
- Base stiffness: A rigid rocker box and ground board prevent flexure and oscillation, especially on uneven terrain. Thicker panels and well-placed braces help.
- Azimuth axis: Many bases ride on three PTFE pads against a laminate or on a large center pivot with a bearing ring. Smooth, uniform friction is the goal; too much reliance on a single center bearing can introduce stick-slip unless matched well with side pads.
Modern 8-inch Dobs often include thoughtful touches like adjustable tension knobs in altitude, quick-collimation hardware, and encoder mounts for optional digital setting circles. If you observe in windy locations, consider a base with a broad footprint and a tube that can be parked horizontally when gusts hit. The calmer your mount behaves, the more productive your nights—particularly when doing high-power planetary work explained in What You Can See.
Essential Accessories and Smart Upgrades
Out of the box, most 8-inch Dobsonians are ready to show you the Moon, planets, and bright deep-sky objects. A few carefully chosen accessories, however, can boost performance and convenience dramatically. Focus on items that improve finding, focusing, and image quality.
Finder Options: Right-Angle and Reflex
Finding targets is a lot easier if your finder matches your preferred technique. Two common approaches:
- Reflex finders (red-dot, red-circle): Super intuitive for star-hopping; they project a dot or ring onto the sky. Excellent for aligning to bright stars and then switching to a magnifying finder or low-power eyepiece for fine hops. See Star-Hopping for a workflow.
- Right-angle correct-image (RACI) finder: A small refractor (e.g., 8×50 or 9×50) that shows a star field matching atlas orientation. Comfortable neck position and more depth for faint reference stars.
Eyepiece Set Strategy
You do not need a suitcase full of eyepieces. For an 8-inch f/6 Dob, a well-spaced trio covers most needs. Use the formulas in Optical Design to adapt to f/5:
- Low power, wide-field (25–32 mm): Framing large open clusters and nebulae; true fields up to around 2 degrees are possible depending on focuser size and eyepiece.
- Medium power (12–14 mm): General-purpose for galaxies, globulars, and planetary nebulae.
- High power (5–7 mm): Lunar and planetary detail, double stars under steady seeing. Consider a quality Barlow to extend your set economically.
Exit pupil matters. For dark sites, a 5–6 mm exit pupil is great for faint nebulae and galaxies; in light pollution, a slightly smaller exit pupil (around 2–3 mm) can improve contrast perception by darkening the sky background.
Filters and Contrast Aids
- UHC/nebula filters: Boost contrast on emission nebulae by passing O-III and H-beta lines while suppressing much of the background. Great on objects like the Lagoon, Swan, and Orion Nebulae.
- O-III filters: More selective; excellent for planetary nebulae and supernova remnants such as the Veil Nebula under dark skies.
- Polarizing or variable polarizer: Dim the Moon for comfort and subtle contrast tweaks without altering color balance as strongly as narrowband filters.

Artist: Astrofalls
Collimation Tools
Accurate collimation separates good nights from great nights. A simple collimation cap is usable, but a Cheshire/sight-tube combo or a well-aligned laser collimator speeds and refines the process. We give a practical routine in Collimation and Thermal Management Best Practices.
Comfort and Usability
- Observing chair: Being comfortably seated stabilizes your body, making fine detail easier to see. It’s often the single best accessory you can add.
- Dew control: Dew shields or small heaters for the secondary and finder can save a winter session.
- Cooled primary: A small rear fan helps the mirror reach ambient temperature faster, improving image steadiness.
- Light shroud (for truss tubes): Keeps stray light out and controls dew while preserving portability.
Collimation and Thermal Management Best Practices
Reflectors reward attention to alignment and temperature. Fortunately, an 8-inch Dobsonian is straightforward to collimate and manage thermally with a simple checklist.
A Fast, Repeatable Collimation Routine
- Center mark: Ensure your primary mirror has a small, non-reflective center mark. Most do; if not, use a pre-cut reinforcement ring and a template.
- Secondary placement: With a sight-tube, confirm the secondary mirror looks circular and centered under the focuser. Adjust its tilt/rotation as needed.
- Primary tilt: Use a Cheshire or properly collimated laser to tilt the primary so the return is centered on the primary’s center mark.
- Star test: At high power, defocus on a bright star. Intra- and extra-focus diffraction patterns should be concentric. Fine-tune the primary if needed.
Tip: Collimate at the temperature you will observe at; significant temperature changes can slightly shift alignment. Recheck primary tilt after transporting the scope.
Thermal Equilibrium
Large mirrors need time to cool (or warm) to ambient air. Thermal plumes rising off a warm mirror soften the image. A small, quiet fan blowing on the back of the primary accelerates equilibration. In moderate temperature differentials, 20–45 minutes is often enough for an 8-inch mirror to settle; larger differentials take longer.
- Ventilation: Keep the rear cell open to airflow; avoid enclosing the mirror in blankets or tight cases right before observing.
- Shield from wind: Wind can induce vibration and cool the optics unevenly; use natural windbreaks or portable screens.
- Dew control: Secondary mirrors dew before primaries. Gentle heat or a dew shield can keep it clear without distorting the image.
When collimation is dialed and the mirror is at ambient temperature, high magnification views snap into focus more crisply. This prep directly improves the detail you can see on Jupiter’s belts, lunar rilles, and tight double stars—areas we cover in What You Can See.
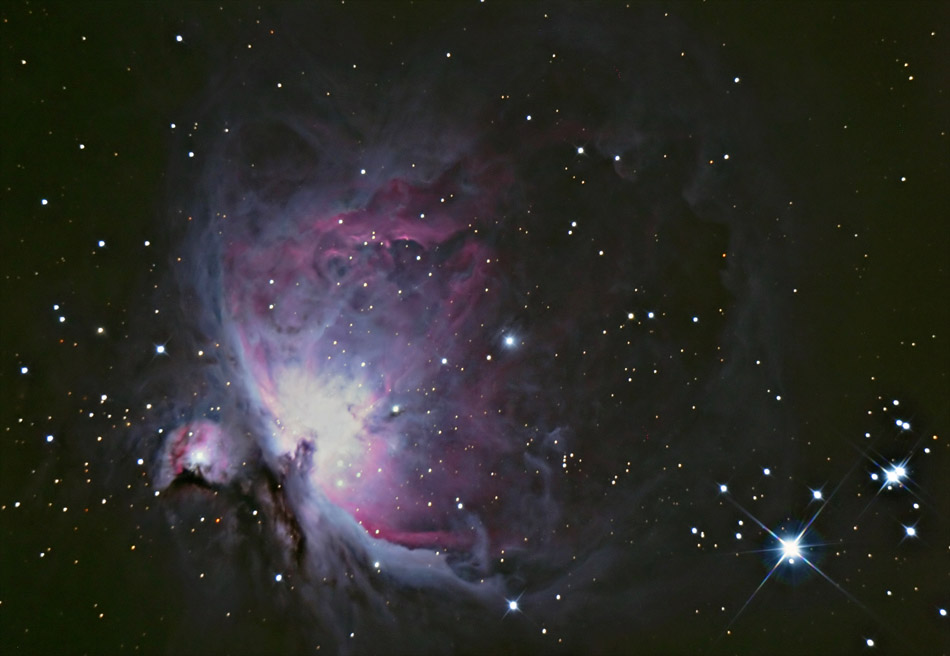
What You Can See: Planets, Moon, Deep-Sky, and Doubles
The observing capability of an 8-inch Dobsonian is broad. It excels as an all-rounder, delivering memorable views across the solar system and deep sky. Conditions matter: seeing controls planetary sharpness; transparency and light pollution determine deep-sky reach. Equip your sessions with realistic expectations and a plan tailored to the night’s strengths.
Planets and the Moon
With good collimation and steady air, an 8-inch can reveal extensive planetary detail:
- Jupiter: Multiple belts with festoons, polar hoods, and the Great Red Spot. Transits of the Galilean moons show inky shadows. Useful magnifications commonly range from ~150× to 250×, higher in exceptional seeing.
- Saturn: Cassini Division when the rings are open, banding on the globe, and several moons. Magnifications similar to Jupiter’s, often slightly lower for comfort.
- Mars: Albedo features and polar caps around opposition; seeing dictates the practical limit. Filters can enhance contrast, though careful focus and patience matter more.
- Moon: Razor-sharp crater rims, rilles, domes, and terraces. A neutral density or variable polarizing filter helps keep glare manageable.
On nights of mediocre seeing, drop the magnification; detail is easier to perceive at slightly lower powers when the image is steadier. For more on matching magnification to conditions, see Optical Design and Focal Ratios.
Deep-Sky Objects
Under darker skies, an 8-inch begins to show character in classic deep-sky targets:
Artist: Rochus Hess
- Nebulae: Emission nebulae like the Lagoon, Swan, and Orion respond strongly to UHC filters; structure and brighter knots stand out. Planetary nebulae reveal small disks and sometimes annular shapes with an O-III filter.
- Galaxies: Bright spirals show central brightening and faint hints of arms; edge-on galaxies present dark lanes. Groups in Leo, Virgo, and Coma become a rewarding spring tour from darker sites.
- Globular clusters: Many start to resolve into pinpoints around the periphery and, with patient viewing, deeper into the core.
- Open clusters: From bright showpieces to delicate star-sprays; low-power eyepieces bring out their best framing.
In suburban skies, galaxies suffer most from skyglow, but bright nebulae and clusters remain excellent, especially with filters and light pollution strategies.
Double Stars
An 8-inch excels at splitting many close doubles. Tight, equal-magnitude pairs test seeing and collimation; unequal pairs test optical quality and observer technique. A high-quality, well-cooled 8-inch under steady air can cleanly separate pairs near the atmospheric limit for many locations. Use 200–300× as conditions allow and refine focus meticulously.
Portability, Storage, and a Fast Setup Workflow
Despite the 8-inch’s significant capability, its physical footprint remains friendly. Most solid-tube models break into two pieces: the tube (often around 1.2 meters long) and the base (a compact rocker box). Many observers transport the tube across their forearms and carry the base by its handle in the other hand. To optimize portability and setup speed, consider the following:
- Protective transport: Use a soft case or blanket to prevent tube scuffs in the car. Avoid hot trunks on summer days; heat-soaked mirrors take longer to settle.
- Tool kit: Pack a small pouch with a Cheshire or laser collimator, a few Allen keys/screwdrivers, a red light, and a lens brush/blower.
- Setup order: Place the base, drop in the tube, attach the finder, insert the lowest power eyepiece, roughly collimate if needed, and start with a bright alignment star. Then let the mirror cool while you enjoy wide-field targets.
- At-home storage: Keep the scope dust-covered in a dry place at near-ambient indoor temperature. Store eyepieces sealed with desiccant if your climate is humid.
For observers with smaller cars or limited storage, consider a truss-tube 8-inch Dobsonian. Truss designs disassemble into compact components and often weigh less per piece. Add a light shroud to control stray light and dew.
Artist: JamesStewart669
Star-Hopping and Finding Objects Without Go-To
One of the Dobsonian’s joys is manual discovery. Star-hopping develops your sky sense and makes every found object feel earned. A simple, reliable workflow pairs beautifully with an 8-inch:
- Plan the hop: Pick targets appropriate to the night’s conditions (use light pollution guidance and transparency forecasts). Study an atlas or app for “stepping stones”: bright stars and asterisms near your target.
- Align the finder: Before dark, center a distant terrestrial object in your low-power eyepiece and match it in your reflex finder and RACI. Recheck on a bright star at dusk.
- Use a bright anchor: Point with the reflex finder to a bright, known star. Confirm in the eyepiece, then switch to the RACI to follow the intended pattern—field by field—toward your target.
- Check field orientation: Remember that a RACI shows a correct image, while your main eyepiece in a Newtonian shows a rotated view depending on focuser orientation. Practice makes this second nature.
- Confirm with averted vision and motion: Faint targets often pop when you gently nudge the scope or look slightly to the side of the expected position.
Adding digital setting circles (encoders plus a handheld or smartphone app) preserves the manual feel while offering pointing assistance. If your Dobsonian supports encoders, they can be a high-value upgrade that complements, rather than replaces, your observing skills.
Managing Expectations Under Light Pollution
Light pollution dims and washes out faint structures, but an 8-inch Dobsonian remains effective in suburban settings with a strategy tailored to skyglow. Emphasize high surface brightness targets and use filters where they help.
- Prioritize: The Moon, planets, open clusters, double stars, and bright planetary nebulae punch through city skies. Globular clusters are still rewarding, especially at moderate to high power.
- Use narrowband filters: A UHC or O-III filter selectively passes nebular emission lines while reducing background, improving the visibility of certain nebulae.
- Smaller exit pupils: In bright skies, using slightly higher magnification (2–3 mm exit pupil) darkens the background and enhances contrast perception.
- Shield stray light: Set up behind buildings or trees, or use portable screens. Stray light near the eyepiece reduces dark adaptation and contrast.
- Chase transparency: Nights with clear, dry air help far more than extra magnification. After fronts pass or when humidity drops, galaxies and nebulae stand a better chance.
For the best deep-sky experiences, take your 8-inch to darker skies when you can. The portability practices in Portability and Setup make such trips easier than you might expect.
How 8-Inch Dobsonians Compare to Other Telescope Types
Choosing a telescope involves trading among aperture, portability, cooldown time, cost, and complexity. Here’s how the 8-inch Dobsonian stacks up against common alternatives:
Versus 4–6 Inch Refractors
- Light grasp: The 8-inch collects significantly more light, revealing fainter objects and more structure in deep-sky targets.
- Color and contrast: Good refractors offer high contrast and pinpoint stars; no central obstruction. They excel at wide fields and double stars. However, aperture wins for faint fuzzies and resolution under equal seeing.
- Portability: Short refractors are ultra-portable and low maintenance; but larger apochromats get heavy and expensive quickly.
Versus 6–8 Inch Schmidt-Cassegrains (SCTs)
- Aperture per dollar: Dobsonians usually deliver more aperture for the price.
- Cool-down and dew: SCTs can take time to equilibrate and often need dew control. Dobsonians benefit from fans but are open-tube and less dew-prone at the primary.
- Tracking: SCTs often have motorized tracking and go-to, handy for outreach and high-power observation. Dobs can add tracking platforms or digital setting circles but remain primarily manual.
Versus Larger (10–12 Inch) Dobsonians
- Performance: Larger mirrors show more—especially in galaxies and globulars—and reach fainter magnitudes.
- Practicality: Weight, size, and cool-down needs increase. The 8-inch is frequently used more often by owners who prefer grab-and-go readiness.
- Eyepiece sensitivity: Faster focal ratios in some larger models can demand better-corrected eyepieces to keep edge stars sharp.
For most beginners and many experienced observers, the 8-inch Dobsonian strikes a balance that maximizes observing time while delivering satisfying views. If your interests skew heavily to planetary imaging or remote control, other designs may fit better, but for visual deep-sky plus planetary enjoyment, the 8-inch Dob is hard to beat.
Frequently Asked Questions
How much magnification can an 8-inch Dobsonian handle?
Rules of thumb suggest a practical upper limit of around 50× per inch of aperture under excellent seeing. For an 8-inch, that’s roughly 400×. In real-world conditions, the atmosphere usually caps comfortable powers lower—often 150–250× on planets and the Moon. Use the magnification formula from Optical Design and adjust to the night: if the image softens or “boils,” back off the power.
Is an 8-inch Dobsonian good for astrophotography?
It’s superb for visual observing and lunar/planetary video capture with a high-speed camera, but it is not the easiest platform for long-exposure deep-sky astrophotography because a manual alt-az base doesn’t track equatorially. That said, you can add an equatorial platform for short to moderate tracking or focus on bright targets (Moon, planets) where fast exposures freeze turbulence. If your priority is deep-sky imaging, consider starting with a small refractor on a quality equatorial mount while keeping the 8-inch Dob for visual enjoyment.
Final Thoughts on Choosing the Right 8-Inch Dobsonian Telescope
An 8-inch Dobsonian remains one of the most universally recommended telescopes for good reason. It provides a compelling intersection of capability, cost, and convenience. In a single, manageable package, you gain access to dynamic planetary detail, richly textured lunar landscapes, and deep-sky vistas that invite genuine exploration. With basic skills—collimation, cooling, and star-hopping—you will consistently draw the best from the instrument and your skies.
To choose the right model, prioritize smooth, stable motions; practical balance solutions; a focuser that handles your eyepiece set; and a base that fits your observing style. Add a small set of thoughtfully selected accessories from Essential Accessories, and adopt the setup habits in Portability and Setup. As you refine your technique, revisit Collimation and Thermal to keep performance at its peak, and use the strategies in Managing Light Pollution to tailor sessions to your location.
Most of all, use it often. The best telescope is the one that sees the night sky under your guidance, again and again. If you enjoyed this guide, explore our related deep-sky and equipment articles, and subscribe to our newsletter for future hands-on tutorials, observing plans, and seasonal targets tailored to instruments like your 8-inch Dobsonian.