Table of Contents
- What Is Urban Deep-Sky Astrophotography?
- Essential Gear for City-Based Deep-Sky Imaging
- Planning: Targets, Bortle Class, Moon Phase, and Weather
- Mastering Polar Alignment and Tracking Accuracy
- Exposure Strategy: ISO/Gain, Sub Length, and SNR Under Light Pollution
- Calibration Frames: Darks, Flats, Bias, and Dark Flats
- Dithering, Guiding, and Eccentricity Control
- Narrowband and Multi-Bandpass Filters for Emission Nebulae
- Data Acquisition Workflow: Sequencing and Automation
- Stacking and Post-Processing: From Raw Lights to Finished Image
- Managing Gradients and Color in Light-Polluted Images
- Common Problems and Practical Fixes
- Frequently Asked Questions
- Final Thoughts on Choosing the Right Urban Astrophotography Setup
What Is Urban Deep-Sky Astrophotography?
Urban deep-sky astrophotography is the practice of capturing galaxies, nebulae, star clusters, and other faint celestial objects from light-polluted locations such as cities and suburbs. Unlike pristine dark-sky sites, urban environments impose a heavy background glow that raises the noise floor, compresses dynamic range, and obscures faint detail. The challenge—and the craft—is to use gear choices, planning, exposure strategies, and processing techniques that maximize signal while controlling noise and gradients.
Artist: Rochus Hess
Success in the city is possible because most deep-sky targets emit or reflect light at levels that can be separated from the sky background when you stack many short exposures, apply proper calibration, and use filters that suppress common sources of light pollution. Combined with precise polar alignment and tracking, these strategies elevate signal-to-noise ratio (SNR) and allow detail to emerge despite bright skies.
Key concepts that shape the urban astrophotography workflow include:
- Sky brightness and the Bortle scale: Brighter skies (e.g., Bortle 7–9) reduce contrast and shorten optimal exposure times before your histogram saturates. They also demand more total integration time.
- Sensor performance: Read noise, full well capacity, quantum efficiency, and analog-to-digital conversion bit depth influence how long you should expose and which gain/ISO to use, as discussed in Exposure Strategy.
- Filtering and target selection: Emission nebulae respond well to narrowband and dual-band filters, while broadband targets (galaxies, reflection nebulae) are more challenging under strong light pollution but still possible with careful planning and processing.
In short, urban deep-sky imaging is about optimization. Every decision—from the target you choose tonight to the way you stretch your stacked image—nudges SNR in your favor. This guide provides a structured path to make those decisions with confidence and capture compelling results from your backyard, balcony, or rooftop.
Essential Gear for City-Based Deep-Sky Imaging
There is no single perfect setup for urban astrophotography, but certain gear choices provide a consistent advantage in bright skies. Consider the following components and how they fit your goals, budget, and available space.
Mount and Tracking
- Equatorial mount (EQ): The mount is the most important investment. A stable, computerized EQ mount with low periodic error and reliable guiding support will outperform a larger telescope on a flimsy mount. Short focal lengths are more forgiving, but even wide-field lenses benefit from accurate tracking.
- Star trackers: Compact trackers excel for travel and rooftops. While they typically carry lighter loads, they are sufficient for camera lenses up to about 135–200 mm and can produce excellent results with dual-band filters on emission nebulae.

A cheap electric equatorial mount (aka “sky tracker”), model iOptron SkyTracker Pro, with a camera attached and a lens (Canon EOS R50 + Canon RF 100–400 mm F5.6–8 IS USM)
Artist: HiyoriX
Optics: Camera Lenses vs. Telescopes
- Camera lenses (24–200 mm): Great for wide fields and large nebulae, fast apertures (f/1.4–f/2.8) help build SNR quickly, but stopping down 1–2 stops often improves star shapes. Tilt and decentering can be challenges.
- Refractor telescopes (60–100 mm aperture, f/4–f/7): A small apochromatic refractor with a field flattener/reducer is an ideal urban workhorse. Short focal lengths (250–600 mm) are friendly to guiding and yield large targets in the frame.
- Reflectors and catadioptrics: Newtonians offer speed and aperture but require collimation and can be bulky. SCTs and Maks offer long focal lengths, which demand tighter guiding and slow down data acquisition under bright skies unless paired with fast reducers.
Cameras
- Dedicated cooled CMOS astro cameras: Cooling stabilizes sensor temperature, reducing dark current and making calibration more predictable. Mono cameras paired with narrowband filters excel in heavy light pollution but require filter wheels and more time per target.
- One-shot color (OSC) cameras: Simplify acquisition and are popular for dual-band filters. Modern OSC sensors with low read noise and high quantum efficiency perform well from the city.
- DSLRs and mirrorless: Unmodified cameras can do wide-field work and brighter targets; astro-modified versions improve H-alpha response for emission nebulae. Use live view and electronic shutters to minimize vibration.
Filters
- Dual-band and tri-band filters: Designed for OSC cameras to pass H-alpha and O III (and sometimes S II). They suppress much of the urban glow, revealing emission nebulae. See Narrowband and Multi-Bandpass Filters for details.
- Broadband light pollution filters: These selectively block common streetlight wavelengths but are less effective with modern white LEDs. They can help marginally with galaxies but do not perform miracles under severe light pollution.
- UV/IR cut: Useful for cameras without internal filters to maintain star sharpness with refractors.
Focusing and Accessories
- Electronic autofocus: Automates precise focus adjustments as temperature changes. Particularly helpful for refractors and long sessions.
- Bahtinov mask: A simple, effective focusing aid for lenses and telescopes.
Bahtinov mask example
Artist: Axleottal
- Dew control: Dew heaters and shields prevent moisture from softening images and altering flat-field accuracy.
- Guiding: An off-axis guider (OAG) eliminates differential flexure at long focal lengths. A small guide scope is sufficient for short to moderate focal lengths.
The most balanced city setup for many imagers is a small apochromatic refractor, OSC camera, dual-band filter, and a reliable EQ mount. This combination minimizes complexity while enabling high-quality results on many emission targets.
Planning: Targets, Bortle Class, Moon Phase, and Weather
Planning determines whether your session produces a noisy dataset or a stack that sings. Good urban planning aligns targets with your sky conditions and schedule.
Assess Sky Brightness and Direction
- Bortle class: Urban skies are often Bortle 7–9. In these conditions, select emission nebulae for narrowband/dual-band imaging and choose galaxies that rise high above the horizon to mitigate gradient and extinction.
- Horizon glow and gradients: Even in the same backyard, the sky to the north may be dimmer than the south due to city centers. Favor directions with fewer streetlights or rooftop glare to reduce gradients that you’ll otherwise mitigate in post-processing.
Moon Phase and Elevation
- Moonless nights: Best for broadband targets like galaxies and reflection nebulae. If the Moon is up, keep it out of your frame and avoid very short separations.
- Narrowband under the Moon: With multi-bandpass filters, you can image emission nebulae even with a bright Moon, though contrast still degrades as the Moon waxes or nears your target.
Target Selection and Seasonality
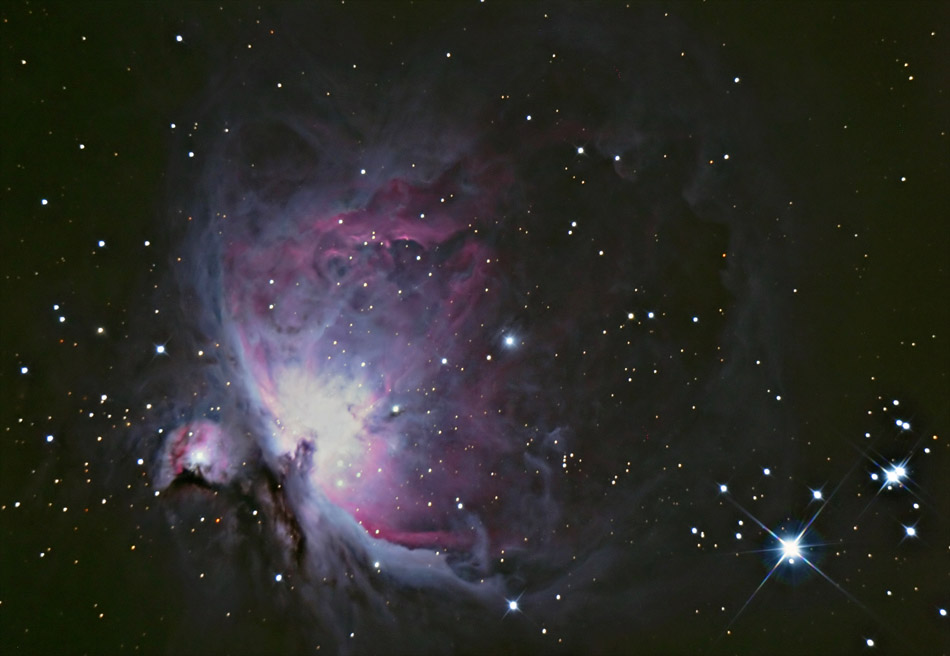
- Emission nebulae: The North America Nebula, Heart and Soul Nebulae, Rosette, California, Lagoon, and Orion are excellent dual-band candidates.
- Broadband targets: Bright galaxies like Andromeda (M31), Triangulum (M33), and larger open clusters are feasible from Bortle 7–8 with longer integration and careful stacking.
- Altitude matters: Shoot targets above 45–60 degrees altitude to reduce atmospheric extinction and skyglow. Time your sequence so the target transits near the middle of your session.
Weather, Seeing, and Transparency
- Transparency: Clarity of the air. Urban humidity and aerosols increase skyglow scatter; prioritize nights with good transparency.
- Seeing: Atmospheric steadiness. Long focal lengths are more sensitive to poor seeing; if the night is turbulent, switch to shorter focal length or wide-field targets.
- Wind: Even modest gusts can bloat stars and spoil guiding. Use wind shields when possible and shorten exposures to minimize motion blur.
Turn planning into a checklist: confirm target altitude windows, the Moon’s position, forecast, and the direction of your darkest patch of sky. If conditions change, pivot to a target that suits them—such flexibility dramatically improves your hit rate from the city.
Mastering Polar Alignment and Tracking Accuracy
Accurate tracking preserves star shapes and prevents field rotation during long integrations. In urban imaging—especially with shorter sub-exposures—you still need good alignment and guiding to keep stars tight.
Polar Alignment Methods
- Polar scope: A calibrated polar scope can achieve good alignment if you set the reticle angle correctly and position Polaris accordingly in the Northern Hemisphere (or Sigma Octantis in the Southern Hemisphere, though it’s fainter).
- Plate-solve assisted alignment: Software-assisted routines using a camera to analyze the sky can yield very accurate alignment. Tools in popular acquisition software offer three-point or iterative alignment without needing to see Polaris directly.
- Drift alignment: The gold standard for precision; monitor star drift in declination and adjust the mount’s azimuth and altitude bolts to null out drift. More time-consuming, but reliable if obstructions hide the pole.

Artist: Negadrive
Guiding Best Practices
- Balance: Slightly biasing balance east-heavy can stabilize gear mesh in some mounts. Aim for smooth RA and DEC corrections without excessive aggressiveness.
- Calibration: Perform a fresh guiding calibration when changing declinations or large portions of sky. Multi-star guiding algorithms help reduce centroid noise.
- Backlash and stiction: Keep gears meshed properly and avoid cable snags. Route cables to prevent tugging that introduces guiding spikes.
Once aligned and guiding, periodically verify eccentricity and FWHM of stars in your subs. If you notice elongation worsening in one axis, revisit balance, backlash, or dithering cadence.
Exposure Strategy: ISO/Gain, Sub Length, and SNR Under Light Pollution
In bright skies, the sky background rises quickly. Your goal is to choose gain/ISO and sub-exposure length such that sky noise dominates read noise—becoming “skyfog limited”—without saturating stars or the target’s bright regions.
Finding the Right Sub-Exposure
- Histogram placement: For DSLRs and OSC cameras, aim to place the sky hump roughly 25–50% from the left in the linear histogram. In severe light pollution, this often means subs of 15–180 seconds, depending on aperture and filter.
- Read noise vs. sky noise: Modern low-read-noise CMOS sensors allow shorter subs while still being sky-noise dominated, which helps avoid clipping bright stars and reduces the cost of a bad sub ruined by wind or tracking hiccups.
Gain/ISO Choices
- Unity gain for CMOS astro cameras: Unity gain is near the point where one electron corresponds to one ADU (digital count). It balances dynamic range and sensitivity. Many imagers start near unity gain and adjust based on target and sky brightness.
- ISO for DSLRs: Choose an ISO that maximizes dynamic range without inflating read noise. For many modern DSLRs, ISO values around 800–1600 are common compromises; test your camera to confirm where dynamic range begins to drop off.
Total Integration Time
- Stack more: Under Bortle 8–9, plan for several hours per target—6 to 12 hours is not unusual for faint nebulae. More integration averages down the sky noise and reveals structure that individual subs never show.
- Dither and restack: With abundant short subs, robust stacking algorithms and dithering can fight pattern noise and improve fine detail.
Principle: Use sub-exposures long enough to be sky-noise limited, but short enough to protect highlights. Let total integration time, not sub length, carry your SNR.
Calibration Frames: Darks, Flats, Bias, and Dark Flats
Calibration frames remove sensor artifacts and optical system variations. In urban imaging, they are essential because even subtle vignetting and dust shadows will amplify when you aggressively stretch to overcome light pollution.
Darks
- Purpose: Subtract thermal signal (dark current) and fixed-pattern noise. Also helps remove amp glow in some sensors.
- How to capture: Cover the lens/telescope, use the same exposure time, gain/ISO, and temperature as your lights. With cooled cameras, build a library across common temps and exposure times.
Flats
- Purpose: Correct vignetting, dust motes, and uneven illumination. Absolutely crucial in city imaging where gradients make any non-uniformity more obvious.
- How to capture: Keep the same focus and image train orientation as lights. Use an evenly illuminated source (flat panel, T-shirt sky flats at dusk/dawn, or sky flats with an adjustable exposure). Aim for mid-histogram levels without clipping.
Bias (or Offset) Frames
- Purpose: Capture the camera’s readout pattern at the shortest exposure. Useful when your stacking software uses master bias for flat calibration.
- Notes: Some modern CMOS sensors respond better to dark flats (below) rather than pure bias frames, especially at high gains where bias instability can occur.
Dark Flats
- Purpose: For cameras where traditional bias is less stable, dark flats (dark frames with the same exposure as your flats) help calibrate flats correctly.
- Workflow tip: If flats are 2 seconds, capture dark flats at 2 seconds with the lens/telescope covered and the same gain/ISO/temperature.
Capture a generous number of calibration frames (20–50 each) so the master frames themselves are low-noise. Good calibration pays dividends when you tackle large-scale gradients and need the image otherwise free of multiplicative artifacts.
Dithering, Guiding, and Eccentricity Control
Dithering is a simple idea with outsized impact: between sub-exposures, slightly move the mount so star positions change by a few pixels. This shifts fixed-pattern and walking noise relative to the signal, allowing stacking algorithms to reject those patterns.
Dithering Basics
- Amount and frequency: Dither by a few pixels every 1–3 subs. Increase the amount with longer focal lengths or visible pattern noise. Balance dither settle time against lost imaging time.
- Software integration: Most sequencing apps can coordinate dithering via your guiding software. Ensure your dither settles to within guiding tolerance before starting the next exposure.
Star Shape and Eccentricity
- Monitor metrics: Many acquisition tools report eccentricity and FWHM per sub. Track these to catch issues early.
- Common causes of elongation: Polar misalignment, periodic error, cable drag, wind, tilt, and differential flexure. See Common Problems and Practical Fixes for targeted remedies.
Consistent dithering combined with solid guiding control will raise your final image quality ceiling dramatically, especially in bright skies where you rely on stacking to do heavy lifting.
Narrowband and Multi-Bandpass Filters for Emission Nebulae
Filtering is the urban imager’s superpower. Narrowband filters isolate specific emission lines—primarily H-alpha (656.3 nm), O III (500.7 nm), and S II (672.4 nm)—allowing you to suppress much of the broadband skyglow and capture structure in emission nebulae even from Bortle 9 locations.
Filter Types
- Mono + individual narrowband: Uses a monochrome camera with separate filters for H-alpha, O III, and S II. Offers maximum control and sensitivity but requires more total time and a filter wheel.
- Dual-/Tri-band for OSC: Passes H-alpha and O III, and sometimes S II, through a single filter. Great for simplifying acquisition while dramatically improving contrast in the city.

Artist: Astrofalls
Bandwidth and Speed
- Bandwidth (e.g., 3 nm, 5 nm, 7 nm): Narrower bandwidths reject more skyglow and isolate emissions better but can be more sensitive to filter tilt and f/ratio effects.
- Fast optics considerations: Very fast systems (e.g., f/2) can shift the effective bandpass, reducing throughput at the target wavelengths. Choose filters specified to work at your optical speed when possible.
Color and Star Handling
- Color mapping: With mono cameras, you can create HOO, SHO, or other aesthetic palettes in post-processing. OSC + dual-band typically yields teal/blue-green for O III and red for H-alpha.
- Star color: Narrowband filters can desaturate or distort star colors. Many imagers blend in short, unfiltered or broadband RGB star layers to restore more natural star hues during post-processing.
When city lights and the Moon dominate, narrowband and dual-band imaging unlocks targets that would otherwise be impractical. Consider tailoring an entire season around emission objects, then switch to broadband favorites on moonless nights with the highest transparency.
Data Acquisition Workflow: Sequencing and Automation
Consistency is essential in bright skies. Software-driven sequencing brings repeatability and efficiency, turning your setup into a reliable imaging appliance.
Session Automation Essentials
- Target framing with plate solving: Precisely center and rotate your target and return to that same framing across nights to build deep integrations.
- Meridian flips: Ensure your sequence can pause guiding, flip, re-center with plate solving, refocus, and resume acquisitions without fuss.
- Autofocus routines: Schedule autofocus based on temperature change, time, or filter swaps. In narrowband imaging, slight focus shifts between filters are common; store per-filter offsets if supported.
- Dithering integration: Coordinate with guiding so each dither settles to your set thresholds to avoid blurring early in the next sub.
File Organization and Logs
- Structured folders: Use a consistent directory structure: target/date/subtype (e.g., Lights, Darks, Flats, DarkFlats).
- Metadata: Preserve FITS headers with exposure length, gain/ISO, temperature, filter, and coordinates. This streamlines stacking and troubleshooting.
- Notes and logs: Keep a simple session log noting seeing, transparency, wind, and any issues for future reference.
Example Acquisition Checklist
- Assemble and balance gear; verify cables and dew control.
- Polar align; run a quick check exposure to verify star shapes.
- Focus with autofocus or a Bahtinov mask.
- Plate-solve to center and frame the target; start guiding.
- Run calibration frames if needed (especially flats if anything changed since last session).
- Start the sequence with dithering enabled; monitor the first few subs for histogram placement as discussed in Exposure Strategy.
Stacking and Post-Processing: From Raw Lights to Finished Image
Stacking increases SNR proportionally to the square root of the number of subs, enabling you to reveal faint signal hidden under city glow. Post-processing then teases out detail, controls gradients, and shapes color.
Pre-Processing and Stacking
- Calibrate lights: Subtract darks/dark flats, divide by flats, and optionally subtract bias frames (or use dark flats if that’s your camera’s preference).
- Register (align) frames: Align images to a common reference with sub-pixel accuracy. Reject frames with trailed stars or poor FWHM.
- Integrate (stack): Use outlier rejection (e.g., sigma clipping) to discard satellite trails and transient artifacts. Normalize backgrounds to manage per-sub gradients.
Gradient Removal and Background Correction
- Automatic background extraction: Use tools that model large-scale gradients with sampled points across the image. Avoid placing samples on nebulosity or bright stars.
- Manual refinement: Iteratively refine the model. If multiple light domes exist in your skyline, gradients may be asymmetric and require careful placement of sample points.
Color Calibration and Balancing
- White balance: For OSC data with dual-band filters, a strict white balance is less important than preserving relative channel strength to maintain the nebula’s natural color mapping.
- Photometric calibration: When using broadband data, photometric color calibration can yield realistic star colors by referencing star catalogs.
Noise Reduction and Sharpening
- Linear noise reduction: Apply gentle, masked noise reduction before stretching. Protect stars and fine structures.
- Deconvolution or deblurring: With good star masks, limited deconvolution can recover detail, but be conservative to avoid ringing.
Stretching and Contrast
- Histogram stretch: Incrementally stretch the image from linear to non-linear, watching star cores to prevent clipping.
- Local contrast: Use masked contrast enhancement on nebular structures and dust lanes, not the entire frame.
Stars and Final Polish
- Star size control: Apply star reduction techniques to keep attention on the target. Blend in RGB stars for natural color if you shot narrowband or dual-band data.
- Color cleanup: Address green cast from background or filters when appropriate while preserving genuine O III teal in emission regions. See Managing Gradients and Color for tips.
Throughout post-processing, your aim is to preserve faint signal integrity while guiding the viewer’s eye. Resist over-saturation and over-sharpening; the urban dataset often benefits from a restrained, methodical approach.
Managing Gradients and Color in Light-Polluted Images
Urban gradients are rarely uniform. They can be multi-directional and change across the night as buildings switch lights or haze thickens. Precise modeling and patient iteration are the antidotes.
Strategies for Gradient Control
- Multiple passes: It’s common to run background extraction more than once, especially for wide fields crossing multiple light domes.
- Dynamic samples: Use many small samples, excluding bright stars and nebulosity. Zoom in to nudge or remove problematic samples that bias the model.
- Color neutrality: After removing luminance gradients, re-check color. A gradient can bias the color balance; recalibrate if needed.
Protecting Nebulae and Galaxies During Gradient Removal
- Masking regions: Build masks based on luminance or star detection to protect nebulosity. Nebula edges are particularly vulnerable to over-subtraction.
- Background reference frames: Consider stacking a synthetic background from dithered sky exposures for extreme cases; however, ensure it doesn’t remove legitimate faint structures.
Maintaining Natural Star Colors
- Dual-band stars: Expect compressed star color variation, as much of the spectrum is suppressed. Blend in short broadband RGB for stars if possible.
- Photometric aids: For broadband targets, photometric color calibration helps counteract urban color casts.
Color and gradient management is iterative—expect to loop between background modeling, color balancing, and stretch adjustments. Done carefully, even a heavily light-polluted dataset can look clean and balanced.
Common Problems and Practical Fixes
Urban astrophotography introduces recurring issues. Here’s a troubleshooting guide to keep your sessions productive.
Walking Noise and Banding
- Symptoms: Directional noise patterns that persist after stacking.
- Fix: Enable dithering every 1–3 subs. Increase dither amplitude, randomize directions, and ensure settle time is sufficient.
Gradients That Won’t Go Away
- Symptoms: Residual large-scale color or brightness gradients after background extraction.
- Fix: Improve flats quality; avoid placing background samples on faint nebulosity; try multi-pass extraction; consider shooting from the darkest direction as noted in Planning.
Elongated Stars
- Symptoms: Stars stretched in RA/DEC or at the corners.
- Fix: Refine polar alignment; check guiding aggressiveness; inspect for cable snag; diagnose tilt or backfocus spacing errors, especially with reducers/flatteners.
Blown-Out Star Cores
- Symptoms: Bright stars saturate, turning white with no color.
- Fix: Shorten sub-exposures; lower gain/ISO; blend a set of short exposures for star cores during post-processing.
Poor Focus Stability
- Symptoms: Star size drifts during the night.
- Fix: Automate refocus based on temperature change or time; ensure the focuser is free of slop; manage dew to prevent focus shifts.
Flat-Field Mismatch
- Symptoms: Residual vignetting or dust doughnuts after flat calibration.
- Fix: Capture flats without changing focus or orientation; ensure even illumination; use dark flats if bias frames cause over/under-correction.
Systematically addressing these issues keeps your signal intact and your post-processing workload manageable.
Frequently Asked Questions
Can I shoot galaxies from Bortle 8?
Yes, but expect to work harder for clean results. Choose bright, large galaxies that rise high—Andromeda (M31) and Triangulum (M33) are common early targets. Use longer total integration time and consider shooting on moonless nights with the best transparency you can get. Carefully manage gradients and color, and don’t hesitate to capture some short exposures to preserve star and core detail. While dedicated narrowband filters do not help with galaxies, quality broadband data with excellent calibration and stacking can still produce pleasing results.
Do I need a telescope, or will a camera lens suffice?
You don’t need a telescope to start. Fast camera lenses (e.g., 50 mm, 85 mm, 135 mm) on a stable star tracker can produce outstanding city images, especially of large emission nebulae with dual-band filters. A small apochromatic refractor is the next logical step when you want flatter fields, better star shapes, and more predictable backfocus for reducers/flatteners. Choose optics based on your targets: large nebulae and wide Milky Way fields favor lenses; smaller nebulae and clusters benefit from refractors in the 250–600 mm range.
Final Thoughts on Choosing the Right Urban Astrophotography Setup

Artist: Gn842
Urban deep-sky astrophotography rewards incremental optimization. Start with what you have—camera, lens, and a sturdy tracker—and refine each link in the chain: improve alignment and guiding, dial in exposure strategy, master calibration, and learn to tame gradients and color. When you’re ready to invest, a small apochromatic refractor, a dependable EQ mount, and a dual-band filter for emission nebulae deliver the most impact in city skies.
Think in seasons rather than nights. Accumulating 8–12 hours on a single target across several sessions lets stacking reveal structure that single nights conceal. With methodical techniques, even Bortle 8–9 skies can yield striking nebulae and respectable galaxies.
If this guide helped you plan your next session, consider subscribing to our newsletter. We share practical, field-tested astrophotography insights every week—gear tips, processing walkthroughs, and target recommendations tailored to real-world skies. Clear skies, and happy imaging from the city.