Table of Contents
- What Is Narrowband Astrophotography from Light‑Polluted Skies?
- Why Narrowband Filters Beat Light Pollution
- Essential Gear: Cameras, Filters, Telescopes, and Mounts
- Selecting Targets and Planning Sessions Under Bortle 6–9
- Acquisition Settings: Exposure Lengths, Gain/ISO, and Dithering
- Calibration and Integration: Bias, Darks, Flats, and Stacking
- Processing Workflows: SHO, HOO, and Natural‑Color Narrowband
- Star Management: Halos, Color Balance, and Starless Techniques
- Troubleshooting Common Urban Imaging Problems
- Frequently Asked Questions
- Final Thoughts on Narrowband Astrophotography from the City
What Is Narrowband Astrophotography from Light‑Polluted Skies?
Narrowband astrophotography is a technique that uses optical filters with very small bandwidths to isolate specific emission lines from nebulae. By capturing only a few nanometers of the spectrum around hydrogen‑alpha (H‑alpha, 656.3 nm), oxygen‑III (OIII, 500.7 nm), and sulfur‑II (SII, around 671.6–673.1 nm, commonly centered near 672.4 nm), astrophotographers can create high‑contrast images even under severe light pollution. The filters block most artificial light and moonlight while transmitting the faint glow from ionized gas, enabling detailed photos from suburban backyards and inner‑city balconies.
In practice, this approach turns a challenging urban sky into a workable laboratory. Instead of fighting gradients and skyglow with broadband color (RGB) imaging, you selectively record the physics of emission nebulae—shock fronts, ionization boundaries, and star‑forming regions—through narrow spectral windows. The result can be surprisingly deep and dramatic photos despite a high Bortle class (6 to 9), provided you apply good acquisition strategy and careful post‑processing.
While narrowband imaging is particularly friendly to emission nebulae (HII regions, planetary nebulae, and supernova remnants), it is less effective on reflection nebulae and galaxies, which emit across broader wavelengths. That means target selection and planning are crucial, especially if you’re imaging under the glow of streetlights or during the full Moon. We’ll discuss smart choices in Selecting Targets and Planning Sessions Under Bortle 6–9.
Key idea: Narrowband is not just for dark‑sky sites. With proper filters and longer total integration times, you can produce publishable images from cities.
Why Narrowband Filters Beat Light Pollution
Light pollution, often described using the Bortle scale (1 = pristine, 9 = inner city), adds an unwanted background that swamps faint cosmic signals. Narrowband filters mitigate this by passing only tiny slices of the spectrum where many nebulae emit strongly and where artificial lighting contributes comparatively little. The result is a dramatic improvement in signal‑to‑noise ratio (SNR) for emission structures.
Three emission lines dominate narrowband imaging:

- H‑alpha (656.3 nm): Strong line from ionized hydrogen, ubiquitous in HII regions and many supernova remnants.
- OIII (500.7 nm, with a close 495.9 nm line): Prominent in planetary nebulae and shocked regions; sensitive to oxygen ionization from energetic radiation.
- SII (around 671.6–673.1 nm): Fainter but informative; correlates with dense ionization zones and shock excitation.
Artificial light sources—LEDs, sodium lamps, and other fixtures—emit over broad ranges of wavelengths, but with narrowband filters, the vast majority of that broad glow is excluded. Even moonlight, which is reflected sunlight and fairly broadband, is largely suppressed. This allows productive imaging during bright lunar phases, a substantial advantage for urban astrophotographers. You still benefit from higher elevations and transparency, but you’re no longer seasonally or phase‑locked to new Moon windows.
Bandwidth matters. Typical narrowband filters range from about 3 nm to 7 nm or broader. Narrower filters (e.g., 3 nm) generally deliver higher contrast in heavy light pollution by rejecting more skyglow, at the expense of requiring accurate optics, focus, and precise filter bandpass alignment. Wider filters (e.g., 6–7 nm) still provide strong benefits and can be more forgiving of fast telescopes where the bandpass may shift slightly with incident angle.
In short, narrowband filters are effective because they convert the urban sky from a noisy problem into a manageable background, letting you integrate signal patiently and build a clean image through targeted wavelengths.
Essential Gear: Cameras, Filters, Telescopes, and Mounts
Success in narrowband imaging comes from the balance of optics, filters, sensor, and tracking. Below is a practical guide to urban‑friendly choices and the trade‑offs involved. For capture strategies, see Acquisition Settings; for turning raw data into color images, see Processing Workflows.
Cameras: Mono vs. Color (OSC)
- Monochrome cameras paired with individual Ha, OIII, and SII filters provide maximum flexibility and efficiency for narrowband. Each pixel collects only the targeted wavelength, boosting SNR and enabling true tri‑band combinations like SHO and HSO. Monochrome is ideal if your goal is the highest possible contrast and control over color mapping.
- One‑shot color (OSC) cameras can also do narrowband using dual‑band or tri‑band filters that pass Ha and OIII (and sometimes SII) simultaneously. While simpler to operate and compatible with lighter rigs, OSC narrowband typically has lower efficiency compared to mono because each pixel is masked by the Bayer matrix. However, OSC with a high‑quality dual‑band filter can still produce impressive results, especially from the city.
Most modern CMOS astronomy cameras offer adjustable gain and low read noise. When in doubt, a unity‑gain setting is a sensible starting point, balancing dynamic range and read noise. Refer to your specific camera’s guidelines for optimal gain and offset values, and match these to your exposure length so you don’t clip highlights or sink faint structures into read noise.
Filters: Bandwidths, Glass Quality, and Halos
- Single‑line filters: For monochrome, use individual Ha, OIII, and SII filters (e.g., 3–7 nm). Narrower is better for heavy light pollution, but ensure your optical system keeps the bandpass on target, especially at fast f/ratios.
- Dual‑band / tri‑band filters for OSC: These pass Ha + OIII or Ha + OIII + SII. They offer convenience and rapid data acquisition but can produce channel crosstalk in processing. A good dual‑band filter can be extremely effective in Bortle 7–9 urban skies.
- Antireflective coatings and halos: Bright stars in OIII can produce halos in some filters. Research halo performance when selecting OIII filters and consider star management techniques in Star Management.
- Filter size and vignetting: Ensure your filter size matches your sensor and optical path to avoid severe vignetting. Flat frames help correct mild vignetting; see Calibration and Integration.
Telescopes: Refractors vs. Reflectors
- Short‑focus refractors (ED/APO): Highly popular for narrowband because they are stable, low maintenance, and yield wide fields ideal for large nebulae. A focal ratio around f/4 to f/7 is common. Field flatteners/reducers help produce sharp corners and shorter exposures.
- Newts and RCTs: Reflectors can offer fast focal ratios and larger apertures for more resolution and speed. Collimation and diffraction spikes are considerations. In cities, the simplicity of a small refractor is often advantageous.
- Fast optics considerations: Very fast systems (e.g., f/2) can shift the effective bandpass of narrowband filters due to the steep light cone. Filters designed for fast optics can mitigate this effect.
Mounts, Guiding, and Focus
- Mount: Accurate tracking is critical. A mount that can guide consistently below your image scale is more important than a big aperture under city skies. Portable equatorial mounts can work well with short focal lengths.
- Guiding: Off‑axis guiding or guide scopes both work. Dithering between sub‑exposures is highly recommended to reduce pattern noise; see Acquisition Settings.
- Focusing: Autofocus routines triggered by temperature and filter changes keep stars tight and data sharp. Narrowband filters increase exposure times for focus metrics; plan for slightly longer focus runs.
Backfocus, Tilt, and Spacing
Optimizing backfocus distance for flatteners/reducers and minimizing tilt are essential for crisp corners and well‑formed stars. Use star shape diagnostics across the frame to tune spacing in small increments. Many issues that look like tracking can actually be tilt or spacing problems.
Selecting Targets and Planning Sessions Under Bortle 6–9
Not all celestial targets are equally suited to urban narrowband imaging. Emission nebulae shine in H‑alpha, OIII, and SII, while reflection nebulae and galaxies are more broadband. The key is to choose objects with strong emission lines and to plan around available sky windows, weather, and the Moon.
Urban‑Friendly Narrowband Targets
- North America Nebula (NGC 7000) and Pelican Nebula (IC 5070): Large H‑alpha rich region in Cygnus; great for wide‑field refractors.

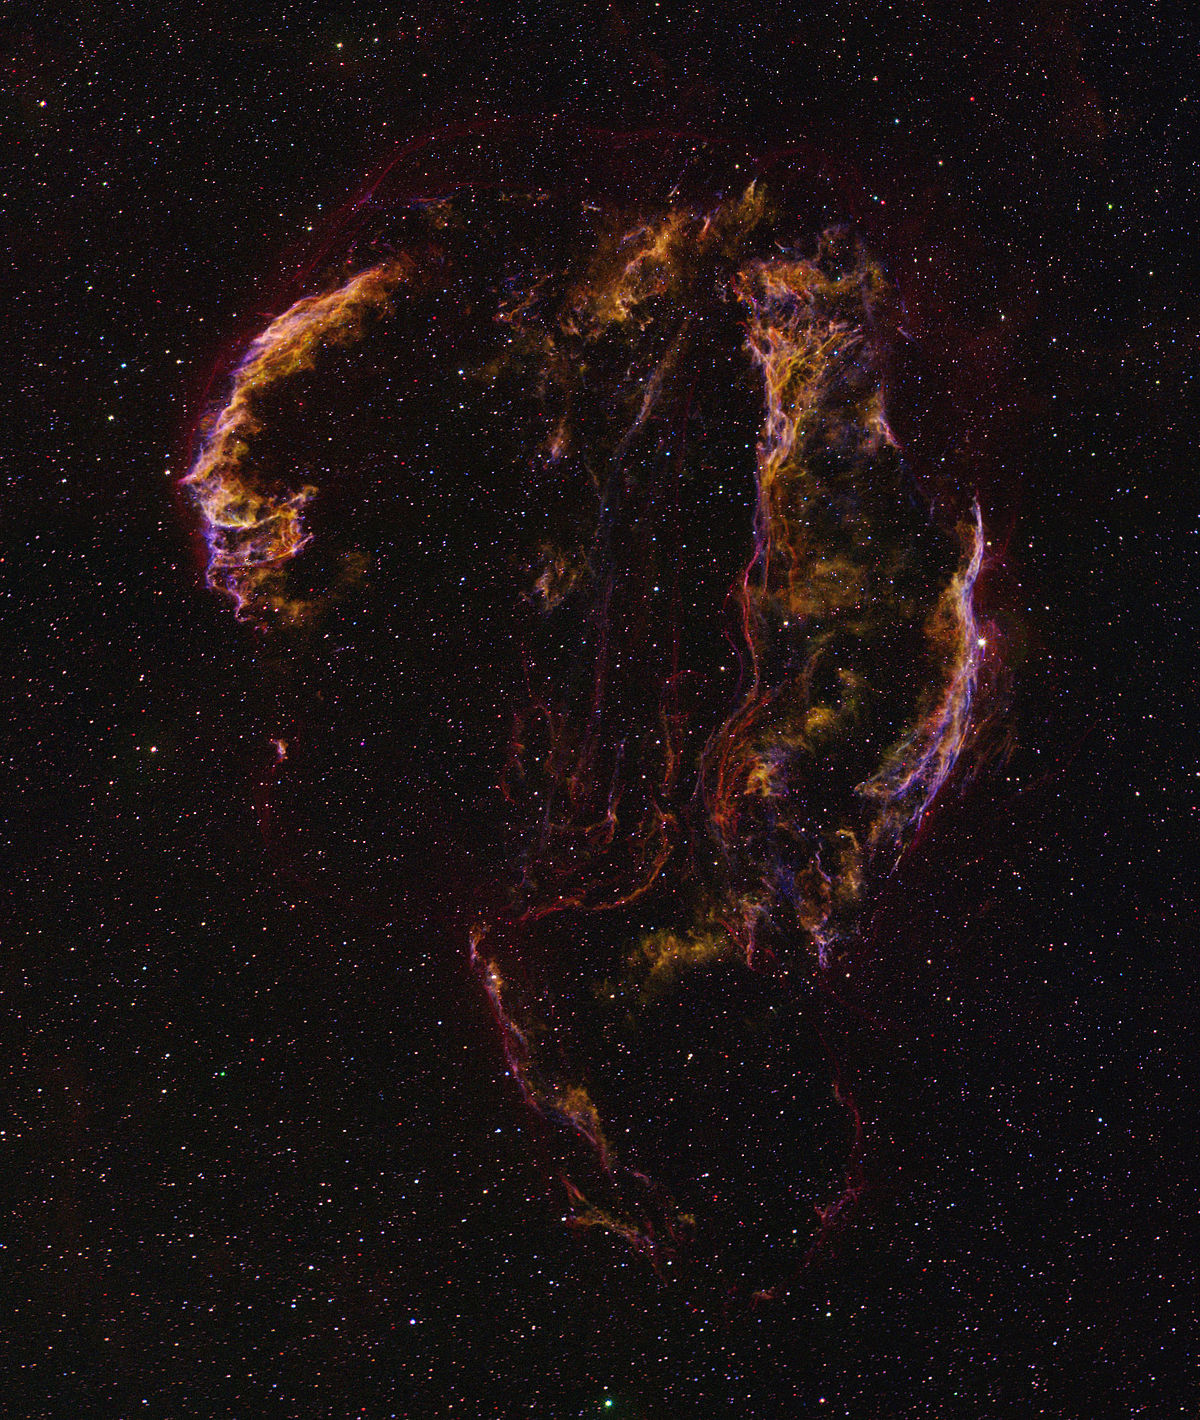
The North America Nebula (NGC 7000) photographed over four nights under Bortle 6 skies. Total exposure time: 20 hours using 3nm duo-band filters (10 hours with H-alpha/OIII and 10 hours with SII/OIII). Image integration and processing completed in PixInsight. — Artist: Astropizza - Veil Nebula (NGC 6960/6992/6995): Supernova remnant with prominent OIII filaments and H‑alpha wisps.
- Heart and Soul Nebulae (IC 1805, IC 1848): Expansive HII regions; benefit from SHO mapping.
- Rosette Nebula (NGC 2237–39 complex): Strong Ha with OIII and SII structure; pairs well with small refractors.
- California Nebula (NGC 1499): Dominant H‑alpha target; dramatic in narrowband mosaics.
- Eagle (M16) and Lagoon (M8): Bright emission cores; OIII features can pop with careful processing.
- Planetary nebulae (e.g., M27 Dumbbell, M57 Ring): Often rich in OIII; smaller targets benefit from longer focal lengths.
Some objects, like the Trifid Nebula (M20), include both emission and reflection components. Narrowband will emphasize the emission but not the blue reflection component; consider blending in broadband color for stars and reflection regions if you have access to darker skies or can allocate additional time to RGB.
Planning Around the Moon and Weather
- Bright Moon: Narrowband allows productive imaging near full Moon. Prioritize H‑alpha and SII during the brightest phases; OIII is sometimes more sensitive to scattered light but is still very workable.
- Transparency and seeing: Transparency affects narrowband less than broadband, but better transparency always helps. Seeing impacts resolution and star shapes; you can adapt by using shorter focal lengths or binning if needed.
- Meridian and altitude: Plan to image targets near culmination when they are highest to reduce atmospheric extinction and dispersion.
Field of View and Image Scale
Match your target to your focal length and sensor. A generous starting point is to target an image scale between roughly 1–2 arcseconds per pixel in average seeing. The basic relation is:
image_scale_arcsec_per_pixel = 206.265 × (pixel_size_microns) / (focal_length_mm)Use this to decide if your setup is better suited to wide nebulae or compact planetary nebulae. If you’re oversampled in poor seeing, you can bin your data during processing to improve SNR at the expense of resolution.
Session Planning Tools and Session Efficiency
- Check weather forecasts for transparency and wind; wind is more damaging than slight haze for long focal lengths.
- Use planetarium software to track object altitude and meridian crossing; schedule flips and autofocus accordingly.
- Build a multi‑night plan. Narrowband rewards total integration time. Revisit the same target across several nights and stack the data; see Calibration and Integration.
Acquisition Settings: Exposure Lengths, Gain/ISO, and Dithering
Exposure strategy depends on sensor characteristics, sky brightness, and filter bandwidth. Your goal is to make each sub‑exposure long enough that sky background noise dominates over read noise, without clipping bright stars or saturating cores. Then, you collect many subs to build total integration time.
Exposure Length Guidelines
- Monochrome + 3–5 nm filters: Typical sub‑exposures range from about 180 to 600 seconds under Bortle 6–9. In very bright skies or with very fast optics, 180–300 seconds often suffice.
- Monochrome + 6–7 nm filters: Slightly shorter exposures are acceptable in brighter skies, but many imagers still run 240–480 seconds.
- OSC + dual‑band filters: 180–300 seconds is a common range; you may go longer if your mount and sky conditions allow without saturating too many stars.

Check star saturation by inspecting the maximum pixel values in your captures. If bright stars saturate excessively, reduce exposure or gain. If your histogram peak sits too close to the left edge (deep in the shadows), increase exposure or gain. Aim for a background peak a safe distance from the left to prevent clipping and to ensure sky noise dominates read noise.
Gain/ISO Settings
- CMOS astronomy cameras: Start around unity gain and adjust based on your sky brightness. If stars saturate, lower gain or shorten sub‑exposures. If your subs are too faint, lengthen subs before raising gain.
- DSLR/mirrorless: Use a low‑noise ISO sweet spot recommended for your model. Many photographers choose a mid‑to‑high ISO that balances dynamic range and read noise; test under your skies.
Dithering and Guiding
Dithering—a small, random offset between subs—is one of the most effective ways to suppress fixed pattern noise and walking noise, especially with CMOS sensors. Dither every few frames (e.g., every 1–3 subs) with a few pixels of movement. Combined with sigma‑clipping or Winsorized rejection during stacking, dithering cleans up streaks and background artifacts.
Autofocus and Temperature
Urban environments can undergo significant temperature shifts at night. Automate focus checks every set interval or after large temperature changes. Narrowband filters reduce star flux reaching your focus metric; allow slightly longer focus exposures or larger focus windows to ensure reliable autofocus.
Subframe Quality and Rejection
Use your capture software to monitor FWHM, eccentricity, and SNR of subs. Reject frames with clouds, wind gusts, or guiding errors. Good stacking relies on consistent quality inputs; see Calibration and Integration for weighted integration methods.
Calibration and Integration: Bias, Darks, Flats, and Stacking
Calibration frames remove or reduce sensor artifacts and optical unevenness, which is crucial when stretching faint narrowband data. Even from the city, careful calibration and stacking can reveal delicate structures with smooth backgrounds.
Calibration Frames
- Darks: Taken with the same exposure, temperature, and gain as your lights to model dark current and amp glow. Many modern CMOS sensors benefit significantly from matched darks.
- Flats: Correct vignetting, dust motes, and uneven illumination. Capture flats for each filter and optical configuration. Keep the histogram near the center to avoid clipping and ensure good signal.
- Bias or Flat‑darks: Some workflows use bias frames (shortest possible exposures) to calibrate flats; others prefer flat‑darks (darks with flat exposure length). For certain CMOS sensors, flat‑darks are more reliable than bias for calibrating flats.
Maintain consistent temperature for darks and flat‑darks. If your camera is cooled, create a library of darks at common settings (e.g., exposure lengths you use frequently and standard set temperatures).
Registration and Stacking
- Registration: Align frames to a common reference using star matching. For multi‑night projects, choose a clean, central sub as the reference.
- Weighting: Assign weights to subs based on SNR, FWHM, and eccentricity to prioritize sharp, clean frames during integration.
- Rejection: Sigma‑clipping, Winsorized sigma, or linear fit clipping helps remove satellites, planes, and transient gradients. Dithering enhances effectiveness.
If you’re combining data from multiple filters (Ha, OIII, SII), calibrate and stack each channel separately first. Then, register the final masters to each other before color combining. This avoids channel misalignment and color fringing. For color workflow guidance, see Processing Workflows.
Processing Workflows: SHO, HOO, and Natural‑Color Narrowband
Narrowband data can be mapped to color in several scientifically inspired or aesthetically driven ways. The most common are:
- SHO (Hubble palette): SII → Red, Ha → Green, OIII → Blue. Highlights structural differences between sulfur, hydrogen, and oxygen emission.
- HOO: Ha → Red, OIII → Green/Blue (or split OIII into both channels). This produces teal/cyan and red/orange contrasts typical of many modern narrowband images.
- HSO/Foraxx and other variations: Alternative blends that balance hues and brightness for pleasing aesthetics with scientific footing.
Pre‑processing and Linear Stage
- Channel masters: Create calibrated, registered, and stacked masters for each filter (Ha, OIII, SII). Inspect each for gradients, noise, and halos.
- Background management: Apply gradient removal while linear. Many tools allow dynamic or automatic background extraction, especially helpful under city gradients.
- Linear noise reduction: Use a mask to protect bright structures while denoising dimmer regions. Keep a light touch; you’ll refine later after stretch.
Color Combinations (Examples)
Using a pixel math approach, you can experiment with blends. Here are representative mappings (syntax varies by software):
// SHO (SII, Ha, OIII)

R = SII

G = Ha

B = OIII
// HOO (Ha, OIII, OIII)

R = Ha

G = OIII

B = OIII
// HSO

R = Ha

G = SII

B = OIII
// Blend to tame green (example)

G = 0.85*G + 0.15*B

After initial assignment, apply color calibration or balancing gently. Narrowband palettes don’t strictly follow true color, but you can calibrate star colors if you replace or blend with RGB stars (see Star Management).
Stretching and Contrast
- Nonlinear stretch: Use a controlled stretch (e.g., arcsinh or masked stretch) to preserve star cores and highlight faint nebulosity.
- Local contrast: Apply local contrast enhancement and multiscale processing to bring out filaments and shock fronts. Use masks so you avoid over‑emphasizing noise.
- Color balance: Narrowband images can skew green due to strong Ha. Gentle green suppression or re‑mapping can produce more balanced palettes while retaining detail.
Deconvolution and Sharpening
Deconvolution is most effective during the linear stage with appropriate star masks and PSF estimation. If you prefer to avoid the complexity, reserve careful sharpening for the nonlinear stage with masks that exclude stars and background.
Combining OSC Dual‑Band Data
If you used an OSC camera with a dual‑band filter, you’ll typically extract approximate Ha and OIII channels from the color data. One approach is to split RGB and use channel ratios or specialized extraction tools to isolate Ha and OIII signals. Then, recombine as HOO or blend into an SHO‑like palette if you have additional SII data from a mono session.
Mosaics and Multi‑Night Integration
Urban imagers often return to the same target over many nights. Keep carefully matched calibration frames and consistent framing. For mosaics, plate‑solve and rotate consistently between panels. Blend overlapping edges with gradient compensation before final color mapping to avoid seams.
Tip: When in doubt, build a clean Ha master first. Ha often carries the strongest structural information and can guide your noise reduction, stretching, and star masks before you bring in OIII and SII.
Star Management: Halos, Color Balance, and Starless Techniques
Stars in narrowband images can dominate if left unchecked, especially in rich Milky Way fields. Urban conditions can also intensify halos around bright stars, particularly in OIII. Managing stars—size, color, and halos—makes your nebulae stand out.
Star Size Control
- Masks and morphological tools: Create star masks to apply gentle morphological operations that reduce star sizes without damaging nebular detail.
- De‑emphasis during stretch: Stretch with star masks so stars grow less than nebulae. Consider separate stretches for stars and nebula, then recombine.
Star Color in Narrowband
Narrowband filters alter star color. Many imagers blend RGB stars into narrowband nebulae to restore natural star hues:
- Produce a clean narrowband nebula layer (with stars minimized or removed).
- Create an RGB stars layer from broadband data or from your OSC data without the narrowband filter if available.
- Use a star mask or star extraction tool to replace narrowband stars with RGB stars.
If RGB star data aren’t available, keep stars modest and neutral in hue by balancing channels post‑stretch. Avoid oversaturation that can emphasize sampling artifacts or halos.
Halos and Reflections
- Filter choice: Some filters handle bright stars better than others, particularly in OIII. Research halo performance.
- Processing mitigation: Use star masks to selectively reduce the brightness of halo rings or blend a shorter‑exposure star field to tame overly bright cores.
Starless and Semi‑Starless Techniques
Star removal tools (for example, methods commonly known as StarNet‑style approaches) can generate a starless nebula layer. This allows heavy contrast work on nebulosity and reassociation with stars later. A conservative workflow:
- Make a copy of your stretched image.
- Create a starless version to process nebulosity aggressively (contrast, color separation).
- Process stars separately (size reduction, color balancing).
- Recombine with a soft blend mode to keep stars present but subtle.
Be careful not to introduce artifacts around star cores during extraction and recomposition. Inspect at 100% and clean halos or ringing with masks and gentle corrections.
Troubleshooting Common Urban Imaging Problems
City imaging brings its own set of predictable challenges. The good news: most have straightforward solutions. Use this checklist to diagnose issues and cross‑reference relevant sections like Acquisition Settings, Calibration and Integration, and Star Management.
Problem: Severe Gradients and Uneven Backgrounds
- Causes: Nearby lights, skyglow, reflections from dew shields, or internal reflections.
- Fixes: Shield stray light, extend dew shields, avoid imaging over rooftops with heat plumes. Apply background extraction tools during linear processing, and ensure flats are high quality and filter‑specific.
Problem: Bloated or Elongated Stars
- Causes: Guiding errors, poor focus, tilt, or chromatic/optical aberrations.
- Fixes: Inspect guiding RMS relative to image scale; refocus periodically; test tilt with corner star analysis; verify reducer/flattener spacing. Use star size control techniques to refine appearance.
Problem: Ringing or Halos Around Stars
- Causes: Filter reflections (especially in OIII), optical reflections, or aggressive deconvolution.
- Fixes: Try a different filter if halos are severe, reduce aggressive sharpening, and use star masks to selectively reduce halo brightness in processing.
Problem: Noisy Background Even After Long Integration
- Causes: Sub‑exposures too short relative to read noise, insufficient total time, or inadequate dithering.
- Fixes: Lengthen subs until the sky background clearly rises above read noise, increase total integration time, and dither more frequently. Apply careful noise reduction in the linear stage and again after stretch with masks.
Problem: Misaligned Channels and Color Fringing
- Causes: Channel masters not registered to each other, flexure, or different focus points for filters.
- Fixes: Register master Ha, OIII, and SII to a common reference before combination; use filter offsets or autofocus per filter to keep stars the same size. If residual fringing remains, use channel‑specific star masks to match star profiles.
Problem: Flat Fielding Doesn’t Correct Vignetting or Dust
- Causes: Flats captured with different focus or rotation, or exposure levels too low/high; using bias with cameras that prefer flat‑darks.
- Fixes: Re‑shoot flats for each filter without changing focus or rotation; keep the histogram centered; consider flat‑darks rather than bias for certain CMOS sensors to avoid calibration mismatch.
Frequently Asked Questions
Can I do narrowband with a one‑shot color camera?
Yes. A high‑quality dual‑band or tri‑band filter paired with an OSC camera can produce excellent narrowband images from urban skies. The filter passes Ha and OIII (and sometimes SII), while the Bayer matrix records these signals across color channels. You’ll typically extract approximate Ha and OIII from the color data and recombine them as HOO or similar palettes. While monochrome remains more efficient for pure narrowband, OSC narrowband is simpler and still highly effective, especially under light pollution.
Is a 3 nm filter always better than a 7 nm filter?
Not always. A 3 nm filter rejects more skyglow and improves contrast in bright environments, which is beneficial in cities. However, narrower filters can be more sensitive to bandpass shift in fast optics and may demand more precise focus. A 6–7 nm filter is more forgiving and still offers strong suppression of light pollution. Choose bandwidth based on your telescope’s focal ratio, local sky brightness, and imaging goals. A practical approach is to use narrower filters for OIII under severe light pollution and a slightly wider Ha if you prefer shorter exposures.
Final Thoughts on Narrowband Astrophotography from the City
Narrowband imaging transforms the challenge of urban skies into an opportunity. By isolating H‑alpha, OIII, and SII emission lines, you can capture richly detailed nebulae despite skyglow and moonlight. The recipe is straightforward: pick emission‑heavy targets, match gear to your goals, set smart exposure and dithering strategies, calibrate meticulously, and use controlled processing to reveal structure without overcooking stars.
If you are just starting, try a short‑focus refractor with a dual‑band filter and an OSC camera to streamline the workflow. As you gain experience, consider a monochrome camera with individual Ha, OIII, and SII filters for maximum control. Keep integrating over multiple nights; urban narrowband rewards patience. Explore different color mappings—SHO, HOO, and variants—and practice star management to let the nebulae shine.
For your next clear night, plan using the tips in Selecting Targets and Planning Sessions Under Bortle 6–9 and refine your Acquisition Settings to fit your camera and sky. If you enjoyed this guide, subscribe to our newsletter for more deep dives into astrophotography techniques, gear optimization, and processing workflows. We’ll continue exploring urban‑friendly methods to help you create vivid, scientifically grounded images from wherever you live.
