
Table of Contents
- What Is Deep-Sky Astrophotography with a DSLR or Mirrorless Camera?
- Choosing a Camera and Lens for Night Sky Imaging
- Mounts, Tripods, and Star Trackers: Why Tracking Matters
- Exposure, ISO, and the NPF Rule: Dialing in Capture Settings
- Focusing at Infinity and Managing Star Shapes
- Calibration Frames: Darks, Flats, Bias, and Why They Matter
- Organizing a Field Workflow: From Setup to Shutdown
- Stacking and Post-Processing: From Raw Lights to a Clean Image
- Battling Light Pollution: Filters, Bortle Scale, and Narrowband
- Composing Targets: Nebulae, Galaxies, and Star Clusters by Season
- Common Problems and Practical Fixes
- Frequently Asked Questions
- Final Thoughts on Choosing the Right Deep-Sky Astrophotography Path
What Is Deep-Sky Astrophotography with a DSLR or Mirrorless Camera?
Deep-sky astrophotography is the craft of capturing faint celestial objects beyond our Solar System—emission and reflection nebulae, dark nebulae, galaxies, and star clusters. While these targets are usually too dim to record in a single frame the way we might photograph a landscape, modern DSLR and mirrorless cameras, combined with tracking mounts and stacking software, make it possible to accumulate many long exposures and reveal structures the eye cannot.
This approach builds on three pillars:

Artist: NASA, ESA, J. Dalcanton, B.F. Williams, and L.C. Johnson (University of Washington), the PHAT team, and R. Gendler
- Signal gathering over time: taking many exposures (“lights”) to gather photons from faint targets while averaging out random noise.
- Stable tracking: using a star tracker or equatorial mount to compensate for Earth’s rotation so stars remain sharp over longer exposures.
- Calibration and processing: applying calibration frames and stacking to reduce noise and gradients, then stretching the data to reveal the hidden detail.
Newcomers often begin with a wide-angle lens and a fixed tripod, then add a portable star tracker for longer exposures. Over time, many move to small refractor telescopes and more capable mounts for narrower, deeper views of nebulae and galaxies. Crucially, you do not need a dedicated astronomy camera to start: a standard interchangeable-lens camera can deliver outstanding results, especially from dark skies.
Because this field straddles photography and astronomy, you will encounter a blend of photographic concepts (aperture, ISO, dynamic range) and astronomical ones (sidereal tracking rate, arcseconds per pixel, NPF rule). This guide stays practical and evidence-based, walking you from gear selection to capture and processing, with a focus on methods that consistently work in real-world conditions.
Choosing a Camera and Lens for Night Sky Imaging
Your camera and lens set the baseline for sensitivity, field of view, and star quality. Fortunately, most modern cameras are capable astrophotography tools. What matters most is how you use them—specifically, how you expose, focus, and process the images. Here’s how to choose and set up your gear.
Sensor type and size
- Full-frame: Larger pixels and a bigger field of view at the same focal length help collect more total signal per exposure. The trade-off is higher lens cost and potential vignetting at wide apertures. Dynamic range and high-ISO performance are often excellent.
- APS-C: A very capable middle ground with a narrower field of view for a given focal length (helpful for smaller targets). Cameras are compact and cost-effective. Many APS-C models have low read noise and strong performance for stacking.
- Micro Four Thirds: Smaller sensors can still produce high-quality results, especially with fast lenses. Tracking and stacking become even more important because of smaller pixels and the crop factor.
ISO and dynamic range considerations
ISO does not change how many photons the sensor collects. Instead, it sets electronic gain and how the data is mapped into the camera’s RAW file. For deep-sky work, sensible ISO choices help keep read noise under control while preserving dynamic range for bright stars and nebula cores. Many cameras perform well in the ISO 400–1600 range; some reach a “sweet spot” of read-noise reduction at a particular gain. Consult independent tests for your specific model. Always shoot RAW to retain maximum data for stacking and stretching.
Lenses for the night sky
- Wide-angle (14–35 mm): Ideal for Milky Way panoramas, large nebula complexes, and constellation-scale framing. On a tracker, you can integrate many long exposures at f/2–f/4 to pull out faint dust and H II regions.
- Short telephoto (50–135 mm): Great for bright nebulae (e.g., the Orion region), open clusters, and galaxy groups. Many affordable 85 mm and 135 mm primes perform well stopped down one or two stops to control coma and vignetting.
- Telephoto (200–400 mm): Tight framing for medium-size galaxies and nebulae with detailed star fields. Tracking precision becomes increasingly important at these focal lengths.
Prime lenses tend to offer better star shapes and faster apertures than zooms, but some zooms perform admirably when stopped down. Evaluate star quality at the edges and corners; aberrations like coma and astigmatism become obvious on pinpoint stars. If you plan to image narrowband with clip-in or screw-on filters, consider lenses with minimal focus shift and adequate backfocus clearance for filter holders.
Essential accessories
- Intervalometer or in-camera interval mode for automated sequences.
- Spare batteries or external power, as long exposures and cold nights can drain power quickly.
- Dew control: at minimum, a lens hood; ideally a USB dew heater strap to keep optics clear.
- Bahtinov mask or live-view magnification aids for precise focus (more under Focusing at Infinity).
Mounts, Tripods, and Star Trackers: Why Tracking Matters
Earth’s rotation smears starlight into trails during long exposures. For deep-sky imaging, we want to follow the sky. A sturdy tripod, a precisely aligned star tracker or equatorial mount, and good balance transform your camera into a photon-collecting machine.
Fixed tripod versus tracking
- Fixed tripod: Useful for learning focus and framing, or for short exposures of star fields and the Milky Way. Without tracking, you’re constrained by the NPF rule to a few seconds of exposure before stars elongate.
- Star tracker/equatorial mount: Compensates for rotation at the sidereal rate, allowing exposures from tens of seconds to several minutes depending on focal length, polar alignment, and mechanical precision.

Artist: Negadrive
Star trackers and small equatorial mounts

Artist: HiyoriX
Portable trackers are compact RA (right ascension) drives that carry a camera and lens. They are ideal for lenses up to about 200–300 mm, depending on the tracker’s capacity and the mass of your setup. Key features to look for include:
- Payload rating that comfortably exceeds your camera, lens, and accessories combined.
- Polar scope or electronic alignment aid for accurate polar alignment; accuracy directly influences maximum exposure time without trailing.
- Fine alt-az adjustment on the base to make alignment precise and repeatable.
- Autoguiding support on some models for longer focal lengths; however, many beginners find unguided exposures of 30–120 seconds sufficient at short focal lengths when stacked.
Tripod stability and balance
A solid tripod is as important as the tracker itself. Use a robust head (or a wedge designed for your tracker) and keep the center column retracted to minimize flex. Balance your camera-lens assembly on the tracker’s declination bracket, if present, to reduce stress on the RA drive and improve tracking performance. Ensure all clamps are snug but avoid overtightening, which can introduce flexure over time.
Environmental stability also matters: avoid placing the tripod on soft ground, and shield it from wind where possible. Even small gusts can smear stars in long exposures, particularly with longer lenses. If you expect wind, keep the setup compact and reduce exposure times to stay within the mount’s comfort zone.
Exposure, ISO, and the NPF Rule: Dialing in Capture Settings
Exposure strategy is about collecting as many clean photons as your conditions allow. With tracking, you can expose longer without trails, but gradients, skyglow, and mount error still impose limits. Here’s how to decide on exposure time, aperture, and ISO.
NPF rule and the 500 rule
The older “500 rule” (exposure seconds ≈ 500 ÷ focal length in mm on full-frame) is a rough guide for fixed tripods, but it ignores pixel size and modern sensor resolution. The NPF rule refines the estimate by accounting for focal length, aperture, and pixel pitch. Many calculators exist; the key takeaway is that higher resolution and longer focal lengths demand shorter unguided exposures to avoid star elongation. With a tracker, the NPF rule is less constraining because the mount cancels most of the sky’s apparent motion, but it’s still useful when you shoot without tracking or when your alignment isn’t ideal.
How long should each sub-exposure be?
There is no single correct answer. Instead, aim for exposures long enough that sky background noise (light pollution, airglow) rises above the camera’s read noise, but not so long that stars saturate or tracking errors show. Practical starting points:
- Wide lenses (14–35 mm) on a tracker: 60–120 s at f/2–f/4, ISO 400–1600, depending on sky brightness.
- Short telephoto (50–135 mm): 60–180 s at f/2.8–f/4, ISO 400–800; check star shapes and histograms.
- Telephoto (200–300+ mm): 60–180 s at f/3.5–f/5.6, ISO 200–800; reduce exposure time if trailing appears.
These ranges keep bright stars below saturation while building signal in nebulae and galaxies. If your histogram’s peak hugs the left edge, try longer or higher ISO; if it’s near the middle or right with clipped highlights, shorten exposure or lower ISO. Always inspect a 1:1 crop of stars to confirm tracking.
Aperture and star quality
Astrophotography exposes lens aberrations. Even premium lenses often benefit from stopping down one or two stops to tighten star shapes and reduce vignetting. The trade is slower light gathering; you can compensate by integrating longer overall. Balance speed and sharpness; the final stacked result usually improves when stars are clean, even if each sub-exposure is a bit dimmer.
ISO choices and in-camera noise reduction
- ISO: Many cameras work well around ISO 800 for deep-sky, but always test your model. If you see excessive star clipping, lower ISO; if your background is barely above black, consider raising it or lengthening exposures.
- Long Exposure Noise Reduction (LENR): This takes a dark frame after each light, halving your duty cycle. For deep-sky, it’s usually more effective to disable LENR and capture your own dark frames separately, preserving precious sky time.
Example capture plan
Here’s a simple, repeatable plan expressed as pseudo-parameters you can adapt:
Target: Emission nebula, 85 mm lens, Bortle 4 sky, on a tracker
Aperture: f/2.8 (stopped down 1 stop from wide-open)
Exposure: 90 seconds per sub
ISO: 800
Lights: 120 subs (3 hours total integration)
Darks: 20 subs at 90 s, same temperature and ISO
Flats: 30 subs at f/2.8 using uniform light source, ~1 s exposures
Bias or Flat-Darks: 50 subs (choose one method, see calibration section)
Interval: 2 s gap between subs for buffer write
Focus: live view at 10x on bright star; verify every 30 minutes
Adjust these numbers based on your mount’s tracking consistency, ambient temperature, and sky brightness. The most common refinement is simply: collect more integration time and keep stars round.
Focusing at Infinity and Managing Star Shapes
Deep-sky images live and die by star quality. Perfect focus and good tracking yield pinpoint stars that make faint nebulosity stand out. Achieving and maintaining focus is easier with a methodical approach.
Reliable focus methods
- Live-view magnification: Aim at a bright star, maximize live-view ISO and exposure simulation, then magnify 5–10× and adjust focus slowly until the star is as small as possible. Use focus peaking if your camera provides it, but verify by eye.
- Bahtinov mask: A laser-cut mask that creates a diffraction pattern; focus is perfect when the central spike is centered. Works best on lenses or small refractors where you can mount the mask.

Example diffraction patterns produced by Bahtinov mask
Artist: Axleottal
- Software-assisted focusing: Some capture utilities compute star size (FWHM/HFR) in real time. If tethering is convenient, this offers quantifiable feedback.
Keeping focus through the night
Temperature changes alter lens and telescope focus. Monitor star size during the sequence and refocus when needed, especially after large temperature drops or when slewing to a new target. For lenses, tape the focus ring once locked. Avoid “infinity” hard stops on some lenses; they’re not always true infinity for the night sky.
Managing star shapes and aberrations
- Coma/astigmatism: Common in fast wide lenses near the corners. Stopping down 1–2 stops usually helps. Crop slightly if necessary rather than overcorrecting in post.
- Field curvature: Corners out of focus while center is sharp. Stopping down helps; tilt can also mimic curvature—ensure the sensor plane is square to the optical axis (check that adapters and clamps are even).
- Trailing: Caused by tracking error, wind, or too-long exposures. Reduce sub length, improve polar alignment, or strengthen the mounting.
- Differential flexure: More relevant when guiding with separate optics; for camera-lens setups, keep everything snug to avoid relative motion.
If you notice subtle elongation in a consistent direction across frames, try reducing exposure by 20–30% and see if it disappears. Slightly conservative sub lengths can increase the keep-rate and improve the stacked result.
Calibration Frames: Darks, Flats, Bias, and Why They Matter
Calibration frames remove reproducible artifacts and help you extract faint dust lanes without blotches or gradients. They are the quiet, unglamorous heart of astrophotography data quality.
Darks
Dark frames are exposures with the same length, ISO, and temperature as your lights, but with the lens cap on. They capture thermal signal, hot pixels, and pattern noise. Subtracting or integrating these via stacking software reduces speckling and hot-pixel trails. Best practices:
- Take a dark library at the end of the session while the camera is still at operating temperature.
- Match exposure time and ISO exactly to your lights.
- Capture 15–30 darks as a typical starting set.
Flats
Flat frames correct vignetting and dust motes. They must be taken without changing focus or aperture from your lights. Use a uniform, featureless light source: a tablet at low brightness with a diffuser, a dawn sky pointing away from the Sun, or a dedicated flat panel. Exposure guidance:
- Target a mid-histogram peak (often around 1/2 to 2/3 for many cameras) without clipping highlights.
- Capture 20–40 flats for good noise reduction.
- For zoom lenses, take flats at the exact focal length used for lights; even slight changes alter vignetting.
Bias and flat-darks
Bias frames are very short exposures (fastest shutter speed) with the cap on, capturing the camera’s readout pattern. Some workflows use flat-darks instead—dark frames that match the exposure time of your flats. Many stacking programs support either method:
- Bias: Simple to build a large library (e.g., 50–100 frames) at any time; effective with cameras where the bias signal is stable.
- Flat-darks: Preferred if your camera’s bias frame does not accurately represent the offset present in your flats (common with some mirrorless/DSLR models). Capture 20–40 flat-darks along with flats.
Whichever method you use, consistent, well-matched calibration frames will make processing far easier. If your stacked image shows dark donuts or bright rings after calibration, the usual culprit is mismatched flats or a shift in focus/aperture between lights and flats.
Organizing a Field Workflow: From Setup to Shutdown
Astrophotography sessions involve many small steps. A simple, repeatable workflow reduces mistakes and helps you make the most of clear nights.
Pre-session checklist
- Charge batteries, clear memory cards, and pack a red headlamp.
- Update object lists and star charts; note rise/set and altitude for targets across the night.
- Check weather, transparency, and wind forecasts. If possible, select a site with darker skies; the Bortle scale is a useful shorthand for darkness.
- Pre-configure your camera: RAW only, LENR off, high ISO noise reduction off, custom white balance optional (it won’t affect RAW but can aid previews).
Setup on site
- Level the tripod and mount or tracker, roughly align to true north/south depending on hemisphere.
- Mount the camera and lens; attach intervalometer and dew heater if used.
- Balance on the declination bracket or dovetail; keep cables short and strain-relieved.
- Perform polar alignment using the tracker’s scope or electronic tool. The better the alignment, the longer the usable exposures; refine if you intend to shoot at 135 mm or longer.
- Set initial framing using a planetarium app to locate the target. Consider composition with foreground if using a wide lens.
- Focus on a bright star using live view magnification or a Bahtinov mask. Verify and lock focus.
Run the sequence
- Start with a handful of test exposures to check star shape, histogram, and framing.
- Begin the intervalometer program for your planned exposure count. Enable a short delay (1–3 s) between frames to allow write buffers to clear.
- Check for dew, wind, and cable snags every 15–30 minutes. Verify focus periodically, especially after temperature changes.
- Optional: If you have a tracking mount with guiding, consider dithering between subs via your guiding software to break up fixed-pattern noise in the stack.
End of session
- Capture darks immediately: leave the camera mounted, cap the lens, keep ISO and exposure identical to lights.
- Take flats before tearing down or at dawn, ensuring focus and aperture match your lights exactly. If you need to shoot daytime flats later, do not touch the focus ring and do not change aperture.
- Record notes: target, lens settings, exposure, ISO, temperature, any issues observed. These notes make troubleshooting easier during processing.
Stacking and Post-Processing: From Raw Lights to a Clean Image
Processing turns raw integrations into finished astro images. The most important step is stacking, which averages noise while preserving signal. Then you will stretch the data, balance color, remove gradients, and enhance detail carefully to avoid artifacts.
Stacking software and workflow
Popular options include cross-platform tools and Windows-based programs. The general flow is similar regardless of software:
- Calibrate each light with darks, flats, and bias/flat-darks.
- Register/align the images so stars line up, compensating for drift and slight rotation.
- Integrate/stack using a rejection algorithm (e.g., sigma-clipping) to remove outliers like satellites and planes.
Free, widely used tools include Siril (cross-platform) and DeepSkyStacker (Windows). Sequator is another Windows option for wide-field work. Commercial suites like Astro Pixel Processor and PixInsight add advanced calibration, mosaic, and gradient modeling features. Each program provides documentation with recommended settings for typical DSLR/mirrorless data.
Linear to non-linear: stretching the data
- Initial stretch: Apply a gentle histogram stretch or mid-tone transfer function in your software of choice (Siril, PixInsight, etc.). Watch the background: over-stretching early introduces noise and banding.
- Background neutralization: Balance the background color toward gray. Remove large-scale gradients caused by light pollution using tools like background extraction or gradient reduction. Neutral, even backgrounds make later color work easier.
- Color calibration: Use photometric color calibration (when available) or manual white balance based on star colors and background neutrality. Many DSLR sensors are sensitive to hydrogen-alpha emission; if unmodified, red response is reduced, so expect subtler reds unless you use a filter that passes H-alpha better or a camera modification.
Noise reduction and sharpening
After stretching, noise becomes visible. Apply noise reduction modestly, prioritizing the background while preserving star cores and structure:
- Multiscale noise reduction tools can target different spatial frequencies, smoothing the background while leaving detail intact.
- Local contrast and deconvolution can enhance details, especially in galaxies, but push carefully to avoid ringing around stars.
Star control and color
Stars can dominate wide-field images. Techniques include star masks, star reduction filters, and color balancing to keep stars natural while highlighting nebulae:
- Use a star mask to selectively reduce star size or saturation.
- Preserve color variety; a natural field shows a range from blue-white to orange, reflecting stellar temperatures.
It’s tempting to push saturation high, but subtle color often looks more realistic and preserves gradients between emission and reflection regions.
Final touches and export
- Crop or rotate slightly to improve composition and remove stacking artifacts at the edges.
- Annotate your image with object names if desired.
- Export in a high-bit-depth format (TIFF) for archiving and an 8-bit JPEG for web sharing.
Keep your stacked linear master and processing history. As your skills grow, you might return to the same data and achieve better results with refined techniques.
Battling Light Pollution: Filters, Bortle Scale, and Narrowband
Light pollution washes out faint structures and reduces contrast. While nothing replaces dark skies, you can mitigate the impact with smart planning and, in some cases, optical filters.
Know your sky: the Bortle scale
The Bortle scale classifies night-sky darkness from 1 (pristine dark) to 9 (bright urban). At Bortle 5–6, bright emission nebulae remain achievable with tracking and stacking, but faint dust and reflection nebulae are significantly harder. If possible, plan trips to darker sites for ambitious targets. Even a one- or two-class improvement can be transformative for broadband targets like galaxies.
Filters for DSLR/mirrorless cameras
- Broadband (light pollution) filters: Designed to attenuate common streetlamp wavelengths while passing most visible light. Their effectiveness varies with LED-dominated skies and can sometimes introduce color casts. They can help with contrast for broadband targets under moderate light pollution but are not a cure-all.
- Narrowband and dual-band filters: Pass specific emission lines like H-alpha and O III, suppressing much of the background. With one-shot-color cameras, dual-band filters can isolate nebular emission in city skies. The trade-off is longer exposure times and potential star color shifts. Focus can shift slightly; refocus after installing a filter.
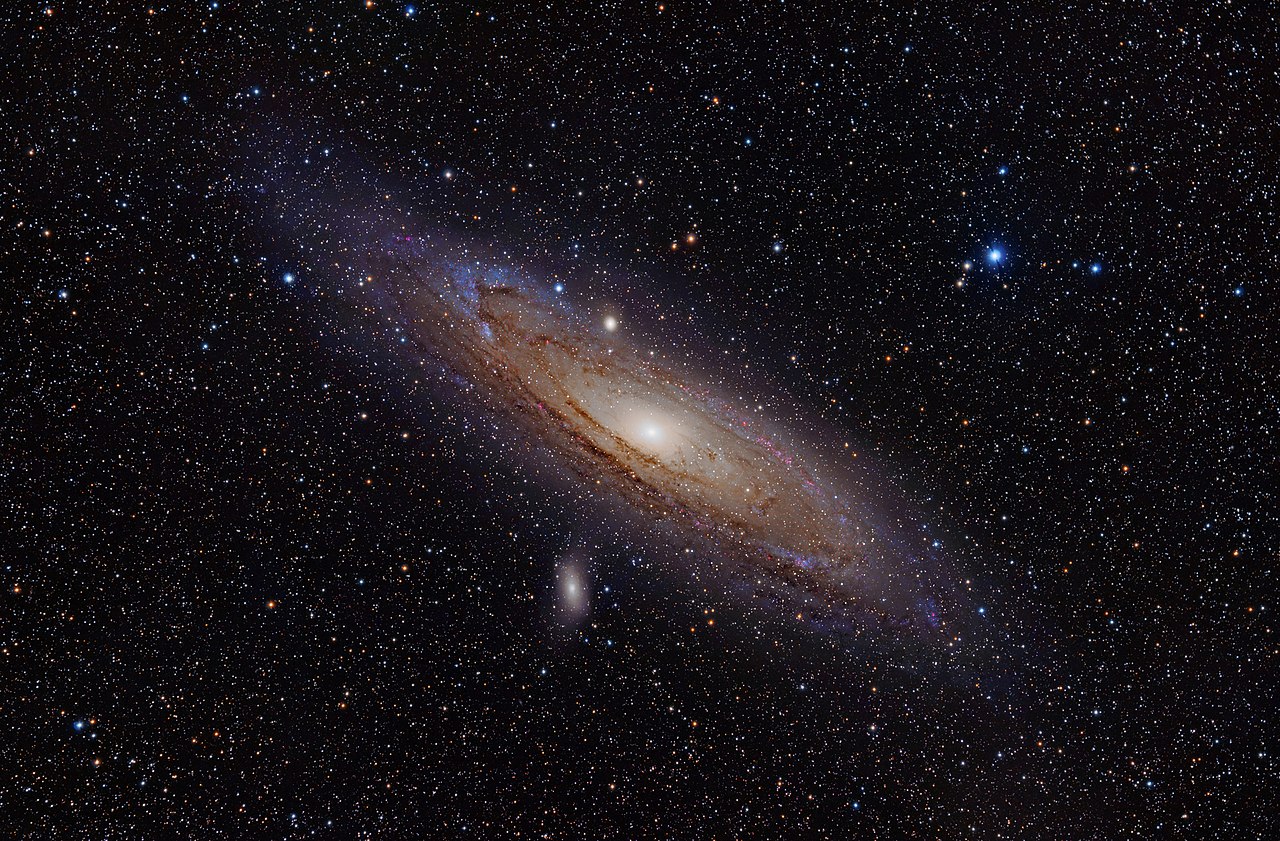
The Andromeda Galaxy is a spiral galaxy approximately 2.5 million light-years away in the constellation Andromeda. The image also shows Messier Objects 32 and 110, as well as NGC 206 (a bright star cloud in the Andromeda Galaxy) and the star Nu Andromedae. This image was taken using a hydrogen-alpha filter.
Artist: Adam Evans
- Clip-in vs. screw-on: Clip-in filters fit inside the camera body (for some models), protecting the sensor from dust when changing lenses and allowing use with lenses lacking front filter threads. Screw-on filters mount in front; step-up rings can adapt sizes across lenses. Avoid vignetting from too-small filter diameters on wide lenses.
When not to use a filter
Galaxies, reflection nebulae, and star clusters are broadband targets that benefit most from dark skies. Under light pollution, you can still image galaxies, but filters designed to cut urban glow may also remove real galaxy signal. In such cases, consider shorter focal lengths for wide-field compositions or concentrate on bright emission nebulae with a dual-band filter.
Composing Targets: Nebulae, Galaxies, and Star Clusters by Season
Success in deep-sky imaging is partly about picking targets that suit your gear, season, and sky conditions. A fast 50 mm lens frames the sky very differently than a 300 mm telephoto on APS-C. Here’s how to plan compelling shots year-round.
Match target size to focal length
- 14–24 mm: Wide Milky Way fields, large nebula complexes, and dark lanes spanning constellations. Foreground landscapes can work for mixed astro-landscapes when tracking is used cautiously.
- 35–85 mm: Individual large nebula regions, bright clusters, and wide galaxy groups. Composition becomes more intentional; star field density remains high.
- 100–200 mm: Prominent emission nebulae and nearby dwarf galaxies fit comfortably. Framing is tighter; tracking precision matters more.
- 200–400 mm: Medium nebulae and many bright galaxies present intricate detail. This is where accurate polar alignment and rigid mounting start to pay off significantly.
Seasonal planning
Different parts of the Milky Way and neighboring galaxies rise to prominence across seasons. Use a planetarium app to visualize altitude and transit times, and favor targets that climb high to reduce atmospheric extinction and distortion. Plan for objects that culminate at least 30°–40° above the horizon during your session.
Composition and star fields
Even when shooting deep sky, treat composition as you would in daytime photography:
- Use bright star asterisms as anchor points; frame to balance dense fields and empty dark nebulae.
- Watch for diffraction spikes or halos from bright stars introduced by filters or lens elements; position them thoughtfully if they must be in the frame.
- Rotate the camera to align dust lanes or nebula arcs with the frame’s diagonal for dynamic tension.
If you plan a multi-panel mosaic, overlap panels by at least 20% and keep exposure, focus, and calibration consistent across panels for smoother stitching during integration.
Common Problems and Practical Fixes
Every astrophotographer meets problems. These fixes are grounded in common, repeatable solutions rather than magic settings.
Stars are elongated in one direction
- Too-long exposure: Reduce sub length by 25–50% and test again.
- Poor polar alignment: Re-align with the polar scope or electronic tool; refine alt/az knobs carefully.
- Wind or vibration: Lower the tripod, add weight to stabilize, use a windbreak, or shorten exposures.
- Balance: Re-balance on the tracker; slight east-heavy bias on some mounts can help the RA gear mesh consistently.
Uneven background or vignetting after stacking
- Flats mismatch: Ensure focus and aperture in flats match lights exactly.
- Light leaks: Check viewfinder cover and cable ports during flats and darks.
- Gradient: Use gradient reduction tools during processing; consider changing framing to avoid bright domes on the horizon.
Color casts and odd star colors
- Filter balance: Dual-band filters often require dedicated color balancing; use star-based or photometric calibration.
- LED lighting: Mixed spectra can create complex gradients; expect to spend more time on background extraction.
Banding or walking noise in stacks
- Dithering: Randomize the pointing slightly between subs (requires guiding) to break up fixed-pattern noise.
- More calibration: Add or improve darks and bias/flat-darks to model sensor patterns.
Dew and fogging
- Prevention: Use a gentle dew heater strap and a lens hood; avoid pointing at cold sky when not exposing.
- Recovery: Warm gently and dry; avoid wiping active dew which can smear and add residue.
Keep a small field notebook. Logging what worked and what failed accelerates learning much faster than guessing each session.
Frequently Asked Questions
Do I need to modify my DSLR or mirrorless camera for astrophotography?
No, you can produce excellent images with an unmodified camera, especially of broadband targets (galaxies, clusters) and many bright nebulae. A modification that removes or replaces the internal IR-cut filter increases sensitivity to the deep red hydrogen-alpha line, improving emission nebulae. If you prefer not to modify the camera, dual-band filters can boost nebular contrast in one-shot-color workflows, though they may impact star color and require longer integration for comparable depth.
How much total integration time should I aim for?
More is almost always better. For a bright emission nebula under Bortle 4–5 skies with a tracked 85–135 mm lens, 2–4 hours yields a clean, presentable image. Under urban skies or for galaxies, aim for 4–10 hours across multiple nights if possible. Stacking increases the signal-to-noise ratio roughly with the square root of the number of subs, so doubling your total exposure reduces noise by about 1.4×. Quality calibration frames and careful processing amplify the gains from longer integration.
Final Thoughts on Choosing the Right Deep-Sky Astrophotography Path
Deep-sky astrophotography with DSLR and mirrorless cameras balances accessibility with genuine scientific technique. Start simple: a reliable tripod, a modest tracker, and a prime lens you trust. Learn to focus perfectly, align accurately, and expose wisely using the NPF-informed approach when shooting unguided. Add repeatable calibration, then stack and stretch with a light, steady hand. The most common path to better images isn’t exotic gear—it’s more integration time, cleaner stars, and more disciplined workflow.

The system is powered by an ALLWEI 256 Wh lithium iron phosphate battery set up below the tripod, which is lit up in red by the mount’s power adapter. In the background is a wagon filled with extra accessories and the west facade of Memorial Library at UW-Madison.
Artist: Brainandforce
As you gain confidence, explore longer focal lengths, guiding, and advanced processing. Keep experimenting with targets that match your setup and sky. Above all, enjoy the process: every clear night teaches something new, and each image is a record of photons that traveled across the cosmos to meet your sensor. If you found this guide helpful, explore our related articles on imaging techniques and data processing, and subscribe to our newsletter for weekly, practical deep-sky tips and target suggestions tailored to the season.