Table of Contents
- What Is a 6-Inch Dobsonian Telescope?
- Key Reasons to Choose a 6-Inch Dobsonian for Beginners
- Optics, Focal Ratio, and Realistic Performance
- Dobsonian Mount Mechanics, Stability, and Portability
- Eyepieces, Barlows, and Filters: Building a Kit
- Collimation, Cooling, and Maintenance Best Practices
- Setup, Alignment, and Finding Deep-Sky Objects
- What You Can See: Planets, Moon, and Deep-Sky Targets
- Astrophotography with a Dobsonian: What’s Realistic?
- Smart Upgrades and DIY Enhancements for Performance
- Buying Checklist, Warranty, and Budget Considerations
- Frequently Asked Questions
- Final Thoughts on Choosing the Right 6-Inch Dobsonian Telescope
What Is a 6-Inch Dobsonian Telescope?
A 6-inch Dobsonian telescope is a Newtonian reflector with a 150 mm (approximately 6″) primary mirror mounted on a simple, stable, alt-azimuth base known as a Dobsonian mount. Designed for visual observing, a 6-inch Dobsonian prioritizes aperture per dollar, ease of use, and portability. It is widely recommended as a first serious telescope because it delivers enough light-gathering power to reveal bright deep-sky objects while still being manageable for a single person to carry and set up.
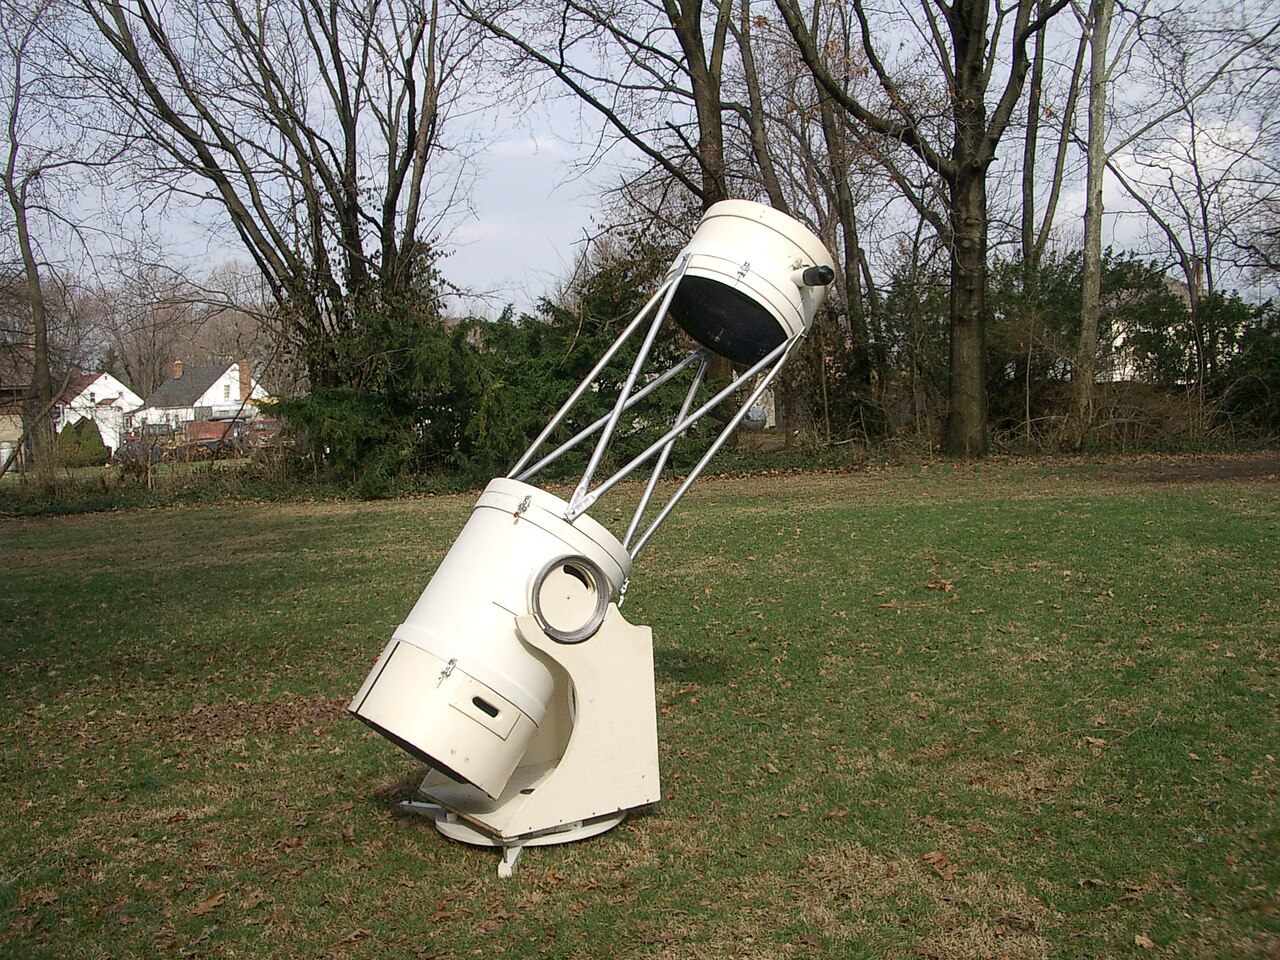
Artist: JamesStewart669
The Newtonian optical tube comprises a parabolic primary mirror at the back and a small flat secondary mirror near the front that redirects light to a focuser mounted on the side. The Dobsonian base is a low-center-of-gravity cradle that pivots in altitude (up/down) and azimuth (left/right). You aim it manually, nudging the tube to track objects as the Earth rotates. This simplicity keeps the price accessible and the user experience intuitive.
In its most common configuration, a 6-inch Dobsonian has a focal ratio around f/8 (focal length ~ 1,200 mm). There are also compact tabletop variants at f/5 (~ 750 mm), which are shorter and wider-field but require a sturdy surface to sit on and a bit more attention to collimation and eyepiece selection. We’ll compare these options in Optics, Focal Ratio, and Realistic Performance and cover setup details in Setup, Alignment, and Finding Deep-Sky Objects.
Key Reasons to Choose a 6-Inch Dobsonian for Beginners
For newcomers and seasoned observers alike, a 6-inch Dobsonian hits a sweet spot between performance, cost, and convenience:
- Substantial aperture for the price: A 150 mm mirror gathers about 459 times more light than a 7 mm dark-adapted human pupil (assuming a 7 mm pupil). That light advantage transforms faint smudges into discernible astronomical targets under dark skies.
- Simple, stable mount: The classic Dobsonian base is forgiving of bumps and breezes and encourages hands-on learning. You point the telescope like a cannon—no electronics required.
- Realistic planetary and deep-sky performance: Jupiter’s belts, Saturn’s rings, bright nebulae, and many open clusters are well within reach. Under good seeing, a 6-inch can split tight double stars and resolve globular clusters into grainy starlight.
- Manageable size and mass: A typical 6-inch f/8 solid tube is roughly 1.2 m (4 ft) long, with a base and tube that most adults can carry in two trips. Tabletop 6-inch models are even more compact.
- Low maintenance: Mirrors rarely need cleaning. Collimation (optical alignment) is straightforward with a simple cap or Cheshire tool. We detail this in Collimation, Cooling, and Maintenance.
Compared with smaller 4–5 inch instruments, a 6-inch pulls in more deep-sky detail and tolerates higher magnification on planets. Compared with larger 8–10 inch Dobs, it’s lighter and less expensive, with faster cooldown and easier storage, which is key if you want to observe frequently without turning backyard astronomy into a workout.
Optics, Focal Ratio, and Realistic Performance
Understanding the optical fundamentals of a 6-inch Dobsonian helps set expectations and guides smart accessory choices.

Artist: Fernly at English Wikibooks
Focal ratio and focal length
A common specification is focal ratio (f/number), defined as focal length divided by aperture. Two mainstream variants are:
- f/8 (≈ 1,200 mm focal length): A classic, forgiving choice. It reduces coma (off-axis aberration) and makes eyepiece selection easier, often working well with simpler Plössl eyepieces. The long tube tracks more smoothly at high power and is gentle on collimation tolerances.
- f/5 (≈ 750 mm focal length): Found in tabletop Dobs and compact tubes. It provides a wider true field of view with the same eyepiece, which is great for star-hopping and large nebulae. However, f/5 optics show more coma toward the edge of the field and are more sensitive to collimation and eyepiece quality.
Basic relationships you’ll use often:
Magnification = Telescope Focal Length / Eyepiece Focal Length

True Field of View ≈ Apparent Field of View / Magnification

Exit Pupil = Eyepiece Focal Length / Telescope f-ratio
These formulas are essential when planning a starter eyepiece set in Eyepieces, Barlows, and Filters.
Resolution and contrast
Angular resolution is often estimated by Dawes’ limit:
Dawes' Limit (arcseconds) ≈ 116 / Aperture(mm)

For 150 mm: ≈ 116 / 150 ≈ 0.77 arcseconds
In practice, atmospheric seeing (the steadiness of the air) is usually the limiting factor. Many nights, you’ll be capped around 1–2 arcseconds, meaning the telescope could do more, but the air won’t allow it. Still, on steady nights, a 6-inch resolves fine planetary detail and splits many double stars.
Realistic magnification range
- Low power (25–60×): Framing large open clusters, wide nebulae, and sweeping the Milky Way. A 25 mm eyepiece in a 1,200 mm scope gives ~48×.
- Medium power (80–150×): Best overall detail for many galaxies and nebulae; planetary disks begin to show structure.
- High power (180–250×, occasionally up to ~300×): Lunar and planetary close-ups, tight double stars. Seeing often limits you before the optics do. The old rule of thumb is ~2× per mm of aperture (≈ 300× for 150 mm), but a steadier 150–220× is more common.
What can you expect to see?
Under suburban skies, bright planets and the Moon look excellent. Many deep-sky objects are visible but muted by light pollution. Under genuinely dark skies, galaxies, globular clusters, and nebulae gain contrast and detail. We offer a realistic tour in What You Can See: Planets, Moon, and Deep-Sky Targets.
Dobsonian Mount Mechanics, Stability, and Portability

John Dobson popularized a minimalist, plywood-and-Teflon mount that emphasized smooth manual tracking. Modern Dobsonian bases keep that spirit with mass-produced bearings and materials.
How the mount moves
- Azimuth (left-right): The base rotates on a central pivot and low-friction pads. Good azimuth motion should be smooth but not too loose, so nudges are predictable.
- Altitude (up-down): The tube sits on curved bearings. Balance is key—heavy eyepieces may make the front dip unless there’s a tension system or counterweight.
Well-tuned Dobsonians feel “buttery” in both axes, allowing small, controlled nudges to keep a planet centered at high power. If your motion feels sticky or jerky, see Smart Upgrades and DIY Enhancements for bearing tweaks.
Portability in the real world
- Solid-tube f/8: Typically ~1.2 m long with a manageable overall mass. Most observers carry the tube separately and the base as a second trip. It fits across most car back seats.
- Tabletop f/5: Compact, lighter, and easy to store, but requires a sturdy table, stool, or crate at a dark site. Pair it with a robust, vibration-free surface.

Celestron FirstScope 76 tabletop Dobsonian telescope. Its aperture is 3" and the focal length is 300 mm, so its focal ratio is approximately f/4. (The photo was taken in a lightbox, see Flickr album at [1], so it almost looks like an official Celestron product shot, but it’s not.)
Artist: Wutthichai Charoenburi
Portability determines how often you actually use the instrument. If you can move your scope from closet to yard in five minutes, you’ll observe more frequently—especially on those unexpectedly clear nights.
Eyepieces, Barlows, and Filters: Building a Kit
The right eyepieces unlock your telescope’s potential. Most 6-inch Dobs ship with a single 25 mm Plössl. You can do a lot with that, but adding two or three more eyepieces plus a Barlow creates a versatile kit. As you read, cross-reference magnification and exit pupil formulas from Optics, Focal Ratio, and Performance.
Recommended eyepiece focal lengths
- Low power (~25–32 mm): Wide-field scanning, large open clusters, bright nebulae with filters. On an f/8 scope, a 32 mm gives a big exit pupil (~4 mm) and comfortable eye relief.
- Medium power (~12–15 mm): The workhorse range for many DSOs. A 12 mm at 1,200 mm gives 100×—ideal for globular clusters and smaller nebulae.
- High power (~6–9 mm): Planets, the Moon’s rilles and craterlets, close double stars. A 6 mm gives 200× on a 1,200 mm scope and is often the practical upper limit on average nights.
Tip: Consider an eyepiece set that maintains similar apparent fields of view (AFOV) across focal lengths, so your true field remains roomy at higher magnification.
Barlow lenses
A 2× Barlow doubles magnification and halves the effective eyepiece focal length, effectively doubling your eyepiece collection. For example, a 12 mm plus 2× Barlow yields a 6 mm equivalent. Choose a well-coated Barlow to maintain contrast and reduce scatter, especially for planetary work.
Filters
- UHC or narrowband nebula filter: Enhances emission nebulae like the Orion Nebula and the Lagoon Nebula by transmitting O-III and H-beta lines while suppressing much of the background glow.
- O-III filter: Stronger nebular contrast on planetary nebulae and supernova remnants. In a 6-inch, it dims the view more than a UHC, but can be transformative on the Veil Nebula under dark skies.
- Lunar filter (neutral density or variable polarizer): Improves comfort and perceived contrast on bright lunar nights.
- Light pollution filters: Results vary. Broad-band LPR filters have modest effect on galaxies but can modestly improve certain nebulae in urban/suburban skies. Dark-sky travel remains the best remedy.
Match filters with target type and sky quality; nebula filters are far more effective on emission nebulae than on star clusters or galaxies. For more target-specific advice, see What You Can See.
Collimation, Cooling, and Maintenance Best Practices
Newtonian reflectors perform best when their optics are well-aligned and at thermal equilibrium. Fortunately, a 6-inch is forgiving and quick to settle if you follow a few simple practices.
Collimation basics
Collimation aligns the primary and secondary mirrors so light focuses cleanly at the eyepiece. You don’t need fancy gear; a collimation cap or Cheshire tool works well. A quick routine:
- Center the secondary mirror under the focuser. Look through a collimation cap; verify the secondary appears circular and centered. This step is infrequent once set.
- Aim the secondary at the primary center mark. Adjust the secondary’s tilt screws to put the primary’s center dot under the sight.
- Align the primary mirror. Use the primary’s collimation knobs to bring the center dot into the Cheshire’s reflective target or cap’s crosshair. This is the step you’ll do most often—often a small tweak after transport.
Check collimation after bumpy car rides or large temperature swings. Faster scopes (f/5) are more sensitive; f/8 are quite forgiving. If you plan to push high magnification on planets, nail your collimation first. For a full setup walkthrough, jump to Setup, Alignment, and Finding Deep-Sky Objects.
Cooling to ambient temperature
Warm mirrors create internal air currents that blur the image. Let the scope cool down 20–60 minutes outdoors before critical observing. You can speed this by:
- Using a small, quiet rear fan to draw air across the mirror’s back.
- Setting up in shade or twilight to pre-cool.
- Pointing the tube slightly downward to reduce dust settling while cooling.
Cleaning and maintenance
- Mirrors: Clean rarely—only when a bright flashlight shows obvious grime affecting contrast. Rinse with distilled water after gentle soaking; avoid vigorous wiping. If unsure, leave it alone and observe.
- Focuser and bearings: Keep dust-free; avoid grease on Teflon bearings, as friction tuning is part of smooth motion.
- Collimation screws: Learn small, deliberate turns; consider replacing Phillips-head screws with knurled thumbscrews on the secondary for tool-free tweaks if your model supports it.
Setup, Alignment, and Finding Deep-Sky Objects
One reason observers love Dobsonians is their minimal setup time. Here’s a practical sequence to go from case to cosmos with minimal fuss, weaving in skills that build confidence night after night.
Fast setup workflow
- Place the base on stable ground. Grass or packed soil is fine. Avoid uneven pavers that rock the base.
- Seat the tube in the cradle. Tighten tension knobs enough to hold balance while keeping motion smooth.
- Add a low-power eyepiece (e.g., 25–32 mm). Start wide; it helps star-hopping later.
- Balance and test motion. If heavy eyepieces make the front dip, adjust tension or add a small counterweight.
- Check collimation quickly. A 30-second primary tweak can sharpen everything; see Collimation.
- Allow cooldown. Use the time to plan targets, review charts, and assess sky transparency and seeing.
Finder systems and aiming
Most 6-inch Dobs include a red-dot finder (RDF) or straight-through 6×30 or 8×50 optical finder. Many observers upgrade to a right-angle, correct-image (RACI) finder to match star charts, often pairing it with a zero-power reticle like a Telrad. For reasons and options, see Smart Upgrades.
Aiming sequence:
- Use the RDF/Telrad to put a bright star or planet in the eyepiece’s low-power field.
- Switch to the optical finder to refine and center your hop point.
- Consult your star chart or app; execute short hops between recognizable asterisms, always returning to low power when lost.
Star-hopping fundamentals
- Work from bright anchors to dim targets. Identify a bright, easily found star close to your target, then step through patterns of fainter stars.
- Use a planisphere or app. Learn the seasonal sky. Know what’s up and when; your success rate soars.
- Keep your field matching your chart. If your finder is inverted, flip the chart mentally or use a correct-image finder to simplify orientation.
- Log observations. Notes on sky quality and objects found will make you faster on future nights.
Pro tip: Master averted vision—look slightly to the side of a faint object. Your eye’s rod cells, more sensitive in the periphery, enhance faint detail.
Protecting dark adaptation
Use red lights at minimal brightness and avoid smartphone glare. Allow 20–30 minutes for your eyes to fully adapt. Keep both eyes open at the eyepiece (cover the non-viewing eye if needed) to reduce fatigue and boost subtle contrast, crucial for faint galaxies and nebulae.
What You Can See: Planets, Moon, and Deep-Sky Targets
A 6-inch Dobsonian reveals a diverse universe. Your best views depend on sky darkness, atmospheric steadiness, and optical alignment. Here’s a realistic tour of targets suited to a 150 mm reflector.
The Moon
- First quarter to gibbous: Rugged shadows along the terminator highlight crater rims, mountain ranges, and rilles. Look for the Alpine Valley, Straight Wall, and the Messier crater pair’s peculiar rays.
- High power nights: Resolve smaller craterlets in Plato (seeing-limited) and delicate terracing in Copernicus.
Use a neutral density or variable polarizing filter to reduce glare and increase perceived contrast; see Filters.
Planets
- Jupiter: Cloud belts, festoons, and the Great Red Spot under good seeing. Watch shadow transits of the Galilean moons. 120–200× is often optimal.
- Saturn: The rings are unmistakable; look for the Cassini Division when seeing allows, plus the planet’s banding and its brightest moon, Titan.
- Mars: Near opposition, Syrtis Major, polar caps, and orographic clouds appear. Seeing and dust storms affect detail visibility.
- Venus: Phases are easy; surface detail is not visible in visual wavelengths, though twilight observing reduces glare.
- Mercury: Elusive due to low altitude; phases visible with steady air and careful timing.
Double stars
From wide showpieces like Albireo’s amber-blue contrast to tighter splits like Epsilon Lyrae (seeing dependent), a 6-inch provides colorful and technically rewarding targets year-round.
Open clusters
Use low to medium power for sparkle and context: the Double Cluster in Perseus, the Pleiades (M45), the Beehive (M44), and M35 with its delicate companion NGC 2158. Open clusters are robust under light pollution, making them fine suburban targets.
Globular clusters
Under darker skies, M13 in Hercules and M5 in Serpens begin to resolve into grainy cores and scattered edge stars at 120–180×. A 6-inch won’t crack the densest globulars fully but delivers rewarding texture.
Nebulae
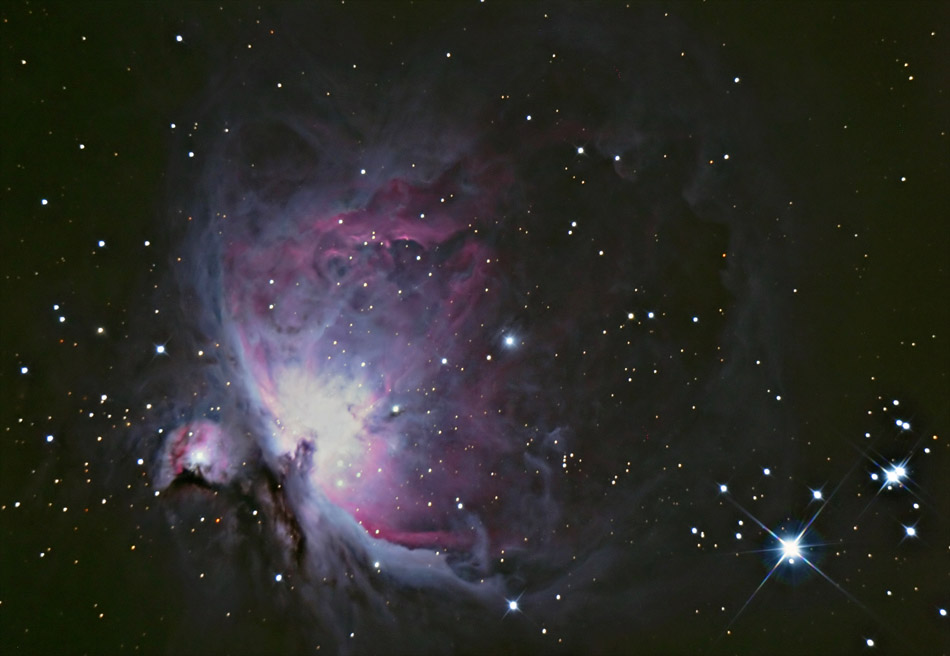
Artist: Rochus Hess
- Orion Nebula (M42): Rich detail in the wings and fish-mouth structure; the Trapezium’s four bright stars are easy, with E and F components under steady air. A UHC filter can enhance the faint outer regions.
- Lagoon (M8) and Swan (M17): Bright emission nebulae that respond well to filters, best from dark sites.
- Planetary nebulae: M27 (Dumbbell) and M57 (Ring) are compact and bright. O-III filters can dramatically increase contrast, making them pop from the background.
Galaxies
Light pollution dims galaxies more than most targets. From dark skies:
- Andromeda (M31): A bright core with extended disk; dust lanes hinted at in a 6-inch with dark adaptation.
- Whirlpool (M51): The companion (NGC 5195) is evident; under very dark, steady conditions, hints of spiral structure may appear at medium power.
- Leo Triplet (M65, M66, NGC 3628): Three distinct smudges with shapes and orientations visible; a rich field in spring.
When galaxy detail seems elusive, reduce magnification slightly to increase contrast. Patience and averted vision help. If you’re unsure whether a faint patch is real, gently jiggle the scope; real objects hold position relative to the background.
Astrophotography with a Dobsonian: What’s Realistic?
Dobsonian mounts are designed for visual observing with manual alt-az motion, not for long-exposure astrophotography. That said, you can still enjoy casual imaging within realistic limits.
Feasible options
- Smartphone afocal imaging: Handheld or clamp an adapter to the eyepiece for snapshots of the Moon and bright planets. Use short video clips and stack frames with planetary software for better results.
- Short-exposure lunar and planetary cameras: Dedicated high-speed planetary cameras can capture detailed lunar and planetary images with very short exposures. You’ll nudge to keep the target centered; software stacking reduces noise and teases out detail.
What is not ideal
- Long-exposure deep-sky imaging: Without an equatorial mount and tracking, star trailing occurs within seconds at typical focal lengths. Field rotation on alt-az mounts also degrades longer stacks.
- Heavy imaging trains: Large cameras, filter wheels, and correctors can strain balance and focuser stiffness on beginner Dobsonians.
If your long-term goal includes deep-sky astrophotography, enjoy the 6-inch Dob for visual learning first. Later, consider a small apochromatic refractor on a tracking equatorial mount for imaging. For visual performance boosts and ergonomics meanwhile, explore Smart Upgrades and DIY Enhancements.
Smart Upgrades and DIY Enhancements for Performance
One joy of Dobsonians is how easily you can tinker and tailor them to your preferences. Small changes can meaningfully improve the observing experience.
Finder and aiming upgrades

Artist: NathanScientific
- RACI finder (Right-Angle, Correct-Image): Easier on the neck and matches your star charts’ orientation.
- Zero-power reticle (e.g., Telrad or Rigel QuikFinder): Projects concentric circles on the sky, making hop distances straightforward.
- Combined approach: Use a reticle finder to get close, then an optical finder to nail the final position.
Smoother motion
- Azimuth bearing tune-up: Some users add plastic or Teflon washers (colloquially “milk jug washers”) around the center bolt to fine-tune friction and reduce stiction.
- Altitude balance aids: Magnetic counterweights or adjustable bearings help when using heavy eyepieces and Barlows.
Focuser and collimation aids
- Dual-speed focuser: Fine focus at high magnification becomes easier, especially on planets.
- Better collimation tools: Cheshire/sight tube combinations or a well-calibrated laser make alignment quick and consistent. For fundamentals, revisit Collimation basics.
Thermal control
- Rear fan: A small, quiet fan powered by AA batteries accelerates cooldown and can improve high-power steadiness.
- Dew control: In humid climates, a simple dew shield and occasional gentle heat for the secondary can help.
Optical accessories
- Quality eyepieces: Wide-field designs with good edge correction improve the f/5 experience and are a luxury at f/8.
- Coma corrector (for fast scopes): Optional for f/5; generally unnecessary for f/8 visual use.
Ergonomics and organization
- Adjustable observing chair: Increases comfort and steadiness; you’ll see more detail when relaxed.
- Field case: Keep eyepieces, filters, and a red flashlight organized, dust-free, and ready to go.
Buying Checklist, Warranty, and Budget Considerations
When selecting a 6-inch Dobsonian, it helps to know which specifications affect your experience most. Use this checklist to compare models and ensure the scope matches your goals and observing environment. For ideas on where accessories fit in, refer back to Eyepieces, Barlows, and Filters and Smart Upgrades.
Optical tube considerations
- Focal ratio: f/8 for ease of use and edge performance; f/5 for wide fields and compactness.
- Focuser size: 2″ focusers accept 2″ wide-field eyepieces; 1.25″ only is lighter and cheaper. Many scopes offer a 2″ focuser with a 1.25″ adapter.
- Mirror cell and cooling: A ventilated mirror cell and optional fan mount support faster cooldown.
- Tube weight and length: Confirm it fits your vehicle and storage. A 6-inch f/8 tube is roughly 4 ft long.
Mount and mechanics
- Altitude bearings: Larger, smooth bearings maintain balance across eyepiece loads.
- Azimuth bearing: Look for stable, low-stiction rotation; avoid sticky particle board on rough surfaces without proper pads.
- Tension or brake systems: Helpful for swapping heavy accessories without rebalancing.
Finder and included accessories
- Finder scope: A RACI plus a zero-power finder is ideal; at minimum, a red-dot or optical finder is needed.
- Eyepieces: Many kits include a single 25 mm. Budget for a 12–15 mm and a 6–9 mm plus a 2× Barlow.
- Collimation tool: A simple cap or Cheshire saves time and money at the start.
Quality control, warranty, and support
- Warranty length and coverage: Know what’s included (optics, focuser, base) and for how long.
- Local dealer or club support: A friendly astronomy club can help with collimation, finder alignment, and first-light tips.
- Replacement parts: Check availability of secondary holders, focuser adapters, and base hardware.
Budget planning
- Scope vs. accessories: Set aside funds for eyepieces, a Barlow, a nebula filter, and an observing chair—these matter as much as the OTA.
- Used market: Dobsonians are robust; a well-cared-for used 6-inch can be a bargain. Inspect mirrors (no coating peel or major scratches), bearings (smooth), and focuser (no wobble).
Safety note
Never look at the Sun without a proper, securely mounted solar filter designed for front-of-tube use. Unfiltered solar observing can cause permanent eye damage or equipment harm.
Frequently Asked Questions
Is a 6-inch Dobsonian better than a 4-inch refractor for planets?
For raw resolving power and brightness, yes. A 6-inch mirror has greater aperture, enabling higher usable magnification and finer detail under good seeing. However, small apochromatic refractors can deliver very sharp, high-contrast images with minimal cooldown and no collimation—so performance in the field depends on conditions and user preferences. If your primary goals include both planets and deep-sky with a single affordable scope, the 6-inch Dob is hard to beat.
How dark do my skies need to be for galaxies with a 6-inch?
For the best galaxy detail, a dark-sky site (Bortle 4 or darker) is ideal. In suburban skies (Bortle 6–7), bright galaxy cores like M31 and M81 remain visible, but faint outer structure and low-surface-brightness targets are much harder. When stuck under light pollution, focus on open clusters, double stars, the Moon, planets, and emission nebulae using filters—then plan occasional dark-sky trips to tackle galaxies and faint nebulae for a dramatic upgrade in what the 6-inch can reveal.
Final Thoughts on Choosing the Right 6-Inch Dobsonian Telescope
A 6-inch Dobsonian sits at a crossroads of capability and simplicity. It’s powerful enough to reveal a wealth of lunar and planetary detail, open a gateway to deep-sky objects, and teach the sky through intuitive, hands-on observing. At the same time, it remains affordable, portable, and easy to maintain—three pillars that turn curiosity into a sustainable hobby.
To choose the right model, decide between the forgiving optics of an f/8 solid-tube and the compact, wide-field strengths of an f/5 tabletop. Ensure the mount feels smooth in both axes, budget for a small eyepiece set plus a nebula filter, and commit to learning basic collimation and cooldown. With those pieces in place, you’ll get all the performance a 6-inch mirror can offer.
If you’re weighing next steps, revisit the practical checklists in Buying Checklist, plan your first light using the workflow in Setup, Alignment, and Finding Deep-Sky Objects, and set realistic expectations on imaging with Astrophotography with a Dobsonian. The night sky rewards preparation and patience; the 6-inch Dob rewards both with unforgettable views.
Want more guides like this, seasonal target lists, and observing tips? Subscribe to our newsletter to get future articles delivered to your inbox and keep exploring under the stars.