Table of Contents
- What Is a 6–8-Inch Dobsonian Telescope?
- Why 6–8 Inches Hit the Sweet Spot for Beginners and Enthusiasts
- Optical Basics: Aperture, Focal Length, and Magnification
- Mount, Bearings, and Motions: The Dobsonian Experience
- Collimation and Thermal Management: Getting Sharp Views
- Essential Eyepieces and Accessories for 6–8-Inch Dobs
- What You Can See: Planets, Moon, and Deep-Sky Targets
- Manual Star-Hopping vs Push-To and GoTo Upgrades
- Buying Checklist: Features, Build Quality, and Hidden Costs
- Setup, Transport, and Care: Step-by-Step Guidance
- Troubleshooting Common Issues: Coma, Dew, and Shaky Views
- Frequently Asked Questions
- Final Thoughts on Choosing the Right 6–8 Inch Dobsonian Telescope
What Is a 6–8-Inch Dobsonian Telescope?
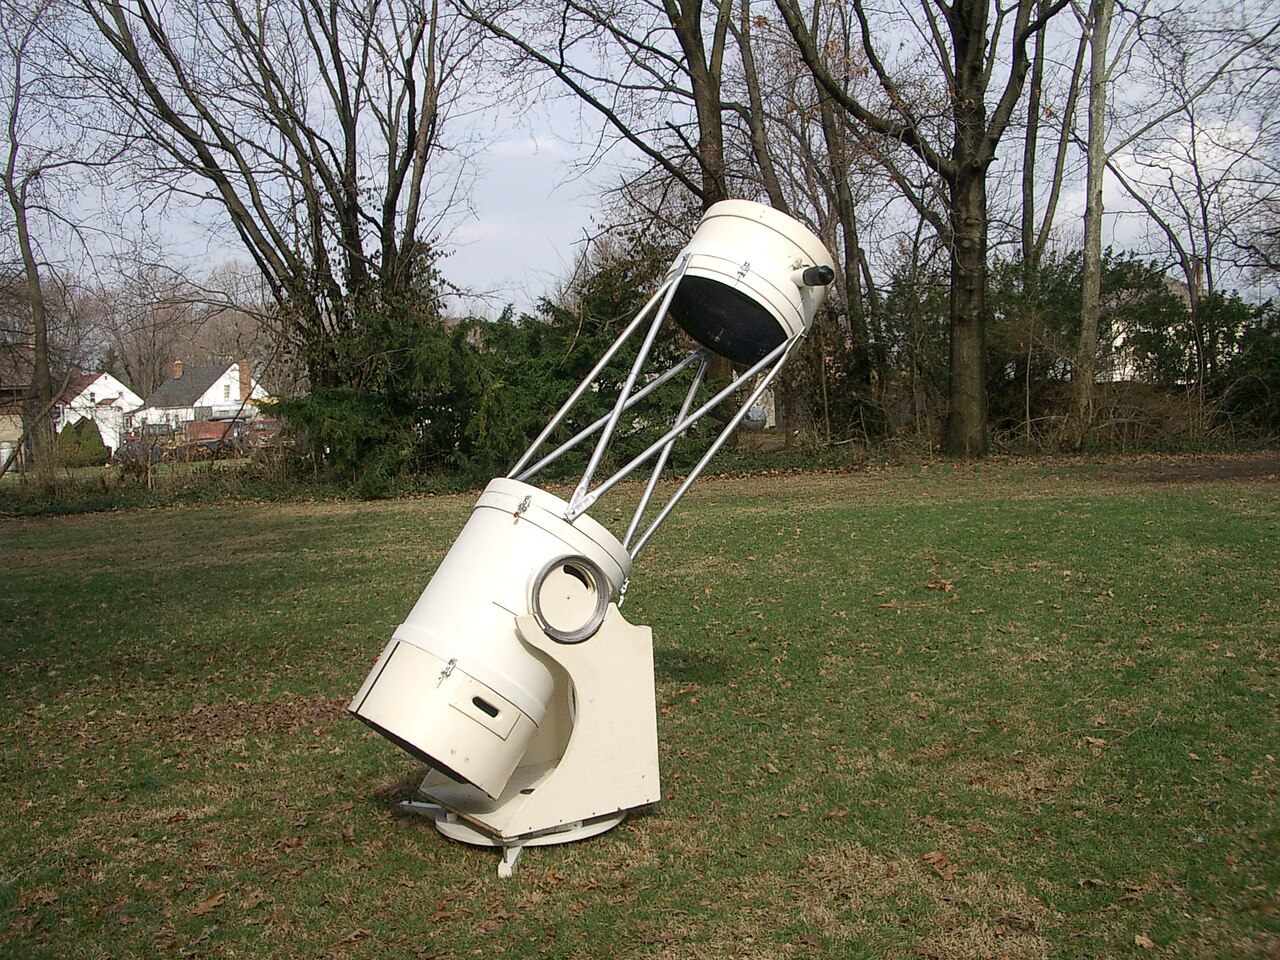
A 6–8-inch Dobsonian telescope is a Newtonian reflector optical tube mounted on a simple, alt-azimuth wooden or composite base designed for smooth, push-to manual motion. The term “Dobsonian” refers to the mount style popularized by John Dobson, which pairs large-aperture optics with low-cost, stable bearings. The result: a telescope that gathers far more light than small refractors and catadioptrics at a fraction of the price, while remaining intuitive to use.
In this size class, a 6-inch (150 mm) and an 8-inch (200 mm) Dobsonian are the most common. Typical specifications you’ll find:
- 6-inch Dobsonian: often f/8 with ~1200 mm focal length (parabolic primary mirror)
- 8-inch Dobsonian: commonly f/6 with ~1200 mm focal length (parabolic primary mirror)
Both use a flat secondary mirror to redirect light to a focuser mounted on the side of the tube. The primary mirror is usually aluminized and overcoated for durability. Many 6–8-inch Dobs use a 2-inch Crayford or rack-and-pinion focuser that accepts both 1.25-inch and 2-inch eyepieces.
The big difference between 6 and 8 inches is light grasp and resolution. An 8-inch primary collects roughly (8/6)2 ≈ 1.78 times the light of a 6-inch, making faint galaxies and nebulae brighter. Resolution, governed by aperture, also improves: a typical Dawes limit is about 4.56/D(inches), giving ~0.76 arcseconds for a 6-inch and ~0.57 arcseconds for an 8-inch (under excellent seeing). This can help split tighter double stars and reveal finer planetary details—though the atmosphere often sets the real-world limit.
If you want an intuitive, solid, and cost-effective visual telescope for both lunar/planetary and deep-sky observing, the 6–8-inch Dobsonian bracket is hard to beat. Throughout this guide, we’ll explore how to choose, set up, and get the most out of these scopes, and we’ll cross-reference key concepts with internal links like optical fundamentals, collimation, and eyepieces.
Why 6–8 Inches Hit the Sweet Spot for Beginners and Enthusiasts
There’s a reason many observers call the 6–8-inch Dobsonian the “sweet spot.” It offers substantial aperture and resolution, manageable weight, forgiving ergonomics, and strong value for money. Here’s why this range works so well:
- Significant light grasp without bulk: A 6-inch reveals hundreds of deep-sky objects under decent skies; an 8-inch reveals noticeably more structure in nebulae and galaxies. Both remain relatively portable compared to 10–12-inch models.
- Ergonomics that invite long sessions: Eyepiece height is comfortable for most observers standing or with a small stool. No ladders needed. The simple alt-az base keeps the experience tactile and engaging.
- Budget-friendly performance: In many markets, 6–8-inch Dobs deliver the best cost-per-aperture among serious visual instruments. You can allocate more budget to quality eyepieces and filters that amplify performance across targets.
- Fast setup and cooldown: Solid-tube 6–8-inch mirrors cool faster than larger optics, reducing thermal currents that soften images. Add a small rear fan and you’ll often reach steady views within 30–60 minutes depending on temperature differentials (see cooling tips).
- Forgiving learning curve: Collimation tolerances at f/8 (6-inch) and f/6 (8-inch) are manageable with basic tools. At these focal ratios, inexpensive eyepieces also tend to perform better than they would at very fast focal ratios.
Compared to smaller refractors (e.g., 80–102 mm), the 6–8-inch Dob collects several times more light and offers higher potential resolution, transforming your view of faint deep-sky objects. Compared to larger Dobs (10–12 inches and beyond), maintenance, weight, storage, and cooldown times are kinder. If you want a telescope that grows with your skills without becoming a burden, this aperture range is a smart choice.
Optical Basics: Aperture, Focal Length, and Magnification

Understanding a few key optical principles helps you configure your Dobsonian for crisp, comfortable views.
Aperture and resolution
Aperture (mirror diameter) determines light-gathering power and theoretical resolution. The Dawes limit (in arcseconds) approximates the smallest separation of equal-brightness double stars you can resolve under ideal seeing:
Dawes limit ≈ 4.56 / D(inches)
- 6-inch: ~0.76 arcseconds
- 8-inch: ~0.57 arcseconds
Real-world seeing often falls in the 1–3 arcsecond range, so atmospheric steadiness, not optics, usually sets the limit—particularly for planetary observing.
Focal length, focal ratio, and field of view
Focal length is the distance light travels from primary mirror to focus. Typical values for 6–8-inch Dobs are about 1200 mm. The focal ratio f/number = focal length / aperture: a 6-inch f/8 is ~1200/150 = f/8; an 8-inch f/6 is ~1200/200 = f/6. Lower f/ratios yield wider fields for a given eyepiece but are tougher on eyepieces at the field edge (astigmatism, coma perception). Higher f/ratios are more forgiving, especially with budget eyepieces.
Magnification (M) is set by eyepiece focal length:
M = Telescope focal length / Eyepiece focal length
For a 1200 mm scope, a 25 mm eyepiece gives 48×, a 10 mm gives 120×, and a 5 mm gives 240×. A 2× Barlow doubles magnification.
True field of view (TFOV) can be approximated by:
TFOV ≈ Apparent FOV / Magnification
An eyepiece with 68° apparent FOV at 48× yields roughly 68°/48 ≈ 1.4° of sky—great for open clusters and context around nebulae (more in eyepieces).
Exit pupil and brightness
Exit pupil is the diameter of the beam leaving the eyepiece. It matters for brightness and visual comfort:
Exit pupil (mm) = Eyepiece focal length / f/ratio
- At f/6 with a 30 mm eyepiece: 30/6 = 5 mm exit pupil
- At f/8 with a 30 mm eyepiece: 30/8 = 3.75 mm exit pupil
For deep-sky scanning, 3–5 mm exit pupils balance brightness and contrast. For planetary, 0.5–1 mm exit pupils sharpen details. Exceeding your dark-adapted pupil (often 5–7 mm for younger eyes, smaller with age) can waste light and show the secondary mirror shadow in very fast systems.
Practical magnification limits
“50× per inch of aperture” is a common rule-of-thumb maximum under excellent seeing and thermal equilibrium. In practice:
- 6-inch: ~300× theoretical max, but 150–250× is more typical
- 8-inch: ~400× theoretical max, but 180–300× is more typical
Seeing, collimation, and cooling (covered in collimation and thermal management) dominate how far you can push magnification usefully.
Mount, Bearings, and Motions: The Dobsonian Experience
A Dobsonian’s hallmark is smooth, intuitive push-to motion. The mount’s simplicity belies its sophistication: good bearing design and balance produce effortless tracking at high power without vibration.
Altitude and azimuth bearings

Traditional Dobs use large, circular altitude bearings that ride on Teflon pads and a textured laminate (often akin to “Ebony Star” or other high-pressure laminates). Azimuth motion is similarly achieved with Teflon-on-laminate pads between the ground board and rocker box. The friction must be balanced—too tight and the scope sticks; too loose and it drifts.
Key mechanical features to evaluate (see buying checklist):
- Bearing diameter and materials (larger bearings spread load and smooth motion)
- Number and placement of Teflon pads
- Azimuth pivot stiffness and surface texture
- Altitude tension or springs (help balance heavy eyepieces)
- Rocker box rigidity (prevents flexure at high magnification)
Balance and center of gravity
A well-balanced Dob stays where you point it, even when swapping light and heavy eyepieces. Features like adjustable altitude trunnions, sliding counterweights, or spring tension systems help maintain balance. Test by nudging the scope at different elevations. It should move with a light touch and stop without overshoot.
Focuser and tube hardware
A dual-speed Crayford focuser enables precise adjustment at high power and is a delight for lunar/planetary work. Check:
- Minimal image shift and slop
- Smooth tension adjustment through the full travel
- 2-inch capability with a 1.25-inch adapter
Look for a sturdy finder bracket, a well-positioned handle, and a primary mirror cell with collimation knobs accessible from the rear. Ventilation behind the primary helps with cooling (see cooling section).
Collimation and Thermal Management: Getting Sharp Views
Collimation—aligning the optical elements—is essential for crisp images in reflectors. Thermal management—letting optics reach ambient temperature—prevents shimmering, soft views. Both are straightforward once you know the steps.

Collimation tools and sequence
Common tools:
- Collimation cap (simple and effective for beginners)
- Cheshire/sight tube combo (excellent alignment of secondary and primary)
- Laser collimator (fast, but verify collimator alignment and use barlowed laser technique for primary)
Sequence overview for a solid-tube 6–8-inch Dob:
- Center spot: Ensure your primary mirror has a small center marker (donut). This is a reference for alignment tools.
- Secondary placement: With a sight tube, center the secondary under the focuser. Adjust secondary fore-aft and rotation to create a concentric view.
- Secondary tilt: Adjust secondary tilt so the focuser’s sight line points to the primary center spot.
- Primary tilt: Using a Cheshire or barlowed laser, adjust the primary collimation screws so the reference returns to the center spot.
- Star test: Under steady seeing, slightly defocus a bright star at high power. In- and out-of-focus diffraction patterns should be concentric; tweak the primary if needed.
At f/8 (typical 6-inch), collimation tolerances are forgiving. At f/6 (typical 8-inch), accuracy matters more but remains manageable. Recheck collimation after transport or large temperature swings, and before high-magnification sessions on planets or double stars.
Cooling and thermal equilibrium
When you bring a warm scope into cool night air, warm air currents above the mirror (“tube currents”) degrade contrast. Steps to improve thermal performance:
- Set the scope outside 30–60 minutes before observing, depending on temperature differential.
- Use a small, quiet fan blowing on the back of the primary mirror to accelerate equilibration.
- Keep the tube uncapped during cooldown to allow airflow, but protect optics from dust and dew.
Thermal equilibrium is especially important for planetary observing. If Jupiter is mushy at 200× but steadies briefly, suspect seeing or thermal issues before blaming optics.
Cleaning and mirror care
Mirrors rarely need cleaning. Dust usually has minimal impact. When reflectivity truly suffers (e.g., pollen, dew residue), remove the primary carefully and rinse with distilled water after a gentle soak and a light drag of clean cotton under water if needed—no scrubbing. Let it air-dry on edge. Do not touch the aluminized surface dry. The secondary can be treated similarly, with extra caution due to its mounting.
Essential Eyepieces and Accessories for 6–8-Inch Dobs
Good eyepieces and a few accessories dramatically expand what your Dobsonian can do. You don’t need to spend a fortune; a thoughtful kit covers low-power sweeping, medium-power detail, and high-power planetary/lunar work.
Eyepiece focal lengths and use cases
- Low power, wide field (24–32 mm): Find and frame large objects. On a 1200 mm scope, 30 mm yields ~40×. Consider 2-inch eyepieces with 65–70° apparent fields for immersive views and easy star-hopping.
- Medium power (12–18 mm): Open clusters, nebula detail with filters, and small galaxies. At 1200 mm, 15 mm gives ~80×—a versatile magnification for many targets.
- High power (5–10 mm): Lunar and planetary detail, tight double stars, core structure in globular clusters. A 10 mm gives 120×; a 6–7 mm delivers 170–200× in steady air.
Eyepiece designs range from simple Plössls (good on-axis sharpness, narrow fields) to wide-angle designs (68–82° apparent fields) that ease manual tracking and enhance the “spacewalk” experience. At f/8, budget wide-fields often hold up well; at f/6, you’ll notice more off-axis aberrations in inexpensive glass. Choose based on your tolerance for edge softness and budget.
Barlow lenses and zooms
A 2× Barlow effectively doubles your eyepiece set, preserving eye relief and ergonomics. A high-quality 2× or 2.5× Barlow is a flexible investment. Zoom eyepieces (e.g., 8–24 mm) offer convenience for dialing in magnification to match seeing; pair one with a wide low-power finder eyepiece and a Barlow, and you can cover most needs.
Filters that make a difference
- Neutral density or variable polarizer (Moon): Tames glare and enhances contrast on lunar features.
- UHC (ultra-high contrast) filter: Boosts emission nebulae like the Orion Nebula (M42) by passing O III and H-beta while suppressing broadband skyglow.
- O III filter: Excellent for planetary nebulae and supernova remnants (e.g., Veil Nebula) under dark skies.
- Light pollution reduction (LPR) filters: Can help with certain emission targets in urban skies, but they won’t fix galaxies; dark sites remain best for broadband objects.
Finders and navigation aids
- RACI (Right-Angle Correct-Image) finder: Comfortable neck position and star charts match orientation.
- Red-dot or reflex sight: Quick initial pointing; pair with a RACI for star-hopping.
- Digital setting circles (DSC): Encoders and a handheld or smartphone app for “push-to” guidance (see manual vs push-to).
Comfort and collimation essentials
- Adjustable observing chair: Dramatically improves steadiness and detail perception.
- Red light and charts: Preserve night vision while navigating star fields.
- Collimation tool: A Cheshire or collimation cap is inexpensive and reliable (see collimation steps).
- Dew control: Dew shield or gentle heater for secondary and finder in humid climates.
What You Can See: Planets, Moon, and Deep-Sky Targets
A 6–8-inch Dobsonian rewards you across the sky—from the rugged lunar terminator to delicate nebula veils and distant galaxies. Expectations should be realistic: you’ll see grayscale details, not Hubble-like color images. Still, the richness and subtlety of visual observing are profound, especially under dark skies.
Lunar and planetary highlights
- Moon: Razor-edged craters, rilles, wrinkle ridges, and mountain shadows. A variable polarizer or neutral density filter improves comfort.
- Jupiter: Equatorial belts, festoons, polar shading, and the Great Red Spot in steady seeing. A 6-inch will routinely show structure; an 8-inch teases out finer details. Watch the Galilean moon transits and shadows.
- Saturn: Cassini Division under steady air, banding on the globe, and multiple moons. Subtle ring features pop at 180–250× when collimation and seeing cooperate.
- Mars: During favorable oppositions, polar cap, Syrtis Major, and albedo features. 6–8 inches handle the needed magnification when the atmosphere allows.
- Venus and Mercury: Phases are clearly visible; surface detail is not, due to thick atmospheres.
Deep-sky showpieces
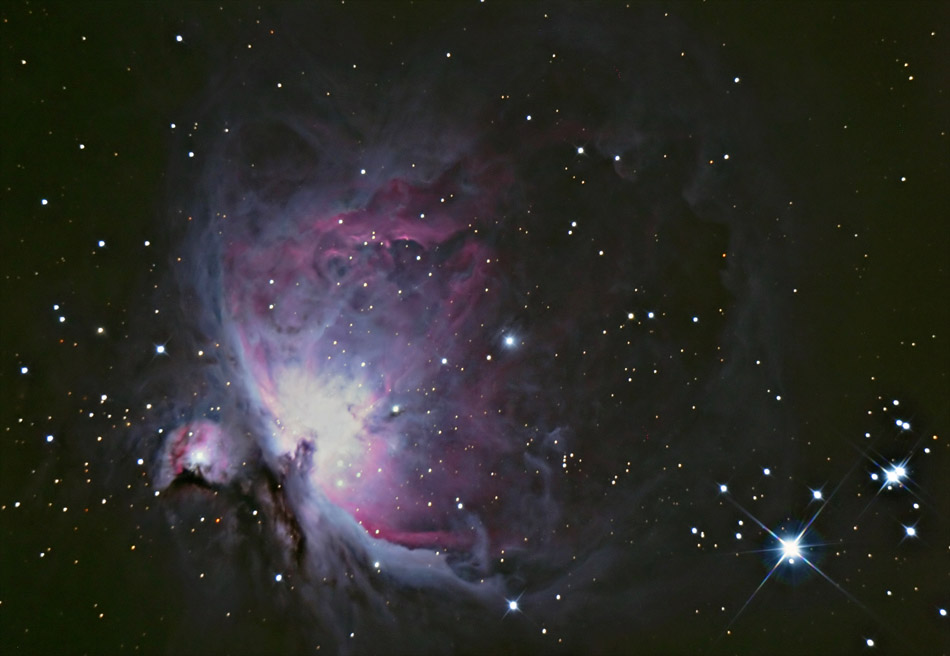
Under suburban skies (Bortle 5–6), open clusters like the Pleiades (M45) and the Double Cluster sparkle. Globular clusters (M13, M3) begin to resolve; with an 8-inch, you’ll punch deeper and resolve more stars toward the core. A UHC filter enhances emission nebulae—M42 in Orion, the Lagoon (M8), and the Swan (M17). Planetary nebulae (M57, M27) show distinct shapes; O III filters can transform their visibility.
Under dark skies (Bortle 2–3), galaxies bloom: M81 and M82 show structure; M51’s spiral hints emerge in an 8-inch on steady nights. Face-on spirals are subtle even in an 8-inch; look for asymmetries, dust lanes, and star-forming knots with averted vision and patience.
Double stars and color
Double stars are a delight with 6–8 inches. Epsilon Lyrae’s double-double splits cleanly in steady air. Albireo’s golden-blue contrast is striking at low power. The added resolution of an 8-inch helps with tighter pairs, though seeing dominates.
Seasonal suggestions
- Winter: Orion’s sword (M42, Running Man), open clusters (M35, M37), bright double stars (Rigel). Use a UHC filter for nebula contrast.
- Spring: Galaxy season in Virgo–Coma; Markarian’s Chain. A detailed star chart or push-to aid helps navigate the galaxy fields.
- Summer: Scutum Star Cloud, Sagittarius nebulae (Lagoon, Trifid, Swan, Eagle), globulars (M22, M13).
- Autumn: Andromeda Galaxy (M31) with satellite companions (M32, M110), the Double Cluster, and the Triangulum Galaxy (M33) under dark skies.
Realistic limits
Maximum useful magnification is constrained by seeing and cooling. Pushing beyond ~200–250× on an average night softens the view. For galaxies in suburban skies, skyglow is the bottleneck; filters won’t help galaxies much. Seek darker locations when possible and practice averted vision to tease out faint structure. Savvy use of exit pupil and magnification can optimize contrast on each target.
Manual Star-Hopping vs Push-To and GoTo Upgrades
Dobsonians excel at manual star-hopping: using a finder and eyepiece to step from bright stars to your target. Many observers prefer this immersive method. Others add navigation aids for convenience, especially under light-polluted skies.
Manual star-hopping
With a reflex sight to get on the starting star and a RACI finder for pattern matching, you can reach most objects quickly using an atlas or app. Low-power, wide-field eyepieces make the process forgiving (see eyepieces). Skills improve rapidly, and you learn the sky deeply.
Degree circles and angle gauges
A popular low-cost hack: attach a printed azimuth degree circle to the base and place a digital angle gauge on the tube for altitude. With a smartphone app providing current alt-az coordinates, you can “push-to” almost any object. Accuracy improves if you level the base and calibrate on a known star.
Digital setting circles (DSC) and push-to systems
Encoder-based DSC kits add high-resolution encoders to altitude and azimuth. A hand controller or smartphone app guides you with arrows toward the target. This preserves the Dobsonian’s simplicity while eliminating guesswork in bright skies. Choose systems compatible with your base and confirm installation requirements in advance.
GoTo Dobsonians and tracking
Some 6–8-inch Dobs offer motorized GoTo and tracking. Pros:
- Automated slewing to targets and hands-free tracking at high power
- Excellent for outreach and sharing the eyepiece
Trade-offs:
- Higher cost and added weight/complexity
- Power requirements (battery management in the field)
- More setup time and alignment procedure
For many observers, push-to is the sweet compromise. If your priority is hands-free planetary study at 250×, tracking can be worth it—especially on nights of excellent seeing when fine detail emerges (see what to see for targets).
Buying Checklist: Features, Build Quality, and Hidden Costs
Before you buy, evaluate the essentials. Whether new or used, a careful check prevents surprises and ensures you get the performance you’re paying for.
Core features to look for
- Parabolic primary mirror: Standard in this class; avoids spherical aberration.
- Focal ratio: 6-inch f/8 is forgiving and yields high-contrast planetary views; 8-inch f/6 offers wider fields for a given eyepiece and brighter deep-sky views.
- 2-inch focuser: Enables true wide-field, low-power viewing with 2-inch eyepieces.
- Finder setup: Ideally both a reflex sight and a RACI finder for flexible navigation.
- Altitude bearings and tension: Large bearings or spring tension to handle heavy eyepieces without droop.
- Primary cell and fan: Tool-less collimation knobs and a provision for a small cooling fan.
Fit, finish, and mechanics
- Check for smooth, stiction-free motion in both axes.
- Rocker box should be rigid with no wobble; joints tight and square.
- Focuser should move smoothly with minimal backlash; compression ring clamps are gentler on eyepieces than set-screws.
- Tube interior should be well-baffled or flocked around the focuser to suppress stray light.
Hidden costs and smart budgeting
Plan for a few essentials beyond the base scope:
- Collimation tool (cap/Cheshire): modest cost, big returns
- Low-power wide-field eyepiece (2-inch), plus two well-chosen 1.25-inch eyepieces
- 2× Barlow for planetary work
- UHC filter; variable polarizer for the Moon
- Observing chair, red light, charts/app subscription if needed
- Dew mitigation (heater or shield) depending on climate
These additions often do more for your observing than jumping to a larger aperture prematurely.
Buying used: inspection tips
- Mirrors: Inspect under diffuse light. Normal fine sleeks are OK; look for coating damage, fungus, or edge chips. Slight dust is inconsequential.
- Primary center spot: Presence simplifies collimation; adding one later is easy with a template.
- Focuser: Verify smooth travel and secure clamping.
- Base condition: Particleboard bases can swell if stored damp; check edges and bearing surfaces.
- Accessories: A solid eyepiece or two, collimation cap, and a finder can save immediate costs.
Setup, Transport, and Care: Step-by-Step Guidance
6–8-inch Dobs are exceptionally user-friendly to set up and move. Solid-tube versions usually separate into a tube and a base for transport.
Transporting and carrying
- Carry the tube with one hand on the handle or under the cradle, the other supporting the mirror end; or use a padded strap.
- Carry the base separately by its cutouts/handles; keep it upright to protect azimuth bearings.
- In vehicles, rest the tube on a soft surface; keep the primary mirror end secure and elevated slightly to avoid bumps.
- Consider a hand truck/dolly for moving the assembled scope short distances over smooth terrain.
Initial setup in the field
- Place the ground board on level, firm ground. Rubber feet or a mat can damp vibration.
- Set the rocker box and check azimuth motion; adjust center bolt tension if required (not too tight).
- Drop in the tube and secure altitude bearings or tension springs.
- Attach finder and check alignment on a distant object during daylight if possible.
- Let the scope cool with caps off; attach a fan if available (see cooling).
- Check collimation; a quick touch-up may be needed after transport.
Observing workflow
Use a low-power eyepiece to locate targets. Once centered, step up magnification based on seeing. Re-center periodically with gentle nudges. If you use filters, start without, then add a UHC or O III to judge contrast improvement on emission nebulae.
Care and storage
- Store in a dry, temperature-stable environment. Avoid damp basements or hot attics.
- Cap both ends of the tube when not in use to keep out dust and insects. Allow the scope to dry before capping if dew formed.
- Wipe down exterior surfaces and bearings occasionally; keep Teflon pads and laminate clean and free of grit.
- Re-collimate as needed; it becomes second nature after a few sessions.
Sample field checklist
Print or save this minimal checklist for grab-and-go nights:
# 6–8-Inch Dobsonian Field Checklist
- OTA + Base
- Finder (aligned) + spare battery if illuminated
- Eyepieces: 30 mm, 15 mm, 10 mm; 2× Barlow
- Filters: UHC, variable polarizer
- Collimation cap/Cheshire
- Red flashlight/headlamp
- Observing chair
- Star atlas/app + power bank
- Dew control: shield/heater straps (as needed)
- Gloves/hat/thermos in cold weather
- Notebook/voice recorder for observations
Troubleshooting Common Issues: Coma, Dew, and Shaky Views
Even a well-chosen Dobsonian can run into avoidable snags. Here’s how to diagnose and resolve the usual suspects.
Coma and edge aberrations
Coma is an off-axis aberration inherent to parabolic mirrors, showing as “seagull” stars at the field edge. It’s more noticeable at faster focal ratios and with very wide fields. On an f/6 8-inch, coma is modest for visual use and often acceptable. If it bothers you:
- Use eyepieces with well-corrected optics and moderate apparent fields.
- Frame objects nearer the center at high power.
- Consider a coma corrector if you’re particularly sensitive, though many visual observers skip it at f/6–f/8.
Soft or mushy views at high power
- Seeing: If images boil and snap in and out, it’s the atmosphere. Back off magnification.
- Thermal issues: Warm tube currents blur details. Cool the mirror and tube (cooling tips).
- Collimation: Misalignment kills contrast; recheck with a cap/Cheshire and a quick star test.
- Dirty optics: Usually a minor factor. Clean only when necessary and correctly.
Dew on the secondary or finder
Secondary mirrors can dew up in humid climates. Strategies:
- Dew shield extension around the focuser end of the tube.
- Low-power secondary heater strip with a simple controller.
- Keep finders capped when not in active use; consider a small heater for the finder if dew is persistent.
Sticky motions or drift
- Ensure bearing surfaces are clean; a tiny application of furniture wax on laminates can help (avoid greases).
- Tune azimuth bolt tension: snug but not binding.
- Add or adjust altitude tension springs/counterweights for heavy eyepieces.
- Use an observing mat to isolate the base from soft ground.
Glare and stray light
Stray light entering the focuser reduces contrast. Consider flocking opposite the focuser and using a simple lightweight light shield. Observe from the shadow side of buildings or trees to block local lights. A UHC filter helps nebulae but won’t fix broad skyglow for galaxies—dark sites are the solution.
Frequently Asked Questions
Is an 8-inch Dobsonian too big for a beginner?
Not inherently. Many first-time observers succeed with 8-inch Dobs. The key is managing weight and storage. An 8-inch solid-tube typically splits into a base (~20–30 lb/9–14 kg) and tube (~20 lb/9 kg). If you can comfortably carry each component and have space to store a ~48-inch (1.2 m) tube, the 8-inch offers noticeably more light and resolution than a 6-inch. If portability is a concern, a 6-inch f/8 is lighter, more forgiving optically, and still very capable. Review our sweet spot pros and the transport guidance to choose wisely.
Do I need a coma corrector for an 8-inch f/6 Dob?
Most visual observers do not. At f/6, coma is present off-axis but moderate. Good eyepiece selection and framing targets near the field center mitigate it. If you use ultra-wide 82–100° eyepieces and are sensitive to edge performance, a coma corrector can help, but it adds cost, weight, and spacing considerations. For many, better use of eyepieces and thoughtful observing technique is enough.
Final Thoughts on Choosing the Right 6–8 Inch Dobsonian Telescope

A 6–8-inch Dobsonian is a remarkably effective and accessible visual telescope. It offers genuine deep-sky reach, satisfying planetary clarity, and a hands-on observing experience that teaches the sky. For budget-conscious buyers, a 6-inch f/8 is a forgiving, sharp, and easy-to-live-with instrument. If you can manage slightly more weight and bulk, an 8-inch f/6 delivers a tangible boost in light grasp and resolution that you’ll notice on nebulae, galaxies, globulars, and fine planetary detail.
Prioritize smooth bearings, a solid 2-inch focuser, and a sensible accessory kit—especially a low-power wide-field eyepiece, a sharp mid-power eyepiece, a 2× Barlow, and a UHC filter. Keep collimation and cooling in mind; they’re the gatekeepers to crisp, high-contrast views. Whether you prefer pure manual star-hopping or add push-to/tracking, the Dobsonian format keeps the path from backyard to deep space refreshingly direct.
If this guide helped, explore our other in-depth observing and equipment articles, and subscribe to the newsletter so you never miss new gear breakdowns, target lists by season, and practical tips that elevate every clear night at the eyepiece.