Table of Contents
- What Is Milky Way Astrophotography?
- Planning Milky Way Visibility: Season, Time, and Location
- Light Pollution, Weather, and Seeing: Optimizing Conditions
- Essential Gear for Nightscape and Milky Way Imaging
- Camera Settings for Sharp Stars and Clean Detail
- Tracked vs. Static Exposures: Pros, Cons, and Workflows
- Calibration Frames and Stacking for Noise Reduction
- Focusing, Composition, and Field Techniques in the Dark
- Post‑Processing: Natural Colors, Contrast, and Noise Control
- Troubleshooting Common Milky Way Imaging Problems
- Advanced Techniques: Panoramas, Blends, and Narrowband
- Safety, Leave‑No‑Trace, and Ethical Image Making
- Frequently Asked Questions
- Final Thoughts on Choosing the Right Astrophotography Setup
What Is Milky Way Astrophotography?
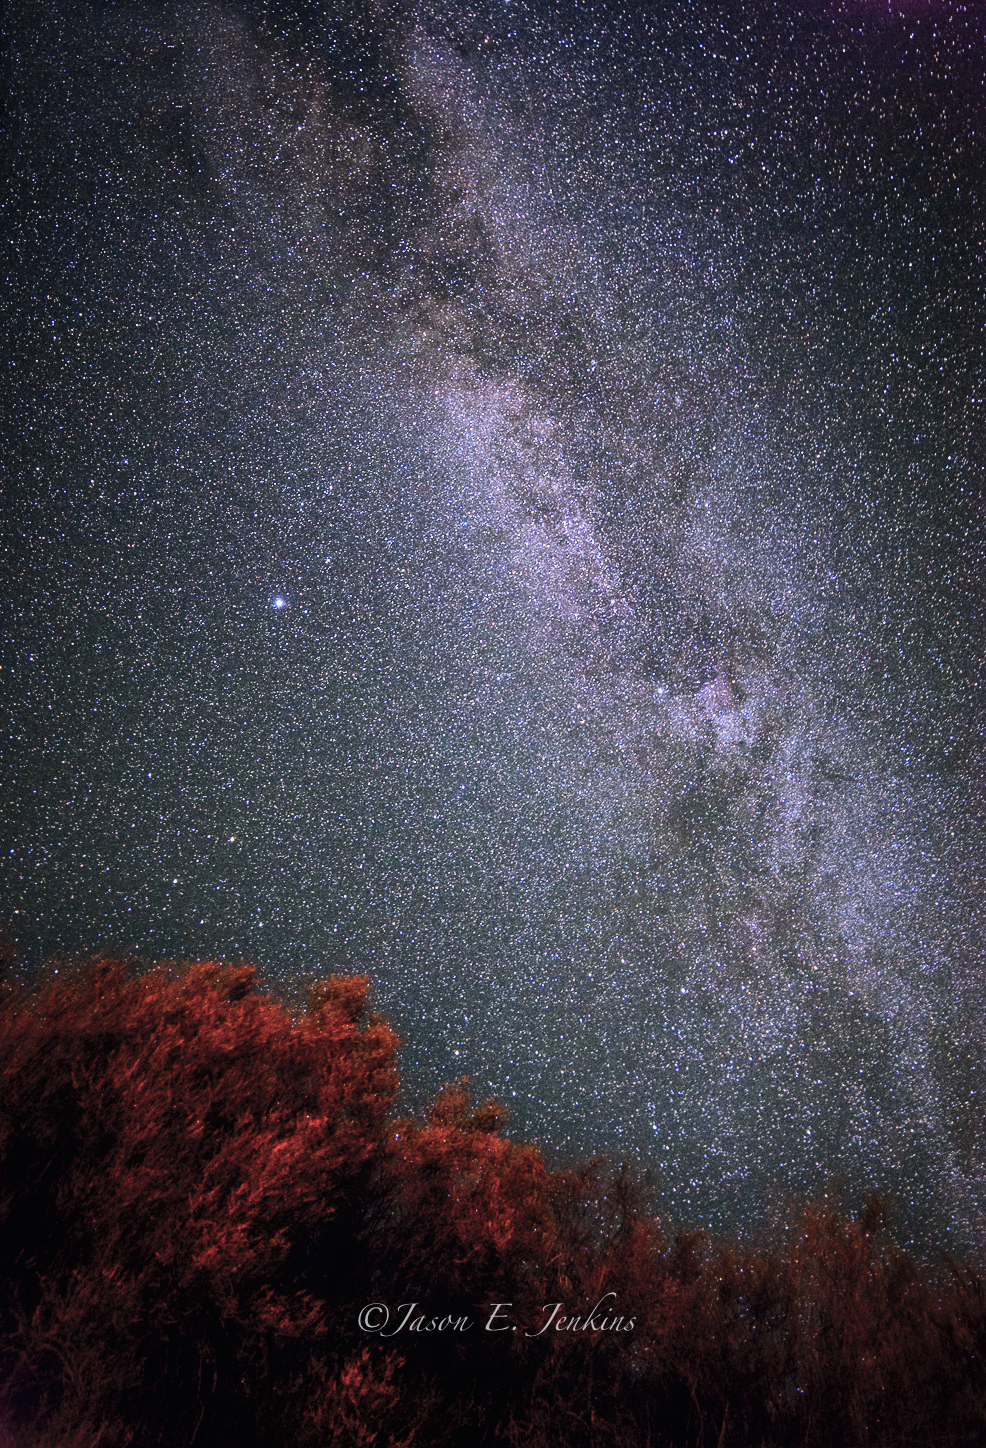
Milky Way astrophotography—often called nightscape photography—captures the luminous band of our galaxy arcing across the sky, usually paired with a terrestrial foreground. It blends landscape composition with astronomical technique, drawing on knowledge of celestial timing, camera settings, and post‑processing. Unlike deep‑sky imaging where telescopes and hours‑long integrations are common, Milky Way photography can be done with a camera, a sturdy tripod, and a fast wide‑angle lens, producing striking results in a single session.
The brightest portion of the Milky Way is the galactic core, centered near the constellation Sagittarius. Its approximate position is right ascension ~17h45m and declination ~−29°, which is why observers in the Southern Hemisphere see the core higher overhead. Maximizing contrast and detail requires careful planning around darkness, weather, and light pollution—topics covered in Planning Milky Way Visibility and Light Pollution, Weather, and Seeing.

At its best, the Milky Way reveals colorful star clouds, dark dust lanes, and nebulae. Your challenge is to record that detail with sharp stars and minimal noise. Achieving this involves three pillars:
- Preparation: seasons, moon phase, and dark sites
- Execution: stable support, accurate focus, tuned exposure settings
- Processing: noise reduction, color balance, and contrast without overcooking the scene
As you read, use the internal links to jump to specifics—such as Camera Settings and Post‑Processing—to refine your workflow.
Planning Milky Way Visibility: Season, Time, and Location
Great Milky Way images begin long before the shutter clicks. Because our galaxy’s core is seasonal and the sky brightness changes rapidly through twilight, planning determines whether you’ll capture a faint smudge or a spectacular arch.
Seasonal visibility
The core visibility changes with latitude and time of year:
- Northern Hemisphere: The core is visible pre‑dawn from late winter, rising to prime evening visibility from roughly April through August, and setting earlier by October.
- Southern Hemisphere: The core rises earlier and climbs higher. The months from March through October are especially favorable, with winter evenings (June–August) offering long, dark windows.
Remember that the Milky Way remains visible outside these windows—especially the fainter northern portions—but the bright core (Sagittarius/Scorpius region) drives most dramatic nightscapes.

Twilight and darkness
Twilight stages affect sky brightness:
- Civil twilight: Sun 0° to −6°, sky too bright for most stars.
- Nautical twilight: Sun −6° to −12°, brighter stars emerge; Milky Way faint.
- Astronomical twilight: Sun −12° to −18°, sky approaches full darkness.
For Milky Way photography, aim for the interval between the end of astronomical twilight in the evening and the start of astronomical twilight in the morning. Apps and almanacs can compute these times for your location and date.
Moon phase and altitude
The Moon is the most significant natural light source. A dark sky (new Moon ± a few days) maximizes contrast. Small crescents can still work, and a low‑phase Moon behind you can softly illuminate the foreground. Avoid bright gibbous or full Moons when targeting the Milky Way’s faint dust lanes.
Core altitude matters: a core above the horizon haze gives better detail. Check its altitude at target times; higher altitudes reduce atmospheric extinction and improve clarity. Tools like planetarium apps or web sky simulations plot the galaxy’s position relative to your site.
Location and composition scouting
Scout foregrounds during daylight for safety and composition. Consider leading lines (trails, shorelines), silhouettes (trees, rock formations), and reflective surfaces (lakes, wet sand). Return at night with pre‑planned vantage points and alignments. In the field, use a red‑lit headlamp to preserve night vision; white lights can spoil your sensitivity to faint detail and disturb others.
To reduce surprises, pair sky planning with on‑the‑ground logistics. Confirm parking rules, access hours, and weather forecasts. If you expect heavy dew, plan for a dew heater or lens hood (see Essential Gear).
Light Pollution, Weather, and Seeing: Optimizing Conditions
Urban skyglow washes out Milky Way contrast. Weather and atmospheric steadiness also shape your images. Understanding these factors helps you choose nights that give cleaner data and less post‑processing struggle.
Bortle scale and sky brightness
The Bortle scale classifies night sky brightness from class 1 (excellent dark sky) to class 9 (inner city). In Bortle 2–3 skies, the Milky Way’s structure is prominent to the unaided eye; in Bortle 7–9, it may be invisible. While you can photograph the Milky Way under moderate light pollution, contrast and color fidelity suffer. If possible, travel to darker sites, or choose compositions that minimize sky area when you must shoot near cities.

Consider the direction of skyglow: pointing south from a northern city often aims over populated areas where the core sits lower in the sky. If city lights dominate one horizon, try a different azimuth or wait for the core to rotate to a cleaner sector.
Transparency and seeing
Two atmospheric qualities matter:
- Transparency: how clear and dust‑free the air is; affects overall sky brightness and contrast. Haze, smoke, or humidity reduce transparency.
- Seeing: steadiness of the atmosphere; primarily affects high‑magnification work. For wide‑angle Milky Way shots, transparency is the bigger concern, though poor seeing can still slightly fatten stars.
Check forecast products that separate cloud cover, transparency, and seeing. Even on clear nights, high humidity or aerosols can mute the Milky Way. After frontal passages and on cold, crisp nights, transparency can improve markedly.
Filters and their limits
Broadband “light pollution” filters can modestly reduce some urban glow, but their effect on Milky Way nightscapes is mixed and can shift color balance. Under heavy light pollution, consider shorter focal lengths, higher elevations, or time‑blending techniques rather than relying on a filter. For emission nebulae, narrowband filters help, but the broadband Milky Way continuum and reflection components are not well served by strong filtration in wide‑angle scenes. See Advanced Techniques for more about narrowband use.
Essential Gear for Nightscape and Milky Way Imaging
While professional results are possible with modest equipment, certain gear makes Milky Way work easier and more consistent.
Camera bodies
- Any interchangeable‑lens DSLR or mirrorless body that shoots RAW is suitable. Full‑frame sensors typically offer better high‑ISO performance and wider fields. APS‑C and Micro Four Thirds cameras can also perform excellently with fast lenses.
- Disable in‑body or lens stabilization when on a tripod to avoid micro‑vibrations.
- Use manual exposure and manual focus; enable exposure delay or electronic shutter to reduce shake.
Lenses
- Wide, fast primes (e.g., 14–35 mm full‑frame equivalent) at f/1.4–f/2.8 are common. Stopping down one stop often improves edge sharpness and coma.
- Ultra‑wides (14–20 mm) are ideal for single‑row arches; 24–35 mm excels at core details and panoramas.
- For tracked mosaics, 35–85 mm can produce extraordinary resolution, at the cost of complexity.
Support and accessories
- Stable tripod with a ball head or low‑profile head. Hang weight from the center column in wind.
- Intervalometer or camera timer for repeated exposures. Many cameras include built‑in interval shooting.
- Dew control: a USB dew heater band and a power bank, plus a lens hood to delay condensation.
- Spare batteries, large memory cards, red headlamp, and a multi‑tool. Tape or elastic bands for focus rings.
- Optional: star tracker (single‑axis equatorial mount) for longer exposures and lower ISO. See Tracked vs. Static Exposures.
Camera Settings for Sharp Stars and Clean Detail
Your settings must freeze star motion sufficiently while gathering enough light for a clean signal. This balance depends on focal length, pixel size, aperture, and whether you track the sky.
Exposure time and star trailing
Stars move relative to the camera due to Earth’s rotation. Longer exposures produce star trails. A commonly used starting point is the “500 rule”: maximum exposure (seconds) ≈ 500 divided by full‑frame focal length (adjust for crop factor). For example, 20 mm on full‑frame yields roughly 25 s. However, this rule is a rough heuristic and tends to allow slight trailing on modern high‑resolution sensors.
For more accurate limits, use an NPF‑based calculator in a planning app, which factors focal length, aperture, and pixel pitch. If you want pinpoint stars at large display sizes, the NPF recommendation is generally more conservative than the 500 rule.
Aperture and ISO
- Aperture: Shoot near wide open (e.g., f/1.8–f/2.8). Stop down by 1 stop if coma or vignetting is severe; compensate by raising ISO or stacking more frames (Calibration and Stacking).
- ISO: Start around ISO 1600–6400 for static wide‑angle shots depending on sensor. Higher ISOs do not increase sensor sensitivity but shift the camera’s analog/digital gain and affect noise and histogram placement. Aim for a histogram that is off the left edge but not clipping highlights.
White balance and RAW
Shoot in RAW. Set white balance to a consistent value (e.g., 3800–4500 K) or use Daylight; adjust later in post. Auto white balance can vary frame‑to‑frame, complicating stacking.
Noise reduction settings
- Long exposure noise reduction (LENR): Off if you plan to shoot many frames rapidly for stacking; LENR halves your shooting time by taking dark frames after each exposure. Instead, capture your own darks (see calibration frames).
- High ISO NR: Off or low for RAW; it mainly affects JPEG processing.
Focusing and sharpness
Use live view magnification on a bright star and switch to manual focus. Some photographers use a Bahtinov mask, which can assist focus but is less effective with very wide lenses. Tape the focus ring to lock it. For fine‑tuning, capture a short test frame and check star shapes in the corners.
File cadence
For stacking, capture many short exposures rather than a few long ones. This improves noise averaging, reduces the impact of occasional wind gusts, and allows rejection of frames with satellite trails or airplane streaks. Interval shooting is also the basis for time‑lapses.
Tracked vs. Static Exposures: Pros, Cons, and Workflows
Milky Way photographers often choose between static tripod shots and tracked sky exposures. Each approach has trade‑offs in complexity and image quality.
Static tripod workflow
- Use short exposures guided by the 500 rule or NPF calculators.
- Capture 10–50 sky frames for stacking. Take separate foreground frames at lower ISO or longer exposures (or both) to improve detail.
- Pros: Simple, fast setup, no polar alignment.
- Cons: Higher ISO, more noise; limited exposure time; slight trailing at high resolution if pushed.
Tracked sky, untracked foreground
- Mount the camera on a star tracker aligned with the celestial pole to follow the sky’s motion.
- Expose the sky longer (e.g., 1–3 minutes) at a lower ISO for cleaner data. Then turn off tracking and shoot the foreground separately to avoid motion blur in the landscape.
- Pros: Lower noise, finer detail, ability to stop the lens down for better star shapes.
- Cons: Requires polar alignment, careful blending in post, extra weight and time.
Two‑camera or two‑sequence method
For efficiency, some photographers run two sequences: a tracked camera for the sky and a second static camera for the foreground. This reduces field time but increases logistics. Regardless of method, meticulous organization of files and metadata helps during processing (Post‑Processing).

Polar alignment basics
To track accurately, align the tracker’s rotation axis with Earth’s axis using Polaris in the north or Sigma Octantis in the south, aided by the tracker’s polar scope or an app. Even rough alignment permits 30–60‑second tracked exposures at wide focal lengths; better alignment supports multi‑minute exposures. Always verify with a quick test exposure at 100% zoom to confirm pinpoint stars.
Calibration Frames and Stacking for Noise Reduction
Stacking multiple exposures improves the signal‑to‑noise ratio by averaging random noise while reinforcing real detail. Calibration frames correct sensor and optical artifacts.
Frame types
- Lights: your actual sky or foreground exposures.
- Darks: frames with the lens cap on at the same temperature, ISO, and exposure time as your lights; remove thermal and pattern noise.
- Flats: evenly illuminated images (e.g., twilight sky or flat panel) taken at the same focus and aperture as lights; correct vignetting and dust shadows.
- Bias/Offset: very short, capped exposures at the same ISO; characterize read noise and the sensor’s baseline signal. Some workflows prefer dark‑flats instead of bias for certain cameras.
Stacking tools
Popular stacking software includes Sequator and DeepSkyStacker on Windows and Starry Landscape Stacker on macOS for nightscapes, as well as general astrophotography tools capable of calibration, registration, and integration. These applications align stars across frames, reject outliers (airplanes, satellites), and output a master stack with improved dynamic range.
Integration strategy
- Sky: stack many short exposures to tame noise and enhance faint dust lanes. Dither between frames (slight framing changes) when possible to reduce fixed‑pattern noise during stacking.
- Foreground: stack fewer exposures or blend a single low‑ISO, longer exposure to maintain natural textures.
- Outlier rejection: use sigma‑clipping or similar to remove transient trails without manually cloning them out.

Keep calibration frames organized by temperature and ISO. If ambient temperature changes, capture a new set of darks to match your lights. Store flat frames for each lens and f‑stop you use, because vignetting patterns vary.
Focusing, Composition, and Field Techniques in the Dark
Field craft separates a strong nightscape from a snapshot. Sharp focus, purposeful composition, and efficient on‑site workflow save time in post and increase your odds of a keeper.
Reliable focus
- Use live view at maximum magnification on a bright star or distant light; focus until the star is smallest.
- Re‑check focus after temperature changes, lens bumps, or long slews on a tracker.
- If your lens exhibits focus breathing or “infinity drift,” confirm with test frames and adjust as needed.
Composition with the galactic core
Plan how the core arcs relative to your foreground. Early season often places the core low and vertical before dawn; mid‑season can yield a sweeping diagonal; late season leans toward a horizontal arch after dusk. Use this to design leading lines or silhouettes. A crooked horizon or converging verticals can be more noticeable at night; use a bubble level or the camera’s electronic level.
Foreground strategies
- Natural illumination: Use starlight or a thin crescent Moon behind you for gentle, even lighting.
- Time blending: Capture a brighter foreground during blue hour, then the sky under darkness, and blend carefully. Disclose this technique when sharing.
- Exposure bracketing: At night, bracket the foreground and choose the cleanest frame. Watch for motion blur in vegetation on windy nights.
Efficient field workflow
- Establish a repeatable sequence: compose, focus, test shot, refine, lock focus, shoot sky set, shoot foreground.
- Use an intervalometer with a 1–2 s delay between frames to reduce buffer saturation and minimize shutter shock.
- Shield your lens from stray light (cars, headlamps). A simple flag or hood helps.
These practices complement your Camera Settings and will streamline Post‑Processing later.
Post‑Processing: Natural Colors, Contrast, and Noise Control
Processing Milky Way images is about restraint and clarity. Aim to reveal dust lanes and star clouds while preserving a natural night‑sky palette.
Initial RAW development
- White balance: Start around 3800–4200 K with a slightly magenta tint to counter sodium‑orange or greenish casts; fine‑tune by eye.
- Exposure and contrast: Raise exposure until the Milky Way stands out without clipping bright stars. Use curves for midtone contrast rather than heavy global contrast.
- Lens corrections: Enable distortion and vignetting corrections for the foreground; consider turning off vignetting correction for the sky if you plan to use flats in stacking.
Targeted adjustments
- Local contrast: Use clarity or texture modestly on the Milky Way band; overuse can create halos and harsh noise.
- Color separation: Gentle HSL tweaks can bring out magenta/pink emission regions and the yellow‑brown dust lanes; avoid oversaturation.
- Star control: If stars dominate, a subtle star reduction pass can emphasize nebulosity and dust structure. Keep natural star sizes.
Noise reduction and sharpening
- Apply noise reduction primarily to the sky, masking out the foreground’s edges to avoid smearing textures.
- Use multi‑scale or frequency‑aware sharpening to avoid boosting noise. Sharpen the foreground separately from the sky.
Blending sky and foreground
Whether you stacked sky frames or captured a single exposure, you may choose to blend a cleaner foreground. Maintain geometric consistency: the sky’s orientation should match the moment it was captured, with no perspective conflicts. Use soft masks along horizon lines and watch for tree branches or fine details that reveal sloppy blends.
Panorama stitching
If you shot a multi‑frame panorama, stitch the sky first after star alignment, then merge the foreground. Consistent exposure and white balance across frames simplifies stitching. Correct lens distortion before stitching if your software doesn’t model it well.
Troubleshooting Common Milky Way Imaging Problems
Even with careful prep, things can go wrong. Here are frequent problems and their remedies.
Soft or smeared stars
- Cause: Misfocus, vibration, or dew. Solution: Re‑focus with live view magnification; use a 2‑s self‑timer; add a dew heater and shield.
- Cause: Overlong exposure for focal length. Solution: Shorten exposure time or use a tracker (Tracked vs. Static).
Color casts
- Cause: Urban lighting or mixed light sources. Solution: Set a stable white balance and correct in post; consider shooting toward darker azimuths (Light Pollution).
- Cause: Overaggressive filtering. Solution: Avoid heavy broadband filters for nightscapes; correct color gently.
Banding and fixed‑pattern noise
- Cause: Pushing single frames too far. Solution: Stack multiple frames and include calibration. Dither if your setup allows.
Star trailing in panoramas
- Cause: Long exposures across multiple frames. Solution: Shorten exposure per frame; shoot more frames; stitch after star alignment; or track the sky sequence.
Coma and corner aberrations
- Cause: Wide‑open fast lenses. Solution: Stop down 1 stop; correct residual aberrations in post only moderately.
Advanced Techniques: Panoramas, Blends, and Narrowband
Once you are confident with single‑row nightscapes, advanced approaches can expand resolution and artistic options.
Multi‑row panoramas
- Use a nodal rail for precise parallax management when foreground elements are close. This helps seamless stitching.
- Overlap frames by 30–50% and maintain consistent exposure and focus.
- For tracked mosaics, capture the sky grid first, then the untracked foreground. Keep careful notes to align later.
Time‑blends and exposure blends
Time‑blends combine a twilight foreground with a dark‑sky Milky Way. Exposure blends combine dark sky frames with a brighter, cleaner foreground captured minutes apart during full darkness. Keep the time separation short enough that star positions don’t contradict the scene, and disclose the technique when sharing the image.
Selective light painting
Subtle, diffused light can add dimension to a foreground. If permitted and used responsibly, briefly sweep a dim, warm light across the scene during the exposure, keeping it moving to avoid hotspots. Many locations prohibit light painting; always check rules and avoid disturbing wildlife or other observers.
Narrowband and specialty sensors
Traditional broadband Milky Way images benefit less from narrowband filters, but if you wish to isolate specific emission nebulae within the Milky Way, dual‑band filters paired with modified cameras can help when shooting at longer focal lengths. This is a more advanced path and typically not necessary for wide‑angle nightscapes. If you go this route, remember that color balance and star colors will differ from natural broadband captures.
Safety, Leave‑No‑Trace, and Ethical Image Making
Night photography carries responsibilities to yourself, the environment, and your audience.
Field safety
- Tell someone your plan and expected return time. Carry navigation (maps, GPS) and sufficient clothing for temperature drops at night.
- Be mindful of terrain hazards—cliffs, tides, wildlife—and know local regulations. Respect closures and private property.
- Use red light to preserve night vision and reduce disturbance to others.
Leave‑No‑Trace principles
- Stay on durable surfaces; avoid trampling vegetation when scouting in the dark.
- Minimize artificial light and noise. Pack out all trash.
- Be considerate: dim screens, cover car interiors, and park responsibly.
Honest post‑processing
Strive for truthful representation. If you create composites (tracked sky with static foreground, time‑blends, or replacement skies), disclose your methods. Avoid misleading captions and clearly label artistic interpretations versus documentary images.
Frequently Asked Questions
What is the best focal length for Milky Way landscapes?
There is no single “best” focal length—it depends on your composition and goals. For sweeping arches and ease of use, 14–20 mm on full‑frame (≈10–14 mm on APS‑C) is popular. For more detailed core portraits with less empty sky, 24–35 mm works well, often combined with a panorama for field of view. Longer focal lengths (50–85 mm) can isolate nebulae and star clouds, especially on a tracker, but stitching and alignment become more demanding. See Essential Gear for lens guidance and Advanced Techniques for panorama strategies.
How do I avoid star trailing without a tracker?
Use shorter exposures based on focal length and sensor resolution. The 500 rule offers a starting point, but NPF calculators in planning apps are more reliable for pinpoint stars. Pair this with a fast aperture (f/1.8–f/2.8), higher ISO to bring the histogram off the left edge, and stacking of many frames to reduce noise. Stabilize your setup, use a remote or timer to prevent shake, and consider dithering small offsets between frames for cleaner stacking. For more, see Camera Settings and Calibration Frames and Stacking.
Final Thoughts on Choosing the Right Astrophotography Setup
Milky Way astrophotography sits at the intersection of preparation, technique, and restraint. You can begin with a camera, a solid tripod, and a fast wide‑angle lens, and then scale up as your ambitions grow. If you want simplicity and speed, lean on static tripod exposures and stacking; if you crave ultra‑clean detail, add a tracker and embrace careful blending. Regardless of gear, the biggest improvements often come from planning: dark sites, new‑moon windows, and clear, transparent nights. Revisit the sections on Planning, Settings, and Post‑Processing to refine your workflow.
As you iterate, keep your edits honest, your fieldcraft considerate, and your expectations patient—noise falls with stacking, stars sharpen with practice, and compositions strengthen with scouting. If this guide helped, explore related topics on stacking, panoramas, and tracked workflows, and subscribe to our newsletter to get future deep dives on night‑sky imaging, gear tests, and seasonal Milky Way planning tools.