Table of Contents
- Introduction
- Why Dew Forms: The Physics You Need
- Assessing Dew and Frost Risk Before You Go
- The Dew Control Toolkit: Passive and Active Methods
- Power Basics: 12V DC, Batteries, and Connectors
- Sizing Your Battery: Realistic Load Budgets
- Wiring, Voltage Drop, and Distribution
- Heater Controllers and Automation
- Field Setup Workflow: From Dry Optics to Dawn
- Safety, Reliability, and Weatherproofing
- Special Cases: SCTs, Refractors, Newtonians, and EAA
- Troubleshooting: Dew, Power Glitches, and Artifacts
- Maintenance, Storage, and Off-Night Care
- FAQs: Dew Control and Field Power
- FAQs for Imagers: Stars, Sensors, and Filters
- Conclusion: Dry Optics, Happy Nights
Introduction
If you observe or image under clear, calm skies, dew will eventually find you. It softens contrast, blurs stars, fogs corrector plates and eyepieces, and—if frost arrives—can end a session outright. In parallel, running heaters, mounts, cameras, and computers all night demands reliable 12V field power and wiring that won’t sag voltage or trip fuses. The good news: with a bit of physics, planning, and the right kit, you can keep optics dry and gear powered from dusk to dawn.
This guide offers a comprehensive, practical approach to telescope dew control and field power management for both visual observers and astrophotographers. We’ll cover condensation basics, risk assessment, passive and active dew strategies, battery types (including LiFePO4 vs lead-acid), load calculations, wiring and connectors, heater controllers, workflows, safety, and detailed troubleshooting. You’ll find internal links to jump between related topics—for example, you can skip ahead to Power Basics or dive into Heater Controllers as needed.
Artist: Cqdx
Why Dew Forms: The Physics You Need
Dew forms when a surface cools below the local dew point—the temperature at which air is saturated and water vapor condenses. At night, telescope optics radiate heat away to the cold sky. Under clear, dry air, the sky’s effective radiating temperature is extremely low (often equivalent to tens of degrees below zero Celsius), so exposed glass cools rapidly. If the optic’s temperature dips below the dew point, condensation appears. When the optic temperature falls below freezing, frost can form directly, even if the measured air temperature is just below or near 0°C.
Key drivers of radiative cooling and dew formation:
- Clear, calm nights: Low clouds act like a blanket, and wind mixes air, reducing surface cooling. Calm, clear nights maximize radiative losses.
- Wide view to the sky: A corrector plate or objective with a direct view of the sky radiates more heat. A dew shield limits the solid angle of sky exposure.
- Humidity and dew point spread: The smaller the difference between air temperature and dew point (the dew point spread), the higher the dew risk.
- Surface emissivity: Glass and painted metal radiate well. High-emissivity surfaces cool more quickly.
Optical systems most at risk:
- SCTs and Maksutovs: Large, forward-mounted corrector plates radiate vigorously. These designs are dew magnets without mitigation.
- Refractors: Front objectives are exposed; built-in dew shields help but may be insufficient in humid climates.
- Eyepieces and finder scopes: Small glass elements cool fast and fog easily during eye use and when pointed skyward.
- Newtonians: Primaries are recessed and usually safe from dew, but the secondary mirror can frost, especially in open-tube Dobsonians.
Takeaway: Radiative cooling is the enemy. Reduce the sky view, add gentle heat just above ambient, and monitor dew point to stay ahead of condensation.
If you want to jump right into strategies, see The Dew Control Toolkit. For estimating whether you’ll need them tonight, continue to Assessing Dew and Frost Risk.
Assessing Dew and Frost Risk Before You Go
Planning beats reacting. A 60-second check of conditions can save your session. Look up:
- Dew point spread: Subtract dew point from air temperature. A spread of 2–4°C (3–7°F) or less means high dew risk. Near-zero spread often means inevitable dew.
- Wind: Light winds (0–5 mph or 0–8 km/h) favor dew. Moderate wind may help delay dew but can affect seeing.
- Cloud cover: Clear skies promote radiative cooling; thin high clouds may act partially like an insulating blanket.
- Ground moisture: Wet ground and nearby vegetation add local humidity.
Useful tools and techniques:
- Local METARs and weather apps: Many list dew point and relative humidity. Watch trends over several hours.
- On-site hygrometer/thermometer: Clip-on sensors near your telescope provide more relevant readings than a weather station many kilometers away.
- Radiative index proxies: If you have an IR thermometer, compare optic versus ambient temperature. A rapidly cooling optic signals imminent dew risk.
Set your expectations accordingly: bring a dew shield and heater strap if the spread is small. If frost is possible, pack extra power and consider insulated shields. If you’re running heaters, remember to revisit Sizing Your Battery so you don’t run flat at 3 a.m.
The Dew Control Toolkit: Passive and Active Methods
Effective dew control uses layers of defense. Start passive, add active heating only as needed, and keep everything efficient to preserve power and seeing quality.
Passive Methods
- Dew shields (long lens hoods): Extend the optic’s tube by 1–1.5 objective diameters. This reduces the sky view, slows radiative cooling, and blocks stray light.
- Insulating wraps: Foam or reflective wraps around the dew shield or OTA can reduce heat loss. Avoid covering vents needed for mirror cooling.
- Eyepiece caps and pockets: Keep eyepieces capped or in a pocket to share body heat when not in use.
- Point down during breaks: Parking the scope horizontally or slightly down during pauses reduces sky exposure.
- Site selection: Avoid low-lying depressions (cold-air sinks). Setup on dry, hard surfaces if possible to reduce local humidity.
Active Methods
- Heater straps: Resistive straps wrap around corrector plates, refractor cells, eyepiece barrels, finder objective cells, and Newtonian secondaries. They provide gentle heat to keep optics just above ambient and above the dew point.
- Dew heater controllers: Pulse-width modulation (PWM) controllers regulate strap power. Some include temperature and humidity sensors for automatic control; see Heater Controllers and Automation.
- Secondary mirror heaters: For Newtonians, adhesive heaters behind the secondary mirror are effective. Route wiring carefully to avoid diffraction artifacts and snagging.
- Gentle air flow: In some designs, a low-speed fan aimed across a corrector or secondary reduces boundary layer cooling and delays dew. Use sparingly to avoid vibration.
- Emergency dry-out: A small, battery-powered, low-heat blower or a brief shot from a hand warmer near—not on—the glass can clear fog temporarily. Avoid hair dryers on high heat, which can induce tube currents and thermal shock.
Strategic use cases:
- SCT/Mak corrector: Combine a long dew shield with a heater strap around the corrector cell. Run low power initially; increase only if dew forms. This combination is far more efficient than heat alone.
- Refractor objective: Extend the dew shield and place a strap behind the cell. Internal heat can induce small focus shifts; use gentle power and refocus as needed.
- Eyepieces and finder: A small strap or intermittent warming prevents fogging when swapping eyepieces. Keep spares capped and warm.
- Newtonian secondary: A purpose-built secondary heater is the cleanest solution. A strap around a truss UTA can help, but direct secondary heating is more effective.
Remember that active heating consumes power. If you anticipate heavy heater use, review Power Basics and Sizing Your Battery to ensure sufficient capacity and proper wiring.
Power Basics: 12V DC, Batteries, and Connectors
Most astronomy gear expects nominal 12V DC. Real-world voltages vary: freshly charged lead-acid can be ~12.6–12.9V at rest; LiFePO4 sits ~13.2V; laptop bricks and some controllers may use 19V or 5V (USB). Always verify the required voltage and polarity for each device. Common 12V loads include mounts, dew heaters, cooled cameras, focusers, filter wheels, mini PCs, and Wi‑Fi hubs.
Battery Chemistries
- Sealed lead-acid (SLA/AGM/gel): Inexpensive and widely available. Heavy for their capacity and suffer reduced usable capacity under high loads and cold temperatures. Do not deeply discharge—staying above ~50% state-of-charge improves longevity.
- LiFePO4 (lithium iron phosphate): Lighter, flatter voltage curve, and typically longer cycle life. Usable to deeper discharge (often 80–90% of rated capacity) without severe lifespan penalty. Higher upfront cost but excellent for astronomy field power.
- Li-ion/NMC power stations: Many “solar generators” use lithium-ion chemistries with built-in inverters, USB, and regulated 12V outputs. Convenient, but check continuous 12V current limits and whether 12V is regulated under load.
Capacity terminology:
- Amp-hours (Ah): Capacity at a given voltage (nominal). Roughly, Wh = V × Ah. For a 12V battery, 20 Ah ≈ 240 Wh.
- Peukert effect (lead-acid): Higher discharge rates reduce usable capacity; a 20 Ah SLA might deliver much less if you draw several amps continuously in cold conditions.
- Cold derating: Battery capacity and heater demand both worsen in cold weather. Plan extra margin for winter.
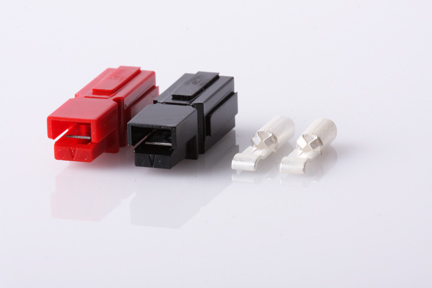
Connectors and Polarity

Artist: Cqdx
- 5.5 × 2.1 mm barrel DC: Common on astronomy gear. Confirm center-positive polarity; mismatches can damage devices.
- Cigarette lighter plugs: Ubiquitous but prone to poor contact and accidental disconnection. Use locking alternatives where possible.
- Anderson Powerpole: Robust, standardized polarity when keyed consistently. Popular for 12V distribution among amateur radio and astronomy communities.
- SAE two-pin: Simple and weather-capable. Watch polarity consistency across cables.
- USB-A/C and 5V rails: For accessories. Check current limits and cable quality to avoid voltage sag.
Protection essentials:
- Fuses: Place a fuse near the battery on each branch circuit. Select a rating modestly above expected current to protect against shorts.
- Polarity and labeling: Color-code and label cables. A single reversed connector can end a night.
- Regulated outputs: Sensitive gear benefits from regulated 12V outputs or DC-DC converters, especially with lead-acid batteries under varying load.
If you’re unsure how large a battery you need, skip ahead to Sizing Your Battery. For cable runs and voltage drop, see Wiring, Voltage Drop, and Distribution.
Sizing Your Battery: Realistic Load Budgets
Start by listing devices, their typical current draw at 12V, and the hours of operation. Many manufacturers list current at 12V; if they list watts, convert with I = P/V. Include duty cycle for heaters and coolers.
Typical 12V Current Draws (ballpark)
- Mount (medium EQ): 0.5–1.0 A tracking; 2–3 A+ when slewing.
- Dew heater strap (per strap): 0.2–1.5 A depending on size and power level.
- Cooled CMOS camera: 0.5–3 A depending on sensor, setpoint, and ambient temperature.
- Guide camera, EAF, filter wheel: Typically small (0.1–0.5 A combined), though focusers can spike briefly.
- Mini PC/Stick PC (12V input): 1–4 A depending on model and workload.
- Wi‑Fi hub/USB hub: 0.1–0.5 A (12V equivalent via DC-DC).
Example Budgets
Visual SCT night (8-inch):
- Mount tracking average: 0.8 A
- Corrector heater (moderate duty): 0.6 A average
- Eyepiece/finder heaters: 0.2 A average
- Misc (fans, small accessories): 0.1 A
Total average ≈ 1.7 A. Over 8 hours: 13.6 Ah. Add 30–50% margin: target a 20–25 Ah usable capacity. For SLA, that might mean a 40–50 Ah battery (since you don’t want to fully discharge). For LiFePO4, ~20–30 Ah is usually sufficient.
Imaging night (EQ mount + cooled camera + mini PC + heaters):
- Mount tracking: 0.8 A (slew bursts higher)
- Cooled camera: 1.5–2.0 A average (depends on delta-T)
- Guide camera/filter wheel/focuser: 0.3 A average
- Mini PC: 2.0 A average
- Dew heaters (two straps): 1.0–1.5 A combined average
Total average ≈ 5.6–6.6 A. Over 8 hours: 45–53 Ah. Add slewing, startup surges, and winter margins; plan for 60–70 Ah usable. That suggests ~100–120 Ah SLA, or ~60–80 Ah LiFePO4 for robust all-night operation.
Headroom and Seasonal Adjustments
- Winter: Heaters and camera coolers work harder. Add generous margin.
- Automation and remote sessions: If you won’t be babysitting, design for worst case to avoid shutdown mid-sequence.
- Inverters: If you must use AC in the field, include inverter losses (often 10–15%+). Prefer DC-DC where possible.
Once you have a budget, you can refine the wiring; see Wiring, Voltage Drop, and Distribution to keep voltage stable at the load.
Wiring, Voltage Drop, and Distribution
Voltage sag at the device can cause mount resets, camera disconnects, and heater underperformance. Good wiring practice is as important as battery capacity.

Artist: 4dtext
Minimize Voltage Drop
- Use thicker wire for higher current or longer runs: Lower AWG number means thicker wire. For several amps over a couple of meters, AWG 16 or AWG 14 is often appropriate; for short, light loads, AWG 18 can suffice.
- Keep runs short: Place the battery or a distribution hub close to the mount to reduce cable length.
- Avoid daisy-chaining high-current devices: Star topology from a fused hub helps maintain voltage and simplifies troubleshooting.
- Quality connectors: Crimp properly with the right tool; strain-relief cables to prevent intermittent connections.
Distribution Strategies
- Power distribution box: A fused or breaker-protected box with multiple 12V outputs (barrel/Powerpole/SAE) and a voltmeter simplifies power management at the mount.
- Regulation where needed: Use buck/boost DC-DC converters for devices sensitive to input voltage. Ensure converters are rated for your current needs.
- Grounding and noise: Keep power grounds common through the distribution hub to reduce ground loops. Use ferrite chokes on data cables if you notice interference.
Cable Management
- Bundle by function: Separate power and data runs to minimize interference.
- Route with motion in mind: Allow slack for RA/DEC movement; test full slews to prevent snags.
- Weather protection: Elevate hubs off damp ground and shield connectors from dew with simple covers.
If you plan to automate heater output, coordinate wiring for temperature probes and controller placement; see Heater Controllers and Automation.
Heater Controllers and Automation
The best dew control is gentle, continuous, and automatic. Overheating optics can soften images by inducing tube currents and focus drift. Modern controllers help maintain a narrow margin above ambient or dew point.
PWM Controllers
Pulse-width modulation rapidly switches power on/off to achieve an average output. Benefits include efficiency, reduced waste heat, and fine-grained control. Multi-channel units let you run separate straps for the corrector plate, objective, finder, and eyepieces.
Closed-Loop Control
- Temperature probes: Placed near the optic cell or strap to monitor temperature. The goal is optic slightly warmer than ambient (often 1–3°C above).
- Environmental sensors: Some controllers accept ambient temperature/humidity inputs and calculate dew point, adjusting outputs automatically.
- Software integration: Imaging control software can interface with smart controllers, letting you set dew-point offsets and log power usage.
Best Practices
- Start low, before dew forms: Preventing condensation is easier than removing it.
- Balance heat: Favor the optic most at risk (e.g., SCT corrector). Keep eyepiece straps minimal until needed.
- Watch focus: Heat can subtly shift focus; pair heater adjustments with quick autofocus or manual checks.
- Avoid hot spots: Place straps on the metal cell or around the tube near the glass, not directly across optical surfaces.
For power planning with controllers and multiple straps, revisit Sizing Your Battery.
Field Setup Workflow: From Dry Optics to Dawn
A consistent workflow prevents surprises and conserves power.
- Pre-trip check: Verify dew point forecasts, charge batteries fully, and pre-assemble heater straps on the telescope at home.
- Site setup: Place the battery on insulating material off damp ground. Keep the power hub near the mount to shorten cables.
- Dew shields and straps: Extend shields and connect straps before powering the controller.
- Power on in stages: Start the mount and critical electronics, confirm stable voltage at the hub, then enable heaters at low power.
- Polar alignment and focusing: Heat-induced focus drift is small but real; run heaters at intended levels before final focus.
- Monitor and adjust: Every hour, check for dew traces on optics, verify controller setpoints, and confirm battery voltage under load.
- End-of-night dry-down: Keep gentle heat on as you warm the scope toward ambient. Cap optics only after they are dry to prevent sealing in moisture.
- Transport and storage: Use desiccant in cases, and keep caps slightly ajar at home until any residual moisture dissipates; see Maintenance.
Imagers running long sequences can automate sensor logging to correlate heater duty cycles with environmental changes; this helps refine future power budgets.
Safety, Reliability, and Weatherproofing
Field environments are unforgiving. Combine electrical safety with basic weatherproofing.
- Fuse every branch near the battery: Protects wiring from shorts. Carry spare fuses.
- Use proper chargers: Lead-acid and LiFePO4 require different charge profiles; follow manufacturer guidance.
- Moisture management: Elevate batteries and hubs. Use simple covers or enclosures that allow ventilation while shedding dew.
- Strain relief and grommets: Prevent chafing and intermittent faults.
- Temperature limits: Many lithium batteries restrict charging below ~0°C; plan charging indoors or use batteries with low-temp charge protection.
- Polarity discipline: Standardize connectors and labeling to prevent reverse hookups in the dark.
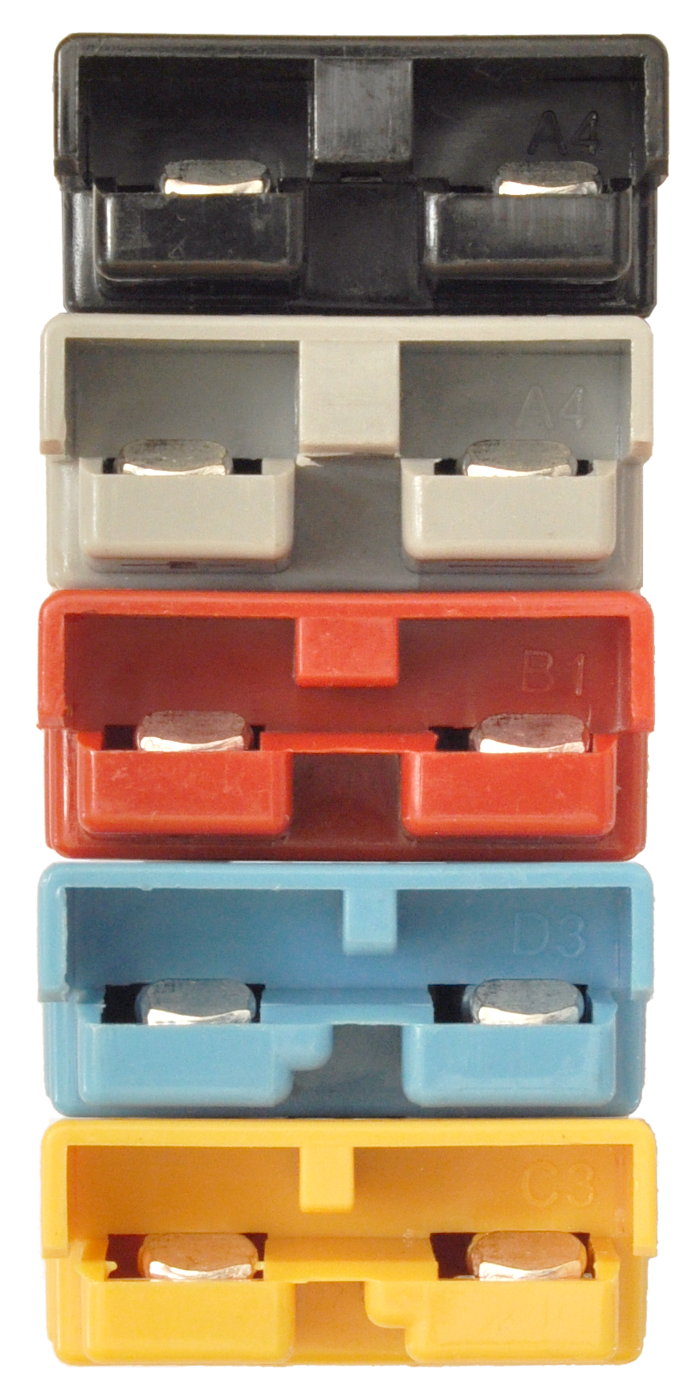
Different coloured plugs in the Anderson SB50 series, illustrating the different keying that allows only like-coloured connectors to mate. Note the black and grey connectors are keyed identically allowing them to interconnect, unlike all the other colours.
Artist: Malvineous
If operating from mains power outdoors, use appropriately rated extension cords and ground-fault protection, and keep AC interfaces off the ground and out of dew exposure. Where possible, prefer a DC-only system to minimize complexity and risk.
Special Cases: SCTs, Refractors, Newtonians, and EAA
SCTs and Maksutovs
These are the most dew-prone. Combine a long dew shield plus a heater strap around the corrector cell. Consider an insulated dew shield in cold climates to slow radiative losses. Monitor for tube currents; minimal, steady heat is better than blasts.
Refractors
Built-in dew shields help, but in humid conditions add a strap just behind the objective cell. Keep power low and refocus after initial warm-up. An insulated extension can pay dividends on small APOs.
Newtonians and Dobsonians
Primary mirrors are recessed and slower to dew, but secondary mirrors are vulnerable. A purpose-built secondary heater is ideal; route thin, flexible wires along the spider to minimize diffraction and snag risk. For open truss designs, a light shroud reduces radiative cooling.
Eyepieces, Finders, and Telrad/RDF
Small optics cool quickly, especially on exposed finder scopes and reflex sights. Dedicated mini-straps or flip-down covers prevent fogging. Keep a cap handy between uses.
EAA and Live Stacking
Electronically Assisted Astronomy benefits from stable dew control without thermal turbulence. Use closed-loop heater control with temperature sensors near the objective or corrector. Keep cables tidy to avoid tugging video/USB connections during slews.
Remote and Semi-Permanent Setups
Automate dew mitigation using environmental sensors and smart controllers. Ensure robust power distribution with monitoring (voltage and current) and remote resets. Weatherproof enclosures should balance moisture exclusion with condensation control; desiccant cartridges and slight positive ventilation are useful.
Troubleshooting: Dew, Power Glitches, and Artifacts
Dew Won’t Go Away
- Increase heat gradually: Raise the controller channel a step at a time until dew clears. Overheating can degrade image quality.
- Check strap placement: Heat on the cell or around the tube near the lens is more effective than far from the glass.
- Improve shielding: A longer dew shield or temporary windbreak can reduce radiative exchange.
- Address ambient humidity: If dew point is nearly equal to ambient, you may need sustained higher duty cycles—plan for extra battery capacity next time.
Mount Resets or Camera Disconnects
- Measure voltage under load: If it sags below the device’s minimum, thicken cables, shorten runs, or use a regulator.
- Check connectors: Loose cigarette plugs are common culprits. Consider locking connectors or Powerpoles.
- Separate power/data: Reduce interference by routing USB away from high-current heater cables; add ferrites if needed.
Star Bloat or Soft Focus
- Reduce heater power: Excess heat can create local turbulence. Use closed-loop control or lower the duty cycle.
- Refocus after warm-up: Minor focus shifts are normal as optics reach equilibrium.
Condensation After Bringing the Scope Indoors
- Cap later, not sooner: Allow the instrument to warm gradually with caps off or slightly ajar so moisture can escape.
- Use desiccant: Place silica gel in the OTA case or use desiccant caps for cameras and focusers.
For wiring-specific issues, return to Wiring, Voltage Drop, and Distribution. For heater tuning, see Heater Controllers and Automation.
Maintenance, Storage, and Off-Night Care
- Dry before sealing: Ensure optics and cables are dry before placing in cases.
- Refresh desiccants: Recharge silica packs per manufacturer instructions to keep cases dry.
- Inspect straps and cables: Look for cracked insulation or loose crimps; repair before field use.
- Battery care: Store lead-acid fully charged; avoid deep discharge. Store LiFePO4 around partial state-of-charge if long idle, and top off before use.
- Controller firmware and logs: If your controller logs data, review heater duty cycles versus ambient conditions to refine future settings.
FAQs: Dew Control and Field Power
Do hair dryers work for dew removal?
They can clear dew temporarily, but high heat risks thermal shock and tube currents that degrade image quality. Use the lowest setting and keep the stream indirect and brief. A better approach is prevention with a dew shield and low-power heater maintained throughout the session.
Will heater straps damage my optics or coatings?
Used correctly, no. Straps should provide gentle warmth, keeping the optic slightly above ambient and above the dew point. Avoid overheating; do not place heating elements directly on glass surfaces. Place them around the cell or tube near the optic.
How big should my dew shield be?
A practical rule is 1–1.5 times the objective diameter in length. Longer shields reduce radiative cooling and stray light but can catch wind; balance length with stability.
Can I run everything from a single battery?
Yes, if the battery and distribution are sized appropriately. Fuse each branch near the source, keep cable runs short and thick, and monitor voltage under load. See Sizing Your Battery and Wiring.
Is LiFePO4 worth the cost?
For frequent field work, LiFePO4 offers lighter weight, flatter voltage, deeper usable capacity, and often longer cycle life than lead-acid. The upfront cost is higher, but the user experience and longevity are compelling for many astronomers.
Can solar panels power a night session?
Panels charge during the day; at night you draw from the battery. If you camp multiple nights, a portable panel and charge controller can replenish daytime energy. Size the panel to replace your typical nightly consumption, considering weather variability.
What about using a car battery or idling the car?
A dedicated deep-cycle battery is safer for your gear and your vehicle. Idling introduces vibration, fumes, and noise; modern vehicles also manage alternators in ways that may not be ideal for sensitive electronics. Prefer a standalone battery with proper fusing and regulation.
FAQs for Imagers: Stars, Sensors, and Filters
Do dew heaters bloat stars in astrophotography?
Excess heat can soften images by creating local turbulence. Use the minimum heater power that prevents condensation and consider closed-loop control targeting a small offset above ambient. Refocus after initial warm-up and after significant heater adjustments.
My camera’s protective window frosts—what can I do?
Ensure the camera’s built-in heater (if present) is enabled. Keep desiccant tablets fresh per the manufacturer’s guidance. Avoid pointing the camera window directly at the sky during long setup pauses. Slightly warming the imaging train with a small strap may help in extreme humidity.
Filters and OAG prisms are dewing inside the train—how do I prevent that?
Seal the train as well as practicable and add gentle heat near the filter drawer or OAG body. Avoid heating the sensor directly; keep the heat external and minimal. Desiccants inside adapters can reduce internal humidity.
Will heater power change focus during automated runs?
Mildly, yes. Integrate periodic autofocus routines—on filter changes, temperature shifts, and after large heater adjustments. Most autofocus software can handle small drifts if scheduled appropriately.
How do I account for heater duty cycle in my power budget?
Multiply the strap’s maximum current by its expected duty cycle under your conditions (for example, 1.5 A at 40% duty ≈ 0.6 A average). In cold, humid weather, assume higher duty cycles. Log controller outputs to refine estimates.
Can I power a mini PC and mount from the same LiFePO4 battery without noise issues?
Yes, with a proper distribution hub, separate fuses, and adequate wiring. Keep data and power cables separated, use ferrites on USB if necessary, and ensure solid grounds to prevent ground loops. If needed, use a DC-DC regulator to provide clean, stable voltage to sensitive devices.
Conclusion: Dry Optics, Happy Nights

Artist: http://hbrobotics.org/wiki/index.php?title=User:Dbc
Dew control and field power are two sides of the same coin. A long, insulated dew shield, properly placed heater straps, and a smart controller prevent condensation while preserving image quality. A well-sized battery, robust distribution, and good wiring practices keep mounts, cameras, and heaters running all night. Together, these habits transform marginal, damp sessions into productive, enjoyable nights under the stars.
As you refine your setup, track conditions, heater duty cycles, and power usage. Use those notes to optimize strap placement, controller settings, and battery capacity. If you found this guide helpful, explore related topics on equipment optimization, and consider sharing your own field-tested tips with your local astronomy club or community—every dry optic and steady voltage helps someone else see the universe more clearly.