Table of Contents
- What Is Smartphone Planetary Imaging and Why It Works
- Essential Gear: Adapters, Mounts, and Eyepieces
- Choosing Planetary Targets and the Best Timing
- Optimal Capture Settings: Frame Rates, Exposure, Focus
- Lucky Imaging with Video: Recording the Best Moments
- Stacking and Processing Workflow in Free Software
- Troubleshooting Blurry, Shaky, and Noisy Results
- Advanced Tips: Filters, Barlows, and Manual Controls
- Safety, Ethics, and Data Integrity in Astrophotography
- Frequently Asked Questions
- Final Thoughts on Choosing the Right Smartphone Planetary Imaging Setup
What Is Smartphone Planetary Imaging and Why It Works
Smartphone planetary imaging—often called afocal astrophotography—is the practice of positioning a phone camera behind a telescope eyepiece to capture bright Solar System objects such as the Moon, Jupiter, and Saturn. With the right technique, you can record short videos (video snippets) and stack the sharpest frames to overcome atmospheric turbulence, revealing cloud bands on Jupiter, Saturn’s rings, and crisp lunar craters.

This approach works for two key reasons:
- Brightness of targets: The Moon and the bright planets are luminous enough that short exposures and high frame rates are possible even with small telescopes. That keeps motion blur and noise low.
- Lucky imaging: Earth’s atmosphere blurs details on most frames, but brief moments of steadier air—called good seeing—produce sharper frames. By capturing hundreds to thousands of frames and selecting the best, you effectively beat the blur. See Lucky Imaging with Video for the method.
Although dedicated planetary cameras and tracking mounts can deliver superior results, a smartphone can get surprisingly close when coupled with a stable mount, a steady hand (or better, a clamp), and a simple stacking workflow. Think of your phone as a compact, sensitive sensor with a powerful processor and apps that can control exposure, focus, and frame rate.
Key idea: Planetary imaging is about gathering many frames quickly and combining the sharpest ones. Image quality depends more on atmospheric steadiness, focus, and alignment than on single-frame exposure time.
In the sections below, we cover the essential gear, target selection, capture settings, and a practical processing pipeline. If you’re just getting started, skim the gear and capture settings sections, then jump to stacking and processing for a step-by-step guide.
Essential Gear: Adapters, Mounts, and Eyepieces
You don’t need a large observatory or a premium camera to capture vibrant planetary detail. The following basics can take you from rough snapshots to impressive close-ups.
1) A Small to Medium Telescope
Any telescope with a stable mount can work, including:
- Refractors (e.g., 70–102 mm): Crisp optics, low maintenance. Ideal for the Moon and larger planetary features.
- Newtonian reflectors (e.g., 114–200 mm): More aperture for the cost; check collimation for best planetary detail.
- Maksutov-Cassegrains and Schmidt-Cassegrains (e.g., 90–200 mm): Long focal lengths deliver higher native magnification—excellent for planets.
Aperture helps resolve fine detail, but it’s not everything. Good seeing and precise focus often matter more than a larger mirror or lens. Keep optics thermally equilibrated (let the scope cool or warm to outdoor temperature) to minimize thermal currents inside the tube.
2) Sturdy Mount and Tripod
A solid mount is critical. Wobbles ruin frames and waste the “lucky” moments. Options include:
- Alt-azimuth mount: Simple and portable. Manual alt-az is fine if you accept that the planet drifts; a motorized alt-az reduces manual nudging.
- Dobsonian: Very stable platforms for Newtonian reflectors. Manual tracking is possible with gentle, frequent nudges.
- Equatorial mount: Tracks the sky with a single axis if aligned. Great for keeping the planet centered during long video captures.
Regardless of mount type, lock all clamps firmly and ensure the tripod legs are fully extended and well braced. Observing from a hard surface can improve stability compared to soft ground.
3) Smartphone-to-Eyepiece Adapter

A phone adapter clamp aligns the phone camera to the eyepiece. Choose a rigid model with three-point or cage-style support that grips the eyepiece firmly. Key features:
- Compatibility with your eyepiece barrel diameter (commonly 1.25-inch eyepieces).
- Fine X-Y adjustment so the phone camera can be centered precisely over the eyepiece.
- Secure, non-marring pad surfaces to protect your phone and eyepiece.
A reliable adapter reduces vignetting, maintains focus when you let go, and helps you keep the planet centered while recording.
4) Eyepieces and Barlow Lenses
On planets, optimal image scale is crucial. Too little magnification, and the planet is tiny; too much, and the image becomes dim and mushy. For common telescopes:
- Eyepieces: Try focal lengths around 10–15 mm to start; adjust based on your telescope’s focal length and seeing.
- Barlow lens (2× or 3×): Doubles or triples effective focal length. Useful for increasing planet size on the sensor, but don’t overdo it when seeing is poor.
Keep the optical train simple: fewer glass elements reduce reflections and preserve contrast. You can always increase effective focal length later if conditions allow.
5) Apps and Manual Controls
Use a camera app that allows manual settings: lock exposure, lock focus, set frame rate, and adjust ISO/gain and shutter speed. Many first-party camera apps now support some manual controls; third-party apps often add more granular control.
6) Optional Accessories
- Wireless shutter/remote: Prevents shakes when starting and stopping video.
- Dew control: Dew shield or gentle heat to keep optics clear.
- Red flashlight: Preserves night vision during setup and focusing.
- Collimation tools: For reflectors; accurate collimation is vital for sharp planetary detail.
With the fundamentals squared away, your next key decision is when and what to shoot. See Choosing Planetary Targets and the Best Timing for planning tips.
Choosing Planetary Targets and the Best Timing
Not all nights—or planets—are equal. Picking the right target at the right time can make the difference between a fuzzy disk and a detailed portrait.
Best Starter Targets
- The Moon: The perfect proving ground. It’s bright, easy to focus on, and shows dramatic relief along the terminator (the day-night boundary). Try different phases for different features.
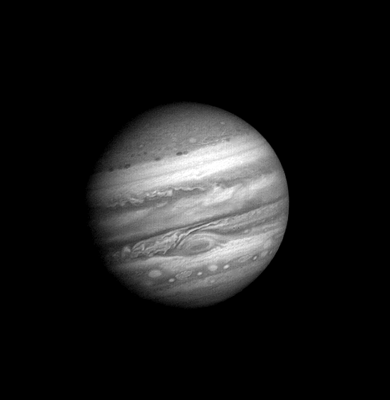
- Jupiter: Large and bright; shows bands, zones, and sometimes the Great Red Spot. Moons are visible as tiny points. Even in modest seeing, Jupiter is rewarding.
- Saturn: Fainter than Jupiter but spectacular. The rings, Cassini Division (in good seeing), and atmospheric belts can be captured with careful technique.

Other targets, such as Mars, Venus, and Uranus, can be tackled once you are comfortable. Mars requires steady seeing and high image scale to reveal surface markings; Venus shows phases and sometimes cloud contrast in specific wavelengths.
Timing and Altitude
Atmospheric distortion is reduced when the target is high in the sky. Plan to image near the target’s culmination (when it is highest above the horizon). Observing apps and planetarium software can tell you when that happens for your location.
Additional timing tips:
- Seeing vs. Transparency: Clear skies aren’t always steady skies. Gentle, stable air (good seeing) matters more than perfect transparency for planet detail.
- Local conditions: Heat-radiating rooftops, nearby roads, or observing over warm surfaces can degrade seeing. Choose locations with minimal thermal turbulence.
- Seasonal visibility: Each planet has periods of good visibility in a given year. Jupiter and Saturn are best around their oppositions, when they are large, bright, and well placed.
To maximize your success rate, plan your session: confirm the planet’s altitude, ensure your telescope has cooled, and prepare your capture workflow. Then move on to dialing in exposure settings and focus.
Optimal Capture Settings: Frame Rates, Exposure, Focus
Planetary imaging prefers short exposures at high frame rates with precise focus. Your goal is to acquire thousands of frames quickly, then let software select and stack the best ones. Here’s how to set up your smartphone for the task.
Frame Rate and Resolution
- Frame rate: Aim for 30–60 frames per second (fps) if your phone and app support it at the chosen resolution. Higher fps means more chances of catching sharp frames during brief moments of good seeing.
- Resolution: Many phones offer 1080p or higher video. 1080p at high fps is a good balance. For smaller planets, consider cropping or using a Region of Interest (ROI) if available in your app to keep frame rates high.
Exposure and Gain/ISO
Start with exposure short enough to freeze atmospheric blur (a few to a few tens of milliseconds for bright targets) and adjust ISO/gain to achieve a histogram that is bright but not overexposed.
- Jupiter: Keep highlights below clipping; aim for a mid-histogram exposure to preserve band detail.
- Saturn: Slightly longer exposures or higher ISO may be needed. Avoid pushing gain so high that noise overwhelms the signal.
- Moon: Use very short exposures. Its brightness allows sharp captures at low ISO.
Rule of thumb: Expose so the brightest parts of the planet are well below saturation. It’s easier to enhance faint belts and rings from a clean, unsaturated signal than to recover detail from blown highlights.
Focus: The Make-or-Break Step
Focus is where most newcomers lose detail. Use high magnification on a bright feature and focus until the image “snaps.” Try these steps:
- Switch to manual focus if your app supports it; auto-focus may hunt or lock onto the wrong edge.
- Magnify the live view (digital zoom on-screen) to see fine features. For Jupiter, watch the edges of cloud bands; for Saturn, the crispness of the ring edges.
- Allow the telescope to reach thermal equilibrium, and minimize touching the focuser during recording.
White Balance and Color
- Lock white balance to prevent color shifts across your video. You can correct color during processing, but a stable white balance simplifies stacking and sharpening.
- For the Moon, a neutral or slightly warm white balance can look natural. For planets, keep it neutral and adjust later.
Sample Starting Settings
These sample settings are a starting point; adjust based on seeing, telescope aperture, and your phone’s capabilities.
Mode: Video (manual)
Frame rate: 30–60 fps
Resolution: 1920×1080 (1080p)
Exposure (Jupiter): ~5–10 ms (avoid clipping)
Exposure (Saturn): ~10–20 ms (or raise ISO slightly)
ISO/Gain: As low as possible while maintaining desired exposure
Focus: Manual; use live view magnification
White balance: Locked (neutral)
Stabilization: Off (optical/electronic stabilization can shift frames unpredictably)
With exposure, focus, and frame rate dialed in, you’re ready for lucky imaging—the core technique for extracting detail from the atmosphere’s fleeting steady moments.
Lucky Imaging with Video: Recording the Best Moments
Lucky imaging is about recording a stream of frames and keeping only the sharpest. Even with a smartphone, you can apply this approach effectively.
Workflow Outline
- Center the target: Use your mount controls to keep the planet near the center of the eyepiece. If you don’t have motorized tracking, nudge gently between short clips.
- Record short video clips: Capture several clips, each 30–120 seconds long. On rapidly rotating planets like Jupiter, very long clips can blur fine details; shorter clips preserve sharpness for stacking.
- Monitor seeing: Watch live view for moments of crisp detail. If seeing improves, record more clips.
- Take multiple sequences: A few thousand frames per sequence is typical. More frames give stacking software more to work with.
File Management
- Use a consistent naming scheme like YYYYMMDD_target_clip#. This helps during selection and alignment in processing.
- Transfer losslessly if possible. Some apps compress heavily; aim for high-quality video to preserve fine detail.
Once you’ve recorded several clips, move on to stacking and processing. That’s where the magic happens.
Stacking and Processing Workflow in Free Software
Stacking converts many noisy, slightly blurred frames into a single sharp image by aligning, scoring, and averaging the best frames. Several free tools support this workflow. The exact software you use may depend on your operating system; many imagers use a combination tailored to their needs.
Typical Toolchain
- Preprocessing: Tools like Planetary Imaging PreProcessor (PIPP) can center and crop the planet, convert formats, and sort by quality metrics.
- Alignment and stacking: AutoStakkert! is widely used for planetary alignment and stacking on Windows; alternatives exist on other platforms.
- Sharpening and wavelets: RegiStax offers wavelet sharpening for bringing out fine detail.
- Final touch-up: General editors like GIMP can adjust levels, curves, and color balance.
Below is a sample workflow that many planetary imagers adapt to their setup. You can apply the same steps to lunar close-ups.
Step-by-Step Guide
- Preprocess with PIPP (optional but helpful):
- Load your video clip.
- Select a planetary preset; enable object detection so the planet is centered and cropped.
- Enable quality estimation and output as a high-quality AVI or SER file.
- Align and stack (e.g., AutoStakkert!):
- Load the preprocessed file.
- Analyze to generate quality metrics per frame.
- Place alignment points over the planetary disk; use multiple points for larger targets like Jupiter.
- Select a percentage of best frames (e.g., 10–30%) for stacking. Experiment with different percentages to balance noise and sharpness.
- Stack to produce a blended image.
- Sharpen with wavelets (e.g., RegiStax):
- Load the stacked image.
- Adjust wavelet layers gradually. Avoid over-sharpening, which introduces ringing and halos.
- Use denoise sliders to tame high-frequency noise.
- Color and contrast in a general editor:
- Adjust levels and curves to increase contrast without clipping highlights or shadows.
- Fine-tune white balance if the image has a color cast.
- Crop and annotate if needed.

Example Processing Notes
PIPP:
  - Planetary mode
  - Center and crop
  - Quality estimation enabled

AutoStakkert!:
  - Place alignment points across the disk
  - Try stacking top 10%, 20%, 30% frames

RegiStax:
  - Start with gentle wavelets; increase in small steps
  - Apply slight denoise

GIMP or similar:
  - Adjust curves for midtone contrast
  - Subtle saturation boost for Jupiter's belts
For lunar images, you can use similar steps, but with more frames and potentially a larger crop since the Moon is big and bright. For more on setting targets and timing, revisit Choosing Planetary Targets and the Best Timing.
Troubleshooting Blurry, Shaky, and Noisy Results
Even experienced imagers fight soft focus, jitter, and grain. Here’s a field-tested checklist to diagnose and correct the most common problems.
Soft or Mushy Detail
- Focus: Re-check with live view magnification. Focus past best focus and come back slowly to avoid backlash.
- Seeing: If stars twinkle vigorously, seeing is poor. Record anyway and stack more frames, or try again on a calmer night.
- Thermal equilibrium: Let your telescope acclimate to outdoor temperature. Internal currents blur images.
- Collimation: Reflectors must be well collimated to deliver crisp planetary detail. Small misalignments are visible on high-power targets.
- Over-magnification: Too much Barlow or too short an eyepiece can empty the image of light and contrast. Back off to a lower image scale.
Shaky Video or Smearing
- Mount stability: Tighten all clamps and balance the telescope. Avoid extending tripods to their maximum height if they become bouncy.
- Wind: Use windbreaks or observe from sheltered locations. Shorten video clips during gusty periods.
- Shutter press shake: Use a timer or remote to start/stop recording.
- Electronic stabilization: Some phones apply stabilization that causes warping. If possible, disable it for planetary imaging.
Noisy or Grainy Results
- Exposure balance: If you increase ISO/gain, keep exposure short but not excessively underexposed. A moderately exposed frame stacked many times beats a severely underexposed one.
- Stack more frames: Doubling the number of frames improves the signal-to-noise ratio roughly by the square root of the increase.
- Gentle denoising: Apply selective noise reduction after sharpening to avoid wiping out fine detail.
Planet Drifting Out of Frame
- Better centering: Use the mount’s slow-motion controls or motorized tracking if available.
- Shorter clips: Record several shorter clips instead of one long clip to keep the planet closer to the center of the field.
- Preprocessing crop: Use a tool like PIPP to center the planet in every frame before stacking.
Color Fringing or Odd Color Balance
- White balance lock: Prevents shifts during the clip.
- Atmospheric dispersion: When planets are low, the atmosphere pries colors apart. Higher altitude helps. See Advanced Tips for mitigation strategies.
As you refine your workflow, keep notes: record the seeing, gear used, exposure settings, and processing parameters. This makes it easier to reproduce successes and diagnose failures across sessions.
Advanced Tips: Filters, Barlows, and Manual Controls
Once you’re comfortable with the basics, a few selective upgrades and techniques can increase detail and efficiency—without abandoning your smartphone-based approach.
Barlows and Image Scale
For planets, a longer effective focal length increases the apparent size of the target on your phone sensor. Start modestly with a 2× Barlow on small scopes; larger apertures can support higher magnification when seeing is steady. Watch the live view: if the image looks dim and wobbly, you’ve pushed too far.
Filters
- Neutral density (ND) or polarizing filters for the Moon: Reduce glare to help your phone maintain consistent exposure and avoid clipping bright highlights.
- Color filters: Some planetary features have better contrast in certain wavelengths (e.g., blue enhances some Jovian features). Results depend on seeing and your particular setup.
- Infrared-pass filters: Advanced imagers may capture in near-IR to mitigate seeing. Smartphones vary widely in IR response due to built-in IR-cut filters, so results can be inconsistent.
Atmospheric Dispersion
Atmospheric dispersion smears colors vertically when the planet is low in the sky. The simplest solution is to image when the planet is higher. Some advanced imagers use atmospheric dispersion correctors (ADCs) with telescopes to realign colors. With a smartphone, keeping to higher altitudes is typically the most practical remedy.
Manual Camera Control and RAW
Use manual exposure and focus. RAW video is uncommon on phones, but if your app offers higher-quality codecs, prefer them. On single-frame lunar images, RAW photos can preserve more tonal range for processing, though the planetary stacking workflow typically revolves around video.
Data Organization and Versioning
Maintain an orderly folder structure by date/target, and keep text notes with settings and seeing conditions. Back up your raw video clips before heavy processing—non-destructive workflow helps you revisit and improve past results.
Cross-Referencing Sessions
On Jupiter, compare multiple sessions to follow the rotation of atmospheric features. For Saturn, changes are more gradual but still visible over months and years. This is where consistent naming and archiving pays dividends. If you’re experimenting with a new technique (e.g., a different Barlow or filter), interleave A/B test clips for direct comparisons during processing.
Safety, Ethics, and Data Integrity in Astrophotography
Planetary imaging might seem harmless, but a few guidelines protect your equipment, your eyes, and the night sky community.
Eye and Equipment Safety
- Never point your telescope at the Sun without an appropriate full-aperture solar filter designed for visual use. Permanent eye damage and equipment damage can occur instantly.
- Mind dew and condensation: Allow equipment to dry after a session. Store optics in a dry environment.
- Power and cables: Keep workspace tidy to prevent tripping hazards in the dark.
Light Pollution and Community
- Be considerate with lights: Use red lights and shielded headlamps at group observing sites.
- Laser pointers: Follow local regulations and never point lasers near aircraft. Many star parties restrict their use.
Data Integrity and Processing Transparency
- Maintain originals: Keep your raw video clips and document processing steps. Transparency helps others learn and validates your results.
- Balanced edits: Avoid excessive noise reduction and sharpening that create misleading features. Subtle processing reveals true details more reliably.
Ethical practices contribute to a supportive community where techniques are shared and results can be compared meaningfully. For newcomers, documenting your capture settings and processing parameters helps others provide precise feedback.
Frequently Asked Questions
How do I know if my focus is truly sharp?
Use live view magnification and focus on the planet’s highest-contrast edges (e.g., Jupiter’s limb or Saturn’s ring edge). If your telescope has a focusing mask for bright targets, you can try it on lunar features first, then switch to the planet. Final confirmation often comes from stacked results—if fine belts or ring divisions don’t emerge even in good seeing, revisit collimation and thermal equilibrium.
How long should each video clip be?
For Jupiter, shorter clips (around 60–120 seconds) help avoid rotational smearing of fine details. For Saturn, slightly longer clips are often acceptable because features change more slowly, but keeping to a couple of minutes is still a good rule of thumb. When in doubt, record several shorter clips and stack them separately; you can always combine results later if they align well.
Final Thoughts on Choosing the Right Smartphone Planetary Imaging Setup
Smartphone planetary imaging sits at a sweet spot: it’s approachable, affordable, and capable of surprising detail in the right conditions. The keys to success are stable gear, disciplined capture settings, and a repeatable stacking workflow. Start with the Moon to refine focus and exposure skills, graduate to Jupiter and Saturn as you tune your technique, and use lucky imaging to harvest those fleeting moments of clarity.
To choose the right setup for you, prioritize a steady mount and a reliable phone adapter before chasing more magnification. Keep the optical train simple, aim for good seeing near culmination, and stack generously. As your confidence grows, experiment with Barlows and filters, and refine your processing to bring out the best in your data.

If you found this guide helpful, explore more articles on practical observing and imaging techniques, and subscribe to our newsletter for upcoming deep dives, equipment tips, and seasonal target planners.