Table of Contents
- Introduction
- Telescopes, Cameras, and Accessories
- Atmospheric Seeing and Thermal Management
- Capture Workflow and Camera Settings
- Preprocessing and Quality Assessment
- Stacking and Registration
- Sharpening, Deconvolution, and Color
- Derotation and Mosaics with WinJUPOS
- Target-by-Target Guides
- Advanced Techniques and Sampling Theory
- Troubleshooting and Common Artifacts
- Data Quality, Annotation, and Responsible Processing
- FAQs: Equipment and Setup
- FAQs: Capture, Stacking, and Processing
- Conclusion
Introduction
High-resolution planetary imaging has undergone a revolution over the past two decades thanks to lucky imaging—the practice of recording thousands to hundreds of thousands of very short exposures and stacking the sharpest frames. This approach, combined with modern CMOS cameras, accurate collimation, and careful processing, can reveal belts and festoons on Jupiter, the Cassini Division and ring structure on Saturn, subtle albedo markings and dust storms on Mars, and even cloud bands on Uranus and Neptune under excellent conditions.
This article is a practical, end-to-end guide to planetary imaging that complements deep-sky workflows by focusing on the unique challenges of bright, small targets. We cover equipment choices, atmospheric seeing, capture strategies, preprocessing, stacking (AutoStakkert!), sharpening (RegiStax, Astrosurface), derotation (WinJUPOS), advanced sampling theory, target-specific tips, and robust troubleshooting. If you are new to the technique, start with Telescopes, Cameras, and Accessories and Capture Workflow and Camera Settings. If you already capture data, jump to Derotation and Mosaics with WinJUPOS and Advanced Techniques and Sampling Theory to push resolution even further.

Attribution: NASA, ESA, and A. Simon-Miller (NASA Goddard Space Flight Center)
Key idea: Atmospheric turbulence blurs most frames, but a small fraction are unusually sharp. Isolate those best moments, align them precisely, and you can approach the diffraction limit of your telescope—often far beyond what a single long exposure could deliver.
Telescopes, Cameras, and Accessories
Planetary imaging thrives on aperture, stable optics, and high frame rates. That said, excellent results are possible with modest gear when seeing cooperates and the workflow is tuned.
Telescopes
- Schmidt–Cassegrains (SCTs): Compact, large aperture, and commonly used. EdgeHD and classic SCTs both work well. Allow time to thermally equilibrate to mitigate tube currents (see Atmospheric Seeing and Thermal Management).
- Newtonians: Fast cooldown, high contrast. Ensure precise collimation and manage the boundary layer with fans. A quality coma corrector is optional for small planetary regions of interest but can help off-axis lunar mosaics.
- Maksutov–Cassegrains: Excellent optical stability and contrast; longer cooldowns due to thick correctors. Great for lunar and planetary detail.
- Apochromatic refractors: Smaller apertures impose resolution limits, but they offer consistent performance and minimal collimation fuss. Great for lunar mosaics and Venus in UV with suitable filters.
The larger the aperture, the finer the diffraction limit, but the more you are at the mercy of seeing. A 200–300 mm aperture is a sweet spot for many imagers.
Cameras
- High-speed CMOS cameras dominate: look for low read noise, high quantum efficiency, and USB 3.0 or faster throughput.
- Color vs mono: Color cameras are simpler and efficient. Monochrome cameras with RGB or LRGB sequences can yield higher resolution and flexibility at the cost of complexity and time.
- Bit depth: 8-bit captures are common for speed; stacking averages quantization. 10–12-bit modes can help retain subtle gradients, but ensure frame rates remain high (see Capture Workflow and Camera Settings).
Barlows and Telecentric Amplifiers
Planetary imaging benefits from critical sampling of the Airy disk. A typical rule-of-thumb for focal ratio is:
- Color camera: f/ratio ≈ 5 × pixel size (in microns). For 2.9 µm pixels, target ~f/14–f/16.
- Mono camera with RGB filters: f/ratio ≈ 7 × pixel size. For 2.9 µm pixels, ~f/20 is common.
Use quality Barlows or telecentric amplifiers to reach the desired f/ratio without excessive vignetting or aberrations. Avoid pushing magnification past what seeing and sampling support; empty magnification reduces SNR.
Filters
- RGB filters (mono workflow) or built-in Bayer matrix (color cameras) for full color.
- IR-pass (e.g., 685 nm) can beat poor seeing and reveal detail on Mars, Jupiter, and Saturn.
- CH4 (methane, ~889 nm) highlights high-altitude clouds on Jupiter and Saturn.
- UV for Venus cloud tops requires specialized filters and a UV-capable optical path; most SCT correctors absorb deep UV, so refractors are favored for UV Venus work.
- UV/IR cut for color cameras to ensure crisp focus in the visible.
Atmospheric Dispersion Corrector (ADC)
An ADC uses counter-rotating prisms to correct color smearing caused by the atmosphere at non-zenith altitudes. It is especially helpful for low-elevation planets. Correct tuning can transform an otherwise soft image into a crisp one. See Advanced Techniques and Sampling Theory for tuning and theory, and Capture Workflow and Camera Settings for practical setup.

Attribution: ESO
Focusers and Mounts
- Dual-speed focusers or motorized focusers help nail critical focus. Focus often on the planet itself, using live-view contrast.
- Mounts: Tracking is required, but sub-arcsecond autoguiding is not. Alt-az is fine for short captures; equatorial preferred for longer sessions and mosaics. Field rotation can be dealt with in WinJUPOS derotation if needed.
Atmospheric Seeing and Thermal Management
Atmospheric turbulence (seeing) limits resolution more often than optics. Understanding and working with seeing is the most powerful upgrade you can make that costs nothing.
Seeing Basics
- Jet stream and upper-level winds degrade high-frequency detail. Consult local jet stream forecasts; calm nights favor fine resolution.
- Low-altitude thermal plumes from rooftops, pavement, and nearby warm surfaces can ruin seeing. Image over grass and away from heat sources when possible.
- Planet elevation matters: higher altitude reduces atmospheric path length and dispersion. Favor seasons when your target is high.
Thermal Equilibrium
- Allow telescopes, especially SCTs and Maks, to cool to ambient temperature. Thermal gradients inside the tube cause shimmering and softening.
- Use rear- and side-fans for Newtonians to break the boundary layer across the mirror.
- Open observatory roofs or roll-offs early to vent heat. Avoid imaging over sun-warmed structures.
Timing Your Session
- Twilight often brings steadier air; try starting at dusk for Jupiter and Saturn.
- Late-night to pre-dawn can see improved seeing after the ground has cooled.
Combine these strategies with an ADC (details) to mitigate atmospheric dispersion at lower altitudes.
Capture Workflow and Camera Settings
Lucky imaging depends on high frame rates, accurate focus, and preventing clipping in your histogram. The goal is to freeze the turbulence while collecting enough frames to stack down noise.
Acquisition Software
- Popular tools include FireCapture and SharpCap. They provide region-of-interest (ROI) cropping, debayering control, ADC assistants, and logging.
- Record in SER format when possible. It preserves frame timing and avoids some AVI limitations.
Exposure, Gain, and Frame Rate
- Target short exposures: typically 5–15 ms for Jupiter, 10–20 ms for Saturn, 3–10 ms for bright lunar scenes. For Mars near opposition, 5–10 ms is common. For Uranus/Neptune, longer exposures (100–500 ms) may be necessary.
- Histogram: aim to fill about 50–70% for Jupiter, 40–60% for Saturn, and 60–80% for Mars. Avoid clipping highlights and shadows.
- Gain: increase gain to reach target frame rates and histograms but avoid excessive noise. Turning gamma off (neutral) is usually best for capture.
- ROI: reduce frame size around the planet to boost frame rate and reduce file size.
Capture Duration and Planet Rotation
Without derotation, keep capture segments short enough to avoid rotational smearing:
- Jupiter: about 2–3 minutes per color channel (or total for a color camera).
- Saturn: about 4–6 minutes thanks to lower apparent rotational shear in the ring/planet detail.
- Mars: 2–4 minutes near opposition (increases with smaller apparent size).
With WinJUPOS derotation, you can combine longer or multiple captures for higher SNR and resolution while compensating for rotation.
Focusing and Collimation
- Collimate on a high-altitude star at high power immediately before imaging. Intra/extra-focal diffraction patterns should be concentric.
- Focus using the planet itself; watch fine features (e.g., the Cassini Division) snap in. A motorized focuser reduces jitter.
ADC Setup
- Align the ADC’s zero-dispersion axis to the vertical (parallactic angle). Many capture apps show the required orientation.
- Tune on a 1–2 magnitude star near the planet: defocus slightly to see color fringes, then adjust prisms until red/blue fringes vanish and the star is symmetric.
File Management
- Use fast SSDs and organize by date/target/filter. Keep logs of UTC times—essential for derotation and ephemeris-based work.
- Note seeing, transparency, and elevation; this metadata helps interpret results and refine strategies.
Preprocessing and Quality Assessment
Before stacking, it helps to sort and crop your data, and optionally discard the worst frames to speed later steps.
Centering, Cropping, and Sorting
- Use a preprocessor like PIPP to center, crop, and optionally sort frames by sharpness. This is especially handy for long captures or for faint targets where the planet may drift.
- For color cameras, preserve raw Bayer data for stacking software that handles debayering well; avoid lossy compression.
Quality Assessment
- Scan a sample of frames to judge seeing. Look for the finest captured detail (e.g., the Cassini Division’s inner edge, Mars albedo boundaries, small Jupiter ovals).
- Check for focus drift, collimation errors, and ADC misalignment by inspecting limb color fringing.
If the majority of frames are extremely soft, consider shorter exposures, retuning ADC, or waiting for better seeing (guidance here).
Stacking and Registration
Stacking is where lucky imaging earns its keep. Software like AutoStakkert! aligns and averages many frames to reduce noise and enhance real detail. Registration is critical: it must track small local shifts caused by turbulence, not just whole-frame motion.
AutoStakkert! Basics
- Import SER/AVI, set analysis, and define an alignment point (AP) grid across the planet. Smaller APs capture local warping; avoid placing APs on dark space or very low-contrast regions if they cause instability.
- Quality graph: choose a stack percentage that balances sharpness and noise. Many imagers create several stacks (e.g., best 5%, 10%, 20%, 50%) and compare results in post.
- Normalization and stabilization settings help with brightness fluctuations and small drifts.
- Debayering: if using a color camera, let the stacking software perform debayering with a suitable algorithm.
Drizzle and Oversampling
AutoStakkert! supports drizzle (e.g., 1.5× or 3×) to improve sampling if your native scale is undersampled and seeing supports it. Drizzle inflates noise and file size; pair it with careful sharpening (next section).
Multiple Stacks for Derotation
Create multiple stacks from separate short captures to be combined via WinJUPOS derotation. This approach maximizes SNR while respecting rotational limits during any single capture.
Sharpening, Deconvolution, and Color
Sharpening reveals the detail latent in your stack. The goal is to enhance real structure without creating artifacts such as ringing, halos, or false texture.

Attribution: Kevin Gill
Wavelets (RegiStax, Astrosurface)
- Wavelets apply multiscale sharpening. Start with the smallest layers to lift fine detail, then carefully add mid-scale layers. Keep an eye on the limb for halos and on uniform regions for “onion rings.”
- Use linked wavelets or layer-by-layer adjustments. Small increments reviewed at 100–150% zoom are safer than big jumps.
Deconvolution
- Lucy–Richardson and Wiener deconvolution can improve detail if an appropriate point-spread function (PSF) is known or approximated.
- Regularization helps avoid amplifying noise. Stop before ringing appears around sharp transitions (e.g., Saturn’s rings).
Color Balance and Luminance Blends
- Neutralize color using the planet’s disk or the rings for Saturn. Ensure no channel clips during capture (settings), or color balance may be skewed.
- LRGB blends: an IR or red-channel luminance can increase apparent detail. Be transparent in labeling if you use non-RGB luminance.
- Avoid over-saturation; subtle color differences (e.g., Jovian zones vs belts) carry scientific significance.
Noise Reduction and Finishing
- Apply gentle, small-radius noise reduction after sharpening. Target smooth areas (e.g., Jupiter’s zones) more than high-contrast edges.
- Finalize with slight contrast curves and a restrained unsharp mask if needed.
Derotation and Mosaics with WinJUPOS
Gas giants rotate quickly. Jupiter’s atmospheric features shift notably within minutes. WinJUPOS allows you to derotate images and even video streams, letting you combine multiple captures as if they were taken at a single moment in time. This boosts SNR without smearing detail.
Image Derotation Workflow
- Measurement: Load each stacked image and create a measurement (.ims) by aligning the planet outline to the disk and features. Accurate timestamps (UTC) and the correct central meridian system (e.g., System III for Jupiter) are essential.
- Derotation: Choose a reference time and combine a series of measured images. WinJUPOS corrects for rotation, outputting a derotated composite for final sharpening.
Derotate first, then apply your strongest sharpening to the result. Alternatively, apply light, conservative sharpening to each stack before derotation, then finalize afterward.
Video Derotation
WinJUPOS can also derotate video streams, but this is more computationally intensive. Many imagers prefer to stack each short capture in AutoStakkert! and derotate the resulting images instead.
Lunar and Saturn Ring Mosaics
Use careful overlap and consistent capture settings for lunar mosaics. For Saturn, be mindful that rings and the globe respond differently to sharpening; consider processing them slightly differently, then blending carefully. For large projects, an equatorial mount simplifies field rotation, but alt-az data can still be mosaicked or derotated with care.
If you are planning extended sessions, revisit the exposure limits in Capture Duration and Planet Rotation to avoid smearing within individual stacks before derotation.
Target-by-Target Guides
Each planet offers unique challenges and opportunities. Use these practical notes to tailor your settings and expectations.
Jupiter
- Features: Belts, zones, Great Red Spot (GRS), ovals, festoons, and transits of the Galilean moons and their shadows. Methane-band (CH4) highlights high-altitude features.
- Capture: Short exposures (5–15 ms) and high frame rates. Keep sequences 2–3 minutes per stack unless using derotation.
- Processing: Watch for ringing around limb and oversharpened festoons. System III longitude is commonly used for feature tracking.
- Tips: If seeing is marginal, try IR-pass for crisper results. Note UTC times for GRS transits and shadow events.

Attribution: Kevin Gill
Saturn
- Features: Cassini Division, ring edges, Encke minimum (notch-like contrast feature), banding on the globe, and polar hexagon under excellent seeing.
- Capture: Typically 10–20 ms exposures; 4–6 minute sequences are feasible, but confirm you’re not smearing subtle globe detail.
- Processing: Rings and globe may benefit from slightly different sharpening strengths. Be conservative to avoid creating artificial gaps or bright rims.
- Tips: An ADC is very helpful when Saturn is low in the sky. CH4 can emphasize high-altitude hazes and the polar region.
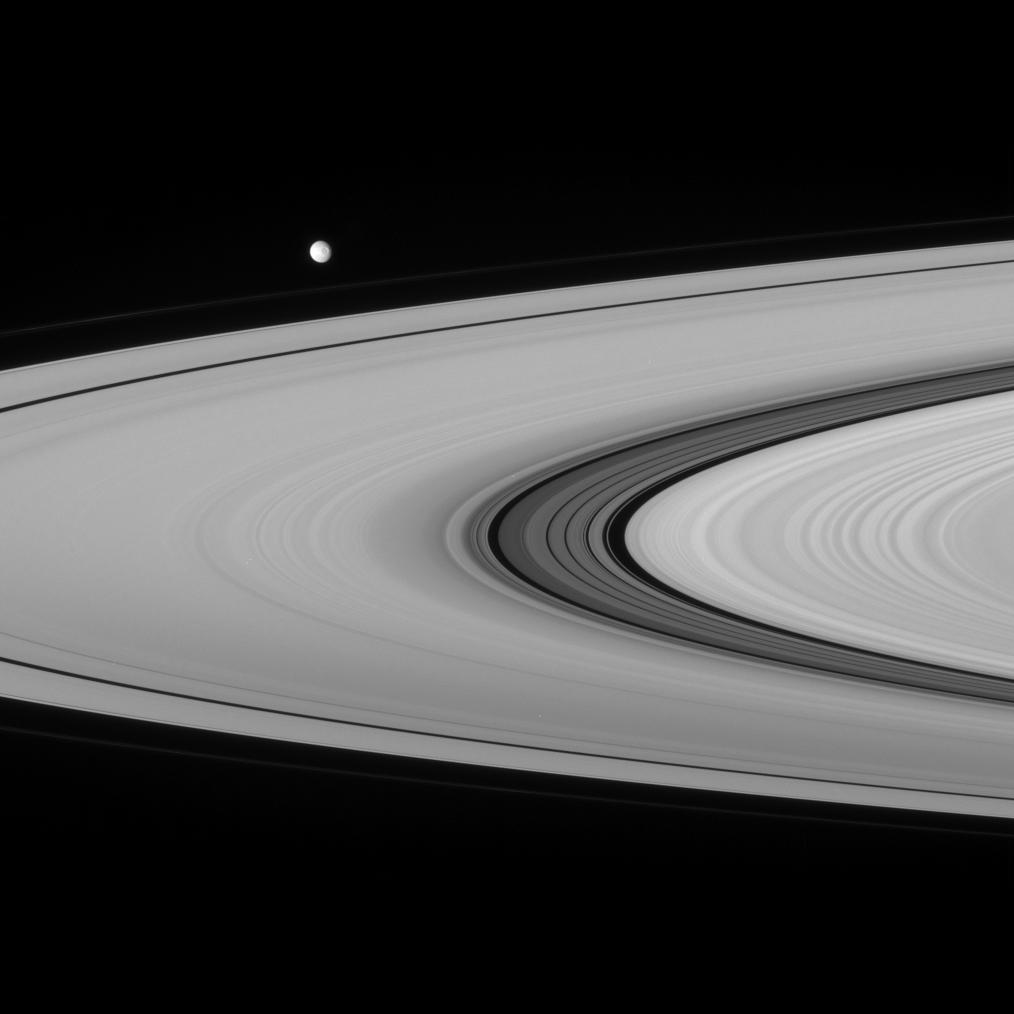
Attribution: NASA/JPL/Space Science Institute
Mars
- Features: Albedo markings (Syrtis Major, Mare Cimmerium), polar caps and hoods, limb hazes, and dust storms during some apparitions.
- Capture: 5–10 ms exposures near opposition. Keep sequences ~2–4 minutes. Mars is bright; watch red-channel saturation.
- Processing: IR luminance can reveal fine albedo contrast; color balance carefully to avoid unnatural hues. Monitor for seasonal and diurnal changes.
- Tips: Dust events can mask albedo features yet are scientifically interesting—annotate dates and times in your logs (see logging practices).
Venus
- Features: Crescent phases; cloud-top patterns in UV. In the visible, Venus often appears bland due to its thick cloud cover.
- Capture: Image in twilight or daytime at higher elevations for steadier seeing. Use extreme caution regarding solar proximity—never point near the Sun without safe practices.
- Processing: UV imaging requires specialized filters and optics that transmit UV. IR can show the night-side thermal emission near inferior conjunction under specific circumstances, but this is challenging and requires careful safety protocols.
- Tips: ADC is crucial when Venus is low; the planet’s brightness makes short exposures easy but focus is unforgiving.
Uranus and Neptune
- Features: Subtle banding and occasional storms under excellent seeing; often best captured in red/IR.
- Capture: Long exposures (100–500 ms) and high gain are common. Keep expectations realistic; detecting any albedo variation is an achievement.
- Processing: Heavy noise reduction may be needed; derotation can help combine multiple sequences for SNR gains.
The Moon
- Features: A perfect laboratory for lucky imaging. Craters, rilles, domes, and wrinkle ridges abound.
- Capture: Very short exposures (sub-millisecond to a few milliseconds) allow extremely high frame rates. Use small ROIs for features or mosaic larger areas.
- Processing: Pay attention to local contrast. Gentle deconvolution and wavelets reveal rilles; avoid creating false facets or checkerboarding in mosaics.
Advanced Techniques and Sampling Theory
Once the basics are working, these concepts unlock the last increments of resolution and fidelity.
Sampling and Focal Ratio
- Nyquist sampling suggests at least two pixels across the smallest detail you wish to resolve. Empirically, the f/ratio rules-of-thumb given in Barlows and Telecentric Amplifiers work well for planetary imaging.
- Oversampling (large f/ratio) spreads light across more pixels, reducing per-pixel SNR; undersampling (small f/ratio) limits resolvable detail. Strike a balance guided by pixel size, seeing, and target brightness.
Lucky Imaging Statistics
- Stacking N frames increases SNR roughly by sqrt(N) if noise is uncorrelated. Quality-based selection preserves the sharpest frames while still reaping noise reduction.
- In good seeing, higher keep percentages can work; in poor seeing, a small top percentage may yield the sharpest result, albeit noisier.
ADC Tuning Details
- Set the ADC’s body so its scale aligns with the vertical in the camera’s field (parallactic angle). Many capture tools compute the needed orientation from time and location.
- Adjust prism levers in opposite directions until blue/red dispersion is minimized on a slightly defocused star. Retune as elevation changes significantly.
CH4 and IR Composites
- Methane-band images reveal high-altitude clouds on Jupiter and Saturn as bright areas; combining CH4 luminance with visible RGB can produce scientifically informative composites when clearly labeled.
- IR luminance can mitigate seeing, revealing structural detail; however, IR-based detail is not identical to visible-light morphology. Keep captions explicit.
PSF Measurement and Deconvolution
- Measure the PSF by recording a bright star at the same focus and optical configuration as your planet data. Use it to guide deconvolution parameters.
- Even an approximate PSF can improve deconvolution stability versus blind approaches.
Drizzle with Caution
- Drizzle is most beneficial when your native sampling is insufficient and you have many high-quality frames. It can amplify correlated noise and artifacts if applied indiscriminately.
Troubleshooting and Common Artifacts
If your results look odd, this section helps you diagnose and fix issues quickly. Cross-reference with Capture Workflow, Stacking, and Sharpening as needed.
- Soft results everywhere: Check focus, collimation, and thermal equilibrium (Seeing and Thermal). Shorten exposures; try IR-pass.
- Limb color fringes: ADC misalignment. Retune (ADC Tuning).
- Onion rings or ripples on smooth areas: Over-sharpened wavelets or deconvolution ringing. Reduce small-scale layers or iterations; apply mild denoise before sharpening.
- Bright rims/halos at limb or ring edges: Over-aggressive sharpening or incorrect deconvolution PSF. Back off and blend layers more gently.
- Uneven color: Channel clipping or misbalance in capture. Recalibrate white balance; check histograms next time (Histogram targets).
- Seams in mosaics: Inconsistent processing between panes. Normalize brightness/contrast across panes before stitching; capture ample overlap.
- Smearing in one direction: Over-long capture without derotation. Use shorter segments or employ WinJUPOS.
- Noise speckle dominating detail: Keep more frames, increase exposure slightly, and reduce gain. Ensure ROI is tight to maintain high frame rate.
- Star-like points on Jupiter: These can be moon transits or processing artifacts. Cross-check ephemerides; if artifacts, revisit sharpening.
Data Quality, Annotation, and Responsible Processing
Planetary images are valuable both aesthetically and scientifically. Amateur observations contribute to long-term monitoring of storms, spots, and seasonal changes when carefully documented.
- Keep logs: Record UTC time, location, equipment, filters, ADC settings, exposure/gain, and seeing/transparency notes.
- Avoid synthetic detail: Do not paint in features or use neural upscalers that invent structure. Be transparent about de-rotation, drizzle, and luminance blends.
- Annotate responsibly: Label moons, shadows, and notable features. Include central meridian longitudes where relevant (e.g., System III for Jupiter).
- Share raw stacks or processing notes when posting in scientific forums to maximize utility.
Consider collaborating with monitoring networks and databases that collect amateur planetary observations. Consistent, well-logged images are more useful than occasional spectacular results without context.
FAQs: Equipment and Setup
What telescope size do I need for planetary imaging?
Resolution scales with aperture, so larger telescopes can resolve finer detail under the same seeing. However, seeing often limits results before optics do. Many imagers achieve excellent planetary images with 150–300 mm apertures. If you are starting out, an 8-inch (200 mm) SCT or Newtonian is a capable and manageable platform.
Do I need a monochrome camera to get top results?
No. Modern color cameras deliver outstanding planetary images with simpler workflows. Monochrome cameras with RGB filters can add a small edge in resolution and flexibility, especially for specialty bands (IR, CH4, UV), but they require more time, careful derotation, and a filter wheel. Choose based on your goals and available observing time.
Is an ADC necessary?
An ADC is extremely helpful whenever planets are imaged below high elevations, which is common for many observers. It corrects atmospheric dispersion—the vertical color spreading that softens detail. If your targets rise above about 60–70 degrees altitude, dispersion is reduced; above that, an ADC is less critical. For low-altitude imaging, an ADC can be transformative.
Can I use an alt-az mount?
Yes. Planetary exposures are short and ROIs are small, so tracking demands are modest. Field rotation becomes significant only over longer sequences or mosaics; you can mitigate it by keeping individual captures short and by using WinJUPOS derotation when combining multiple stacks. Equatorial mounts remain convenient for extended sessions.
Will a DSLR or mirrorless camera work?
They can, especially for the Moon and bright planets, but dedicated planetary CMOS cameras excel thanks to high frame rates, low read noise, and flexible ROI. If using a DSLR/mirrorless, employ a crop/ROI video mode to increase frame rate and avoid heavy compression. Connect via a capture utility that provides control over exposure and gain, and prefer uncompressed or lightly compressed video streams.
FAQs: Capture, Stacking, and Processing
How long should I capture Jupiter without derotation?
About 2–3 minutes total per stack is a good rule. Jupiter’s rapid rotation smears details if you go much longer. With WinJUPOS derotation, you can combine multiple 2–3 minute stacks for higher SNR.
8-bit or 12-bit capture?
8-bit captures are common and efficient; stacking reduces quantization noise. If your camera maintains high frame rates in 10–12-bit modes, the extra depth can help in subtle gradients and reduces the chance of clipping. Prioritize frame rate and SNR; do not sacrifice speed so much that your lucky imaging advantage is lost.
How many frames should I stack?
There is no single number. A typical stack might keep 10–30% of frames from a 2–3 minute capture on Jupiter. In steady seeing, you can keep more; in poor seeing, a smaller top percentage can look sharper but noisier. Create multiple stacks (e.g., 5%, 10%, 20%, 50%) and compare after sharpening to find the sweet spot for that session.
Why do my images look waxy or plastic?
Over-aggressive smoothing or wavelet settings can obliterate micro-contrast. Reprocess with lighter noise reduction, reduce mid-scale wavelet layers, and add small amounts of fine-scale sharpening. Ensure you are not upscaling excessively without enough data to support it. Check for slight defocus or miscollimation at capture time.
What is WinJUPOS used for in planetary imaging?
WinJUPOS derotates planetary images to compensate for the planet’s rotation, allowing you to combine multiple short captures into a single, higher-SNR result without smearing. It also supports measurements, map projections, and ephemeris calculations. See Derotation and Mosaics with WinJUPOS for the workflow.
Conclusion
High-resolution planetary imaging is a craft at the intersection of physics, meteorology, and artistry. The fundamentals—steady seeing, thermal control, precise collimation, appropriate sampling, and disciplined capture—enable the software magic of lucky imaging to work. From high frame rate acquisition to careful stacking, from restrained sharpening to smart derotation, each step contributes to a final image that both pleases the eye and preserves real detail.

Attribution: NASA, ESA, and A. Simon-Miller (NASA Goddard Space Flight Center)
Start simply with your current gear, keep meticulous notes (best practices), and iterate. As you refine technique, consider adding an ADC, exploring CH4/IR filters, and experimenting with deconvolution and drizzle under excellent seeing. For further learning, revisit sections when you upgrade equipment or target a new world—the practical tips are designed to scale with your ambitions.
If you enjoyed this guide, explore our other observational and technical articles, and consider subscribing to stay updated on future deep dives into imaging techniques, planetary science, and observing opportunities.