Table of Contents
- What Is a Dobsonian Telescope? Origins, Design, and Core Advantages
- Why Dobsonians Dominate for Visual Astronomy
- Aperture, Focal Ratio, and Optical Performance Explained
- Dobsonian Types and Configurations: Solid-Tube, Truss, and Tabletop
- Essential Features and Materials to Evaluate Before You Buy
- How to Choose the Right Dobsonian for Your Sky, Space, and Goals
- Setup, Collimation, and Cooling: A Practical Step-by-Step Guide
- Eyepieces, Finders, and Accessories That Truly Matter
- Push-To Encoders, Digital Setting Circles, and GoTo Options
- Observing Techniques: From Dark Sites to Urban Balconies
- Maintenance, Storage, and Transport Best Practices
- Frequently Asked Questions
- Final Thoughts on Choosing the Right Dobsonian Telescope
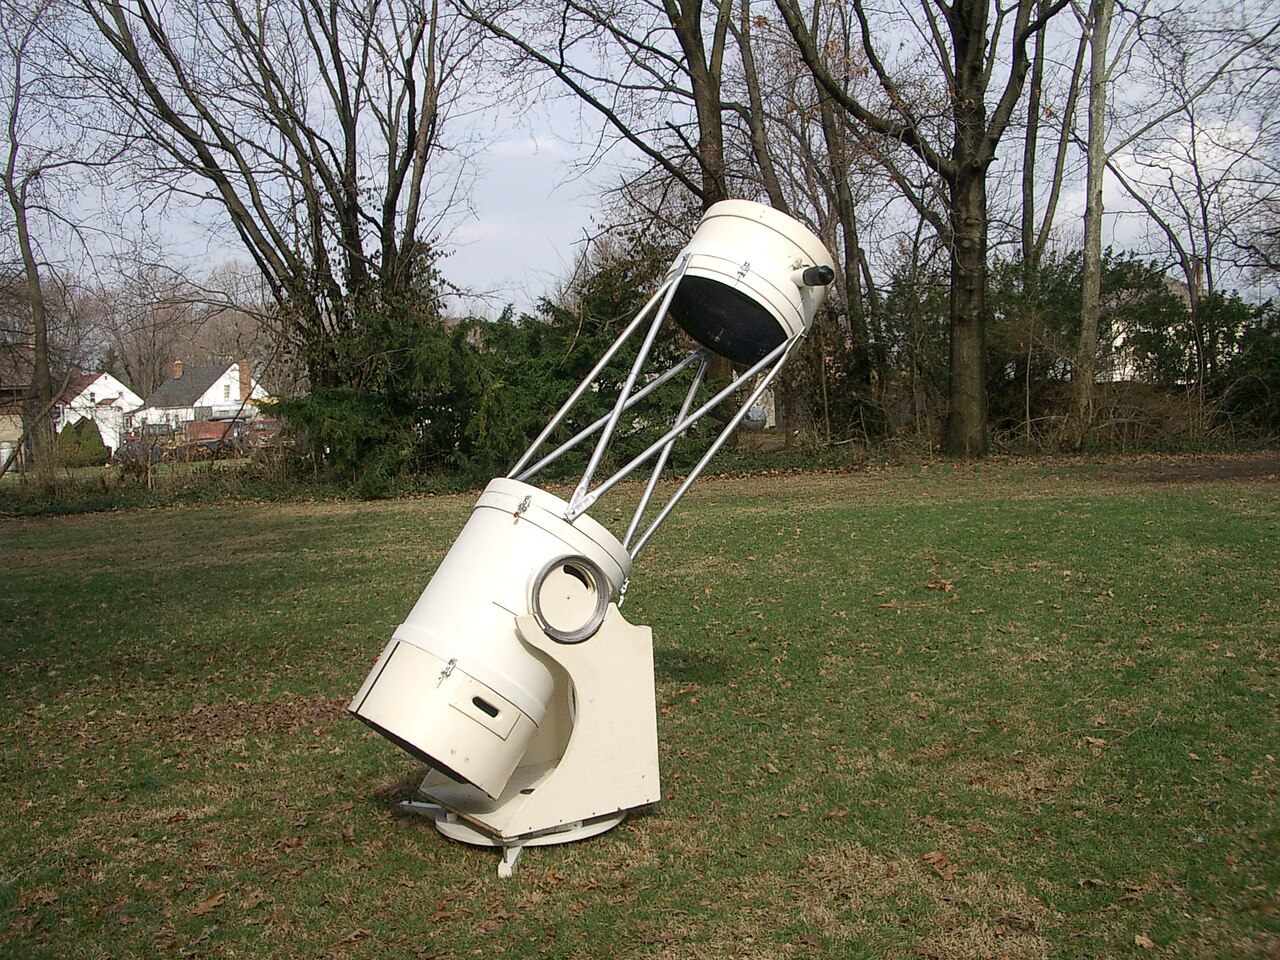
What Is a Dobsonian Telescope? Origins, Design, and Core Advantages
A Dobsonian telescope is a Newtonian reflector mounted on a simple, low-cost, and highly stable alt-azimuth base. The concept was popularized by amateur astronomer John Dobson in the late 1960s and 1970s, who championed building large-aperture telescopes from affordable materials so skywatchers could explore deep-sky objects visually. The hallmark of a Dobsonian is the combination of a parabolic primary mirror, a flat secondary mirror, and a friction-based mount that allows smooth motion in altitude (up-down) and azimuth (left-right).

Artist: Unknown
Unlike many equatorial mounts that track the sky mechanically, a classic Dobsonian is designed primarily for manual operation. You nudge the scope to keep a target centered as Earth rotates. This simplicity dramatically lowers cost and complexity, especially as aperture increases. As a result, Dobsonians deliver exceptional aperture per dollar—often the best in amateur astronomy for visual observing.
Core elements of a Dobsonian include:
- Optical tube assembly (OTA): A Newtonian reflector with a parabolic primary mirror. Most modern Dobsonians use parabolic mirrors regardless of size; slower, small Newtonians can sometimes use spherical mirrors, but parabolas are standard for achieving better off-axis performance and sharp focus, especially at faster focal ratios typical of Dobsonians.
- Secondary mirror and spider: The flat secondary redirects light to the side-focusing eyepiece. A thin-spider design reduces diffraction but must remain rigid.
- Alt-az base: Typically plywood or engineered wood with low-friction bearings (e.g., Teflon on textured laminate) that give smooth, controlled motion. Many commercial designs use variations of this approach.
- Focuser: Either a 1.25-inch or 2-inch focuser (often a dual-speed Crayford in higher-end models) for fine focus control. A 2-inch focuser allows sweeping wide-field views with low-power eyepieces that have larger field stops.
This foundational design makes Dobsonians excellent for observing faint nebulae, galaxies, and star clusters. Their straightforward mechanics also encourage tinkering, upgrades, and learning essential skills like collimation that sharpen performance. Before diving into specs like aperture and focal ratio, it helps to understand why Dobsonians are favored by many visual observers.
Why Dobsonians Dominate for Visual Astronomy
Dobsonians are beloved because they emphasize what matters for visual astronomy: light-gathering ability, stability, and ease of use. Their distinctive advantages include:
- Maximum aperture per budget: Mirror-based reflectors are more economical to scale up in diameter than lenses in refractors. The Dobsonian mount amplifies this cost efficiency by using simple bearings and materials. If your goal is to see the spiral arms of galaxies, dust lanes, and faint nebulae, extra aperture makes the difference.
- Ergonomic, intuitive motion: The alt-az base lets you push the scope where you want to look. Beginners find this more intuitive than polar alignment and slow-motion controls. The ergonomics are particularly good for scanning the Milky Way or star-hopping to targets with a RACI finder or red-dot sight.
- Mechanical stability: The low center of gravity and wide stance of a Dobsonian base minimize vibration. Larger altitude bearings distribute weight smoothly, making high-magnification observing more comfortable with less shake.
- Low maintenance and modular upgrades: Simple construction means there are fewer things to break. Owners can upgrade focusers, add digital setting circles, or attach cooling fans to the mirror cell to improve performance.
- Community and support: Because Dobsonians are popular, there is a large knowledge base of tips on collimation, mirror care, and observing techniques. Many astronomy clubs use Dobsonians for public outreach because they are robust and friendly to newcomers.
Dobsonians do have trade-offs. They require occasional collimation, and traditional models do not track automatically unless you add encoders, a GoTo system, or a platform. They are generally not the best choice for long-exposure astrophotography because an alt-az mount introduces field rotation; however, for visual observing and short-exposure snapshots of the Moon and bright planets, they are excellent.
Aperture, Focal Ratio, and Optical Performance Explained
When comparing Dobsonian telescopes, three specifications determine most of the visual performance: aperture (mirror diameter), focal length, and focal ratio (f/number). Understanding how they relate helps you choose the right design for your observing priorities.

Artist: Fernly at English Wikibooks
Aperture: Light and Resolution
Aperture is the clear diameter of the primary mirror. Larger aperture gathers more light and resolves finer details, all else equal. Light-gathering power scales with the area of the mirror, proportional to the square of the diameter. For example, a 200 mm (8-inch) mirror collects about four times the light of a 100 mm mirror, making faint targets noticeably easier.
Angular resolution—the ability to separate close features—is commonly estimated by the Dawes or Rayleigh criterion:
- Dawes limit (arcseconds):
116 / D_mm - Rayleigh criterion (arcseconds):
138 / D_mm
In practice, atmospheric turbulence (“seeing”) often sets the limiting resolution on most nights, especially at high magnification. Still, more aperture provides higher potential resolution and brighter images at a given magnification.
Focal Length and Focal Ratio
The focal ratio, or f/number, is defined as focal length / aperture. For a given aperture, a lower f/number (“faster” mirror) yields a shorter tube and a wider maximum field of view. Common Dobsonian focal ratios include f/4.5 to f/6 for mid- to large-aperture scopes. An 8-inch f/6 has a focal length of about 1200 mm; a 10-inch f/5 is about 1250 mm.
Key trade-offs:
- Fast optics (e.g., f/4.5–f/5): Shorter and lighter tubes for the same aperture, wider fields for sweeping star fields, and lower ladder height for very large truss Dobs. However, faster mirrors show more off-axis coma (a star shape distortion near the field edge) and demand more precise collimation. Many observers mitigate coma with a coma corrector, especially for critical, widefield views.
- Moderate optics (e.g., f/5.5–f/6): A balance of field width, eyepiece performance, and forgiving collimation tolerances. At f/6, coma is reduced compared with faster systems, and many eyepieces perform better at the field edges without additional correction.
Magnification, Exit Pupil, and Field of View
Three eyepiece-related quantities matter for planning your observing set:
- Magnification (M):
M = F_telescope / F_eyepiece - Exit pupil (mm):
ExitPupil = F_eyepiece / f_ratio - True field of view (TFOV): Approximation
TFOV ≈ AFOV / Mor more preciselyTFOV ≈ (FieldStop / F_telescope) × 57.3°
The exit pupil should roughly match your dark-adapted eye pupil for bright, wide views; for many adults this is about 6–7 mm, though it can be smaller (5–6 mm) as we age. If the exit pupil is larger than your eye’s pupil, some light is wasted. For high-power planetary work, exit pupils around 0.5–1 mm are common, balancing image scale and brightness.
Practical magnification guidelines under typical seeing:
- Low power (4–7 mm exit pupil): Framing large nebulae and open clusters; easy star-hopping.
- Medium power (2–4 mm exit pupil): Globular clusters, galaxies, small nebulae; a sweet spot for many targets.
- High power (0.5–2 mm exit pupil): Moon, planets, double stars, and small planetary nebulae. On average nights, magnification near 1–1.5× per millimeter of aperture is often usable. Higher powers (approaching 2× per mm) require steady seeing.
These relationships guide both telescope selection and eyepiece kit planning. For instance, on an 8-inch f/6 (1200 mm focal length), 30 mm, 15 mm, and 8 mm eyepieces yield roughly 40×, 80×, and 150×, with exit pupils of 5 mm, 2.5 mm, and about 1.3 mm, respectively—covering low, medium, and high power use cases.
Dobsonian Types and Configurations: Solid-Tube, Truss, and Tabletop
Dobsonians come in several physical formats that balance portability, stiffness, and cost. The right choice depends on where and how you observe.
Solid-Tube Dobsonians
These are the most common, particularly in the 6–12 inch (150–300 mm) aperture range. The tube is typically steel or aluminum for stiffness, with a wooden base. Advantages include simplicity, quick setup, and good collimation stability because the optics stay fixed relative to each other. A solid-tube also offers better dew resistance and light baffling compared to open designs.
Potential downsides include bulk for transport and storage. Tube length is roughly equal to the focal length, so an 8-inch f/6 tube is about 1200 mm long. Larger solid-tube Dobs (12+ inches) can be unwieldy for small vehicles or staircases.
Truss and Collapsible Dobsonians
Artist: JamesStewart669
Truss-tube designs break the OTA into a lower mirror box, upper secondary cage, and connecting truss poles. Some models use sliding or folding struts. These designs excel above 12 inches, where portability becomes the limiting factor. Trusses pack down small for transport but take longer to assemble and collimate. A fabric shroud is advisable to block stray light and improve image contrast.
Because the optical train is reassembled each session, truss Dobs demand consistent collimation habits. In exchange, they scale easily to very large apertures while keeping eyepiece heights manageable at fast focal ratios (e.g., f/4.5).
Tabletop Dobsonians

Artist: Wutthichai Charoenburi
Compact and portable, tabletop Dobs in the 100–150 mm range (4–6 inches) place the small reflector on a mini-Dobsonian mount designed for a sturdy table or tripod. These are outstanding for beginners and for quick sessions on balconies. Their short focal lengths and wide fields make them fun for Milky Way scanning and lunar observing. Because they rely on a solid surface, stability depends on your table or a compact platform. A hefty, well-damped base helps at higher powers.
Essential Features and Materials to Evaluate Before You Buy
Beyond aperture and focal ratio, small design details affect the experience. Consider these factors while comparing models.
Mirror Quality and Substrate
- Figure and smoothness: A well-figured parabolic primary with a smooth surface yields sharper images with better contrast. Reputable manufacturers specify that mirrors are parabolic in common Dobsonian apertures.
- Substrate: Common materials include plate glass and borosilicate (e.g., Pyrex-type) for better thermal behavior. Borosilicate warms and cools more quickly than standard glass, helping the mirror reach thermal equilibrium faster.
- Coatings: Standard aluminum with protective overcoat is typical. Enhanced coatings can add a few percent reflectivity. Clean mirrors sparingly to preserve coatings, as discussed in maintenance.
Mirror Cell and Cooling
- Support points: Larger mirrors benefit from multi-point flotation cells to maintain the optical shape as the tube tilts. Even mid-size mirrors benefit from spring-loaded collimation bolts that hold alignment.
- Ventilation and fans: A rear fan that gently moves air across the back of the mirror speeds thermal equilibration. Side vents or boundary-layer fans can further improve image steadiness at high magnification.
Altitude and Azimuth Bearings
- Altitude bearings: Larger diameter bearings provide smoother motion and wider balance range for heavy eyepieces, finders, or a coma corrector or encoders. Friction is typically managed with Teflon pads and textured laminate.
- Azimuth bearing: A ring of Teflon pads on laminate is a classic solution; some designs add a central pivot bolt with proper tensioning. Commercial variants may use roller bearings or lazy-Susan turntables. Smooth, stiction-free motion makes manual tracking more pleasant.
Focuser and Drawtube
- 2-inch dual-speed Crayford: Offers fine focus with minimal image shift, supports heavy accessories, and enables wide-field 2-inch eyepieces.
- 1.25-inch focusers: Lighter and fine for small scopes; adapters let you use 1.25-inch eyepieces in a 2-inch focuser when needed.
Finder Options
- Red-dot or reflex sight: Intuitive aiming for bright stars; pairs well with a wide-field eyepiece.
- RACI (Right-Angle, Correct-Image) finder: A magnifying finder that shows an upright, correct-left-right view. Excellent for star-hopping with charts.
- Combination finders: Many observers use both a red-dot and a RACI simultaneously for speed and precision.
Base Materials and Durability
- Plywood vs. particle board: Quality plywood tends to be more durable and moisture-resistant than particle board. Edge banding and sealed surfaces improve longevity.
- Hardware: Metal inserts, proper T-nuts, and robust collimation knobs make adjustments smoother and more repeatable.
- Portability aids: Cutout handles, detachable bases, or wheelbarrow handles (on large truss Dobs) help with transport.
How to Choose the Right Dobsonian for Your Sky, Space, and Goals
Picking the best Dobsonian hinges on where you observe, what you want to see, and how much setup effort you want to manage. Use the following considerations to map your needs to a design.
Match Aperture to Observing Conditions
- Urban/suburban observers: Light pollution dims galaxies and faint nebulae, but aperture still helps. An 8–10 inch Dobsonian reveals more planetary detail, brighter globular clusters, and small planetary nebulae. Consider contrast-preserving techniques and filters to maximize performance.
- Rural/dark-sky observers: If transport allows, 10–12 inches and beyond can provide dramatic views of galaxies, dark nebulae, and emission regions. Wider fields with a fast focal ratio are appealing for scanning star clouds.
- Balcony or limited storage: A tabletop Dobsonian or a compact 6–8 inch solid-tube can deliver rewarding results while fitting your space.
Balance Portability and Ergonomics
- Vehicle and stairs: Ensure the tube and base fit your car and can be carried safely. Tube length equals focal length approximately; check dimensions and weight for your chosen aperture.
- Set-up time: Solid-tubes are fastest from car to sky; truss scopes pack smaller but take additional minutes to assemble and collimate.
- Observer height and eyepiece position: Fast large apertures keep eyepieces lower. Sit-to-observe ergonomics improve comfort and visual performance.
Define Visual Priorities
- Wide-field scanning: Favor faster focal ratios (e.g., f/5) and a 2-inch focuser to accommodate wide stop eyepieces for sweeping nebulae and open clusters.
- Planetary and double stars: Moderate focal ratios (e.g., f/6) are forgiving with simpler eyepiece designs and typically reduce coma. Stable thermal performance and precise collimation matter for high-contrast results.
- Public outreach: Rugged mechanics, intuitive finders, and comfortable eyepiece heights help observers of all ages.
Budget for the System, Not Just the Tube
Reserve part of your budget for eyepieces, a good finder, a collimation tool, and possibly a push-to or GoTo upgrade. Accessories round out the telescope and can upgrade the experience more than a marginal bump in aperture if your current eyepiece set is limited.
Setup, Collimation, and Cooling: A Practical Step-by-Step Guide
Getting the most from a Dobsonian involves three routine tasks: assembly, collimation, and thermal management. None are difficult with practice, and each dramatically affects image quality at the eyepiece.
Assembly and Initial Balancing
- Place the base on level ground: A reasonably level surface improves ergonomics and azimuth motion. Avoid soft soil that can sink under weight.
- Attach the tube: Lift the tube into the altitude bearings or cradles, ensuring the bearing pads engage evenly. Secure any clamps or knobs.
- Install finder and accessories: Add your RACI finder and reflex sight. If you use heavy eyepieces, consider adding small counterweights (e.g., magnetic) near the mirror end to maintain smooth balance across altitudes.
- Check motion: Nudge in altitude and azimuth. Motion should be smooth, with slight stiction. Adjust the azimuth center bolt tension and altitude friction if your model allows.
Collimation Basics
Collimation is the alignment of the optical elements so the optical axis of the primary and secondary mirrors converge at the focuser. The steps below assume a typical Newtonian configuration used in Dobsonians. Collimation tools include a simple collimation cap, a sight tube, a Cheshire eyepiece, or a laser collimator (checked for proper alignment). A high-quality combo tool (sight tube + Cheshire) is reliable and mechanical.

Artist: Morn
- Center the secondary under the focuser: With a sight tube, adjust the secondary’s position (fore-aft and rotation) so the primary mirror appears centered within the secondary, and the secondary appears circular. Some secondary offset is normal and typically built in by the manufacturer.
- Secondary tilt: Adjust the tilt screws so the primary mirror’s center mark (usually a donut sticker) is centered under the sight-tube crosshairs. This aims the focuser axis at the center of the primary.
- Primary tilt: Using a Cheshire or collimation cap, adjust the primary mirror’s collimation knobs until the reflected donut aligns with the tool’s reference (e.g., the Cheshire’s bright ring). Tighten evenly to maintain alignment.
- Star test: Point at a moderately bright star at high power and defocus slightly. In good seeing, the diffraction rings should appear concentric inside and outside of focus. Small tweaks to the primary tilt can refine alignment. Perform this test after cooling is complete.
At faster f/ratios, tolerances get tighter. A precisely aligned system rewards you with crisp planetary detail and pinpoint stars across the central field.
Cooling and Thermal Equilibrium
A mirror performs best when its temperature matches the ambient air. A warm mirror can produce boundary-layer turbulence that blurs detail, especially at high power. To accelerate cooling:
- Place the telescope outside 30–60 minutes before observing. Larger mirrors benefit from more time.
- Run a gentle rear fan to move air across the back of the mirror. In some designs, side fans help scrub the boundary layer across the face of the mirror.
- Allow the tube or shroud to cool as well to reduce internal currents.
Temperature gradients diminish contrast and sharpness; patience here pays off.
Safety Note: Sun Observing
Never point a Dobsonian (or any telescope) at the Sun without a secure, full-aperture solar filter designed for visual use mounted over the front of the telescope. Never use eyepiece-mounted solar filters. Verify the filter is undamaged, secured, and cannot blow off in wind.
Eyepieces, Finders, and Accessories That Truly Matter
A well-chosen accessory set transforms a good Dobsonian into a great one. Prioritize tools that improve aiming, framing, and image contrast.
Eyepiece Strategy: Three Anchors + One Utility
Build around three primary focal lengths that produce low, medium, and high magnifications, then add a flexible option like a Barlow. Example sets for an f/6 scope:
- Low power (exit pupil ~5–6 mm): 28–32 mm 2-inch eyepiece for wide sweeps and large nebulae.
- Medium power (exit pupil ~2–3 mm): 12–18 mm eyepiece for galaxies, globulars, and small emission nebulae.
- High power (exit pupil ~0.8–1.5 mm): 6–9 mm for lunar, planetary, and splitting close double stars in steady seeing.
- Utility magnifier: A 2× Barlow extends your set economically, effectively halving eyepiece focal lengths and preserving eye relief on comfortable longer eyepieces.
Choose eyepieces with good edge correction for faster focal ratios if you own an f/5 or faster scope. Wide apparent fields (e.g., 68°–82°) reduce nudging frequency during manual tracking and make viewing more immersive.
Finders and Aiming Aids
- Reflex sight (red-dot, Telrad-style): Place the glowing dot or reticle on a star visible to the naked eye; then move to the target using a star-hop. Reflex sights shine in conjunction with star charts and wide-field eyepieces.
- RACI finder: The correct-image view matches printed charts and digital atlases, streamlining hops and object framing.
- Illuminated reticle eyepiece: Helpful for fine pointing, drift alignment on an equatorial platform, or centering for encoder alignment.
Filters for Contrast and Safety
- UHC and O III filters: Narrowband and line filters improve contrast on emission and planetary nebulae under a variety of skies. Large nebulae respond especially well at low power.
- Moon filter or variable polarizer: Tames glare for comfortable lunar viewing.
- Neutral density/colored filters for planets: Optional and subtle; some observers prefer the unfiltered view combined with steady seeing and high-quality collimation.
- Full-aperture solar filter: Required for safe white-light solar observation; fits securely over the front of the telescope. Always follow solar safety guidance.
Coma Correctors and Field Optimization
At f/5 and faster, off-axis coma can elongate star images at the field edge. A coma corrector optically compensates for this, yielding sharper star fields across wide apparent fields of view. Whether you need one depends on your tolerance for edge aberrations, the size of your field stop, and your observing priorities. Planetary observers who keep targets centered may forgo it; widefield enthusiasts often consider it essential.
Dew Control and Comfort
- Dew shields and heaters: Secondary mirrors and finders dew faster than primaries. Gentle heat or shields preserve transparency.
- Observing chair: A height-adjustable chair increases comfort and steadiness. The steadier you are, the more detail you’ll see.
- Red light and charts: A dimmable red light protects night vision. Paper atlases or a dimmed device with a red filter pair well with push-to navigation.
Push-To Encoders, Digital Setting Circles, and GoTo Options
While classic Dobsonians are fully manual, many observers add technology to speed target acquisition or enable tracking.
Push-To with Digital Setting Circles (DSC)
A push-to system uses encoders on the altitude and azimuth axes. After a simple alignment on one or two bright stars, an on-board computer or connected app shows real-time arrows guiding you to the target. You still move the scope by hand; the encoders simply tell you where to push next.
Benefits include:
- Rapid target location even under light-polluted skies.
- No motors to drain batteries or add noise; manual feel is preserved.
- Compatibility with a wide range of Dobsonian sizes.
To get the most from push-to, ensure the base is sturdy and that encoder brackets are rigidly mounted. Centering calibration stars accurately—ideally at medium to high power—improves pointing precision.
GoTo Dobsonians
GoTo Dobsonians add motorized slewing and, often, tracking. After alignment, you select an object and the telescope moves to it and keeps it in the field. This is helpful for public nights and high-power planetary viewing where constant nudging can be tedious. GoTo alt-az mounts track visually quite well. For long-exposure astrophotography, an equatorial mount or an equatorial platform is required to mitigate field rotation; however, for visual use and short exposures of bright targets, GoTo Dobsonians are convenient and fun.
Equatorial Platforms
An equatorial platform sits under a Dobsonian base and provides equatorial tracking by slowly tilting over time to compensate for Earth’s rotation. Platforms extend comfortable high-power viewing and enable certain imaging techniques (e.g., planetary video capture). They require careful polar alignment and periodic reset, but they maintain the Dobsonian’s simplicity and low center of gravity.
Observing Techniques: From Dark Sites to Urban Balconies
Dobsonians shine under any sky when paired with smart observing habits. Whether you observe from a city, suburb, or dark-sky site, you can adopt techniques that boost contrast and detail.
Dark Adaptation and Averted Vision
- Dark adaptation: Give your eyes 20–30 minutes away from white light to fully adapt. Preserve night vision with dim red light.
- Averted vision: Look slightly away from a faint object; the more sensitive parts of your retina detect low-contrast detail better off-axis.
Star-Hopping and Framing
Use bright stars as waypoints in your finder, then switch to your lowest-power eyepiece to scan for the target. Align the finder carefully at the start of the session by centering a terrestrial object or a bright star in both the eyepiece and finder. For complex hops, plan the path using an atlas app or printed chart. Once you acquire the target, adjust magnification to optimize the view. Galaxies often benefit from a bit more magnification than beginners expect to darken the background sky—experiment across exit pupils around 2–3 mm.
Filters and Contrast Management
- Narrowband filters: For nebulae rich in emission lines, narrowband or line filters can dramatically increase contrast, especially under suburban skies. Try different magnifications; filters are not only for low power.
- Stray light control: Use a shroud on truss scopes and a light shield opposite the focuser to block streetlights. Turn off nearby lights and avoid looking at screens without a strong red filter.
Urban and Suburban Strategies
- Target selection: Focus on the Moon, planets, double stars, open clusters, and bright planetary nebulae. These withstand light pollution better than low-surface-brightness galaxies.
- Transparent nights: Even with light pollution, transparency (low haze/humidity) makes a big difference. Use weather apps or local astronomy forecasts to time sessions for best results.
- Timing: Observe later at night when local lights dim and the atmosphere often settles. After midnight, many neighborhoods quiet down and skies can improve subtly.
High-Magnification Planetary and Lunar Observing
- Thermal control first: Make sure the mirror is cooled and collimation is spot-on. Small thermal plumes can erase fine detail on Jupiter or Saturn.
- Patience with seeing: Wait for brief moments of steady air (“lucky seeing”). Details pop in and out; watch continuously, sketch or note features.
- Filters and color balance: A variable polarizer or neutral density filter can help on the Moon; some observers use subtle color filters for planets. The biggest gains, however, come from precise alignment and steady optics.
Maintenance, Storage, and Transport Best Practices
Dobsonians are robust and low-maintenance. A few good habits keep yours performing for decades.
Cleaning Optics Sparingly
Mirrors do not need frequent cleaning. Dust and small specks have surprisingly little effect on visual performance. Clean only when a bright light reveals significant haze, pollen, or spots that degrade contrast.
- Primary mirror: Remove the mirror cell if the design allows and rinse with clean water to float off particles. Follow with a distilled-water rinse. For stubborn spots, use a gentle solution (a drop of mild detergent in water) and very light fingertip pressure with clean, rinsed hands; rinse thoroughly. Let the mirror air-dry on edge or wick droplets with clean lens tissue touching only the water, not the coating. Avoid rubbing.
- Secondary mirror: More delicate due to size and mounting. If necessary, clean in place with extreme care or remove following the manufacturer’s instructions. Keep exposures to humid air brief to reduce risk of streaking.
- Eyepieces and finder lenses: Use a blower to remove dust, then lightly clean with lens tissue and appropriate fluid. Avoid overcleaning.
Collimation Checks and Hardware Care
- Verify collimation at the start of sessions, especially after transport. Small tweaks to the primary tilt are common.
- Occasionally check collimation screw tension, focuser drawtube play, and base hardware. Tighten gently to remove slop without binding movement.
- Lubrication is rarely required on Teflon/laminate bearings; keep surfaces clean and free of grit. If azimuth motion is sticky, inspect for debris and ensure proper pivot bolt tension.
Storage and Transport
- Dry environment: Store the telescope in a dry, temperature-stable area to reduce dew and corrosion. Cap the tube and focuser to keep dust out.
- Padding and restraint: During transport, pad the tube and base to prevent dings. Use straps to prevent shifting in vehicles.
- Heavy apertures: For large truss Dobs, consider wheelbarrow handles and ramps. Lift with legs, not back, and carry components separately when possible.
Frequently Asked Questions
How much magnification can I use with a Dobsonian?
Maximum usable magnification depends on aperture and atmospheric seeing. A common rule of thumb is up to about 2× per millimeter of aperture under excellent conditions, but many nights support 1–1.5× per millimeter more reliably. For an 8-inch (200 mm) Dobsonian, that suggests about 200–300× often being usable, with higher powers possible on rare, steady nights. The best results come when your telescope is well-cooled and precisely collimated. Remember that increasing magnification dims the image and magnifies atmospheric turbulence; balance power against contrast and steadiness.
Do I need a coma corrector on an f/5 Dobsonian?
It depends on your eyepieces and sensitivity to edge aberrations. At f/5, off-axis coma is present and more visible with wide-field eyepieces that have large field stops. If you enjoy sweeping rich star fields with 2-inch wide-angles, a coma corrector can keep star images tight across more of the field. If your observing is centered on planets and small targets in the central field, or you primarily use narrower apparent fields, you may find a corrector optional. Try before you buy if possible to gauge your preference.
Final Thoughts on Choosing the Right Dobsonian Telescope
Dobsonian telescopes distill visual astronomy to its essentials: generous aperture, intuitive motion, and reliable mechanics. Whether you are scanning the Milky Way from a dark site with a fast truss Dob or splitting double stars from a city balcony with a compact solid-tube, the Dobsonian format adapts gracefully to your goals.

Artist: Rob Teeter
To make a confident choice, anchor your decision on three pillars: your observing environment, your portability constraints, and your visual priorities. Balance aperture with ergonomics, pair the scope with a sensible eyepiece and finder kit, and commit to routine collimation and thermal management. If you value navigation assistance or tracking, add push-to encoders or GoTo without sacrificing the Dobsonian’s core simplicity.
Above all, use the scope often. Familiar skies and steady habits unlock more detail than any single spec on paper. If you found this guide helpful, consider subscribing to our newsletter for future deep dives on equipment, observing techniques, and practical astrophysics—so each clear night yields new discoveries.