A Dobsonian telescope is a Newtonian reflector optical tube mounted on a simple, ground-based alt-azimuth mount. Popularized by John Dobson in the late 20th century, the design focuses on affordability, ease of use, and maximizing aperture for visual astronomy. Rather than complex tripods and counterweights, a Dobsonian sits in a low, stable rocker box. The result is a low-friction, push-to-aim experience that makes star-hopping and casual scanning intuitive.
n
n nn 10″ Newton telescope on dobson mount. n Credit: first uploaded on the English-speaking Wikipedia under the same filenamen n
n
n
The defining strengths of Dobsonians include:
n
n
Aperture per dollar: For the same budget, a Dobsonian typically offers a larger primary mirror than other designs, enabling brighter and more detailed views of faint deep-sky objects.
n
Simplicity and stability: The mount is mechanically straightforward, with smooth motion in altitude and azimuth. No polar alignment is required for visual observing.
n
Low setup time: Especially with solid-tube designs under 10 inches, setup can be as simple as carrying the base outside, placing the tube in its cradle, and starting to observe.
n
Community support: Because Dobsonians are widespread, advice on collimation, tweaks, and eyepiece pairing is easy to find. Many clubs run public outreach with Dobsonian scopes for exactly these reasons.
n
n
If your primary goal is visual observing—sweeping the Milky Way, resolving star clusters, exploring planetary detail, and seeing texture in nebulae—a Dobsonian provides a rewarding path with minimal fuss. While they can be large and require occasional collimation, the experience of pushing a large, smooth instrument to reveal faint galaxies is hard to beat.
nn
How a Dobsonian Works: Optics, Mount, and Motions
n
Dobsonians are a subtype of Newtonian reflector. Understanding the basic components helps you choose wisely and maintain performance over time.
n
Primary mirror and optical path
n
A Newtonian uses a concave primary mirror to collect and focus light. A flat secondary mirror placed at 45° diverts that light to a focuser on the side of the tube. Unlike refractors, there are no large lenses, which keeps costs down as aperture grows.
n
n nn Simple Diagram of a Newtonian Telescope created by TMoore using MSPaint. n Artist: Tmoore (English Wikipedia)n n
n
n
n
Primary mirror diameter (aperture): Determines light grasp and resolution. Larger diameters gather more light and can resolve finer detail under stable atmospheric conditions.
n
Focal length and focal ratio: The focal ratio (f/number) is focal length divided by aperture. Shorter focal ratios (e.g., f/4.5–f/5) yield wider fields and shorter tubes, while longer focal ratios (e.g., f/6–f/8) are more forgiving of collimation and eyepiece aberrations.
n
n
Secondary mirror and focuser
n
The secondary mirror size must balance illumination across the field versus contrast. Smaller secondaries enhance contrast for planetary work, while slightly larger secondaries help fully illuminate wide fields. Focusers are typically 1.25″ or 2″; 2″ focusers accept larger eyepieces for expansive true fields of view.
n
Alt-azimuth mount and bearings
n
The classic Dobsonian mount is a wooden (or composite) rocker box with two large semicircular altitude bearings attached to the tube and a rotating base for azimuth motion. Low-friction materials—commonly PTFE (Teflon) on textured laminate—enable smooth panning with fingertip pressure.
n
n
Balance: Smooth motion depends on proper balance around the altitude axis. Heavy eyepieces or finders may necessitate counterweights or adjustable bearings. See Maintenance, Tweaks, and Common Upgrades for simple solutions.
n
Stiction vs smoothness: The sweet spot is low friction without being “skatey.” Too little friction leads to overshoot; too much causes jerkiness. Bearing surface, pad area, and material choice all matter.
n
Ground board and pivot: A large azimuth bearing diameter (wider footprint) improves smoothness and stability. Many users add a center bushing and large diameter laminate ring to refine motion.
n
n
With this mechanical foundation, a Dobsonian excels at hand-guided tracking. At low to medium magnification, following objects is easy. At higher powers (e.g., planetary magnification), smooth bearings and a comfortable observing posture become critical.
nn
Choosing Aperture and Focal Ratio for Your Sky and Goals
n
Selecting aperture and f/ratio is central to matching a Dobsonian to your conditions and interests. Consider these factors before purchasing.
n
Aperture and what it reveals
n
Aperture primarily controls two things: how bright faint objects appear and the maximum theoretical resolution. In practice, atmospheric steady-state conditions (“seeing”) set a cap on usable resolution most nights, especially for apertures above ~8–10 inches.
n
n
6-inch (150 mm): A compact, budget-friendly choice. Good for lunar/planetary, brighter nebulae (with filters), open clusters, and the brightest galaxies under dark skies.
n
8-inch (200 mm): Often the best all-around beginner size. Noticeably deeper reach than a 6-inch; capable of resolving many globular clusters and showing structure in bright galaxies under dark skies.
n
10-inch (250 mm): Substantial performance jump, with more resolved detail in globulars, improved views of planetaries and faint nebulae, and more galaxies within reach.
n
12-inch (300 mm) and up: Dark-sky performance shines. Spiral structure in galaxies becomes more apparent, planetary nebulae show internal complexity, and rich-field sweeping is spectacular with the right eyepiece.
n
n
Remember, portability matters. A 10-inch solid-tube can be bulky in small vehicles or apartments. If you plan frequent travel to dark sites, weigh setup effort against gains in light grasp; see Solid-Tube vs Truss Dobsonians.
nn
Focal ratio trade-offs
n
Focal ratio (f/number) shapes the observing experience:
n
n
Fast (f/4–f/5): Wide fields, shorter tubes, and large exit pupils with long eyepieces. Collimation tolerance is tighter, coma is more noticeable off-axis, and eyepieces must be well-corrected. Coma correctors can improve edge performance.
n
Moderate (f/5–f/6): A balanced choice for most users. Reasonable tube length, manageable collimation, and good performance with mid-tier eyepieces.
n
Slow (f/6–f/8): Longer tubes, narrower fields at a given eyepiece focal length, but very forgiving collimation and excellent planetary contrast. Often favored in smaller apertures (e.g., 6-inch f/8).
n
n
Two field-useful formulas help when planning eyepiece sets and magnifications:
For comfortable deep-sky viewing, many observers target exit pupils of ~2–4 mm. For planetary and lunar detail, exit pupils around 0.5–1.0 mm are common, contingent on seeing. These values help you choose eyepiece focal lengths in Eyepieces, Finders, and Essential Accessories.
n
nn
Solid-Tube vs Truss Dobsonians: Portability and Performance
n
Dobsonian optical tubes come in two broad architectures: solid-tube and truss/strut frames. Each has pros and cons.
n
Solid-tube designs
n
n
Pros: Simple assembly, enclosed light path (resists stray light and dew), usually better balance with heavy eyepieces, fewer parts to misplace. Often more affordable.
n
Cons: Bulkier and heavier as aperture grows; can be cumbersome through doorways or stairs; slower thermal equalization in larger apertures due to enclosed air volume.
n
n
Truss or strut designs
n
n nn dobsonian telescope built using a truss tube design n Artist: JamesStewart669n n
n
n
n
Pros: Breaks down into lighter, compact pieces for transport; faster cooling; easier to handle in large apertures (12 inches and above).
n
Cons: Requires assembly in the field; needs a shroud to block stray light and dew; may demand more attention to collimation stability; more exposure to dust.
n
n
Choose solid-tube for convenience up to about 10 inches (individual preference varies). For 12 inches and larger, a truss design often makes the difference between observing frequently or leaving the scope at home due to bulk.
nn
Manual, Push-To, and GoTo Dobsonians: Finding Objects
n
Dobsonians traditionally rely on star-hopping, aided by a finder scope and charts. Today, you can add technology to speed up navigation without losing the tactile joy of manual use.
n
Manual star-hopping
n
Using a reflex finder and a right-angle correct-image (RACI) finder, you match star patterns to charts or a mobile app. This builds sky familiarity and works without power. It is extremely effective under dark skies. See Eyepieces, Finders, and Essential Accessories for recommended finder combinations.
n
Push-to (digital setting circles)
n
Encoders on the altitude and azimuth axes feed coordinates to a hand controller or smartphone app. The display shows arrows guiding you where to push the scope. Push-to keeps the scope fully manual, with no motors to drain batteries, while enabling fast object acquisition—a great compromise for public outreach or light-polluted backyards where star-hopping can be trickier.
n
GoTo tracking
n
Motorized Dobsonians can slew to targets and track automatically. This is ideal for high-power planetary observing and for sharing the eyepiece with groups. Keep in mind:
n
n
Power and weight: Motors add weight and require power management.
n
Field rotation: Alt-az tracking is fine for visual work. For long-exposure imaging, field rotation becomes an issue unless you use an equatorial platform (see Limitations and Astrophotography Considerations).
n
nn
Step-by-Step Setup and Collimation in the Field
n
Quick, repeatable setup maximizes observing time. The following sequence applies to most Dobsonians. Adjust details per your model.
n
Setup checklist
n
n
Place the base: Set the rocker box on level ground. Grass or firm soil is fine; avoid wobbly decks if possible.
n
Insert the tube: Lift the tube into the altitude bearings or truss cradle. Engage clamps if present.
n
Balance check: With your heaviest eyepiece and finder installed, nudge the tube up and down. It should stay put. Add a magnet weight or adjust bearings if needed (see upgrades).
Collimation: Verify alignment with a sight tube/Cheshire or a well-aligned laser. Touch up as necessary.
n
Finder alignment: In twilight, center a distant terrestrial object in a low-power eyepiece, then align the finder(s) to the same point.
n
n
Fast collimation guide
n
n nn Meade LightBridge Mini 114, a 4.5″ f/4 (focal length 450 mm) Dobsonian reflector telescope, shown with Bob’s Knobs adjustment screws for the secondary mirror and the included 26 mm 1.25″ eyepiece. Two eyepieces, 26 mm and 9 mm, are included with the telescope which result in about 17x and 50x magnification, respectively. n Artist: Mornn n
n
n
Newtonian collimation aligns the primary mirror, secondary mirror, and focuser axis. Tools help, but the logic remains the same:
n
n
Secondary centering: Through a sight tube, ensure the secondary appears centered under the focuser and rounded.
n
Focuser axis: Adjust secondary tilt to aim the reflected focuser axis at the primary center mark (donut). A laser simplifies this step.
n
Primary tilt: Using a Cheshire or a barlowed laser, adjust the primary collimation knobs until the primary center mark aligns with the tool’s reference.
n
n
At fast focal ratios (e.g., f/4.5), small errors are more apparent. Using a barlowed laser for the primary and a calibrated sight tube for secondary placement helps. After collimating, verify star images at high power: defocus slightly inside and outside focus and compare diffraction patterns. If one side shows astigmatism or asymmetric rings, recheck tilt and mechanical squareness.
n
Keep a compact kit ready: a sight tube/Cheshire combo, a quality laser checked for self-collimation, a small screwdriver or hex wrench, and a red flashlight. Practice at home under good light so field adjustments are quick.
nn
Eyepieces, Finders, and Essential Accessories
n
The right accessories elevate a Dobsonian from good to great. Start with eyepieces covering low, medium, and high power, plus reliable finders and a comfortable observing seat.
n
Eyepiece selection
n
A practical three- to four-eyepiece set spans most use cases. Choose focal lengths based on your scope’s focal ratio and desired exit pupils (see Choosing Aperture and Focal Ratio). As a starting point:
n
n
Low power, wide field: 2″ eyepiece in the 24–35 mm range for rich-field views and framing large nebulae. Target ~4–6 mm exit pupil, adjusting for your dark-adapted eye.
n
Medium power: 12–18 mm for galaxies, clusters, and nebulae detail. This is the workhorse range under most skies.
n
High power: 5–8 mm for lunar/planetary and resolving tight doubles, when seeing allows.
n
Optional barlow/telecentric: A 2× barlow doubles your range economically and can improve eye relief in short focal length designs.
n
n
Apparent field of view (AFOV) affects drift time and immersion. Wider AFOV (68–82–100°) keeps objects in view longer at high power and is especially pleasant for manual tracking. However, fast scopes are more demanding of eyepiece correction; well-corrected designs outperform budget wide-fields at f/4.5–f/5. If you run a very fast scope, consider a coma corrector to sharpen off-axis stars.
n
Finders and aiming aids
n
n
Reflex sight: Projects a 1× reticle against the sky for initial pointing. Great for hopping from bright stars.
n
RACI finder (8×50 typical): A right-angle, correct-image finder that matches the star chart orientation, excellent for precise hops.
Nebula filters: Ultra-high contrast (UHC) and O III filters improve contrast on emission and planetary nebulae. They can transform views of objects like the Veil or Orion Nebula from suburban skies.
n
Polarizing or neutral density filters: Helpful for lunar glare control, preserving contrast at the eyepiece.
n
Observing chair: A stable, height-adjustable chair dramatically improves steadiness and comfort, enabling you to see finer detail.
n
Dew control: Dew shields for secondary, gentle heaters for finder and eyepieces, and caps for idle optics keep observing uninterrupted on humid nights.
n
nn
Cooling, Thermal Management, and Collimation Stability
n
Thermal equilibrium is critical for sharp views. Temperature differences between your primary mirror and ambient air create convection currents—”tube currents”—that blur fine detail.
n
Fans and ventilation
n
n
Rear fan: A quiet fan behind the primary speeds cool-down, especially on thick mirrors. Running continuously at low speed during observing often helps maintain equilibrium.
n
Boundary layer control: Side fans or directed airflow across the front surface can break up the warm layer clinging to the mirror, improving high-power performance.
n
Open designs: Truss scopes cool faster but may need a shroud to reduce stray light and dew.
n
n
Acclimation timing and storage
n
Bring the scope outside early if the temperature will drop steadily. If possible, store the scope in a shed or garage near ambient temperature to reduce the initial delta-T. A mirror that is only a few degrees above ambient can settle surprisingly fast with gentle airflow.
n
Collimation stability
n
Thermal contraction, transport bumps, and assembly variances can shift collimation slightly from session to session. Good mechanicals—stiff truss poles, tensioned secondary spiders, robust primary cells—improve repeatability. Verify alignment at the start of each session, especially on fast scopes. Quick checks keep performance consistent and make high-power planetary sessions more rewarding.
nn
Visual Observing Techniques: Planets, Moon, and Deep-Sky
n
Great views are a blend of optics, conditions, and observing skill. Small technique tweaks pay big dividends.
n
Planetary and lunar observing
n
n
Wait for steady air: Planetary detail pops during moments of good seeing. Spend time at the eyepiece and let the image “settle” intermittently.
n
Use appropriate magnification: Push magnification until the image softens, then back off slightly. Typical range: 150–300× for medium to large Dobs when seeing allows.
Filters and contrast: Subtle color filters can enhance certain planetary features for some observers; a variable polarizer helps with lunar glare.
n
n
Deep-sky observing
n
n
Dark adaptation: Protect your night vision. Use a dim red light, shield from stray light, and give your eyes 20–30 minutes to adapt.
n
Averted vision: Look slightly away from the target to engage more sensitive retinal cells, often revealing fainter extensions or structures.
n
Exit pupil strategy: For galaxies and reflection nebulae, try ~2–3 mm exit pupil; for diffuse emission nebulae with a UHC/O III filter, 4–6 mm often works well; for globular clusters, start around 1.5–2 mm and increase magnification to resolve stars.
n
Transparency and Bortle scale: Under darker skies (lower Bortle number), faint galaxies and nebulae reveal far more structure. When local transparency is poor, switch to clusters and the Moon.
n
n
Ergonomics and tracking
n
Comfort is underrated. A steady posture and relaxed breathing help your eye-brain system detect low-contrast detail. Position the eyepiece so your neck is neutral. At higher power, practice smooth, small pushes in azimuth and altitude to keep the target centered. Wider AFOV eyepieces extend drift time, easing manual tracking (see Eyepieces).
nn
Maintenance, Tweaks, and Common Upgrades
n
Dobsonians invite easy tinkering. A handful of low-cost tweaks can markedly improve the user experience.
n
Smooth motion upgrades
n
n
Azimuth bearing surfaces: Many users replace factory bearing material with PTFE pads riding on a textured laminate ring to refine smoothness. Adjust pad area to balance inertia and stiction.
n
Center pivot tension: A large washer stack and adjustable knob or bolt allow you to fine-tune azimuth friction for your preferred feel.
n
Altitude bearing enhancements: Larger diameter bearings reduce sensitivity to balance shifts and improve buttery motion when swapping heavy eyepieces.
n
n
Balance, counterweights, and springs
n
n
Magnetic counterweights: Simple, adjustable, and tool-free. Shift them along the tube or mirror box to accommodate different loads.
n
Spring-tension systems: Some designs use springs to increase altitude axis tension, helping with heavy eyepiece balance.
n
Truss clamp tuning: On truss scopes, ensure clamps are snug and repeatable to assist collimation consistency.
n
n
Light control and interior treatment
n
n
Flocking: Applying low-reflectance material opposite the focuser and around the primary reduces stray light, enhancing contrast under urban skies.
n
Shrouds: On truss scopes, a dark, breathable shroud blocks stray light and helps with dew. Ensure it doesn’t sag into the light path.
n
n
Optical and mechanical care
n
n
Mirror cleaning: Clean sparingly. Dust seldom affects views. When necessary, use distilled water, gentle detergent, and a careful rinse. Avoid rubbing unless particles are fully floated.
n
Collimation screws/knobs: Tool-free knobs on the primary and secondary make tweaks faster in the field.
n
Primary mirror cells: Ensure the mirror is supported by proper points and edge supports to avoid astigmatism from pinch or sag.
n
n
Navigation aids
n
n
Setting circles: A printed azimuth circle on the base combined with a digital angle gauge on the tube can create a low-cost push-to system with a planetarium app.
n
Encoder kits: Aftermarket encoders and controller apps provide full digital setting circles without motors. See Push-To.
n
nn
Limitations and Astrophotography Considerations
n
Dobsonians excel at visual observing. While they can be adapted for certain imaging niches, there are inherent constraints to understand.
n
Alt-az tracking and field rotation
n
Manual or GoTo Dobsonians track in altitude and azimuth. Without an equatorial mount or platform, long-exposure astrophotography suffers from field rotation: the sky appears to rotate in the camera’s field as the telescope tracks. This smears star images over multi-minute exposures.
n
Where Dobsonians can image effectively
n
n
Lunar and planetary video: Short exposures (milliseconds) and high frame rates allow stacking software to reject bad frames and sharpen detail. A Dob’s large aperture is a benefit here, provided collimation and seeing are good.
n
Electronically Assisted Astronomy (EAA): Stacked short exposures on alt-az mounts can reveal deep-sky targets in near real-time. Software aligns and stacks frames to mitigate rotation over short intervals.
n
Equatorial platforms: A platform under the base can provide equatorial tracking for several tens of minutes per cycle. This enables longer exposures and aids both high-power visual and basic astrophotography.
n
n
If your primary goal is deep-sky imaging, a dedicated equatorial mount with a lighter optical tube is usually a better route. For visual observers who occasionally dabble in lunar/planetary imaging, a Dobsonian remains a compelling choice.
nn
Buying Checklist and Budget Scenarios
n
Use this checklist to match a Dobsonian to your needs and constraints.
n
Key questions before you buy
n
n
Transport: What vehicle and storage space do you have? Can you lift a 30–40 lb tube or move a base through narrow doors or stairs?
n
Sky quality: Are you primarily observing from a suburban yard or traveling to dark sites? Aperture helps under light pollution, but contrast-enhancing filters and target selection also matter.
n
Use case: Visual only, or do you want push-to/GoTo? Are high-power planetary sessions a focus? Consider tracking options.
n
Ergonomics: Your height, typical targets, and chair availability influence ideal focal length and eyepiece height at zenith.
n
Maintenance comfort: Are you willing to learn collimation and basic tweaks? If so, faster scopes are viable; if not, an f/6–f/8 might be more forgiving.
n
n
Sample budget paths
n
n
Entry (under ~$500–$800): 6–8 inch solid-tube Dobsonian, two decent eyepieces, a reflex finder, and a chair. Add a UHC filter later.n n nn Celestron FirstScope 76 tabletop Dobsonian telescope. Its aperture is 3″ and the focal length is 300 mm, so its focal ratio is approximately f/4. (The photo was taken in a lightbox, see Flickr album at [1], so it almost looks like an official Celestron product shot, but it’s not.) n Artist: Wutthichai Charoenburin n
n
n
n
Midrange (~$900–$1,600): 8–10 inch with 2″ focuser, RACI + reflex finders, three eyepieces spanning low/medium/high power, a barlow, and a UHC filter. Consider push-to encoders.
n
Upper midrange (~$1,700–$3,000+): 10–12 inch truss or premium solid-tube, upgraded bearings, cooling fans, digital setting circles, and a tailored eyepiece set. A coma corrector if f/5 or faster and you enjoy wide fields.
n
Premium and large-aperture: Custom or boutique builds with high-spec mirrors, large bearings, feather-touch focusers, and optimized cells. Outstanding views, with correspondingly higher cost and lead time.
n
n
Before buying, if possible, attend a star party or astronomy club night. Moving a scope, testing motion, and peeking through different apertures helps calibrate expectations. The scope you use most is the one that fits your life, not just your wish list.
nn
Frequently Asked Questions
n
Are Dobsonians good for beginners under light pollution?
n
Yes—especially 6–8 inch models. While light pollution reduces contrast on galaxies and diffuse nebulae, planets, the Moon, open clusters, double stars, and brighter planetary nebulae still look excellent. A UHC or O III filter can notably improve emission nebulae. Push-to encoders help find targets when star-hopping is hampered by a bright sky. For best results, combine backyard sessions with occasional trips to darker sites.
n
How often do I need to collimate, and is it difficult?
n
Expect to verify collimation each session—usually a quick check. Solid-tube scopes at f/6 often hold alignment well; fast truss scopes may need small touch-ups after transport. With a sight tube/Cheshire or a well-aligned laser, collimation becomes a five-minute routine. Practice in daylight and follow the sequence outlined in Step-by-Step Setup and Collimation.
nn
Final Thoughts on Choosing the Right Dobsonian Telescope
n
A Dobsonian telescope delivers exceptional value, simplicity, and performance for visual astronomy. By prioritizing aperture within the limits of your transport and storage, selecting a focal ratio that matches your comfort with collimation, and investing in a solid set of eyepieces and accessories, you set yourself up for years of rewarding night-sky exploration. Smooth bearings, good thermal practices, and a comfortable observing posture elevate the whole experience, whether you’re teasing out spiral structure in a distant galaxy or tracing delicate rilles across the lunar surface.
n
Most importantly, choose the scope you will use often. If a compact 8-inch means more nights under the stars than a 12-inch that sits at home, the smaller scope will win on real viewing time. When you are ready, incremental upgrades—push-to encoders, a better finder, or a high-quality wide-field eyepiece—unlock new capabilities without replacing the core instrument.
n
n nn Example of custom truss-tube Dobsonian telescope n Artist: Rob Teetern n
n
n
If you enjoyed this guide and want more practical, field-tested advice on observing strategies, equipment tweaks, and night-sky targets, consider subscribing to our newsletter. You’ll get future articles on choosing accessories, optimizing your setup, and seasonal observing plans delivered straight to your inbox.
 n
n n
n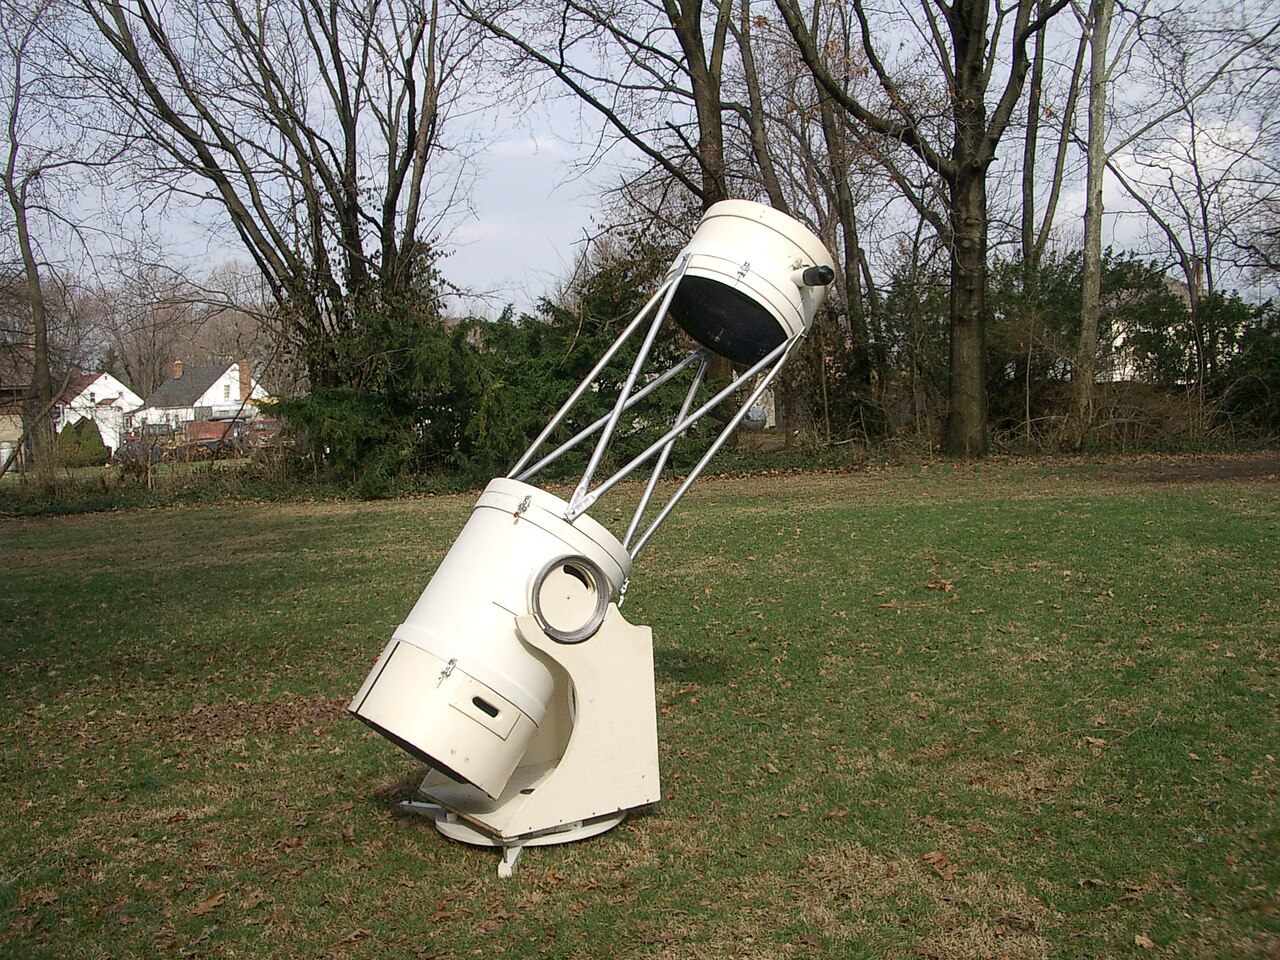 n
n n
n n
n n
n