Table of Contents
- What Is a Dobsonian Telescope? Core Design and Why It Matters
- Key Specifications That Matter for Visual Observing
- Dobsonian vs Other Telescope Types: Pros, Cons, Use Cases
- Choosing Aperture: 6″, 8″, 10″, 12″ and Beyond
- Essential Accessories: Eyepieces, Finders, Filters, Collimation Tools
- Setup, Collimation, and Cooling: Step-by-Step Workflow
- Observing Techniques: Star-Hopping, Dark Adaptation, Averted Vision
- Maintenance, Upgrades, and Troubleshooting
- Light Pollution and Travel: Urban Observing Strategies
- Budget and Buying Guide: New vs Used, What to Check
- Frequently Asked Questions
- Final Thoughts on Choosing the Right Dobsonian Telescope
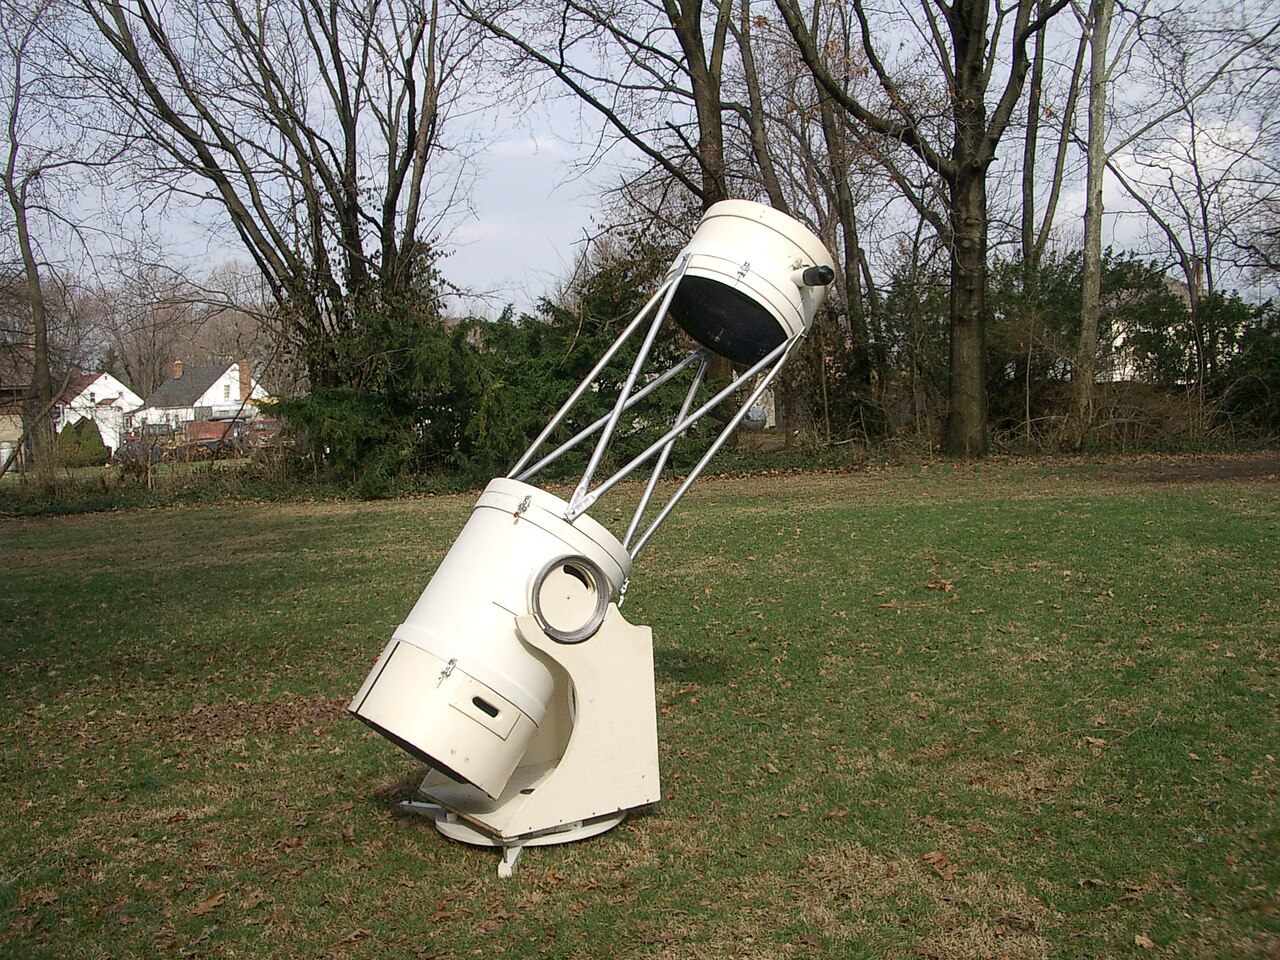
What Is a Dobsonian Telescope? Core Design and Why It Matters
A Dobsonian telescope is a Newtonian reflector mounted on a simple, stable alt-azimuth base. The optical tube contains a parabolic primary mirror at the bottom and a small flat secondary mirror near the top that redirects light to a focuser on the side. The signature low-profile wooden (or composite) base supports the tube with smooth altitude (up-down) and azimuth (left-right) motions.

Credit: first uploaded on the English-speaking Wikipedia under the same filename
Dobsonians were popularized by John Dobson in the late 20th century as a portable, affordable path to large-aperture visual observing. By simplifying the mount and emphasizing light gathering, the design gives observers a lot of aperture for the price—ideal for faint deep-sky objects like galaxies, nebulae, and star clusters.
Three characteristics define the Dobsonian experience:
- Aperture: Large mirrors (150–400+ mm) capture more light, revealing faint detail.
- Alt-az mount: Intuitive point-and-look operation, great for sweeping the sky.
- Value: Cost per millimeter of aperture is lower than many other designs.
Because Dobsonians are optimized for visual use, they excel at real-time observing. The combination of smooth manual tracking and big optics makes them a favorite at star parties and with observers who want a “front-row seat” to deep-sky targets. To understand how to choose one, it helps to grasp the key specifications discussed in Key Specifications That Matter and how they translate to the eyepiece.
Key Specifications That Matter for Visual Observing
Dobsonians are straightforward, but a few core specs drive performance and usability. When comparing models, pay particular attention to aperture, focal length, focal ratio, mirror quality, and the motion/feel of the mount.

Artist: The original uploader was Tmoore at English Wikipedia.
Aperture (Mirror Diameter)
Aperture controls light gathering ability and theoretical resolution. All else equal, a larger primary mirror reveals fainter objects and finer details.
- Light gathering scales with the area of the mirror: proportional to
D^2(D = diameter). - Resolution improves as diameter increases, though actual sharpness also depends on thermal equilibrium, collimation, and atmospheric seeing.
Relative light grasp vs. the dark-adapted eye ≈ (D / 7 mm)^2
Example: 200 mm mirror → (200/7)^2 ≈ 816x the light of a 7 mm pupil.
Focal Length and Focal Ratio (f/number)
Focal length is the distance the mirror focuses light; focal ratio is focal length divided by aperture (e.g., 1200 mm focal length and 200 mm aperture → f/6). These matter because they influence magnification, field of view, and aberrations.
- Focal length sets base magnification with a given eyepiece.
- Focal ratio (f/) affects optical tolerance and eyepiece behavior. Faster scopes (f/4–f/5) yield wider fields but demand better collimation and eyepieces; slower scopes (f/6–f/8) are more forgiving.
Magnification (M) = Telescope focal length / Eyepiece focal length
Exit pupil (mm) = Eyepiece focal length / f-ratio
Approx. True Field (TFOV) ≈ Eyepiece AFOV / Magnification
For visual deep-sky work, common Dobsonian focal ratios are f/5 to f/6—a balanced sweet spot between portability, field of view, and optical tolerance. Shorter (f/4) instruments are compact and excellent for wide-field scanning but require more precise collimation and higher-quality eyepieces to control off-axis coma and astigmatism.
Mirror Quality and Coatings
Most mass-market Dobsonians use aluminized mirrors with a protective overcoat (e.g., SiO2) to resist oxidation. Higher reflectivity coatings can provide a modest brightness gain; what matters more is the accuracy of the mirror figure and smoothness of the surface. A well-figured mirror with good collimation and thermal management will outperform a larger but poorly tuned system.
Mount and Motions
A hallmark of the Dobsonian is smooth, predictable motion with minimal “stiction.” High-quality bearings and balanced altitude tension let you nudge the scope at high power without overshoot. Some models include clutch adjustments or spring-tension systems to handle changes in eyepiece weight. If you plan to observe at 200× and above, the ability to track objects smoothly is essential.
Keep these fundamentals in mind as you consider the trade-offs explained in Dobsonian vs Other Telescope Types and the aperture recommendations in Choosing Aperture.
Dobsonian vs Other Telescope Types: Pros, Cons, Use Cases
Before committing to a Dobsonian, it’s helpful to compare it to other common designs—refractors and catadioptrics (SCTs and Maksutovs). Each family of telescopes offers distinct advantages.

Artist: OpenStax
Dobsonian (Newtonian on Alt-Az Base)
- Strengths: Large aperture per dollar; intuitive manual tracking; excellent deep-sky views; fast setup; low eyepiece height for mid-size apertures.
- Trade-offs: Requires periodic collimation; bulkier optical tube at larger sizes; coma more noticeable at fast focal ratios; not optimized for long-exposure astrophotography.
Refractors
- Strengths: Excellent contrast; sealed tubes; minimal maintenance; wide fields (short focal lengths).
- Trade-offs: Cost increases rapidly with aperture; long tubes at slower focal ratios; large-aperture refractors are heavy and expensive.
Schmidt-Cassegrain (SCT) and Maksutov-Cassegrain
- Strengths: Compact for aperture; long focal length for high magnification; compatible with motorized tracking and GoTo mounts.
- Trade-offs: Longer cool-down times; narrower maximum true field at a given aperture; more expensive per inch of aperture.
For purely visual deep-sky observing and casual planetary viewing, a Dobsonian often provides the most immersive experience at a given budget. If your goal is long-exposure astrophotography, consider the guidance in Frequently Asked Questions—Dobsonians can do planetary and lunar imaging, but long-exposure deep-sky imaging typically calls for an equatorial mount.
Choosing Aperture: 6″, 8″, 10″, 12″ and Beyond
Aperture is the most consequential choice you’ll make. It determines the faintest objects you can reach and how much structure you’ll see in galaxies and nebulae. But bigger isn’t always better if the scope stays in the closet because it’s too heavy or cumbersome to transport.
6-inch (150 mm)
- What you’ll see: Bright Messier objects, open clusters, globular clusters resolving at the edges, major nebulae (with filters), lunar and planetary detail.
- Pros: Lightweight; quick cool-down; budget-friendly.
- Cons: Fainter galaxies and fine structure are more challenging, especially in light pollution.

Artist: Morn
8-inch (200 mm)
- What you’ll see: A significant step up in galaxy count, better resolution of globular clusters, planetary detail improves with steady seeing.
- Pros: Excellent balance of reach and portability; many observers consider 8 inches a long-term sweet spot.
- Cons: Still manageable, but bulkier than 6-inch; consider storage space and vehicle fit.
10-inch (250 mm)
- What you’ll see: Fainter galaxies become accessible; spiral structure shows more often under dark skies; planetary views benefit from increased resolution when seeing allows.
- Pros: Noticeable performance jump from 8 inches; still a single-person setup for many observers.
- Cons: Heavier tube and base; cool-down time increases.
12-inch (300 mm) and Larger
- What you’ll see: Deep reach into galaxy clusters; enhanced nebula structure with filters; impressive globular resolution.
- Pros: Serious deep-sky performance; truss designs improve portability.
- Cons: Bulky; more sensitive to seeing and thermal issues; ladder or stepstool may be needed at higher focal ratios.
Use the following approximations to visualize light grasp increases:
Relative light grasp scales with area ∝ D^2
6" (152 mm): baseline ≈ 23,100 mm^2
8" (203 mm): ≈ 32,400 mm^2 → ~1.4× 6"
10" (254 mm): ≈ 50,700 mm^2 → ~2.2× 6"
12" (305 mm): ≈ 73,000 mm^2 → ~3.2× 6"
These ratios don’t guarantee object visibility (sky brightness and experience matter), but they illustrate why stepping up in aperture can be dramatic at the eyepiece. If you observe from bright urban skies, the tips in Light Pollution and Travel will help you get the most from any size.
Essential Accessories: Eyepieces, Finders, Filters, Collimation Tools
A few well-chosen accessories dramatically improve a Dobsonian’s performance and ease of use. Focus on versatility and ergonomics before you chase exotic add-ons.
Eyepieces and Barlow Lenses
Eyepieces set magnification, field of view, and comfort. Start with three focal lengths (low, medium, high) that create a balanced kit. A quality 2× Barlow lens effectively doubles your options.
- Apparent Field of View (AFOV): Wider AFOV (e.g., 68°–82°) provides immersive views and more drift time before nudging. Narrower AFOV (e.g., 50°–60°) can be lighter and more affordable.
- Eye relief: If you wear glasses for observing, look for long eye relief (15–20 mm).
- Exit pupil: An exit pupil of 2–4 mm is a general-purpose sweet spot for deep-sky. For planets, 0.5–1 mm exit pupils give higher contrast when seeing permits.
Exit pupil (mm) = Eyepiece focal length / f-ratio
Example: f/6 scope + 24 mm eyepiece → 4 mm exit pupil (great for DSOs)
Artist: DrCruse
Sample spread for an 8″ f/6 Dobsonian (1200 mm focal length):
- Low power, wide field: 30–35 mm eyepiece (34–40×, large true field)
- Medium power: 18–24 mm eyepiece (50–67×)
- High power: 8–12 mm eyepiece (100–150×)
- Very high: 5–7 mm eyepiece or use a 2× Barlow (170–240×), seeing permitting
Finders: Optical and Reflex
Pair a unity-reflex finder (projects a red dot on the sky) with a right-angle, correct-image finder scope. The red dot gets you in the right neighborhood, and the optical finder shows stars too faint to see naked-eye for precise star-hopping. This combination makes the techniques in Observing Techniques much easier.
Filters
- UHC and O-III: Nebula filters that enhance emission nebulae by passing key wavelengths while suppressing skyglow. They are most effective under already decent skies, but can also help in urban areas on suitable targets.
- Moon/Neutral Density: Reduces glare and increases comfort on bright lunar phases.
- Solar: Only with a proper, full-aperture or securely mounted off-axis solar filter made for visual use. Never point your telescope at the Sun without a certified safe solar filter.
Collimation Tools
- Collimation cap: Simple, effective, often included with scopes.
- Cheshire/sight tube: Accurate tool for aligning secondary and primary mirror axes.
- Laser collimator: Convenient for primary tilt, but ensure it is collimated itself.
Whatever you choose, practice will make collimation quick and routine. For an overview of the process, see Setup, Collimation, and Cooling.
Setup, Collimation, and Cooling: Step-by-Step Workflow
A consistent setup routine minimizes frustration and maximizes observing time. The following step-by-step workflow covers the essentials from unloading to first target.
1) Site and Transport
- Place the base on level ground with a clear view of the sky. Avoid heat sources like rooftops and driveways, which create thermal plumes.
- Carry the tube separately or use a hand truck for larger apertures. Some truss designs break down into compact components.
2) Assembly and Balance
- Seat the tube in the altitude bearings. Check that it stays put when you change eyepieces. If the front dips with heavier eyepieces, add counterweights or adjust altitude tension.
- Verify smooth azimuth motion. If it feels sticky, a gentle, even cleaning of the bearing surfaces can help (see Maintenance and Upgrades).
3) Thermal Equilibrium (Cooling)
Mirrors deliver their best performance when their temperature closely matches the ambient air. Until then, images can appear soft and jittery, especially at high power.
- Allow 30–90 minutes for cool-down depending on mirror thickness and temperature difference. A small fan behind the primary mirror can speed this process.
- Avoid capping the tube during cool-down; allow air to flow. Shield the scope from wind, but don’t seal it off.
4) Collimation Check
Fast scopes (e.g., f/5) benefit from a quick collimation check each session. Slower instruments may hold collimation longer, but checking is fast insurance.
- Center the secondary under the focuser using a sight tube. Adjust the secondary’s position if necessary.
- Align the focuser axis so the view down the tube shows the primary centered. This often uses the secondary tilt screws.
- Adjust primary tilt so the primary center mark returns to the collimation tool’s reference (e.g., Cheshire or laser target).
At the eyepiece, defocused star images should show concentric rings when the scope is close to collimation and thermally stable. For details on tools, review Essential Accessories.
5) Finder Alignment
In twilight, center a distant terrestrial object in the main eyepiece, then adjust your reflex and optical finders so the same object is centered. This makes your first star-hops quick and reliable. Cross-reference this step with the star-hopping methods in Observing Techniques.
6) First Targets and Magnification Choices
- Start with low magnification to locate objects and survey the sky.
- Increase power gradually as seeing and focus allow. For extended nebulae, lower power and larger exit pupils often show more structure.
Tip: Seeing (atmospheric steadiness) limits useful magnification more than aperture does on many nights. If stars won’t focus tightly at high power, drop back to a lower magnification for sharper, more pleasing views.
Observing Techniques: Star-Hopping, Dark Adaptation, Averted Vision
Skill multiplies the performance of any telescope. These techniques help you consistently find and see more.
Star-Hopping
Star-hopping uses recognizable asterisms as waypoints to step to fainter targets. With a reflex finder, place the red dot relative to bright anchor stars, then switch to the optical finder for finer nudges using a wider star field.
- Use charts tailored to your finder’s field of view.
- Recenter and reorient often; don’t try to make a giant leap in one go.
- Practice under a known part of the sky before chasing a difficult object.
These skills improve quickly when paired with a well-aligned finder as described in Setup, Collimation, and Cooling.
Dark Adaptation
It takes roughly 20–30 minutes for your eyes to reach deep-sky sensitivity. Bright white light resets this process. Use a dim red light for charts, and give your eyes a moment after looking at a device screen.
- Shield yourself from stray light (car headlights, porch lights) using a hood or portable screen.
- Even in cities, improved dark adaptation helps tease out subtle contrast.
Averted Vision and Motion
The retina is more sensitive to faint light away from the central fovea. Gently look slightly to the side of a faint object—averted vision—and rock the scope a tiny bit. Motion can help faint objects stand out from the background.
Logbook and Sketching
Keep a simple observing log. Note conditions (seeing, transparency), magnifications used, and impressions. Quick sketches help you detect structure you might otherwise miss and provide a record to revisit. This practice ties in nicely with the maintenance tracking in Maintenance, Upgrades, and Troubleshooting.
Maintenance, Upgrades, and Troubleshooting
Dobsonians are mechanically simple, but occasional care keeps them performing like new. Resist the urge to over-maintain. Many issues are solved by cleaning bearing surfaces or rebalancing the tube.
Optics Care
- Primary mirror cleaning: Only when needed—dust rarely harms views. If you see a haze or persistent dew marks, remove the mirror following manufacturer guidance. Rinse gently with distilled water; if necessary, use a mild cleaning solution and fingertip pressure. Rinse thoroughly and let air-dry on edge. Avoid wiping with cloths.
- Secondary mirror: Treat similarly, but it’s more delicate to handle. Ensure it’s completely dry before reassembly.
- Coatings: Modern protective overcoats resist oxidation. Recoating is infrequent for typical users unless the mirror is damaged or decades old.
Mount and Motions
- Azimuth bearing: If motion is sticky or jerky, inspect pads and laminate. Clean debris and dust; replace worn pads if necessary. Some owners upgrade to low-friction materials (e.g., PTFE on fine-texture laminate) for buttery motion.
- Altitude bearings: Adjust tension or springs for balance with heavy eyepieces. Consider counterweights on the mirror end to maintain smooth movement.
- Focuser: Keep the drawtube clean; adjust tension screws for smooth focus without slop. A 2-inch dual-speed focuser is helpful for fine planetary focus and heavy eyepieces.
Thermal and Dew Management
- Fans: A quiet rear fan helps bring the primary mirror to ambient temperature. Side fans can disrupt boundary layers around the mirror surface.
- Dew control: Secondary mirrors dew up sooner than primaries. Use a dew shield or gentle heat if your conditions demand it.
Collimation Stability
- Check the tightness of primary cell springs and lock bolts. Weak springs can let collimation drift.
- Ensure the secondary holder is secure; avoid overtightening the center screw, which can shift alignment.
Troubleshooting Common Issues
- Soft views at high power: Often thermal or seeing-related; allow more cool-down or reduce magnification.
- Stars look like comets near the edge: Coma is normal in fast Newtonians. Use longer focal ratios, better eyepieces, or accept that the center field is the sharpest region.
- Image won’t snap into focus: Check collimation; inspect focuser slop; verify that the mirror is cooled.
Light Pollution and Travel: Urban Observing Strategies
Dobsonians thrive under dark skies, but you can still enjoy productive sessions in light-polluted areas with the right targets and techniques.
Target Selection
- Best in bright skies: The Moon, planets, double stars, open clusters, bright globulars, and carbon stars.
- Challenging in bright skies: Diffuse galaxies and reflection nebulae. Save these for darker locations when possible.
Narrowband filters (UHC/O-III) can boost contrast on emission nebulae, especially when used at lower magnifications. For galaxies, filters typically do not help; dark skies remain the most effective “filter.”
Portable Setups
Artist: JamesStewart669
- Solid-tube Dobsonians: Simple to transport in a sedan if the tube and base fit your trunk or backseat dimensions.
- Collapsible/truss designs: Pack down smaller for travel; require more assembly and careful collimation but enable larger apertures to go mobile.
Observing Etiquette and Efficiency
- Use red lights at star parties and preserve your night vision.
- Plan a few “anchor objects” that are high in the sky to minimize atmospheric extinction and improve contrast. The planning process pairs well with the Observing Techniques section.
Travel Safety and Care
- Secure the tube and base during transport with padding to prevent scuffs and collimation shifts.
- Allow extra cool-down time after moving from a warm car to a cold site.
Budget and Buying Guide: New vs Used, What to Check
Dobsonians span a wide range of sizes and price points. Whether buying new or used, focus on the elements that most affect your nightly experience: optics, mount smoothness, and ergonomics.
New vs Used
- New: Warranty, known history, consistent quality. You can often bundle eyepieces and accessories.
- Used: Potential savings; local pickup avoids shipping risks. Inspect carefully for optical and mechanical condition.
Inspection Checklist
- Primary mirror: Use a flashlight sparingly; small dust and pinholes in coatings usually don’t affect views. Look for obvious scratches or coating failure (peeling, severe haze).
- Secondary mirror: Check for secure mounting, no chips on the edge, and intact coating.
- Focuser: Smooth travel with minimal play. Verify that 2-inch eyepieces seat securely if applicable.
- Bearings: Altitude and azimuth motions should be smooth without grinding or binding.
- Tubes and trusses: Solid-tube models should be round and undented; truss connectors should be firm with no wobble.
- Accessories: Evaluate included eyepieces, finder, and collimation tools to see whether you’ll need upgrades.
Specifications to Prioritize
- Aperture that fits your routine: If it’s easy to carry and set up, you’ll use it more. See examples in Choosing Aperture.
- Focal ratio: f/5–f/6 is a versatile range for visual; f/4 favors wide-field and compactness but tolerances are tighter.
- Collapsible vs solid tube: Collapsible saves space; solid is quicker to set up and holds collimation well.
Budget Planning
- Allocate funds for two or three eyepieces, a Barlow, and a nebula filter if deep-sky is a priority.
- Consider a comfortable observing chair; steadier posture improves what you can see.
Smart buying rule: The best telescope is the one you will use often. A well-chosen 8-inch you love to set up will outperform a 12-inch that gathers dust.
Frequently Asked Questions
Can a Dobsonian be used for astrophotography?
Dobsonians are optimized for visual observing with manual alt-az mounts, so they are not ideal for long-exposure deep-sky astrophotography, which typically requires equatorial tracking to compensate for Earth’s rotation and keep stars pinpoint over many minutes. However, you can do effective planetary and lunar imaging by capturing short video clips at high magnification and stacking the best frames. Some observers also experiment with electronically assisted astronomy (EAA) and short-exposure live stacking on bright objects. For more on the visual strengths of Dobsonians, revisit Dobsonian vs Other Telescope Types.
How often do I need to collimate?
It depends on your focal ratio, how far you travel with the scope, and temperature changes. Faster instruments (f/5 and below) benefit from quick checks each session. Slower scopes may hold alignment longer, but a 2-minute verification prevents frustration. If you notice star images that won’t focus symmetrically or planetary views that seem mushy despite steady seeing, check collimation. The step-by-step process in Setup, Collimation, and Cooling outlines a reliable workflow.
Final Thoughts on Choosing the Right Dobsonian Telescope
Dobsonian telescopes deliver a rare combination of simplicity, aperture, and affordability. By understanding the core specifications—aperture, focal length, focal ratio—and prioritizing smooth mount motions and good collimation, you can assemble a setup that consistently impresses at the eyepiece. A thoughtfully chosen set of eyepieces, a nebula filter, and a dual-finder system will take you far, whether you’re sweeping rich star fields or chasing subtle galaxy groups under dark skies.
As you evaluate options, be honest about storage, transport, and the time you have for cool-down and setup. An 8-inch f/6 remains a superb all-rounder for many observers, while 10–12 inches open new depths from dark sites if you can comfortably handle the size. Build a routine around the techniques in Observing Techniques, and keep your equipment tuned using the guidance in Maintenance, Upgrades, and Troubleshooting.
If this guide helped you clarify your next step, consider exploring more detailed topics in future articles—like advanced collimation nuances, optimizing eyepiece sets for specific targets, or travel-friendly truss designs. Stay connected and subscribe to our newsletter to get the latest hands-on guides, sky highlights, and deep dives delivered right to your inbox.