Table of Contents
- What Is a Dobsonian Telescope and Why It Matters?
- Aperture, Focal Ratio, and What They Mean at the Eyepiece
- 6-inch vs 8-inch vs 10-inch: Real-World Trade-offs
- Rocker Boxes, Bearings, and Motions: Understanding Dob Mounts
- Collimation, Cooling, and Optical Performance
- Essential Eyepieces and Accessories for Dobsonian Owners
- Portability, Storage, and Observing Sites
- Step-by-Step: From Unboxing to First Light
- Smart Upgrades: Push-to, Digital Setting Circles, and EAA
- Maintenance, Mirror Care, and Safety Tips
- Frequently Asked Questions
- Final Thoughts on Choosing the Right Dobsonian
What Is a Dobsonian Telescope and Why It Matters?
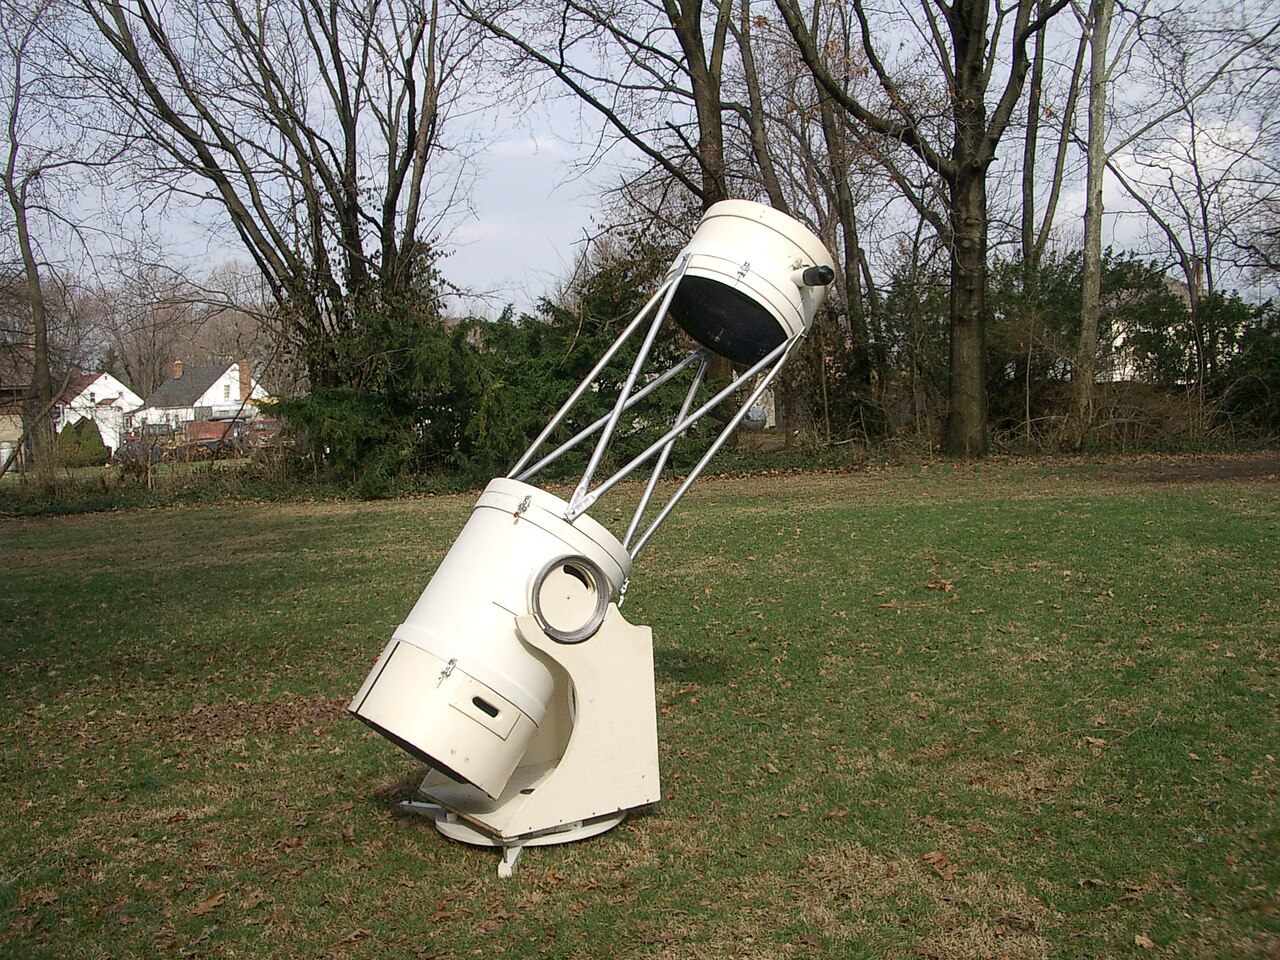
A Dobsonian telescope is a Newtonian reflector mounted on a simple, alt-azimuth base. Its popularity stems from a powerful combination of large aperture, smooth manual motion, and exceptional value for visual observing. In practical terms, a Dobsonian is often the most cost-effective way to put a lot of light-gathering power under the night sky. That’s why many observers call it a “light bucket.”
Invented and popularized by John Dobson in the late 20th century, the design emphasizes simplicity and performance. The optical tube contains a parabolic primary mirror at the back and a flat secondary mirror near the front to redirect light into a side-mounted focuser. The base—typically made of plywood or particle board—uses wide bearings to provide smooth movement in altitude (up-down) and azimuth (left-right). Because there’s no equatorial wedge or heavy counterweights, Dobsonians offer remarkable stability and ease of use for newcomers and veterans alike.

Artist: The original uploader was Tmoore at English Wikipedia.
The Dobsonian’s sweet spot is deep-sky observing: galaxies, nebulae, and star clusters. Under dark skies, even a 6-inch will reveal striking detail, and an 8- to 12-inch can show structure in bright galaxies and texture in emission nebulae. Yet Dobsonians also excel at the Moon and planets. With steady atmospheric seeing and good collimation, a medium-aperture Dob can deliver razor-sharp views of Jupiter’s belts, Saturn’s rings, and lunar rilles.
This guide explains how to choose your first Dobsonian telescope with confidence. We’ll cover optics and mounts, handling and transport, essential accessories, smart upgrades, and practical observing tips—so you can find the right balance of aperture, portability, and budget for your goals.
Aperture, Focal Ratio, and What They Mean at the Eyepiece
Two fundamental specifications shape your experience: aperture (the diameter of the primary mirror) and focal ratio (f/number). Understanding both will help you predict performance, choose eyepieces, and set realistic expectations.
Aperture: Light, Resolution, and Reach
Aperture governs how much light your telescope gathers and how finely it can resolve detail. Light-gathering power scales with the area of the primary mirror, which in turn scales with the square of the diameter. As a rule of thumb, the gain in light relative to the dark-adapted human eye (roughly a 7 mm pupil) is:
Light gain ≈ (Aperture in mm / 7 mm)2
- 6-inch (152 mm): ≈ (152/7)2 ≈ 472× the eye
- 8-inch (203 mm): ≈ (203/7)2 ≈ 842× the eye
- 10-inch (254 mm): ≈ (254/7)2 ≈ 1,314× the eye
On the resolution side, a common empirical guideline, the Dawes limit, estimates the smallest stellar separation resolvable under perfect optics and excellent seeing:
Dawes limit (arcseconds) ≈ 116 / Aperture in mm
- 6-inch (152 mm): ≈ 0.76″
- 8-inch (203 mm): ≈ 0.57″
- 10-inch (254 mm): ≈ 0.46″
While real-world atmospheric seeing often dominates what you can actually resolve, larger apertures usually show more at the eyepiece—especially on deep-sky objects.
Focal Ratio: Field of View, Eyepieces, and Coma
The focal ratio is the telescope’s focal length divided by its aperture (e.g., f/5, f/6, f/8). In Dobsonians, faster systems (lower f/number like f/4.5–f/5) deliver wider fields and shorter tubes for the same aperture, making them more compact. Slower systems (like f/6–f/8) yield narrower fields at a given eyepiece focal length and tend to be more forgiving of eyepiece aberrations and collimation errors.
- Fast Dob (f/4.5–f/5): Wide-field deep-sky views; compact tubes; more visible coma off-axis; benefits from well-corrected eyepieces and possibly a coma corrector.
- Moderate (f/5.5–f/6): Balanced for most users; moderate tube length and forgiving optics; works well with many eyepiece designs.
- Slow (f/7–f/8): Long tube; narrower field; less coma and often very sharp on-axis performance; can be excellent for lunar/planetary work.
Coma is a natural off-axis aberration in Newtonians that makes stars look like little comets near the edge of the field. It grows more conspicuous at faster focal ratios. Good eyepieces help, and a dedicated coma corrector can substantially improve edge-of-field sharpness in fast scopes. For most newcomers, an f/5–f/6 Dob strikes a great balance.
Exit Pupil and Magnification Basics
Magnification depends on the eyepiece focal length and the telescope’s focal length. The exit pupil—the beam of light leaving the eyepiece—equals the eyepiece focal length divided by the telescope’s f/ratio. A few practical benchmarks:
- Low power / wide field: Exit pupil ~4–6 mm. Great for large nebulae and star fields.
- Medium power: Exit pupil ~2–3 mm. Ideal for many galaxies and globular clusters.
- High power: Exit pupil ~0.5–1 mm. Suited for planets, the Moon, double stars.
Maximum useful magnification depends on seeing and optical quality. A common rule of thumb is ~25–50× per inch of aperture (i.e., 1–2× per mm), with the lower end being more realistic for average conditions. An 8-inch Dob might deliver excellent high-power views around 200× on many nights, with 300–400× reserved for steady air and bright targets.
6-inch vs 8-inch vs 10-inch: Real-World Trade-offs
Most first-time Dobsonian buyers choose among 6-, 8-, and 10-inch models. Each brings distinct advantages and compromises in light grasp, resolution, weight, and cost.
6-inch (152 mm): Affordable, Friendly, and Capable
A 6-inch Dob tends to be the most budget-friendly and approachable. It’s easy to move as a single piece, fits in compact cars, and cools quickly. Under dark skies it shows:
- Bright Messier objects with pleasing detail
- Open clusters, many globular clusters resolved at the edges
- Bright planetary nebulae and large emission nebulae with a filter
- Lunar and planetary detail at moderate to high magnification
In suburban light pollution, the 6-inch remains fun and productive, especially on star clusters, double stars, and the Moon/planets. If you need ultra-portability and low cost, a 6-inch is a fine first scope.
8-inch (203 mm): The Sweet Spot for Most Beginners
An 8-inch Dob often delivers the best “wow per dollar.” It nearly doubles the light grasp over a 6-inch, improving views of galaxies, globulars, and faint nebulae. The tube is still manageable, and the base remains a one-person carry for many observers. At 8 inches, you’re in a regime where subtle spiral structure becomes easier in bright galaxies under dark skies, and planetary detail typically pops more readily when the air steadies.
For many, the 8-inch hits the sweet spot of portability, cost, and performance.
10-inch (254 mm): Punchy Performance, Bigger Logistics
Moving up to 10 inches brings a dramatic increase in light (about 56% over an 8-inch) and feels like a clear step-change on many deep-sky targets. However, everything gets bigger: the base footprint, the tube length and weight, and cool-down time. If you have the storage, a vehicle to transport it, and a robust willingness to carry heavier gear, the 10-inch can be a transformative upgrade—especially if you enjoy faint fuzzies from dark sites.
Many observers who start with 6- or 8-inch eventually step up to a 10- or 12-inch once they’re sure deep-sky observing is their long-term passion.
Solid Tube vs Truss/Collapsible
- Solid tube: Simpler, fixed alignment, better light control; bulkier for larger apertures.
- Truss or collapsible: Breaks down for transport; lighter for big mirrors; requires shrouds for stray light control and more careful collimation.
Artist: JamesStewart669
Rocker Boxes, Bearings, and Motions: Understanding Dob Mounts
The foundation of the Dobsonian experience is smooth manual motion—often called the “Dobsonian dance.” The base supports the tube in two axes: altitude and azimuth. It should move smoothly with light fingertip pressure but hold position when you change eyepieces or the wind picks up.

Credit: first uploaded on the English-speaking Wikipedia under the same filename
Bearings and Materials
- Altitude bearings: Large-diameter circles or semicircles attached to the tube cradle the optical tube. Bigger bearings generally produce smoother, more stable motion and make balance less sensitive to accessory weight.
- Azimuth bearing: The base rotates on pads (often PTFE/Teflon) against a surface (such as a laminate). A well-matched combination yields low stiction and smooth tracking.
- Base materials: Plywood or particle board are common. Plywood tends to be lighter and more durable when sealed; particle board is economical but heavier and more sensitive to moisture.
Balance and Friction Control
Dobsonians must remain balanced as you add accessories. Some designs use adjustable altitude bearings, spring tensioners, or friction knobs to maintain balance when you switch between a light Plössl and a heavy wide-field eyepiece plus finder. Ideally, your scope should not drift when you let go after a gentle nudge.
Push-to vs GoTo on a Dob
- Classic manual Dob: Pure star-hopping. Teaches the sky; requires a finder and patience.
- Push-to (digital setting circles): Encoders read the telescope’s angle and provide arrows on a handset or app. You push the scope to the target—fast and power-efficient.
- GoTo: Motors slew the telescope automatically to selected targets. Great for outreach and busy observing sessions; adds weight, cost, complexity, and power needs.
For most beginners who enjoy learning the sky, push-to offers a sweet compromise. You keep the simplicity of a Dob while gaining the ability to land faint objects quickly. For more on upgrades, see Smart Upgrades.
Collimation, Cooling, and Optical Performance
Newtonian reflectors reward you when their mirrors are aligned and at thermal equilibrium. Even a premium mirror underperforms if it’s out of collimation or 5–10 °C warmer than the air.
Collimation Tools and Methods
- Collimation cap: A simple peep-hole cap that ships with many scopes. Effective and inexpensive.
- Cheshire/sight tube: Combines centering and tilt adjustments with clear visuals of mirror alignment.
- Laser collimator: Quick for tilt adjustments, but quality and calibration matter. A Barlowed laser technique helps align the primary accurately.

Artist: Morn
Basic steps (always follow your manufacturer’s manual):
- Center and rotate the secondary: Using a sight tube, ensure the secondary appears centered under the focuser and circular.
- Secondary tilt: Adjust screws to aim the secondary so the focuser’s sight returns centered on the primary’s center mark.
- Primary tilt: Using a Cheshire or Barlowed laser, adjust the primary mirror’s collimation knobs to center the donut reflection or laser shadow in the reference circle.
At f/5 and faster, collimation tolerance tightens, so check it each time you set up. Slower systems are more forgiving but still benefit from periodic verification.
Cooling and Thermal Management
- Fans: A small rear-mounted fan speeds mirror cool-down. Run it at low speed during early observing to reduce tube currents.
- Ventilation: Open mirror cells and truss designs shed heat faster; solid tubes benefit from passive cooling time.
- Acclimation: Allow 30–60 minutes for moderate temperature deltas; longer if bringing a warm scope into a cold night.
The payoff is crisp high-magnification views and tighter star images. If your planetary view looks mushy, verify collimation and let the scope cool before blaming the optics.
Essential Eyepieces and Accessories for Dobsonian Owners
Dobsonians are compatible with a vast universe of eyepieces and accessories. A minimal yet effective kit can start small and grow with your interests.
Core Eyepiece Set
- Low-power wide-field (e.g., 25–32 mm): For sweeping the Milky Way and framing large nebulae. Choose an apparent field of 50–70° depending on budget.
- Medium power (e.g., 12–14 mm): The workhorse for many galaxies and globular clusters.
- High power (e.g., 5–7 mm): For lunar/planetary and close double stars when seeing allows.
If your Dob is f/5 or faster, higher-quality eyepieces better control off-axis aberrations. That said, many mid-range eyepieces perform admirably, especially at medium and high powers where the field is narrower.
Barlow and Zoom Options
- Barlow lens (2× or 1.5–2× modular): Doubles your eyepiece collection and can improve edge correction at fast focal ratios.
- Zoom eyepiece: Convenient for dialing in magnification on planets or variable seeing. Pair with a Barlow for higher ranges.
Finders and Aiming Aids
- Red-dot finder (RDF): Lightweight and intuitive; great for initial pointing.
- Telrad/Reflex finder: Projects concentric circles; powerful for star-hopping with charts.
- RACI finder (Right-Angle Correct-Image): Comfortable, correct orientation for fine star-hops; pairs well with a reflex finder.
Filters That Make a Difference
- UHC or narrowband nebula filter: Boosts contrast on emission nebulae (e.g., Orion, Lagoon) by passing key wavelengths.
- O III filter: Very effective on planetary nebulae and supernova remnants (e.g., the Veil) under dark skies.
- Neutral-density or polarizing filter: Tames lunar glare for comfortable viewing.
Filters won’t help galaxies much; those are broadband targets. For galaxies, dark skies and site selection matter most.
Comfort and Practicalities
- Observing chair: Sitting steadies your view, revealing more detail.
- Dew control: Dew shields, gentle heat for secondary and eyepieces in humid climates.
- Red light and charts: Preserve night vision and facilitate star-hopping.
Portability, Storage, and Observing Sites
Selecting the right Dobsonian isn’t only about optics. How you move, store, and deploy your telescope can determine how often you use it. A slightly smaller scope used frequently beats a giant that rarely leaves the closet.
Weight and Handling
- Two-piece carry: Most solid-tube Dobs split into tube and base. Test-lift both. If either feels marginal at home, it will feel heavier at midnight.
- Vehicles: Measure trunk/hatch openings and back seats. Solid tubes longer than ~1.2–1.5 m can be awkward in compact cars.
- Dollies and straps: Hand trucks, rolling bases, and lifting straps can turn a heavy scope into an easy one.

Artist: Wutthichai Charoenburi
Storage Environment
- Dry and stable: Avoid damp basements or unsealed sheds. Moisture and temperature extremes can swell particle board and encourage corrosion or fungus.
- Dust control: Cap both ends of the tube and use a breathable cover. Keep the focuser racked in.
- Quick access: Storing near an exit makes spontaneous sessions feasible. Convenience boosts use.
Observing Sites and the Bortle Scale
Light pollution dramatically limits faint galaxy and nebula visibility. The Bortle scale categorizes sky darkness from 1 (pristine dark) to 9 (inner city). Under Bortle 7–9 skies, galaxies look dim and small; under Bortle 3–4, they show more structure; under Bortle 1–2, they can be breathtaking even in a modest aperture. If possible, plan periodic trips to darker sites—your Dobsonian will feel like it has doubled in size.
Step-by-Step: From Unboxing to First Light
Here’s a practical workflow to get you observing quickly and confidently the first night. Keep your manual handy for model-specific details.
Assembly
- Unpack and inventory all parts. Assemble the base on a flat surface, tightening hardware snugly without over-torquing.
- Place the tube on the altitude bearings. Install the finder(s) and attach the focuser accessories.
- Check for smooth motion in altitude and azimuth. Adjust tension or bearing spacing if needed for silky travel with no wobble.
Daytime Quick Checks
- Perform a rough collimation with a cap or Cheshire.
- Align the finder to the main scope by focusing on a distant terrestrial object.
- Familiarize yourself with the eyepiece parfocal positions and focuser travel.
First Light Routine
- Set the base on level, firm ground with a wide, comfortable stance.
- Allow the scope to acclimate for 30–60 minutes. Run the primary fan on low if available.
- Re-check primary tilt if the temperature has dropped significantly.
- Start with a low-power eyepiece (e.g., 25–32 mm). Center a bright star and focus carefully.
- Star-hop to an easy, bright target such as the Moon, the Pleiades (M45), or the Orion Nebula (M42) if in season.
- Experiment with a medium-power eyepiece for detail. On the Moon or planets, try high power if the image remains steady.

Artist: NASA, ESA, M. Robberto (Space Telescope Science Institute/ESA) and the Hubble Space Telescope Orion Treasury Project Team
Keep a simple observing log. Noting conditions and equipment helps you learn faster and plan future sessions.
Date & Time: 2026-01-15, 21:00–23:00 local
Location: Suburban backyard (Bortle 6)
Seeing: 3/5   Transparency: 3/5   Temperature: 5 °C
Telescope: 8" f/6 Dobsonian
Eyepieces: 30 mm (40×), 12 mm (100×), 6 mm (200×)
Filters: UHC (nebula)

Targets:
1) M42 (Orion Nebula): Bright core; wings visible; UHC improves contrast.
2) M45 (Pleiades): Wide field; faint nebulosity suspected with averted vision.
3) Jupiter: Two main belts; hints of festoons at 200× when seeing steadies.
4) M31 (Andromeda): Core bright; M32 stellar-like; M110 faint extended glow.

Notes: Collimation checked; fan on low for first hour. Eyepieces dew-free.
Smart Upgrades: Push-to, Digital Setting Circles, and EAA
Once you’ve mastered the basics, a few targeted upgrades can broaden your observing options without sacrificing Dobsonian simplicity.
Push-to and Digital Setting Circles (DSC)
Adding encoders to the altitude and azimuth axes, paired with a handheld or smartphone-based database, lets you select a target and then follow on-screen arrows to center it. Advantages include:
- No motors or heavy batteries; low power draw
- Quick acquisition of faint targets otherwise difficult to star-hop
- Preservation of the classic Dob experience and tactile control
GoTo Dobsonians
Fully motorized Dobsonians can align on a few stars, then slew automatically. This is excellent for outreach and for observers who want to see many objects quickly. Trade-offs include higher cost, more weight, reliance on power, and a taller learning curve for setup. If this appeals, be sure the base still offers smooth manual motion and that transport remains practical for you.
Coma Correctors
For fast systems (around f/5 and faster), a coma corrector can sharpen star images toward the edge of wide fields. If you love sweeping the Milky Way with ultra-wide eyepieces, this is one of the most impactful optical upgrades you can make.
Electronic Assisted Astronomy (EAA)
EAA uses a sensitive camera and live-stacking software to enhance faint objects in real time. On a Dobsonian’s alt-az mount, exposures must be short to minimize field rotation, but modern software can stack many short frames to reveal color and structure that the eye can’t perceive directly. Keep expectations clear: EAA complements visual astronomy rather than replacing it, and requires a laptop or dedicated device at the scope.
Maintenance, Mirror Care, and Safety Tips
A little maintenance keeps your Dobsonian delivering peak performance for years. Mirrors are robust but prefer a gentle touch.
Cleaning Optics
- Frequency: Clean mirrors only when necessary—dust rarely harms views. Over-cleaning risks scratches.
- Dry dusting: Use a blower to remove loose particles. Avoid wiping dry dust across coatings.
- Wet cleaning: If needed, remove the primary carefully, rinse with clean water, and follow with distilled water. A drop of mild dish soap in water can help. Use surgical cotton or clean fingertips under water with minimal pressure. Let air-dry on edge; avoid wiping if possible.
Always consult your telescope’s manual for model-specific guidance. Secondary mirrors can usually be cleaned in place with great care, but many observers prefer to leave them alone unless visibly dirty.
Mechanical Care
- Keep bearings free of grit. Replace worn pads if motion becomes sticky.
- Tighten loose screws periodically, especially on the focuser, finders, and altitude bearings.
- Seal exposed particle board edges with appropriate finishes to resist moisture if your base is not already sealed.
Safety Essentials
- Never point at the Sun without a proper front-aperture solar filter. Eyepiece “solar filters” that screw into the eyepiece are unsafe.
- Use a red light at night to preserve night vision; avoid tripping hazards by organizing cables and gear.
- Dress for the weather; cold impacts comfort and concentration long before it harms equipment.
Frequently Asked Questions
Do I need tracking or GoTo for planetary observing?
Not necessarily. Manual tracking on a Dob is intuitive at high magnification once you get used to the push-and-glide motion. A comfortable observing chair helps steady your hand. Tracking (via equatorial platforms or motorized GoTo Dobs) adds convenience for long planetary sessions or sketching, but isn’t required for excellent views. Good collimation and cooling plus steady seeing matter more.
How often should I collimate my Dobsonian?
Check collimation each time you observe, especially with fast focal ratios (f/5 and faster) or after transporting the telescope. Minor touch-ups take only a minute with practice. Slower scopes may hold alignment well for several sessions, but it’s still good habit to verify quickly before pushing to high power.
Final Thoughts on Choosing the Right Dobsonian Telescope
A Dobsonian telescope offers a rare blend of performance, simplicity, and value. If you prioritize visual observing and want the most sky for your budget, a Dob is hard to beat. Match the scope to your life: a 6-inch for low cost and grab-and-go convenience; an 8-inch as the versatile sweet spot for many beginners; a 10-inch for those ready to handle more weight in exchange for deeper reach. Consider focal ratio, required collimation precision, and how you’ll store and transport the telescope. Build a small, thoughtful kit of eyepieces and accessories, and practice under the stars. With time, your skills will improve and the sky will open up—one nudge at a time.
If you found this guide helpful, explore our other observing resources and consider subscribing to our newsletter for future deep dives into gear, techniques, and night-sky highlights.