Table of Contents
- What Is Backyard Deep-Sky Astrophotography?
- Planning, Bortle Scale, and Weather Windows
- Essential Gear: Mounts, Optics, Cameras, and Filters
- Accurate Polar Alignment: Methods That Work
- Critical Focus and Framing Techniques
- Tracking and Guiding: Getting Round Stars at Long Exposures
- Exposure Strategy: Gain/ISO, Sub Length, and SNR
- Calibration Frames: Darks, Bias, Flats, and Dark Flats
- Stacking and Processing: From RAW Lights to a Clean Master
- Narrowband Imaging Under Heavy Light Pollution
- Wide-Field vs Long Focal Length: Choose the Right Target
- Troubleshooting Common Imaging Problems
- Safety, Etiquette, and Responsible Light Use
- Frequently Asked Questions
- Final Thoughts on Choosing the Right Backyard Astrophotography Setup
What Is Backyard Deep-Sky Astrophotography?
Backyard deep-sky astrophotography is the art and science of capturing faint celestial objects—nebulae, galaxies, star clusters—from everyday locations, including suburban and urban yards. Compared to planetary imaging, which relies on short, high-speed video frames and lucky imaging of bright targets, deep-sky work depends on long exposures, precise tracking, careful calibration, and image stacking to boost the signal from dim objects above noise and light pollution.
At its core, deep-sky imaging balances three pillars:
- Signal: Photons from the target collected over time.
- Noise: Read noise, thermal noise, sky glow, and pattern noise.
- Resolution: Determined by seeing conditions, optics, and pixel scale.
Because faint nebulae and galaxies are often many magnitudes dimmer than stars, a single long exposure rarely looks impressive straight out of the camera. Instead, you collect many “sub-exposures” (subs) and combine them. Stacking improves the signal-to-noise ratio (SNR) roughly by the square root of the number of frames, so quadrupling your total number of subs approximately doubles SNR, all else equal. That statistical edge is why consistent acquisition, good polar alignment, steady guiding, and rigorous calibration matter.
While pristine dark-sky sites are ideal, modern sensors, careful technique, and targeted filters enable excellent results from light-polluted backyards. Strategic planning around the Moon, clouds, and target altitude can turn a weeknight session into a publishable image.
Planning, Bortle Scale, and Weather Windows
Planning turns uncertainty into predictable success. Even with basic gear, knowing when and where to point the telescope—and how local conditions affect data—makes a bigger difference than most upgrades.
Understand the Bortle Scale
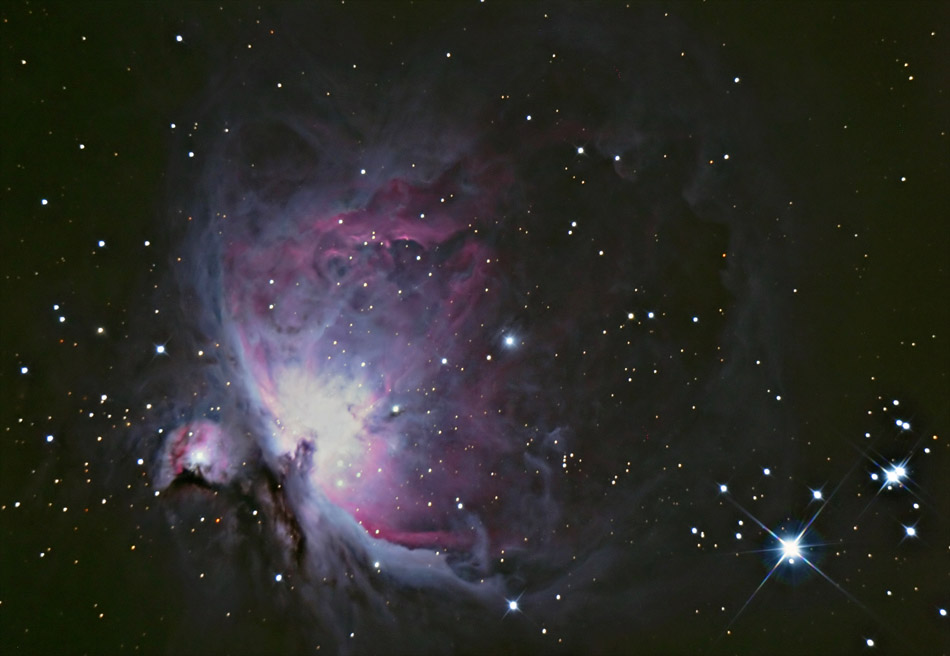
The Bortle scale classifies sky brightness from Class 1 (pristine dark) to Class 9 (inner-city). In brighter skies, gradients are stronger, background noise is higher, and faint outer galaxy halos or dark nebulae are harder to extract. Nonetheless, bright emission objects such as the Orion Nebula (M42), Lagoon Nebula (M8), or North America Nebula (NGC 7000) can still be imaged effectively, especially with narrowband or dual-band filters.
- Bortle 7–9 (urban): Favor bright emission nebulae with narrowband/dual-band filters.
- Bortle 5–6 (suburban): Emission targets excel; brighter galaxies and clusters are feasible.
- Bortle 3–4 (rural): Most targets work; broadband imaging is productive.
Moon Phase and Altitude
The Moon is a natural light source that raises background sky brightness, especially near full phase. Plan broadband targets (galaxies, reflection nebulae) near new Moon. During brighter phases, focus on narrowband-friendly emission targets or image when the Moon is below the horizon.
Altitude matters: higher in the sky means less atmospheric path length, better seeing on average, and reduced extinction. Try to image targets when they are near the meridian (highest point) to minimize gradients and maximize detail.
Seasonality and Timing
Different constellations dominate different seasons. Winter favors Orion and Canis Major; spring showcases galaxies in Virgo and Leo; summer features the Milky Way’s rich nebulae; autumn brings the Andromeda Galaxy high at night. Align your gear choices with the season’s targets: wider fields for large nebulae, longer focal lengths for spring galaxies.
Field of View and Composition
Use a field-of-view calculator to match your sensor and focal length to a target’s apparent size. For instance, the Andromeda Galaxy (M31) spans several degrees including its outer halo—better suited to short focal lengths—while small galaxies or planetary nebulae benefit from longer focal lengths. During planning, consider framing with star fields, dust lanes, and orientation to avoid bright gradients from nearby city lights.
Good planning reduces the burden on processing. It also informs whether you’ll lean more on narrowband imaging or broadband approaches for the night’s conditions.
Essential Gear: Mounts, Optics, Cameras, and Filters
In deep-sky work, the mount is the foundation. Optics, cameras, and filters matter, but none can compensate for a mount that can’t track smoothly or handle the payload. Build your kit around stability and repeatability.
Mounts: The Bedrock
- Equatorial mounts (GEMs) track Earth’s rotation with a single motor axis, minimizing field rotation during long exposures. They are the standard for deep-sky work.

Equatorial mount for low price telescopes Image by Negadrive. - Star trackers are compact, weight-limited equatorial devices that pair well with camera lenses and short refractors. You can start here for wide-field imaging.
- Payload and balance: Stay comfortably under the mount’s stated capacity for imaging. Balance RA and DEC axes with slight “east heavy” bias in RA to keep gears meshed during tracking.
- Periodic error is a mechanical imperfection that repeats with the worm gear cycle. Guiding can correct much of it. Some mounts support periodic error correction (PEC), which you can record and play back.
Optics: Telescopes and Lenses
- Small apochromatic refractors (e.g., 60–100 mm aperture, f/4–f/7) are a favorite: sharp, low maintenance, and forgiving of seeing and tracking errors. Field flatteners may be needed for edge-to-edge star shapes.
- Camera lenses (e.g., 50–200 mm) deliver sweeping Milky Way fields and are ideal on trackers. Stopping down 1–2 stops often improves star shapes.
- Reflectors and catadioptrics provide longer focal lengths for small targets. They demand tighter focusing, better guiding, and careful collimation.
- Focal ratio and speed: For extended objects, faster systems (lower f-number) collect the target’s surface brightness more quickly per unit exposure. This is why f/4–f/5 refractors are so popular for emission nebulae.
Cameras: DSLR/Mirrorless vs. Cooled Astro Cameras
- DSLR and mirrorless cameras are accessible and versatile. Many modern sensors are “ISO-invariant” over a range (you can adjust brightness in processing with similar noise impact). Astrophotography benefits from RAW capture and long-exposure noise reduction turned off.
- Dedicated cooled CMOS cameras regulate sensor temperature, reducing thermal noise and improving calibration frame matching. Monochrome versions paired with filters deliver maximal flexibility and efficiency, especially for narrowband imaging.
- Sensor size and pixel pitch: Larger sensors capture wider fields, but demand better corrected optics. Pixel size and focal length together set the pixel scale (arcseconds per pixel), which should be matched to typical seeing conditions in your area to avoid over- or under-sampling.
Filters: Managing Light Pollution and Enhancing Signal
- Broadband UV/IR cut: Provides proper color balance and star shapes for refractors that are corrected in the visible but not in IR.
- Light pollution reduction filters can suppress certain emission lines from artificial lights. Their effectiveness varies with local lighting types and may not help with modern broad-spectrum LEDs.
- Dual-band and tri-band filters (e.g., H-alpha + OIII, sometimes SII) are excellent for emission nebulae with one-shot color cameras under heavy light pollution.
- Monochrome + narrowband (Hα, OIII, SII) excels in urban settings and under bright Moon, isolating emission lines and rejecting most sky glow.
Choose gear that suits your sky brightness, portability needs, and targets. A well-matched starter setup—small apochromatic refractor, solid equatorial mount, and a DSLR or cooled color camera—can produce superb results from a backyard.
Accurate Polar Alignment: Methods That Work
Polar alignment aligns your mount’s right ascension (RA) axis with Earth’s rotational axis, allowing accurate tracking without field rotation. Good polar alignment reduces star trailing, guiding corrections, and elongated stars, especially in long exposures and at longer focal lengths.
Polar Scope and Star Pattern
Many mounts include a polar scope with a reticle that shows the offset position of Polaris (Northern Hemisphere) or the appropriate reference asterisms (Southern Hemisphere). Use a planetarium app to find the current hour-angle position of Polaris and place it accordingly on the reticle. Re-check after tightening everything down; small shifts can occur.
Iterative and Drift Alignment
- Iterative alignment involves slewing to a star, centering it, and correcting mount alignment errors in steps until the star stays centered across axes. It takes time but converges well.
- Drift alignment refines polar alignment by observing drift in declination when the mount tracks at sidereal rate. Adjust the mount altitude and azimuth until drift is minimized. It’s more precise but needs patience and a crosshair eyepiece or camera software.
Electronic Assistance
Several capture or guiding tools provide assisted polar alignment routines using plate solving and on-screen adjustments. Whether you use a polar scope or software-assisted method, aim for alignment error small enough that guiding corrections remain minor over your sub-exposure length. High-precision alignment pays dividends in guiding performance and reduces field rotation in long sequences.
Tip: Do polar alignment before balancing and final cable routing so you can nudge the tripod and adjust bolts without snagging wires. After alignment, re-check balance and cable slack.
Critical Focus and Framing Techniques
Sharp stars and well-composed frames separate polished astrophotography from snapshots. Focus drifts with temperature, and framing changes as your target rises and rotates relative to your camera’s orientation. Take a few minutes to nail both.
Achieving Critical Focus
- Bahtinov masks create diffraction spikes. Focus by centering the central spike between the two outer spikes on a bright star.

Example diffraction patterns produced by Bahtinov mask Image by Axleottal. - Live view magnification (for DSLR/mirrorless) or focusing aids in capture software let you watch star size (FWHM or HFR) as you tweak focus. Aim for the smallest, tightest star profile.
- Temperature drift can shift focus over hours. Check focus after significant temperature changes or mid-session meridian flips.
- Motorized focusers with temperature compensation help maintain critical focus and can autofocus using star-size metrics.
Framing and Rotation
Composition matters even in science-inspired photography. Use a planetarium or capture program to simulate framing with your camera sensor and focal length. Consider where bright stars fall in the frame and rotate the camera to avoid diagonal gradients or overlapping diffraction spikes.
Before committing to a long run, take a short exposure and check for vignetting, tilt-induced star elongation in the corners, and any nearby light sources leaking into the frame. If your target is near the horizon, be aware that field rotation relative to your camera can change over time on alt-az mounts; equatorial mounts largely eliminate this issue for long exposures if polar aligned well.
Tracking and Guiding: Getting Round Stars at Long Exposures
Guiding uses a second camera and optics—or an off-axis pick-off—to measure star motion and nudge the mount during the exposure. It corrects periodic error, gear imperfections, and minor polar alignment errors. Good guiding maximizes usable exposure length and preserves round stars across the frame.
Guide Scope vs. Off-Axis Guider (OAG)
- Guide scope: A small refractor paired with a guide camera. It’s simple and works well at short to moderate focal lengths. Beware of differential flexure—motion between your main scope and guide scope—that can blur long exposures.
- OAG: A prism sits in the main optical path and feeds a guide camera. It eliminates flexure but demands precise backfocus spacing and may require a more sensitive guide camera to find stars in narrow fields.
Guiding Calibration and Settings
Before a session, calibrate your guiding software near the celestial equator and meridian where mount motion is most orthogonal. Use appropriate exposure times on the guide camera to average out seeing (often in the 1–3 second range), and tune aggressiveness and backlash compensation as needed. If your mount supports it, enable periodic error correction in tandem with guiding.
Dithering for Cleaner Stacks
Dithering intentionally shifts the pointing slightly between subs. This smears out fixed pattern noise and helps stacking algorithms reject hot pixels, banding, and walking noise. Set it to occur every 1–3 frames depending on sub length and mount settle time. Dithering is especially effective in combination with calibration frames.
Practical Exposure Lengths
- Unguided star trackers: Expect 15–60 second subs at short focal lengths (e.g., 50–135 mm) with careful polar alignment. Pixel scale and mount quality matter.
- Guided equatorial mounts: 120–300 second subs are common for color cameras. Narrowband with mono cameras often uses 180–600 seconds per filter, depending on sky brightness and target signal.
Longer isn’t always better; balance sub length with sky brightness and read noise as discussed in Exposure Strategy.
Exposure Strategy: Gain/ISO, Sub Length, and SNR
How long should each sub be? Which gain or ISO? How many subs? These choices balance sky brightness, camera noise, guiding, and target surface brightness.
ISO and Gain Basics
- DSLR/mirrorless ISO controls the digital amplification applied to the signal before it’s written to RAW. Many modern sensors are roughly ISO-invariant over a wide range, so pushing exposure in processing has similar noise impact to raising ISO in capture, within reason.
- Dedicated CMOS camera gain adjusts upstream amplification, often affecting read noise and dynamic range. Many cameras have a “unity gain” where one electron corresponds to one analog-to-digital unit; this is often a practical starting point.
Sub Length: Swamp the Read Noise
A common rule is to expose long enough that the sky background signal dominates over read noise by a comfortable margin. In practice, a back-of-camera histogram showing the peak separated from the left edge can indicate the sky background has risen above read noise. Exact values vary with sky brightness, filter bandwidth, and camera; test exposures are your friend.
When sky brightness is high (urban broadband), shorter subs can prevent clipping the background while maintaining dynamic range for bright stars. Under narrowband or darker skies, longer subs are often productive. If guiding is marginal, more shorter subs can be better than fewer longer ones.
How Many Subs? The SNR Math
Stacking N subs improves SNR by roughly sqrt(N), assuming consistent exposures and calibration. That means 4× the number of subs doubles the SNR. The total integration time (sub length × number of subs) is king: more total photons equals cleaner data. Prioritize capturing as much total exposure time as your conditions and schedule allow.
Dynamic Range vs. Noise
Higher gain/ISO reduces read noise but can sacrifice dynamic range, blooming bright star cores and losing highlights in bright nebula regions. If your target has both bright cores and faint outskirts (e.g., Orion’s Trapezium region in M42), consider high-dynamic range imaging with mixed sub lengths (short and long) blended in processing.
Guideline: Aim for a sky background ADU that is safely above read noise but below 30–50% of full well for broadband. For narrowband, longer subs may be needed to reach that background level at all.
Calibration Frames: Darks, Bias, Flats, and Dark Flats
Calibration frames reveal and remove systematic noise and optical artifacts: hot pixels, amp glow, vignetting, dust shadows, and pattern noise. Well-captured calibration can make as much difference as hours of extra exposure.
Dark Frames
- Same exposure length, gain/ISO, and temperature as lights, with the shutter closed or lens capped.
- Capture a library (e.g., 20–50 frames) and integrate into a master dark. Temperature-matched darks are especially important for uncooled cameras where sensor heat varies with ambient conditions.
Bias Frames
- Shortest possible exposures at the same gain/ISO as lights, with the shutter closed or lens capped.
- Capture 50–100; combine into a master bias. Some modern cameras have very low bias structure, but bias frames still help model read noise and offsets.
Flat Frames
- Short exposures at a modest brightness that reveal vignetting and dust shadows. Keep histogram roughly centered without clipping.
- Don’t change focus, orientation, or filter after your lights; flats must match the optical configuration. Capture 20–40 and integrate into a master flat.
- Flat sources: flat panel, evenly illuminated white screen, or twilight sky (t-shirt method over the aperture).
Dark Flats (or Flat Darks)
- Same exposure length and gain/ISO as your flats, but in darkness. They calibrate the flats, especially when bias frames don’t match the behavior of short flat exposures.
Whether to use bias + flats or dark flats + flats depends on your camera’s behavior; test both approaches and inspect results for residual patterns or gradients.
Stacking and Processing: From RAW Lights to a Clean Master
Processing transforms a pile of noisy frames into a clean, detailed image. The general pipeline is consistent across tools, whether you use open-source or commercial software.
Core Steps
- Ingest and sorting: Organize by session, target, and frame type (lights, darks, flats, bias). Discard obvious outliers (clouds, bumps, trailed stars).
- Calibration: Subtract master bias/dark and divide by master flat (or calibrate flats with dark flats first). This removes fixed patterns and optical artifacts.
- Registration (alignment): Star-align all lights to a reference frame. Sub-pixel alignment helps preserve detail.
- Integration (stacking): Combine registered lights with robust rejection (e.g., sigma-clipping) to eliminate remaining outliers like planes and satellites. Output a linear master.
- Background extraction: Remove gradients with a gradient model or background neutralization tool. Avoid sampling bright nebula regions as background.
- Color calibration: Set white balance using stars or photometric methods, ensuring realistic colors.
- Nonlinear stretch: Gradually stretch the histogram (e.g., curves, arcsinh) to reveal faint structures without blowing out highlights.
- Noise reduction: Apply early in the nonlinear stage with detail-preserving methods. Multiple light passes are often better than one heavy pass.
- Contrast and color refinement: Use local contrast, saturation, and star reduction to shape the final look.
Software Options
- Popular stacking and processing workflows are available across platforms. Many astrophotographers use a combination of dedicated stacking tools and general image editors.
- Open-source software can handle calibration, stacking, and part of processing pipelines. Specialized commercial tools offer advanced features but have learning curves.
Example Session Notes
# Capture checklist (example)
- Polar alignment verified
- Focus locked (Bahtinov mask, HFR logged)
- Guiding calibrated and dithering enabled every 2–3 frames
- Flats plan: capture before teardown
- Target: Emission nebula, dual-band filter
- Sub length: 180 s, total goal: 3 h (60 subs)
As you process, refer back to your choices in Exposure Strategy and Calibration Frames to understand noise sources and how to counter them. Don’t rush the nonlinear stretch; incremental adjustments with frequent inspection at 100% scale keep stars tight and colors balanced.
Narrowband Imaging Under Heavy Light Pollution
Narrowband imaging isolates specific emission lines—commonly hydrogen-alpha (Hα), oxygen-III (OIII), and sulfur-II (SII)—through very narrow filters. This approach rejects most broadband sky glow and is particularly effective under urban skies or during bright Moon phases.

One-Shot Color with Dual-Band Filters
Dual-band or multi-band filters pass Hα and OIII simultaneously (sometimes SII as well). With a color camera, these filters allow emission nebula imaging with reduced gradients. They are less effective for broadband targets like galaxies, which emit light across the visible spectrum rather than in narrow lines.
Monochrome Cameras and Filter Wheels
Monochrome sensors paired with individual narrowband filters capture each emission line separately, offering higher signal efficiency and control over channel blending. This enables creative compositions (e.g., Hubble palette) and scientific insight into ionization structures. Under poor skies, narrower bandwidths (e.g., 3–7 nm) further suppress unwanted light but demand longer exposures and careful guiding.
Color Mapping and Blends
- HOO: Map Hα to red, OIII to green and blue. Natural-looking cyan/teal oxygen regions and red hydrogen structures.
- SHO (Hubble palette): SII→R, Hα→G, OIII→B. Requires channel balancing to taste.
- For dual-band color data, extract Hα and OIII contributions from the color channels before recombining with targeted stretches and noise reduction.
Narrowband won’t fix tracking or focus issues, but it makes data collection productive under skies where broadband would struggle. Combine narrowband practices with solid polar alignment and calibration for the best outcomes.
Wide-Field vs Long Focal Length: Choose the Right Target
Matching focal length and pixel scale to your target and seeing conditions is critical. Urban and suburban seeing often limits practical resolution, so chasing ultra-long focal length detail can be frustrating without exceptionally stable nights and robust guiding.
Wide-Field Advantages
- Forgiving tracking: Short focal lengths are more tolerant of small guiding errors.
- Big, bright targets: Ideal for large nebulae and the Milky Way.

A cheap electric equatorial mount (aka “sky tracker”), model iOptron SkyTracker Pro, with a camera attached and a lens (Canon EOS R50 + Canon RF 100–400 mm F5.6–8 IS USM) Image by HiyoriX. - Faster systems: Many camera lenses and small refractors are fast, capturing extended emission efficiently.
Long Focal Length Use Cases
- Small targets: Planetary nebulae, small galaxies, globulars benefit from longer focal length.
- Seeing-limited resolution: On steady nights, longer focal length can resolve finer detail, but demands excellent guiding and focus.
- Backfocus and spacing: Flatteners and reducers require precise sensor spacing. Test with star shape inspection in the corners to diagnose tilt or spacing errors.
If you’re just starting, a wide-field setup on a capable mount will usually deliver faster, more consistent success—and breathtaking images—from your backyard.
Troubleshooting Common Imaging Problems
Even experienced imagers run into issues. A structured approach to trouble-shooting saves nights and preserves data quality.
Elongated Stars
- Tracking errors: Check polar alignment (see Accurate Polar Alignment), guiding parameters, and balance. Inspect RA vs. DEC errors.
- Differential flexure: If using a guide scope, consider stiffening connections or switching to an OAG.
- Field curvature/tilt: Corner-only elongation often points to optical issues or sensor tilt. Evaluate flattener spacing and tilt adapters.
Walking Noise and Banding
- Insufficient dithering: Increase dither amplitude and frequency (see Tracking and Guiding).
- Calibration mismatches: Ensure temperature and exposure match for darks; use dark flats if bias doesn’t model very short flats well.
Dew and Frost
- Dew heaters and shields: Use controlled heat to keep lenses and correctors clear.
- Acclimation: Allow gear to reach ambient temperature before critical focusing; warm surfaces are dew magnets.
Gradients and Color Casts
- Stray light: Shield from streetlights; adjust framing to avoid direct glare.
- Gradient removal: Use background extraction tools carefully, sampling true background regions.
- Color balance: Calibrate using star colors or photometric routines after gradient removal.
Star Bloat and Halos
- Focus and seeing: Refocus after temperature changes. Poor seeing naturally swells star profiles.
- Filters and optics: Some filters can cause halos around bright stars; adjust processing to tame halos or consider alternate coatings.
Guiding Won’t Settle
- Cable drag: Reroute and secure cables to avoid tugging.
- Balance: Slightly bias RA east-heavy; ensure DEC is neutrally balanced and backlash minimized.
- Calibration: Recalibrate near the meridian/equator; ensure guide scope focus and guide star SNR are good.
Safety, Etiquette, and Responsible Light Use
Backyard astrophotography happens close to homes, neighbors, and shared spaces. A few considerations keep your sessions safe and neighbor-friendly.
- Trip hazards: Keep cables tidy, tape them down, and use soft red lights sparingly.
- Respect quiet hours: Mount motors and cooling fans are usually quiet, but be mindful.
- Light discipline: Shield laptop screens, avoid shining lights over fences. Offer to show neighbors a live view to build goodwill.
- Weather safety: Dew, frost, and humidity can soak electronics. Use covers and monitor forecasts. Don’t image in lightning risk or high winds.
These habits not only protect your gear but also uphold the spirit of shared skies in the community.
Frequently Asked Questions
How many sub-exposures do I need?
There’s no single number. Aim for as much total integration time as your conditions allow. Because SNR scales roughly as the square root of the number of subs, doubling total time increases SNR by about 1.4×. In practice, a few hours for bright emission nebulae with dual-band filters can produce strong results from suburban skies, while broadband galaxies under brighter skies may need several nights to accumulate sufficient depth.
What ISO is best for a DSLR?
Modern DSLRs and mirrorless cameras are often close to ISO-invariant across a useful range. Many astrophotographers select a mid-to-high ISO that keeps read noise reasonable without clipping highlights—often in the ISO 400–1600 range, depending on the specific sensor and sky brightness. Test at your location: expose so the sky background peak is separated from the left edge of the histogram without saturating star cores, and keep RAW-based long-exposure noise reduction off so you can calibrate with darks and bias in stacking.
Final Thoughts on Choosing the Right Backyard Astrophotography Setup
Success in backyard deep-sky astrophotography comes from a chain of good decisions rather than a single magic component. A stable equatorial mount, a modest and well-corrected optic, and a camera you know how to operate—guided by careful planning, solid polar alignment, accurate focus, thoughtful exposure strategy, and rigorous calibration—will outperform a fancier but poorly integrated setup. Under light pollution, narrowband and dual-band filters open the door to emission targets all year, while broadband work still shines with patient integration and diligent gradient control.

The system is powered by an ALLWEI 256 Wh lithium iron phosphate battery set up below the tripod, which is lit up in red by the mount’s power adapter. In the background is a wagon filled with extra accessories and the west facade of Memorial Library at UW-Madison. Image by Brainandforce.
Start simple, collect lots of quality data, and refine one variable at a time. As your skills grow, consider incremental upgrades: better mount guiding, motorized focusing, improved filters, or a cooled camera. Above all, keep observing and iterating—clear nights are precious, and every session teaches something new.
If you found this guide helpful, explore more of our step-by-step workflows and target-specific planning articles, and subscribe to our newsletter for future astrophotography deep-dives, seasonal target picks, and gear tips.