8–10 Inch Dobsonian Telescopes: A Complete Guide
An authoritative, practical handbook for choosing, using, and upgrading mid-aperture Dobsonian reflectors for visual astronomy under real skies.
Table of Contents
- What Is an 8–10 Inch Dobsonian Telescope?
- Aperture, Focal Ratio, and Optical Performance
- Dobsonian Mount Design: Alt-Az Simplicity and Upgrades
- Choosing Between 8-Inch and 10-Inch Apertures
- Eyepieces, Finders, and Essential Accessories
- Collimation, Cooling, and Mirror Care
- Observing Techniques: Tracking, Star-Hopping, and Sketching
- Light Pollution, Seeing, and Site Choice for Dobsonians
- Best Targets for 8–10 Inch Dobsonians by Season
- Can You Do Astrophotography with a Dobsonian?
- Buying Guide: New vs Used, Solid-Tube vs Truss, and Budget
- Frequently Asked Questions
- Final Thoughts on Choosing the Right Dobsonian Telescope
What Is an 8–10 Inch Dobsonian Telescope?
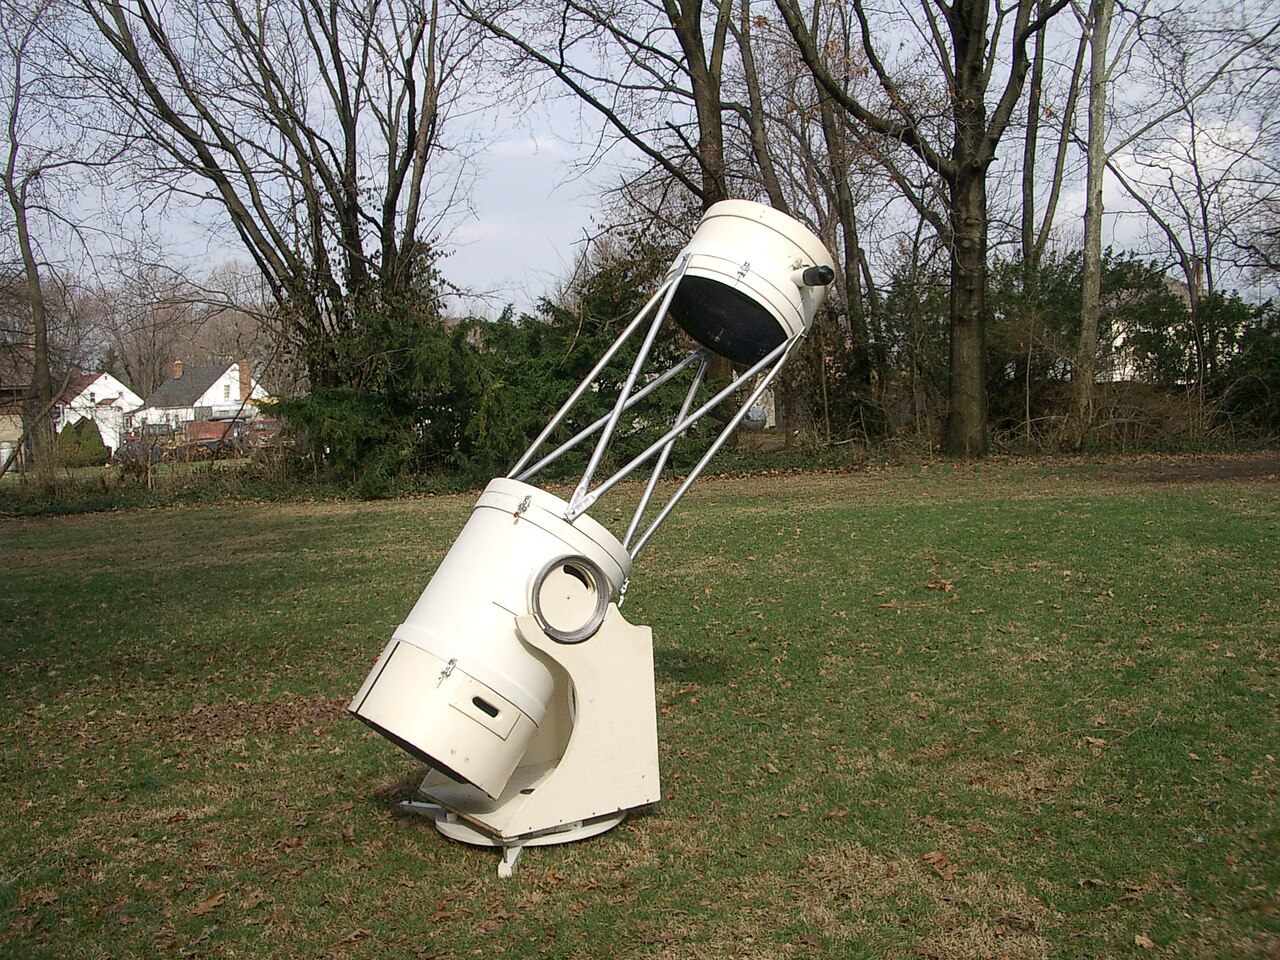
An 8–10 inch Dobsonian telescope is a Newtonian reflector mounted on a simple, ground-based alt-azimuth (alt-az) mount popularized by John Dobson. The optical tube houses a primary parabolic mirror 8 or 10 inches (about 200–250 mm) in diameter and a small flat secondary mirror that diverts the light cone to a side-mounted focuser. The Dobsonian mount supports the tube in altitude (up-down) and azimuth (left-right) with smooth, low-friction bearings.

These telescopes strike a sweet spot between portability and performance. An 8-inch reflector gathers enough light to reveal hundreds of deep-sky objects with real structure, while a 10-inch begins to make fainter galaxies and more subtle nebula detail accessible. Both apertures deliver crisp, contrasty lunar and planetary views when optics are well-collimated and seeing cooperates. Because the design is mechanically simple and mass-produced, price per inch of aperture is excellent compared to refractors or catadioptric designs.
In practice, most 8-inch Dobsonians are around f/6 (roughly 1200 mm focal length), and many 10-inch models are close to f/4.7–f/5 (say 1200–1250 mm). This balance keeps the tube length manageable while providing reasonably forgiving optical performance. If your search intent includes “best 8 inch Dobsonian for beginners” or “is a 10 inch Dobsonian worth it,” the rest of this guide will help you decide by comparing optical factors, mount mechanics, and accessories, and by exploring real-world observing in a variety of sky conditions.
Aperture, Focal Ratio, and Optical Performance
Understanding how aperture and focal ratio influence performance is the key to choosing between otherwise similar Dobsonians. The mirror diameter determines resolution and light grasp; focal length and focal ratio (f-number) influence image scale, field of view, and aberrations like coma.
Aperture: Light Grasp and Resolution
- Light grasp: Scales with the area of the primary mirror. A 10-inch mirror collects approximately (10/8)^2 ≈ 1.56 times as much light as an 8-inch, which is meaningful at the eyepiece for faint nebulae and galaxies.
- Resolution: Theoretical resolving power in arcseconds roughly follows Dawes’ limit: 4.56 arcseconds / aperture(inches). For 8 inches, ≈0.57″; for 10 inches, ≈0.46″. Atmospheric seeing usually limits sub-arcsecond resolution, but on steady nights the extra aperture reveals finer planetary and lunar detail.
Focal Ratio and Image Characteristics
The focal ratio is focal length divided by aperture (f/number). It shapes image scale, field of view (with given eyepieces), and how demanding the optics are on eyepiece designs:
- Typical values: 8-inch f/6 (1200 mm), 10-inch f/5 (1250 mm) or f/4.7 (~1200 mm).
- Field of view: At the same focal length, both 8-inch f/6 and 10-inch f/4.7 can produce very similar magnifications with the same eyepiece. True field depends on focal length and eyepiece field stop, not aperture per se.
- Coma: Newtonians exhibit off-axis coma that increases at faster focal ratios. Coma becomes more noticeable around f/5 and faster. Some observers add a coma corrector for wide-field, high-quality views, especially with 68–100° eyepieces.
- Exit pupil and brightness: Exit pupil (the beam of light exiting the eyepiece) controls perceived brightness of extended objects. It depends on focal ratio and eyepiece focal length.
Magnification (M)  = Telescope Focal Length / Eyepiece Focal Length
Exit Pupil (mm)    = Eyepiece Focal Length / f-ratio = Aperture (mm) / M
Approx. True FOV   = Eyepiece Apparent FOV / M (rough estimate)

Examples (8-inch f/6, 1200 mm focal length):
 - With a 30 mm eyepiece: M = 1200 / 30 = 40x; Exit Pupil = 30 / 6 = 5 mm
 - With a 10 mm eyepiece: M = 120x; Exit Pupil ≈ 1.7 mm

Examples (10-inch f/5, 1250 mm focal length):
 - With a 30 mm eyepiece: M ≈ 42x; Exit Pupil = 30 / 5 = 6 mm
 - With an 8 mm eyepiece: M ≈ 156x; Exit Pupil ≈ 1.6 mm
Optical Coatings and Reflectivity
Most commercial primary mirrors are aluminum-coated with a protective overcoat (often silicon dioxide). Standard coatings typically reflect around 88–92% per surface; enhanced aluminum can reach into the mid-90s. Newtonians have two mirrors, so cumulative throughput matters, but the Dobsonian’s generous aperture compensates. Clean, well-aligned optics do more for contrast than small differences in nominal reflectivity.
If you intend to push planetary magnification, prioritize mechanical stability and precise collimation over chasing minimal coating gains. For wide-field nebulae, optimizing exit pupil and using appropriate filters (see accessories) will make the largest difference.
Dobsonian Mount Design: Alt-Az Simplicity and Upgrades
The Dobsonian mount is celebrated for low cost, low weight, and smooth manual tracking. It’s essentially a lazy-susan-like azimuth bearing under a cradle that supports altitude bearings on the tube. When well-executed, it enables effortless “nudging” to follow objects at moderate to high power.

Bearings, Friction, and Balance
- Altitude bearings: Larger-diameter altitude bearings reduce sensitivity to balance changes caused by heavy eyepieces or finders. Tensioning springs, clutches, or friction pads help maintain smooth movement without drift.
- Azimuth bearings: Many bases use Teflon pads gliding on laminate for consistent motion. Some use roller or lazy-susan bearings; these can be very smooth but may need controlled friction to prevent overshoot.
- Balance: A Dobsonian should stay put when you remove your hands. If the front gets heavy (large eyepiece, coma corrector), add counterweights at the back, adjust spring tension, or raise bearing friction slightly.
Base Materials and Durability
Commercial bases are typically engineered wood such as particleboard or MDF with laminate surfaces. These work well but should be protected from moisture. Many users later replace the base with a lighter plywood design for improved rigidity and portability.
Push-To and Digital Setting Circles
Digital setting circles (DSCs) add encoders to your alt and azimuth axes, allowing you to use a handheld or app-based interface to guide manual slews to targets. This preserves the Dobsonian’s simplicity while greatly speeding up object acquisition—especially in light-polluted skies. If you find frequent star-hopping frustrating, DSCs are one of the most impactful upgrades you can make (see observing techniques for star-hopping tips you can still use even with technology).
GoTo and Equatorial Platforms
Motorized GoTo Dobsonians automate finding and tracking, reducing frequent nudging at high magnification. An alternative is an equatorial platform: a low-profile, motorized tilting base that imparts accurate tracking for several tens of minutes. Platforms are especially useful for high-power lunar/planetary viewing and for electronically assisted astronomy (EAA) or short-exposure imaging.
Choosing Between 8-Inch and 10-Inch Apertures
Both sizes are excellent all-rounders. Which is “best” depends on your use case, carrying distance, vehicle space, and sky quality. Here’s how to evaluate the trade-offs.
What a 10-Inch Does That an 8-Inch Doesn’t
- Deeper reach: About 0.5 magnitude deeper on point sources under dark skies. Faint galaxy groups, smaller planetary nebulae, and subtle globular cluster members become more accessible.
- Higher resolution headroom: On steady nights, fine albedo features on Mars, delicate Saturnian ring structure, and lunar rilles can benefit from the extra resolving power.
- Brighter at the same magnification: With larger aperture, for a given exit pupil you can use higher magnification, making small targets like planetary nebulae pop without dimming as quickly.
Why an 8-Inch May Be the Better First Dobsonian
- Portability and ergonomics: A typical 8-inch solid-tube optical tube assembly (OTA) is shorter and lighter than a 10-inch, often in the ~9 kg (20 lb) range, with the base of similar or slightly heavier mass. Many observers can carry each piece comfortably in one trip from garage to yard.
- Cooldown and collimation: Slightly less mass means quicker thermal equilibrium. An f/6 system is also more forgiving of minor collimation errors than faster f/5 systems.
- Eyepiece friendliness: Budget eyepieces perform better at f/6 than at f/4.7–f/5, with less edge-of-field aberration, reducing the need for premium glass or a coma corrector.
Typical Specs and Real-World Handling
Dimensions vary by brand and model, but solid-tube 8-inch Dobsonians commonly have tubes around 1.2 meters long and bases that fit across small hatchbacks. Solid-tube 10-inch scopes are bulkier; the base can be wider and heavier, and the tube is fatter and slightly heavier as well. If stairs are involved, or you must store the scope upstairs, lean toward the 8-inch unless you commit to multiple trips or a dolly.
Truss or collapsible 10-inch designs mitigate bulk, packing smaller for cars and reducing awkward lifting. However, they often require assembly at the site and more frequent collimation.
Decision Pointers
- Primarily observing from a light-polluted backyard? Either size is fine; consider filters and DSCs. The 10-inch helps punch through skyglow a bit better on galaxies, but contrast is still sky-limited.
- Often driving to dark sites? The 10-inch’s extra light grasp shines. If transport is easy, choose 10 over 8.
- New to collimation and working with a tighter budget on eyepieces? The 8-inch f/6 is forgiving and cost-effective.
- Have steady seeing and love lunar/planetary detail? A well-cooled, well-collimated 10-inch rewards you frequently.
Eyepieces, Finders, and Essential Accessories
Your eyepiece set and finders transform a good Dobsonian into a great observing platform. Because these telescopes are optically capable, carefully chosen accessories yield outsized improvements in usability and view quality.
Building a Smart Eyepiece Kit
Think in terms of exit pupil and magnification steps that cover wide-field sweeping, mid-power deep-sky, and high-power planetary/lunar. A simple three- or four-eyepiece kit often suffices:
- Low power (4–6 mm exit pupil): Great for open clusters, large nebulae, and Milky Way scanning. For an 8″ f/6, a 24–32 mm eyepiece works; for a 10″ f/5, a 24–30 mm is typical. Wider apparent fields (68–82°) help maintain context and drift time.
- Medium power (~2–3 mm exit pupil): Globular clusters, galaxies, planetary nebulae. Around 12–18 mm often hits this range.
- High power (~1–1.5 mm exit pupil): Planetary and lunar detail, tight double stars. That’s about 6–10 mm depending on your focal length and seeing.
- Very high power (<1 mm exit pupil): Specialty use on very steady nights for close doubles or peak planetary detail; 3–5 mm eyepieces or a Barlow lens when seeing allows.
Many observers favor a 2″ low-power eyepiece for maximal field plus a set of 1.25″ eyepieces for mid/high power. If your focuser supports 2″ accessories, it broadens your options for sweeping views.
Coma Correctors and Focal Extenders
At f/5 and faster, coma becomes more obvious with wide-field eyepieces. A coma corrector preserves sharp stars across the field. For planetary work, a quality 2x Barlow or 1.5–2x focal extender provides extra magnification while maintaining comfortable eye relief on longer focal length eyepieces.
Finders: Red-Dot, RACI, and Reflex Sights
- Red-dot finders: Show a simple illuminated dot against the sky. Very intuitive for initial alignment on bright stars.
- Reflex sights: Project concentric circles (e.g., 0.5°, 2°, 4°) to match patterns on charts. Popular for star-hopping with atlases.
- RACI (Right-Angle Correct-Image) finders: Optical finders (e.g., 8×50) offering a wider field and upright, left-right correct view matching charts. Excellent for centering dimmer guide stars and finishing hops.
Many use a reflex or red-dot finder to get the scope pointed broadly, then a RACI finder to nail the star field precisely. If your skies are bright, a RACI finder pays dividends when chasing fainter targets.
Filters That Make a Difference
- UHC (Ultra High Contrast): Narrowband filter passing O III and H-beta improves contrast on emission nebulae. Particularly impactful from suburban sites.
- O III: Even narrower, excels on planetary nebulae and supernova remnants. Dark sites + O III on the Veil Nebula are a revelation in 8–10 inch scopes.
- Variable polarizer or neutral density: Tames glare on the Moon for comfortable, high-contrast views.
- Light pollution reduction (broadband): Modest effect on galaxies; more benefit on reflection nebulae and general skyglow trimming. Narrowband filters deliver stronger bang-for-buck on emission nebulae.
Other Useful Accessories
- Observing chair: Being seated stabilizes your body and eyesight, revealing more detail.
- Cooling fan: A small, quiet fan behind the primary accelerates cooldown (see thermal management).
- Collimation tools: At minimum a collimation cap. A Cheshire/sight-tube or a well-aligned laser improves precision.
- Dew control: Dew shield or gentle heat for secondary and finder in humid climates.
- Star atlas and red light: Paper charts or an app with night mode plus a dim red light preserve night vision.
Collimation, Cooling, and Mirror Care
Collimation is the alignment of your telescope’s optical elements. It ensures that the optical axis of the primary mirror, secondary mirror, and focuser are precisely aligned. Cooling is managing temperatures to minimize thermal currents that blur images. Together, they set the ceiling for how good your views can be on any given night.
Collimation Basics
- Center-mark the primary: Most modern mirrors are center-spotted. If yours isn’t, use a removable reinforcement ring and a template to place a non-reflective center spot.
- Secondary alignment: Use a sight-tube or combo tool to center the secondary under the focuser. Adjust secondary tilt so that the primary’s center mark appears centered through the tool.
- Primary tilt: With a Cheshire or a correctly aligned laser, adjust the primary’s collimation screws until the center mark aligns with the reference. Finish with a star test at high power: defocus a bright star slightly inside and outside of focus and refine the primary to center the diffraction pattern.
At f/6, small errors are more forgiving; at f/5 and faster, be more meticulous. Aim to collimate before each session or after transport. It takes only minutes with practice.
Thermal Equilibrium
Mirrors and tubes hold heat from indoors; as they cool outdoors, warm air currents rise off the mirror and inside the tube, degrading images. Strategies:
- Pre-cool: Place the scope outside 30–60 minutes before serious viewing in temperate conditions. A 10-inch mirror may need a bit longer than an 8-inch, especially if temperature differentials are large.
- Use fans: A rear fan blowing gently on the back of the primary speeds heat transfer. Side fans can disrupt the boundary layer at the front mirror surface.
- Allow time for the environment: Even after optics cool, the ground, walls, and roofs can radiate heat causing local seeing issues. Position your scope away from heat sources.
Cleaning and Care
Dust rarely matters. Clean mirrors sparingly—perhaps every year or two—unless there’s obvious contamination. When you do:
- Remove the mirror cell if your design allows easy access, noting screw positions and alignment marks.
- Rinse gently with distilled water to float off loose dust. If needed, soak in a basin with a few drops of mild dish soap in distilled water.
- To lift stubborn spots, many use clean cotton balls or optical wipes, barely touching the surface and dragging under their own weight; avoid rubbing. Rinse thoroughly with distilled water and allow to air dry.
Protect the secondary from dew with a modest dew shield and keep the primary covered when not in use. Store your scope in a dry place to protect the base from moisture.
Tip: If your high-power views are soft, check three things first: collimation, thermal equilibrium, and atmospheric seeing. If those are all good, try a slightly lower magnification to match the night’s conditions.
Observing Techniques: Tracking, Star-Hopping, and Sketching
Dobsonians thrive on simplicity: manual pointing and tracking. With a little technique, you can keep objects centered and find your way around the sky efficiently.
Smooth Tracking at High Power
- Balance and friction: Tune your altitude and azimuth friction so the scope moves with a light push but stops without rebound. See mount design for tweaks.
- Two-hand nudging: At 200x and above, use gentle two-hand nudges—one on altitude, one on azimuth—to track smoothly.
- Plan the drift: Position the target just ahead of the field drift and let Earth’s rotation carry it across. Wide apparent fields extend drift time.
Star-Hopping Fundamentals
- Pick a bright anchor star: Use a red-dot or reflex sight to place the telescope on a bright star near your target.
- Use a RACI finder: With a correct-image finder, reproduce the hop from your atlas or app, moving by degrees and star patterns.
- Confirm at low power: Once in the general area, switch to a low-power eyepiece. Identify the star field, then increase power as needed.
If you add digital setting circles, you can still leverage star-hopping skills when technology isn’t available. And if you often observe from Bortle 7+ skies, DSCs can dramatically reduce time spent hunting faint fuzzies.
Sketching and Notes
Sketching deep-sky objects and recording observing conditions sharpen your eye. Keep a small notebook and note transparency, seeing, eyepieces used, exit pupil, and subtle details. Over time, you’ll build a personal atlas and see your observing acuity improve.
Light Pollution, Seeing, and Site Choice for Dobsonians
Two environmental factors dominate visual astronomy: sky darkness (light pollution) and seeing (atmospheric steadiness). A Dobsonian’s generous aperture means you can do meaningful observing even from suburbs, but you’ll maximize performance by matching targets and technique to conditions.
Light Pollution and the Bortle Scale
The Bortle scale classifies sky brightness from 1 (pristine dark) to 9 (inner-city). Under Bortle 6–7, bright nebulae and clusters remain satisfying with filters, while faint galaxy details are challenging. Under Bortle 2–3, the same 8–10 inch scope reveals spiral hints, dust lanes, and delicate nebula filaments.
Seeing vs Transparency
- Seeing: Describes atmospheric steadiness. Good seeing allows high magnification with stable, sharp images—critical for planets and double stars.
- Transparency: Describes clarity and absence of haze or thin cloud. High transparency benefits faint, extended deep-sky objects.
Planets thrive under good seeing, even from urban sites. Galaxies and large nebulae flourish under transparent, dark skies. Flex your plan nightly: if stars twinkle madly and planets swim, pivot to open clusters and bright nebulae at moderate power.
Site Choice and Setup
- Local microclimate: Avoid heat-radiating surfaces like asphalt and rooftops. Grass fields often provide steadier local seeing.
- Wind management: Wind shakes the image; set windbreaks or use natural shelter.
- Dew and humidity: In humid climates, dew control on secondary and finder keeps the session going. A simple dew shield can delay onset.
When possible, plan occasional trips to dark sites. A 10-inch Dobsonian under dark skies easily outperforms much larger instruments under heavy light pollution, especially for low-surface-brightness objects.
Best Targets for 8–10 Inch Dobsonians by Season
Below are curated targets that play to the strengths of 8–10 inch reflectors. Use low power with filters for broad nebulae and moderate to high power for compact objects like globular clusters and planetary nebulae. Under each season, start with showpieces, then stretch to more challenging objects.
Spring: Galaxy Season
- Virgo Cluster and Markarian’s Chain: A field day for galaxies—chain your hops across dozens of island universes. Try medium power to reveal shapes and orientations.
- Leo Triplet (M65, M66, NGC 3628): Classic trio. The 10-inch begins to hint at NGC 3628’s dust lane under dark skies.

This small group of galaxies consists of the Messier objects M65 (NGC3623), lower right, and M66 (NGC3627), lower left, along with the edge-on spiral galaxy NGC3628, upper left. Attribution: REU program/NOIRLab/NSF/AURA/ - M51 (Whirlpool Galaxy): Spiral structure becomes suggestive in an 8-inch under dark skies; the 10-inch may show bridge hints to the companion.
- M104 (Sombrero Galaxy): Striking bulge and a thin dust lane with patience. Benefits from higher magnification to increase apparent contrast.
Summer: Nebulae and Globulars
- M13 and M92 (Hercules): Globular clusters resolve beautifully, with the 10-inch breaking deeper into the core on steady nights.
- M8 (Lagoon) and M20 (Trifid): Use a UHC filter at low power. The dark lanes in the Trifid are especially photogenic to the eye with careful averted vision.
- Veil Nebula (NGC 6960/6992): A showpiece in both apertures with an O III filter. Sweep with a wide-field eyepiece; filaments and knots become intricate under dark skies.
- Planetary nebulae (M57, M27, NGC 6543): Medium to high power reveals internal structure; an O III filter can boost contrast.
Autumn: Andromeda and Beyond
- M31–M32–M110: The Andromeda Galaxy and companions. In very dark skies, dust lanes in M31 are hinted at. Use a wide field to frame the system, then higher power on the core and companions.
- NGC 891: Edge-on galaxy with a delicate dust lane; the 10-inch helps. Needs dark, transparent nights.
- M33 (Triangulum): Low surface brightness but large; use very low power and averted vision. Spiral hints emerge with patience.
- Double Cluster (h and χ Persei): Sparkling star fields that are captivating from any site.
Winter: Orion’s Splendor and Planetary Highlights
- Orion Nebula (M42/M43): A UHC filter and moderate power showcase sweeping wings and the Trapezium. E and F components of the Trapezium split more readily in a cooled, collimated 10-inch under steady seeing.

In one of the most detailed astronomical images ever produced, NASA/ESA’s Hubble Space Telescope captured an unprecedented look at the Orion Nebula. Attribution: NASA, ESA, M. Robberto (Space Telescope Science Institute/ESA) and the Hubble Space Telescope Orion Treasury Project Team - Crab Nebula (M1): Subtle filamentary structure at medium power on transparent nights; benefits from a dark site.
- Open clusters: M35, M36–M38, and NGC 2360 sparkle with 2″ wide-field eyepieces.
- Lunar and planetary: Jupiter’s belts and festoons, Saturn’s Cassini Division, and Mars’ albedo features are rewarding in both apertures when seeing is good.
Keep a running target list that adapts to conditions. On nights of mediocre seeing, emphasize open clusters and large nebulae. When the air steadies, switch to planets, double stars, and high-power cores of globular clusters.
Can You Do Astrophotography with a Dobsonian?
Dobsonians are optimized for visual observing. Their alt-az mounts don’t track the sky’s rotation in right ascension, so long-exposure deep-sky astrophotography suffers from field rotation and tracking drift. That said, there are pathways to meaningful imaging experiences:
Planetary and Lunar Imaging
High-speed “lucky imaging” excels with Dobsonians. Use a planetary camera (or adapted webcam) to capture thousands of short frames, then stack the sharpest in software. An equatorial platform or motorized tracking base helps keep targets centered, but manual nudging can work with practice and wide capture regions.
Electronically Assisted Astronomy (EAA)
EAA uses sensitive cameras and short exposures with live-stacking to produce near-real-time views of deep-sky objects. With an equatorial platform or field de-rotation solutions, an 8–10 inch Dobsonian can deliver engaging live-stacked results. These won’t match dedicated long-exposure imaging rigs for detail, but they expand your visual reach, especially from light-polluted sites.
Short-Exposure Experiments
Bright deep-sky objects can be captured with very short exposures to limit field rotation, then stacked. It’s a narrow niche, but a fun way to document what you see visually. Keep expectations grounded: the Dobsonian remains a visual champion first.
Buying Guide: New vs Used, Solid-Tube vs Truss, and Budget
Mid-aperture Dobsonians are common on the used market and widely available new. Here’s how to evaluate your options.
New vs Used
- New: Warranty support, predictable condition, and current accessories. Great for peace of mind.
- Used: Cost savings can be significant. Inspect mirrors with a dim light at a shallow angle (avoid harsh, direct light that exaggerates minor dust). Check the base for moisture damage, focusers for smoothness, and included accessories.
Solid-Tube vs Truss or Collapsible
- Solid-tube: Quick setup, holds collimation well, generally less expensive. Bulkier and may be awkward through doorways in the 10-inch class.
- Truss/collapsible: Breaks down for transport, lighter bases, and compact storage. Assembly time and more frequent collimation are trade-offs. A shroud helps control stray light and dew.
Focuser and Accessory Readiness
A 2″ dual-speed focuser (coarse + fine) is a quality-of-life upgrade, especially for critical focus at high power and for heavy eyepieces. Verify that the secondary mirror is sized appropriately to fully illuminate the field for your intended 2″ eyepiece usage. Most commercial 8–10 inch scopes are designed with common use cases in mind.
Mount Quality and Upgrades
Check bearing smoothness and base rigidity. If azimuth motion is sticky or inconsistent, aftermarket laminate/Teflon kits or simple DIY tweaks can transform the feel. Consider whether you might add digital setting circles or a tracking solution later.
Budget for the Whole System
- Plan for at least three eyepieces or two eyepieces plus a Barlow spanning low/medium/high power.
- Add a UHC filter for emission nebulae and an O III if you love supernova remnants and planetary nebulae.
- Include a comfortable observing chair, collimation tools, and a red light for charts or app navigation.
- If you anticipate urban observing, budget for DSCs or a reflex + RACI finder pairing to streamline star-hops.
Safety Note
Never point your telescope at the Sun without a proper, securely mounted, full-aperture solar filter specifically designed for telescopes. Severe eye injury can occur in an instant if this precaution is ignored.
Frequently Asked Questions
Do I need a coma corrector for an 8–10 inch Dobsonian?
It depends on your focal ratio, eyepieces, and preferences. At f/6 (common for 8-inch), coma is mild and many observers are satisfied without correction, especially using narrower-field or well-corrected eyepieces. At f/5 and faster (common for 10-inch), coma becomes more apparent off-axis with wide-field eyepieces (68–100°). A coma corrector keeps stars tight to the edge and can be a worthwhile investment if you enjoy wide, immersive views.
How often should I collimate my Dobsonian?
Check collimation before each observing session, especially if you’ve transported the scope. Minor tweaks to the primary mirror tilt take just a minute with a Cheshire or laser. Fast systems (f/5 and below) demand more consistent precision than slower ones. If the scope lives assembled and is handled gently, you may find it holds collimation well between sessions, but it’s wise to verify.
Final Thoughts on Choosing the Right Dobsonian Telescope
For many observers, an 8–10 inch Dobsonian is the telescope that reveals the sky as a living, three-dimensional landscape. The 8-inch f/6 is an ideal first serious instrument: forgiving, portable, and optically capable. The 10-inch adds a meaningful boost in reach and resolution that pays off at dark sites and on steady nights. Whichever you choose, focus on fundamentals: precise collimation, thermal management, comfortable observing posture, and eyepieces that deliver sensible exit pupils for your targets.
Invest in a finder system that suits your sky and consider digital setting circles if you’re in light pollution or prefer fast target acquisition. Build a target list that flexes with conditions—planetary when seeing is steady, nebulae and clusters when transparency is high, and galaxies when you can reach dark skies. And remember: incremental upgrades in ergonomics and technique often yield larger gains than chasing tiny optical specs.
If you found this guide helpful, explore our other deep-dive articles, and consider subscribing to our newsletter for new, evidence-based observing tips, gear guides, and seasonal target roundups delivered to your inbox.