Table of Contents
- What Is an 8‑Inch Dobsonian Telescope?
- Why Choose an 8‑Inch Aperture for Visual Astronomy?
- Optics, Focal Ratios, and Image Quality in 8‑Inch Dobs
- Mounts, Bearings, and Ergonomics: What to Look For
- Eyepieces, Exit Pupil, and Magnification Planning
- Collimation, Cooling, and Maintenance: Step‑by‑Step
- Setup, Transport, and Storage Considerations
- What You Can See: Targets and Sky Conditions
- Finders, Star‑Hopping, Push‑To, and GoTo Options
- Accessories That Add Real Value (Filters, Fans, Chairs)
- Astrophotography With an 8‑Inch Dob: What’s Realistic?
- Troubleshooting Common Issues and Performance Tuning
- Frequently Asked Questions
- Final Thoughts on Choosing the Right 8‑Inch Dobsonian
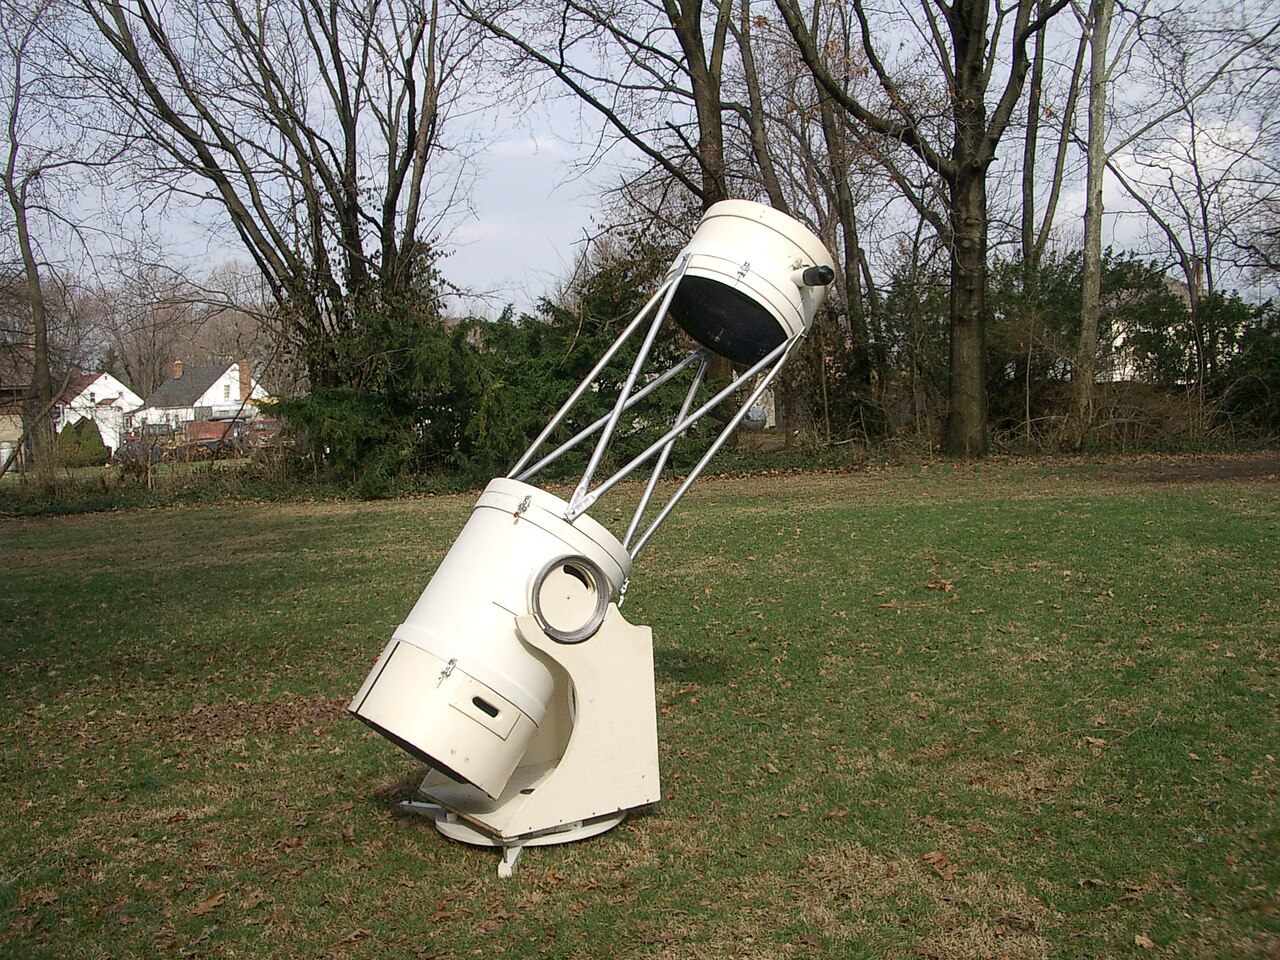
What Is an 8‑Inch Dobsonian Telescope?

Credit: first uploaded on the English-speaking Wikipedia under the same filename
An 8‑inch Dobsonian is a Newtonian reflector with an 8‑inch (203 mm) primary mirror mounted on a simple, alt‑azimuth base. The Dobsonian design prioritizes large aperture, straightforward mechanics, and affordability. Typically, an 8‑inch Dobsonian has a focal ratio around f/6 (focal length ≈ 1200 mm), providing a balanced mix of magnification potential, contrast, and field of view for visual observing.
The optical path is classic Newtonian: a parabolic primary mirror gathers light and reflects it to a flat secondary mirror, which diverts the beam out the side of the tube to a focuser and eyepiece. The mount is manually guided in altitude (up–down) and azimuth (left–right). This simplicity is the Dob’s strength. There are few gears to bind, no tripods to wobble, and fewer components to maintain over time.
Compared with smaller refractors and catadioptrics, 8‑inch Dobsonians deliver significant light‑gathering power and resolution for the price. The design is optimized for visual astronomy: sweeping star fields, resolving globular clusters, examining the Moon and planets, and hunting galaxies under dark skies. While you can add digital encoders or GoTo motors, at heart the Dobsonian is a manual, intuitive observing machine built for stability and smooth motion.
If you’re new to telescopes and want a capable all‑rounder that “just works,” an 8‑inch Dobsonian is often recommended by experienced amateurs. In the following sections, we’ll walk through how to choose one, what optical features matter, how to collimate and maintain it, which eyepieces pair well, and what kinds of celestial targets you can expect to see clearly.
Why Choose an 8‑Inch Aperture for Visual Astronomy?
Aperture—the diameter of the primary mirror—drives what you will see. An 8‑inch (203 mm) mirror collects much more light than the human eye and smaller telescopes, helping reveal faint deep‑sky detail and support higher magnification on planets when atmospheric conditions cooperate.
Key performance points for an 8‑inch:
- Light‑gathering power: A mirror’s area scales with the square of the diameter. An 8‑inch mirror gathers roughly 800–900 times as much light as a fully dark‑adapted 7 mm human pupil. That abundant light allows you to see faint stars in clusters and tease out nebulosity at low power.
- Angular resolution: Using common approximations, the Dawes limit for an 8‑inch is about 0.57 arcseconds, and the Rayleigh criterion is about 0.68 arcseconds. Real‑world seeing is often 1–2 arcseconds or worse, so the atmosphere is the limiting factor most nights. Still, that theoretical resolving power helps with double stars, lunar rilles, and fine planetary detail during steady moments.
- Useful magnification range: Practically, an 8‑inch supports about 30×–300× on most nights. The often‑quoted absolute maximum of ~50× per inch (~400×) is rarely achievable due to seeing and optical tolerances. Expect 120×–200× to be a sweet spot for planets and the Moon when the air is steady.
- Limiting stellar magnitude: Under dark, transparent skies with good technique, observers commonly reach ~14th magnitude in an 8‑inch reflector. Conditions, observer experience, and sky brightness dominate this outcome.
- Portability balance: An 8‑inch Dobsonian is large but manageable for one person. The solid‑tube optical assembly is about 1200 mm long. The mount is boxy but compact. Most hatchbacks and sedans can accommodate both pieces comfortably. This balance of portability and capability is a big reason the 8‑inch Dob has become a classic recommendation.
If you’re debating between 6‑inch, 8‑inch, and 10‑inch reflectors, the 8‑inch often lands in the “just right” zone: a noticeable performance step above 6 inches without the weight and bulk jumps that 10 inches brings. For many observers, that makes the 8‑inch an ideal first serious telescope and a long‑term keeper.
To get the most from an 8‑inch aperture, plan on dialing in collimation and cooling, using appropriate eyepieces and exit pupils, and learning to read sky conditions.
Optics, Focal Ratios, and Image Quality in 8‑Inch Dobs
Most mass‑market 8‑inch Dobsonians are f/6 (focal length ≈ 1200 mm), but you’ll also encounter f/5 and occasional f/4.9 versions. Focal ratio influences image scale, field of view, coma, and collimation tolerance.

Artist: Fernly at English Wikibooks
f/6 vs. f/5 Trade‑offs
- f/6 (≈1200 mm): Gentler off‑axis coma, more forgiving of collimation and eyepiece imperfections, and generally higher contrast on planets for a given eyepiece set. The field remains wide enough for most deep‑sky objects, especially with 2‑inch eyepieces.
- f/5 (~1000 mm): Wider true fields at a given eyepiece focal length and slightly shorter tube, which aids portability. However, f/5 shows more off‑axis coma with wide‑angle eyepieces, and collimation demands are tighter. Many observers still prefer f/5 for its broader field and manageable size.
Primary Mirror Figure and Secondary Size
A well‑figured parabolic primary mirror is essential for sharp images. Most reputable producers supply decent mirrors; excellent cooldown and precise collimation are just as important as the exact figure in routine use. Secondary mirrors in 8‑inch tubes are typically sized to illuminate a moderately wide field while keeping the central obstruction reasonable. Central obstructions around 20–25% of the diameter are common; this level has little practical impact on planetary contrast in properly collimated scopes.
Coma and Correctors
Newtonians exhibit coma—off‑axis star images appear like small comets toward the field edge. At f/6, coma is modest and many observers find it unobtrusive, especially with eyepieces that better control astigmatism. At f/5, coma is more noticeable with ultra‑wide fields. A coma corrector can greatly improve edge performance but adds complexity, backfocus spacing requirements, and cost. If you primarily use 68°–70° eyepieces, you may not feel a strong need for a corrector at f/6.
Optical Coatings and Reflectivity
Aluminum coatings with protective overcoats are standard on primary and secondary mirrors. Reflectivity figures around 88–94% per surface are typical. Enhanced coatings nudge reflectivity a bit higher, but overall throughput depends on the full optical train (both mirrors, coatings, glass in the eyepiece). For visual observing, the differences are subtle; prioritizing smooth mirror figure and thermal control usually pays bigger dividends.
For more on maintaining image quality, jump to Collimation, Cooling, and Maintenance.
Mounts, Bearings, and Ergonomics: What to Look For
Dobsonian mounts are simple yet nuanced. Smooth, predictable motion is vital: you need to track planets at high power and nudge across nebulae at low power without overshoot or stick‑slip.
Altitude and Azimuth Bearings
- Altitude bearings: Larger radius bearings distribute weight and make balance less critical. Spring tensioners or clutches help when swapping heavy eyepieces. With small altitude bearings, balance can be finicky, and small changes in accessory weight may cause the tube to drift.
- Azimuth bearing: Many mounts use Teflon pads riding on a laminate surface. You want low stiction and consistent friction. If rotation feels jerky, tiny adjustments while tracking become frustrating. An even, moderately firm feel allows precise nudging at high magnification.
Base Construction and Stability
Most bases are engineered wood panels; rigidity matters. A wobbly base will limit the sharpness you can realize, especially above 150×. Heavier bases resist wind and vibration but are harder to carry. Look for solid joinery, square geometry, and hardware that doesn’t loosen easily. Check that the center pivot bolt is snug but not binding the azimuth motion.
Focuser and Finder Ergonomics
- Focuser: A 2‑inch dual‑speed Crayford focuser is common and recommended. Fine focusing is a major ergonomic win at high power. Test for image shift and smoothness across the drawtube range.
- Finder: A right‑angle correct‑image (RACI) finder is easy on the neck for star‑hopping. A zero‑power reflex sight helps with initial alignment. Using both together is a popular setup; see Finders, Star‑Hopping, Push‑To, and GoTo Options.
Balance and Accessory Weight
Wide‑angle eyepieces, binoviewers, and heavy coma correctors shift balance. Systems with adjustable or larger altitude bearings handle this gracefully. Magnetic counterweights or sliding tube rings can help fine‑tune balance if you expand your accessory suite later.
Eyepieces, Exit Pupil, and Magnification Planning
Eyepieces transform the native capabilities of an 8‑inch Dob. Planning a small, complementary set that spans low, medium, and high power is more effective than chasing dozens of focal lengths. Two formulas guide most decisions:
Magnification (×) = Telescope focal length / Eyepiece focal length
Exit pupil (mm) = Eyepiece focal length / f‑ratio
For a typical f/6 8‑inch (~1200 mm focal length), here’s a practical framework:
Low Power: 4–6 mm Exit Pupil
- Eyepiece range: ~24–40 mm
- Use cases: Large nebulae (Orion Nebula), sweeping the Milky Way, large open clusters (Pleiades), framing bright galaxies in context.
- Notes: At f/6, a 30 mm eyepiece yields a 5 mm exit pupil and 40× magnification. Too large an exit pupil wastes light if your eye’s pupil doesn’t open as wide, so many observers cap it around 5–6 mm.
Medium Power: 2–3 mm Exit Pupil
- Eyepiece range: ~12–18 mm
- Use cases: Globular clusters, smaller nebulae, galaxy detail, tight framing of lunar features.
- Notes: A 15 mm eyepiece gives 80× and a 2.5 mm exit pupil—often the sweet spot for contrast on many deep‑sky objects.
High Power: 0.5–1.5 mm Exit Pupil
- Eyepiece range: ~5–10 mm
- Use cases: Planets, the Moon, close double stars, small planetary nebulae.
- Notes: A 6 mm eyepiece yields 200× and a 1 mm exit pupil, excellent for planetary nights with steady seeing. Keep expectations realistic: seeing often limits you before optics do.
True Field of View (TFOV) and Apparent Field of View (AFOV)
Approximate TFOV with: TFOV ≈ AFOV / Magnification. For wide, well‑corrected fields, 68°–82° AFOV eyepieces are popular on Dobsonians because they provide longer drift time before targets exit the field at high power. That eases manual tracking.
Barlow Lenses and Zoom Eyepieces
- Barlow: A quality 2× Barlow effectively doubles your eyepiece focal length coverage (e.g., 24 mm becomes 12 mm). It can reduce the need for very short focal length eyepieces while preserving eye relief.
- Zooms: A good 8–24 mm zoom is convenient for dialing in magnification to match seeing conditions. It’s especially nice for the Moon and planets, where the best magnification can change minute‑to‑minute.
Whichever path you take, pair your eyepiece selection with the realities of your local skies. If you frequently observe in unsteady seeing, lean on the medium‑power range. In dark, transparent conditions, enjoy large exit pupils with nebula filters; see Accessories That Add Real Value.
Collimation, Cooling, and Maintenance: Step‑by‑Step
Collimation—the precise alignment of optical elements—is essential for sharp views. Cooling—the mirror reaching ambient temperature—reduces tube currents and image smearing. Together, they make or break performance.
Collimation Tools
- Collimation cap: Simple and effective for rough alignment.
- Cheshire/sight tube: Time‑tested tools that help center the secondary and align the primary.
- Laser collimator: Convenient, but ensure it is itself collimated. A barlowed laser technique is useful for primary tilt.

Artist: Morn
Quick Collimation Workflow
- Center the secondary under the focuser: Use a sight tube to confirm the secondary mirror looks circular and centered. This mostly needs doing once, then rarely again.
- Secondary tilt: Adjust the secondary screws to aim the focuser axis at the primary center spot. The Cheshire crosshair or laser dot should hit the center marker.
- Primary tilt: Use the primary collimation knobs to bring the center spot into alignment. A Cheshire shows this clearly; with a barlowed laser, center the shadow of the spot on the target.
- Star test: At high power on a bright star, gently defocus inside and outside focus. Symmetric diffraction patterns indicate good collimation. Slight tweaks may refine alignment.
Tip: At f/5, collimation tolerances are tighter; check more often. At f/6, you have a bit more leeway but good alignment is still crucial for high‑power work.
Cooling and Thermal Management
- Mirror fan: A small rear‑mounted fan helps bring the primary mirror to ambient temperature faster. For an 8‑inch, 30–60 minutes of cooling is common, shorter with a fan.
- Ventilation: If your scope has back vents or a ventilated cell, use them. If not, even a gentle fan can reduce boundary layers.
- Acclimatization strategy: Set the telescope outside early. Observe low‑power objects first while the system equilibrates, then ramp up magnification as images snap to focus.
Cleaning Mirrors and Optics
- Frequency: Clean mirrors sparingly—dust typically has little effect on visual performance. Over‑cleaning risks scratches.
- Method: If needed, remove the mirror, rinse with distilled water, and gently float off contaminants with a mild detergent solution. Use distilled water for a final rinse. Avoid rubbing; if necessary, very light drag with clean cotton can help lift stubborn specks.
- Secondary dew and dust: The secondary is more exposed and may dew up. A simple dew shield or heater can help. Gently clean as needed using similar care.
Dialing in these fundamentals maximizes what your optics can deliver. For how this affects real targets, see What You Can See.
Setup, Transport, and Storage Considerations
One reason the 8‑inch Dobsonian is so popular is that it’s large enough to impress but still easy to handle without a complex mount.
Weight and Handling
- Two‑piece carry: Most observers carry the optical tube assembly (OTA) and base separately. Typical weights vary by model, but many OTAs are roughly 8–12 kg (18–26 lb) and bases around 10–15 kg (22–33 lb). Check specs before you buy and lift safely.
- Grips and cutouts: Handy cutouts or handles on the base make a big difference. For the OTA, a sling strap or hand trucks can help over longer distances.
- Collapsible/truss options: Some 8‑inch designs use collapsible tubes or mini‑trusses to reduce length for transport. These often need a shroud to block stray light and may require more frequent collimation checks.
Artist: JamesStewart669
Vehicle Fit
A 1200 mm tube fits diagonally across the backseat of many sedans. Bases are boxy; measure your trunk opening. For small cars, fold seats and pack soft padding around edges to avoid chipping laminate and mirror cells.
Setup at the Site
- Base first: Place on level, firm ground. Grass works; concrete is better for stability but may radiate heat. A thin mat can insulate from driveway heat.
- Attach OTA: Set the tube into altitude bearings or cradle. Balance with your heaviest eyepiece to avoid surprises later.
- Thermals and dew: Start the fan, set out accessories, and cap eyepieces to keep dew at bay. Allow cool‑down while you align the finder.
Storage and Care
- Dry environment: Store in a dry, temperature‑stable location. Avoid damp garages without desiccant packs. Moisture can tarnish mirror coatings over time.
- Dust control: Keep caps on both ends of the tube. A simple breathable cover for the base helps protect bearings and laminate.
- Fastener checks: Periodically snug loose screws. Don’t overtighten the azimuth pivot—aim for smooth motion.
What You Can See: Targets and Sky Conditions
An 8‑inch Dobsonian opens a rich catalog of objects. What you can see depends on sky darkness, atmospheric steadiness, and your observing technique. Here’s what to expect when the scope is well collimated and cooled as described in Collimation, Cooling, and Maintenance.
Planets and the Moon
- Jupiter: Multiple belts and zones, festoons, and the Great Red Spot in steady seeing. Transits and shadows of the Galilean moons are striking at 150–250×.
- Saturn: The rings and Cassini Division are routine targets in good seeing. A hint of banding on the globe becomes apparent around 150–200×.
- Mars: During favorable oppositions, dark albedo features and the polar cap are visible. Seeing is pivotal; fine detail snaps into focus during brief steady moments.
- The Moon: Razor‑edged craters, rilles, domes, and wrinkle ridges throughout the lunar cycle. High power and a neutral density or polarizing filter improve comfort.
Deep‑Sky Delights
Artist: Rochus Hess
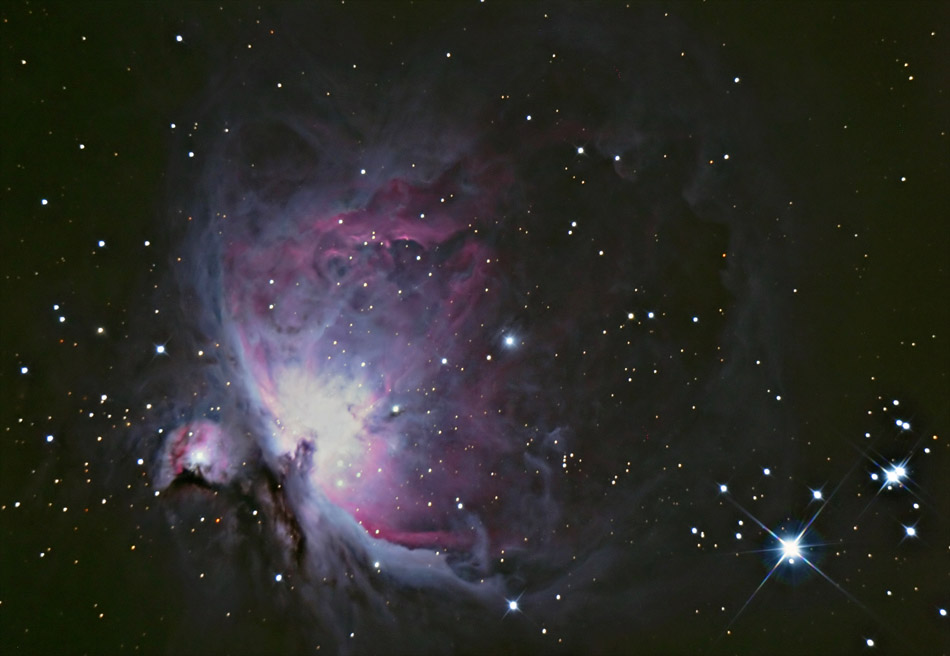
- Nebulae: The Orion Nebula (M42) shows structure and subtle shading, especially with a narrowband or UHC filter. Planetary nebulae like the Ring Nebula (M57) display well‑defined shapes at medium to high power.
- Star clusters: Globular clusters (M13, M3) begin to resolve into granular star clouds in the outer regions, with more resolution at higher power. Open clusters (Double Cluster, M35) are beautiful at low power.
- Galaxies: Under dark skies, the Andromeda Galaxy (M31) shows a bright core and suggestions of a disk. M51 can hint at spiral structure. Many NGC galaxies are within reach as smudges or ovals; details depend heavily on sky brightness and transparency.
- Double stars: An 8‑inch splits many challenging doubles when seeing allows. The textbook diffraction pattern is rewarding in calm air.
Reading the Sky
- Transparency vs. seeing: Transparency controls how faint you can go; seeing controls how sharp you can get. Faint galaxies require dark, transparent nights. Planetary detail demands steady seeing.
- Altitude matters: Observe targets high in the sky to minimize atmospheric thickness. Near the horizon, dispersion and turbulence degrade views.
- Dark adaptation: Protect your night vision with a dim red light and patience. Use a hood or shroud to block stray light, especially in suburban locations.
Complement these techniques with sensible eyepiece choices and optional filters for nebulae to make the most of your sessions.
Finders, Star‑Hopping, Push‑To, and GoTo Options
Locating targets is half the fun—and sometimes half the challenge. An 8‑inch Dob can be a superb star‑hopping platform, and it can also take advantage of digital aids.
Finder Configurations
- Reflex sight: Projects a red dot or bullseye against the sky. Excellent for initial alignment with bright stars.
- RACI finder: A right‑angle correct‑image finder shows a small, correctly oriented star field. Combined with a star chart, it’s perfect for hopping from bright stars to fainter targets.
- Both together: Use the reflex sight to point, then the RACI finder to refine. This pairing is popular on Dobsonians.
Star‑Hopping vs. Digital Assistance
- Star‑hopping: Builds sky familiarity and works without power. It’s slower at first but deeply satisfying.
- Push‑to (digital setting circles): Encoders and a small computer or app show arrows that guide you by hand to objects, preserving the simplicity of the mount while speeding acquisition.
- GoTo: Motorized tracking and automated slews reduce manual effort and keep objects centered. This adds weight, complexity, and power requirements. For visual use, push‑to is often a sweet compromise.
Whichever you choose, align your finder(s) carefully at low power before dark—ideally on a distant terrestrial target or a bright star—so objects slip into the eyepiece after a short hop.
Accessories That Add Real Value (Filters, Fans, Chairs)
Thoughtful accessories can transform usability without breaking the bank. Here are upgrades with consistently high value for an 8‑inch Dobsonian.
- Observing chair: A height‑adjustable chair is arguably the best accessory you can buy. A steady, comfortable observer sees more detail.
- Narrowband/UHC filter: Boosts contrast on emission nebulae under a range of sky conditions. Use at low to medium power with a 3–5 mm exit pupil.
- OIII filter: Strongly enhances certain planetary and faint emission nebulae; works best at dark sites and with low‑power eyepieces.
- Dew control: A simple dew shield, secondary heater, and caps for eyepieces minimize dew‑related downtime.
- Fan and battery pack: A quiet, vibration‑free fan on the mirror cell speeds cooldown and improves image stability.
- Quality collimation tools: A Cheshire/sight tube set or well‑aligned laser saves time and ensures accuracy.
- Light shroud (for collapsible scopes): Blocks stray light and reduces dew on the secondary.
- Red flashlight and charts/app: Keep your night vision intact while navigating the sky. Consider paper atlases or reliable offline apps.
Before investing in specialty items like coma correctors, ensure you’ve optimized basics: collimation and cooling, a balanced eyepiece set, and a comfortable observing position.
Astrophotography With an 8‑Inch Dob: What’s Realistic?
Dobsonians are built for visual observing. The alt‑azimuth mount doesn’t track equatorially, so long‑exposure deep‑sky imaging is impractical without major modifications. Field rotation and manual tracking limit exposure length. That said, certain types of imaging are feasible:
- Lunar and planetary imaging: Short video captures with a high‑frame‑rate camera can be “lucky imaged” and stacked for sharp results. Manual tracking at high power is possible with practice; motorized tracking or an equatorial platform helps a lot.
- Bright objects: The Moon, Jupiter, and Saturn are accessible with brief exposures, even on an alt‑az mount. Use a Barlow to reach appropriate image scale and keep exposures short.
- Electronically assisted astronomy (EAA): Low‑noise cameras and live stacking software can reveal some deep‑sky structure with very short sub‑exposures, but field rotation remains a constraint for long integrations.
If your primary goal is deep‑sky astrophotography, an equatorially mounted refractor or reflector is a more appropriate starting point. Keep the 8‑inch Dobsonian for visual enjoyment—it excels there.
Troubleshooting Common Issues and Performance Tuning
Even good telescopes benefit from fine‑tuning. Here are common issues and practical remedies.
Jerky or Slippery Motions
- Symptom: The azimuth motion is sticky; high‑power targets overshoot.
- Fixes: Check for debris on bearing surfaces. Adjust the pivot tension so the base turns smoothly without wobble. Ensure Teflon pads are clean and contacting evenly.
Balance Problems
- Symptom: Tube drifts when swapping between light and heavy eyepieces.
- Fixes: Use adjustable altitude tensioners if present, add a small counterweight, or balance with your heaviest eyepiece installed. Larger altitude bearings are more forgiving.
Soft Images at High Power
- Symptom: Planets won’t sharpen beyond ~150×.
- Fixes: First, evaluate seeing—atmospheric steadiness may be limiting you. Confirm collimation and cooling are dialed in. Check for tube currents or boundary layers; use the fan. Inspect eyepiece cleanliness and focus finesse (a dual‑speed focuser helps).
Dew on the Secondary or Eyepieces
- Symptom: Gradual loss of contrast and foggy stars.
- Fixes: Add a dew shield, use gentle heat on the secondary, and keep eyepiece caps on. Store eyepieces in a closed case between uses.
Unexpected Flare or Glare
- Symptom: Bright object washes out fine detail; glare arcs across the field.
- Fixes: Check for shiny surfaces inside the tube; consider flocking the area opposite the focuser. Ensure the focuser drawtube doesn’t protrude into the light path at focus for your typical eyepieces.
Primary Mirror Shift or Collimation Drift
- Symptom: Collimation changes as the scope points higher.
- Fixes: Verify that primary mirror cell clips are not too tight or too loose; they should restrain the mirror without pinching. Ensure collimation bolts have enough friction or springs of adequate stiffness.
If you travel to new sites with temperature swings or wind, revisit Setup, Transport, and Storage strategies to maintain consistent results.
Frequently Asked Questions
How difficult is collimation for a beginner?
With basic tools and a methodical approach, collimation becomes routine quickly. Most users can achieve good alignment in a few minutes once familiar with the steps. Start with a collimation cap or Cheshire, learn to identify each mirror’s adjustment role, and confirm on a star test. Faster focal ratios (e.g., f/5) demand more precise alignment than f/6, but the process is the same.
Can I use an 8‑inch Dobsonian for safe solar observing?
Yes, but only with a proper, securely mounted full‑aperture solar filter designed for visual use, or with a safe off‑axis solar filter made for your scope. Never point the telescope at the Sun without a certified solar filter placed over the front of the telescope. Eyepiece‑end filters without a front‑end filter are unsafe. A good solar filter reveals sunspots, faculae, and granulation under steady daytime seeing.
Final Thoughts on Choosing the Right 8‑Inch Dobsonian
An 8‑inch Dobsonian telescope hits a time‑tested sweet spot of capability, cost, and convenience. With careful attention to collimation and cooling, a sensible set of eyepieces, and smooth mount ergonomics, it will deliver crisp lunar and planetary views, detailed star clusters, and an expansive deep‑sky tour from dark sites.

Artist: James Stewart 669
When choosing among models, prioritize optical quality, focuser smoothness, bearing feel, and practical portability. Add a comfortable observing chair, a narrowband filter, and a reliable finder setup, and you’ll have a system that encourages longer, more rewarding sessions. If you later expand into digital assistance, push‑to encoders are an elegant bridge that preserve the Dobsonian’s manual charm.
Ready to take the next step? Keep exploring our in‑depth guides, compare observing checklists, and subscribe to our newsletter for fresh, evidence‑based articles on telescopes, techniques, and the night sky. Clear skies and steady seeing!