Table of Contents
- What Is Deep-Sky Astrophotography and What Can You Shoot?
- Essential Gear for Deep-Sky Imaging: From Mounts to Filters
- Planning, Framing, and Dark-Sky Strategy
- Accurate Polar Alignment and Tracking Techniques
- Exposure Strategy: ISO, Gain, Subexposures, and Calibration Frames
- Capture Workflow: From Focusing to Meridian Flips
- Stacking and Processing: Turning Data Into an Image
- Advanced Techniques: Narrowband, Filters, and Mosaics
- Troubleshooting Common Problems in Deep-Sky Imaging
- Frequently Asked Questions
- Final Thoughts on Mastering Deep-Sky Astrophotography
What Is Deep-Sky Astrophotography and What Can You Shoot?
Deep-sky astrophotography is the practice of photographing faint celestial objects outside our solar system—primarily nebulae, galaxies, and star clusters. Unlike nightscape or Milky Way photography, which can often use short exposures on a static tripod, deep-sky targets require long integrations with precise tracking to overcome their low surface brightness and reveal delicate structure and color.
Typical subjects include:
- Emission nebulae (e.g., the North America Nebula, Rosette Nebula): Clouds of ionized gas glowing in narrow wavelength bands such as H-alpha, OIII, and SII.
- Reflection nebulae (e.g., M78, Iris Nebula): Dust clouds reflecting the light of nearby stars, often with blue hues.
- Dark nebulae (e.g., the Dark Horse, Barnard objects): Opaque dust silhouetted against rich Milky Way star fields.
- Galaxies (e.g., Andromeda, Triangulum, Whirlpool): Island universes with spiral arms, bars, and dust lanes.
- Star clusters (open clusters like the Pleiades; globulars like M13): Dense groupings of stars, excellent early targets.
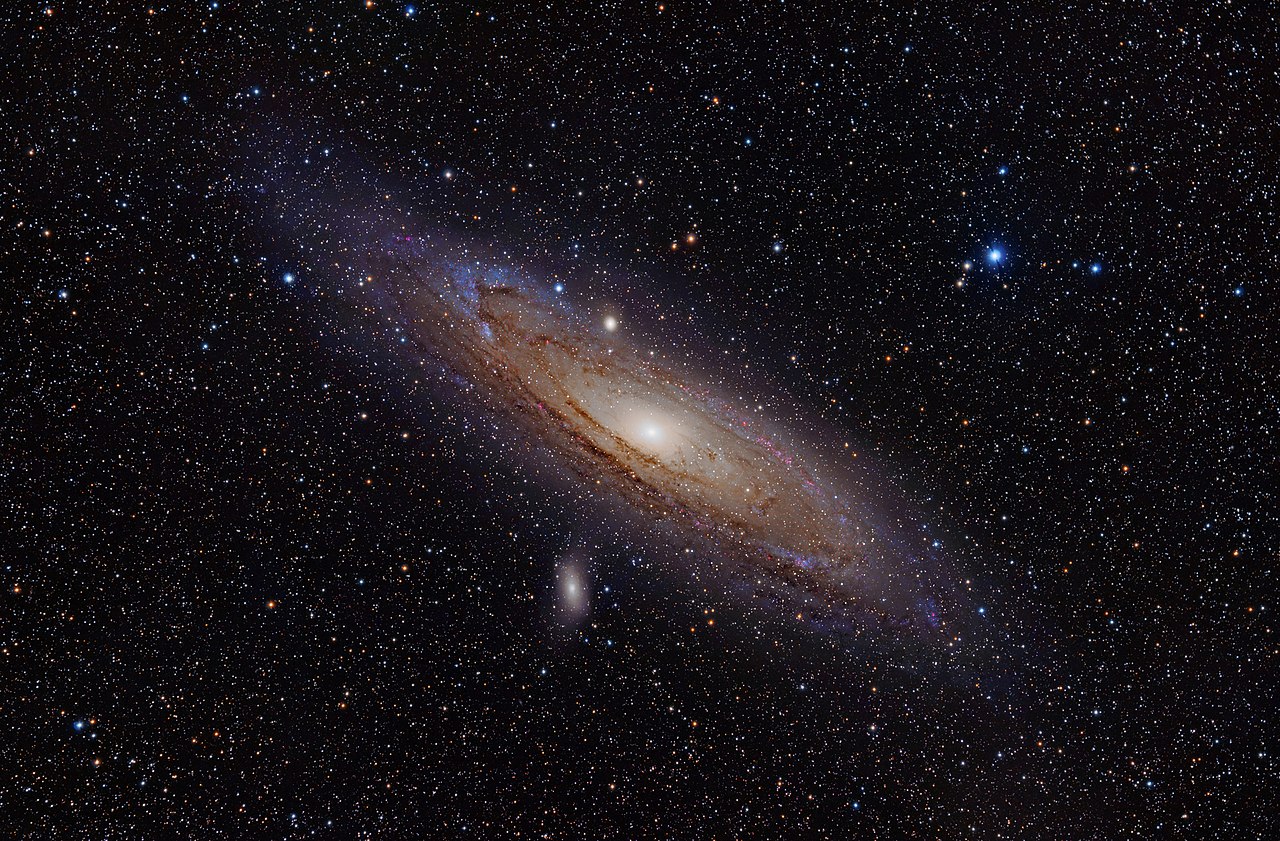
Artist: Adam Evans
The core challenge is signal-to-noise ratio (SNR). Faint signals hide in camera read noise, thermal noise, and skyglow. Improving SNR drives nearly every technique in this guide—from careful polar alignment and guiding to optimal exposure strategy and data processing. You build SNR by collecting many sub-exposures (subs) and stacking them to average down random noise.
Key principle: Astrophotography is an exercise in integration time. The more high-quality, properly calibrated data you gather, the better the final image—often more than any single gear upgrade.
Deep-sky astrophotography is accessible with a modest equatorial mount, a small refractor, and a modern DSLR or dedicated astronomy camera. Start simple, learn consistently, and add complexity only as your technique improves.
Essential Gear for Deep-Sky Imaging: From Mounts to Filters
A well-matched kit maximizes your success on clear nights. Here is how each component contributes and what practical choices look like for beginners through intermediate imagers.
Mount: The Foundation of Every Image
The mount is the most important investment. For deep-sky work you need an equatorial mount (EQ) that tracks the sky’s rotation around the celestial pole. Alt-az mounts suffer from field rotation during long exposures. Consider:

Artist: Gn842
- Capacity and ratio rule: For astrophotography, keep total payload at roughly 50–70% of the manufacturer’s stated capacity for best tracking performance.
- Guiding capability: Choose a mount with an ST-4 port or, preferably, good support for computer-guided corrections via software.
- Portability vs. stability: Heavier mounts damp vibrations better but are harder to transport.
- Periodic error and backlash: Errors are normal; guiding and proper balance mitigate them.
Optics: Refractors, Newtonians, and SCTs
Small-to-moderate apochromatic refractors (e.g., 60–100 mm) are highly recommended for first deep-sky rigs because they’re compact, low-maintenance, and forgiving at short focal lengths (250–600 mm). Alternatives:
- Newtonian reflectors (e.g., 150–200 mm f/4–f/5): Bright and budget-friendly but require collimation and often a coma corrector.
- SCTs and EdgeHD/RC systems: Excellent for small galaxies and planetary nebulae due to long focal length; demand precise tracking and guiding.
- Correctors and reducers: Many refractors benefit from a field flattener; reducers widen the field and speed up the system.

Artist: Brainandforce
Backfocus spacing for correctors is critical—often near 55 mm but always verify the specific requirement. Incorrect spacing leads to elongated or distorted stars away from the center.
Cameras: DSLR/Mirrorless vs. Dedicated Astronomy CMOS
- DSLR/Mirrorless: Cost-effective, versatile, and widely available. Shoot RAW. Unmodified cameras are best at broadband targets; a full-spectrum or H-alpha modified body greatly improves emission nebula capture.
- Dedicated astronomy cameras (cooled CMOS): Offer regulated cooling, low noise, and fine-grained control over gain/offset. Monochrome sensors paired with filters enable narrowband imaging. One-shot color (OSC) cameras simplify capture but limit ultimate flexibility compared to mono.
Guiding and Accessories
- Guide scope or off-axis guider (OAG): A small guide scope is simple to start; an OAG avoids differential flexure at longer focal lengths.
- Guide camera: Pairs with guiding software to send small corrections and keep stars steady.
- Dew control: Dew heaters and shields prevent optics from fogging.
- Power and cables: Reliable power distribution and clean cable management reduce tracking issues.
- Focusing aids: A Bahtinov mask or autofocus motor improves consistency.
Filters for Light Pollution and Narrowband
Filters can help—but they can’t defeat physics. Understand what they do before buying:
- Broadband “light pollution” filters: Mild suppression filters can improve contrast for star fields and some reflection nebulae, but they often reduce color fidelity for galaxies and don’t remove continuum skyglow. Under heavy light pollution, results vary. Many imagers prefer no broadband filter for galaxies.
- Dual/tri-band narrowband filters (for OSC cameras): Isolate H-alpha and OIII/SII emission. Highly effective for emission nebulae in bright urban skies.
- Monochrome + narrowband (Hα, OIII, SII): Maximizes signal in light-polluted areas and during bright Moon phases; requires filter wheel and longer integration per channel.
Pair your filter choice with your targets and conditions. If galaxies are your priority under urban skies, consider traveling to darker skies or capturing extended integration time rather than relying on broadband filters.
Planning, Framing, and Dark-Sky Strategy
Good planning multiplies the value of every clear night. Before you set up, decide what you’re shooting, when it’s highest in the sky, and how you’ll frame it with your optics.
Choose Targets by Season and Altitude
Deep-sky targets are seasonal. Identify windows when your object climbs high above the horizon, ideally above 45–60 degrees where atmospheric extinction and seeing are better. Planetarium apps and sky planners can show altitude over time and moon interference.
- Moon phase and angle: Emission nebulae tolerate Moon better with narrowband filters. Broad targets and galaxies benefit from dark, moonless nights.
- Transit time: Center your session around the target’s meridian transit, when it’s highest and the atmosphere is thinnest.
Framing and Field of View (FOV)
Use field-of-view simulators to visualize your framing with your camera and telescope combination. Factor in room for cropping after stacking and processing. Consider rotation angle to align spiral arms or dust lanes pleasingly within the frame.
- Mosaics: If a target doesn’t fit in one frame, plan a 2×1 or 2×2 mosaic with sufficient overlap (20–30%). See advanced techniques.
- Foreground avoidance: Watch for trees, rooftops, or mount limits, especially near meridian flips.
Bortle Scale and Site Selection
The Bortle scale describes sky brightness. Moving from a Bortle 7 urban sky to a Bortle 4 rural site can dramatically improve broadband targets like galaxies and reflection nebulae. If travel isn’t feasible, lean into narrowband and emission nebulae at home, and reserve broadband work for darker trips.
Checklist for a Productive Night
- Confirm clear forecast and wind limits.
- Charge batteries or prepare AC power.
- Update planetarium and capture software for target ephemerides.
- Verify focusers, cables, and firmware to avoid surprises in the field.
- Print or save a shot list with planned sub-exposures and calibration frames.
Accurate Polar Alignment and Tracking Techniques
Precise polar alignment reduces field drift and keeps stars round during long exposures. It’s fundamental—everything else depends on it.
Artist: HiyoriX
Polar Alignment Methods
- Polar scope alignment: Many mounts include a polar scope with a reticle. Use a smartphone app to position Polaris (or Sigma Octantis in the southern hemisphere) at the correct clock angle.
- Plate-solve–assisted alignment: Software-based methods use short exposures and plate solving to estimate and correct polar error. They’re fast and accurate even if Polaris is obstructed.
- Drift alignment: Observing drift near the meridian and celestial equator provides precise correction. It’s more time-consuming but effective for long focal lengths.
Balancing and Guiding
Balance RA and DEC axes so the mount runs smoothly. Slightly east-heavy balance in RA can keep gears engaged and improve tracking consistency.
- Guiding software: A guide camera monitors a star and sends minute corrections to the mount. Multi-star guiding can improve robustness to seeing fluctuations.
- Dithering: In between some sub-exposures, nudge the mount randomly by a few pixels. Dithering reduces pattern noise and combats walking noise when stacking.
- Calibration: Allow guiding software to calibrate near your target’s declination for optimal results.
When stars elongate in one consistent direction across subs, suspect tracking or polar alignment. If elongation rotates between subs, check flexure, cables, or backfocus spacing.
Exposure Strategy: ISO, Gain, Subexposures, and Calibration Frames
Designing your exposure plan means balancing sky brightness, mount performance, and camera characteristics. Your goal is to expose long enough that sky background noise dominates over read noise, without clipping bright stars or saturating too much signal.
ISO and Gain
- DSLR/Mirrorless ISO: Many astrophotographers use moderate ISOs (e.g., 400–1600) to balance dynamic range and read noise. The optimal ISO varies by camera; testing is valuable. Avoid extreme ISOs that severely compress highlights.
- CMOS Gain: Dedicated cameras specify gain and offset. A gain near the camera’s unity setting is common, but lower gain preserves highlights for bright targets. Check manufacturer curves for read noise and full well depth.
Sub-Exposure Length
Typical broadband subs range from 30–300 s depending on sky brightness and tracking. Narrowband often requires longer subs (180–600 s) due to reduced bandwidth, though modern low-noise CMOS cameras tolerate many shorter subs effectively. Start with modest lengths and evaluate star shapes and histogram placement.
- Histogram: On the back-of-camera preview or capture software, place the sky background peak a bit right of the left edge (not clipped). If it’s hard against the left, increase exposure or ISO/gain. If too far right, decrease exposure.
- Star saturation: A small fraction of clipped stars is normal, but excessive clipping loses color information.
Integration Time
SNR improves with the square root of total integration time. Doubling total exposure improves SNR by about 1.41×. Under light pollution or for faint targets, aim for multiple hours across one or more nights. For example:
- Bright open clusters: 30–90 minutes can work well.
- Moderate emission nebulae: 2–6 hours broadband; 4–10 hours with narrowband for rich detail.
- Faint galaxies/IFN: 6–20+ hours are common for clean background and faint structures.
Calibration Frames
Calibration frames remove sensor artifacts and optical gradients. Take them seriously; they are as essential as light frames:
- Darks: Same exposure, gain/ISO, and temperature as your lights, with the lens cap on. Subtracts thermal signal and amp glow.
- Flats: Correct vignetting and dust shadows. Shoot evenly illuminated frames at a mid-histogram level. Keep focus and optical train unchanged.
- Flat-darks (or dark-flats): Same settings as flats but capped, used to calibrate flat frames—especially useful for modern CMOS sensors.
- Bias: Very short exposures to capture read noise. For some CMOS sensors, bias can interact poorly with calibration; flat-darks are preferred.
Organize calibration libraries by exposure, gain/ISO, and temperature (if using a cooled camera). Good calibration can dramatically improve your final image quality.
Capture Workflow: From Focusing to Meridian Flips
Establish a repeatable sequence so you spend clear nights collecting photons, not troubleshooting. A robust workflow also simplifies stacking and processing.
Focusing for Sharp Stars
- Initial focus on a bright star: Use live view or a quick exposure and zoom in to check star size.
- Bahtinov mask: The diffraction spikes form a cross; when centered, you’re in focus.
- Temperature drift: Re-check focus as temperatures change or after slews.
- Software metrics: Monitor HFR/FWHM values; minimize them for best sharpness.

Artist: Axleottal
Sequencing and Automation
Capture software can automate target centering, autofocus, guiding, dithering, and meridian flips. You can define filter changes, exposure plans, and calibration blocks. Build in pauses for focus checks and plate solves to recenter after dithers or flips.
Meridian Flips and Mount Limits
When a target crosses the local meridian, many equatorial mounts need to flip to avoid hitting the tripod. Configure a safe meridian limit and verify your cabling is slack enough. After the flip, recenter using plate solving, refocus, and resume guiding. Your software should handle this seamlessly once configured.
Practical Capture Script
Here is a simple, adaptable capture plan for a one-night emission nebula session using a dual-band filter and OSC camera:
# Session: Emission Nebula (Dual-Narrowband)

Telescope: 400 mm f/5 refractor + reducer

Mount: EQ mount with guiding

a) Polar align and balance

b) Focus with Bahtinov; verify HFR

c) Slew + plate solve to center target
# Exposures
- 60 x 180 s lights @ gain near unity, cooled to -10°C
- Dither every 2–3 frames
- Autofocus every 60 minutes or 2°C change
# Calibration (same night or next session)
- 30 darks @ 180 s, -10°C
- 30 flats (mid-histogram) @ same orientation
- 30 flat-darks matching flats
Stacking and Processing: Turning Data Into an Image
Processing transforms a stack of dim, noisy subs into a clean, contrasted image. Work nondestructively and save intermediate versions so you can back up if a step goes awry. The exact tools vary by software, but the principles are consistent.
Preprocessing and Stacking
- Calibration: Subtract darks, apply flats and flat-darks/bias appropriately. Some software handles this in one workflow.
- Alignment/registration: Align all subs to a common reference; exclude subs with poor tracking or clouds.
- Integration: Combine frames with a robust method (e.g., median or sigma-clipping) to reject outliers like satellites and planes.
Inspect the integrated master: stars should be tight; no major walking noise; gradients and color casts are expected and will be addressed later.
Linear Processing Steps
While the image is still linear (unstretched), perform foundational corrections:
- Background extraction: Model gradients from light pollution, Moon glow, or vignetting leftover. Place samples carefully away from nebula and star halos.
- Color calibration (for color data): Balance channels so stars look neutral-white on average. Photometric methods can improve star color realism.
- Noise reduction: Linear noise reduction can be more effective; target the background with masks to protect stars and structures.
Nonlinear Processing: Stretching and Contrast
After stretching, the image becomes human-visible. Stretch gradually to preserve star color and avoid clipping.
- Masked stretch or curves: Lift the mid-tones to reveal nebula detail while protecting highlights.
- Local contrast: Gentle local contrast enhancement can bring out dust lanes or nebulosity. Avoid halos around stars.
- Star management: Star masks or star-reduction tools keep stars from overwhelming nebula/galaxy detail. Consider separate star processing and recombination.
Color, Narrowband, and SHO/HOO Palettes
For narrowband data, mapping channels to color palettes is creative and technical:
- HOO: Hα→red, OIII→green/blue produces natural-looking teal/cyan and red regions.
- SHO: SII→red, Hα→green, OIII→blue yields the iconic “Hubble palette.”
- Channel blending: Use channel combinations and pixel math to control star color and balance.
Final Touches
- Color saturation: Increase judiciously, especially for star colors. Avoid oversaturation that reveals processing artifacts.
- Deconvolution/sharpening: Applied carefully with masks, it can recover fine detail, particularly under good seeing.
- Crop and rotate: Remove stacking edges and optimize composition. If the crop is severe, review framing strategy for next time.
- Annotation: Adding labels to galaxies or nebula regions can be educational for sharing.
Advanced Techniques: Narrowband, Filters, and Mosaics
Once you’re comfortable with the full workflow, expand your toolkit for tougher targets and brighter skies.
Narrowband Strategies Under Light Pollution
- OSC + dual-band filters: Fast setup, excellent for emission nebulae. Capture long integrations to compensate for reduced bandwidth.
- Monochrome + filter wheel: Flexibility to tune exposure per channel (e.g., more time in Hα on faint structures). Enables SHO/HOO palettes and advanced combinations.
- Luminance detail: If combining broadband L with RGB, capture more total time in L for structure, then add color with shorter RGB sessions.
Mosaics and Large Targets
For expansive nebulae or regions like the Cygnus star fields, mosaics reveal wide structures at high resolution:
- Overlap: Plan 20–30% overlap to ensure reliable stitching.
- Consistent integration: Match exposure times and calibration across panels.
- Stitching: Preprocess each panel identically before stitching; then apply global gradient removal.

Artist: NASA, ESA, Benjamin F. Williams (UWashington), Zhuo Chen (UWashington), L. Clifton Johnson (Northwestern); Image Processing: Joseph DePasquale (STScI).
Multi-Night Integration and Project Planning
Challenging targets may require many nights. Keep logs of sky conditions, camera settings, and filter usage. Plate solving ensures the same framing on subsequent nights. Use consistent exposure strategy to merge data cleanly.
Hardware Refinements
- Off-axis guiding: Reduces differential flexure at long focal lengths.
- Autofocus motors: Tighten focus consistency through the night and across temperature swings.
- Pier or permanent setup: If feasible, a fixed setup saves time and improves repeatability.
Troubleshooting Common Problems in Deep-Sky Imaging
Even experienced imagers encounter issues. Develop a diagnostic mindset and change one variable at a time.
Star Shapes and Tracking
- Elongated stars in one direction: Check polar alignment, guiding aggressiveness, balance, and wind. Shorten sub-exposure length if necessary.
- Coma or field curvature: Use appropriate correctors and verify backfocus spacing. Tilt adapters can address sensor tilt causing asymmetry.
- Differential flexure: If a guide scope is used, make sure it’s rigidly mounted; consider OAG for long focal lengths.
Noise, Gradients, and Calibration Artifacts
- Banding or walking noise: Enable dithering and avoid repeating patterns in tracking errors.
- Uneven background or vignetting: Improve flat-field calibration; ensure flats match optical configuration and that dust hasn’t moved between flats and lights.
- Hot pixels or amp glow: Use well-matched darks; verify sensor temperature stability if using a cooled camera.
Focus and Seeing
- Bloating stars: Focus drift, high humidity, or poor seeing can bloat stars. Refocus periodically and consider shorter subs when seeing is poor.
- Soft detail: Overaggressive noise reduction or deconvolution can smear structure. Apply masks and subtle adjustments.
Mount and Cable Issues
- Snags during meridian flip: Reroute cables, add strain relief, and test flips during daylight.
- Backlash hiccups: Adjust guiding settings (e.g., increased hysteresis or backlash compensation), and avoid balance that causes gear float.
Frequently Asked Questions
How many sub-exposures do I need for a good image?
The number depends on target brightness, sky quality, and camera noise, but more total integration time is always beneficial. As a starting point, aim for at least 2–4 hours on moderate nebulae in broadband, or 4–8 hours for narrowband. If your sky is bright or the target is faint (like some galaxies or integrated flux nebula), plan for 10–20+ hours across several nights. Prioritize consistent, well-calibrated subs, and don’t hesitate to discard poor frames—quality matters as much as quantity.
Can I shoot galaxies under heavy light pollution?
Yes, but it’s challenging. Light pollution raises the background and swallows faint outer arms and dust lanes. Strategies include: long total integration, careful gradient removal, and collecting data on moonless nights. Mild broadband filters may help a bit but can distort galaxy colors; many imagers prefer no broadband filter for galaxies and instead travel to darker skies when possible. If city-bound, consider emission nebulae with narrowband filters, which are more resistant to skyglow.
Final Thoughts on Mastering Deep-Sky Astrophotography
Deep-sky astrophotography rewards patience, planning, and disciplined technique. The essential pillars—precise polar alignment, balanced exposure strategy, methodical capture workflow, and thoughtful processing—work together to lift faint structures out of the sky background and reveal the cosmos in color and detail.
Start with a stable mount and a short, forgiving focal length. Pick seasonal targets that rise high. Build your data set over multiple nights if needed, and calibrate carefully. As you grow, add guiding refinements, narrowband filters for urban skies, and advanced techniques like mosaics or off-axis guiding. Above all, treat each session as data gathering for a long-term project; even modest rigs can produce striking images with clean technique and adequate integration time.
If you found this guide helpful, explore our related articles on equipment optimization and processing workflows, and subscribe to our newsletter for new deep-sky tutorials, seasonal target picks, and practical gear tips delivered weekly.