Table of Contents
- What Is an 8-Inch Dobsonian Telescope?
- Key Specifications and Optical Performance Metrics
- Planetary, Lunar, and Deep-Sky Observing with an 8-Inch Dob
- Mount Mechanics, Motion, and Balance
- Essential Accessories and Upgrades for 8-Inch Dobsonians
- Collimation, Cooling, and Maintenance Best Practices
- Setup, Transport, and Storage: Real-World Ergonomics
- Push-To, GoTo, and Digital Tools for Finding Objects
- Comparing 6″, 8″, and 10″ Dobsonians: Value and Tradeoffs
- Budget Planning and What to Buy First
- Frequently Asked Questions
- Final Thoughts on Choosing the Right 8-Inch Dobsonian Telescope
An 8-inch Dobsonian telescope has earned a reputation as the all-around champion for visual stargazing. It is large enough to deliver satisfying views of galaxies, nebulae, globular clusters, planets, and the Moon, yet compact and affordable enough for many backyard observers. Whether you are purchasing your first serious instrument or upgrading from a small refractor or tabletop reflector, understanding the strengths, limits, and practical details of an 8-inch Dob will help you get the most from every clear night.

What Is an 8-Inch Dobsonian Telescope?
An 8-inch Dobsonian is a Newtonian reflector with a primary mirror 8 inches (about 203 mm) in diameter, mounted on a simple, stable, alt-azimuth base. The design was popularized by John Dobson for its emphasis on large aperture, low cost, and ease of use. The telescope typically consists of:
- A parabolic primary mirror housed in a tube or truss structure.
- A flat secondary mirror that redirects light out the side of the tube to a focuser.
- An alt-azimuth “rocker box” base that allows smooth motion up-down (altitude) and left-right (azimuth).
- A simple finder (red-dot or optical), eyepieces, and occasionally a cooling fan.
Most 8-inch Dobsonians have focal ratios around f/6 (focal length near 1200 mm), though some are f/5 (~1000 mm). At f/6, the tube length is roughly 1200 mm, which still fits in a typical car and standard closets. This aperture and focal ratio combination is considered a sweet spot because it balances field of view, image brightness, portability, collimation tolerance, and cost.
Dobsonians are prized for their simplicity: you point the tube at a target and nudge the scope to track it manually. There is no requirement for polar alignment, counterweights, or power for basic operation. Many observers find that the intuitive, “point-and-look” experience encourages longer sessions and more time at the eyepiece.
If you are wondering whether this is the right instrument for your needs, the sections on observing performance by target type, portability and setup, and the comparison with 6- and 10-inch Dobsonians will help frame your decision.
Key Specifications and Optical Performance Metrics
When evaluating an 8-inch Dobsonian, a handful of specifications and rules of thumb will help you predict its performance. Understanding these will also inform your choices in eyepieces, finders, and upgrades.
Focal Ratio, Focal Length, and Field of View
Most 8-inch Dobs are f/6 (about 1200 mm focal length). Some trend to f/5 (~1000 mm). Focal ratio influences the following:
- Field of view (FOV): Shorter focal length (f/5) yields wider potential fields for the same eyepiece. At f/6, a 30 mm, 68° eyepiece gives about 40x and roughly 1.7° true field (approximate). A 25 mm Plössl (50° AFOV) at f/6 gives ~48x and ~1.0° true field.
- Coma visibility: Faster mirrors (lower f/number) show more off-axis coma. At f/6, many observers find coma modest; at f/5, coma becomes more apparent, and a coma corrector may be desirable for wide-field observing.
- Collimation tolerance: f/6 is more forgiving; f/5 requires more precise collimation to maintain sharpness, especially at high power.
Useful approximations you can keep in your observing notebook:
Magnification = Telescope focal length / Eyepiece focal length

Exit pupil (mm) = Eyepiece focal length / Telescope f-ratio

True field (deg) ≈ Apparent FOV (deg) / Magnification
Example at f/6 (1200 mm): with a 12 mm eyepiece, magnification ≈ 100x. With a 30 mm eyepiece, exit pupil ≈ 5 mm. Aim to keep the exit pupil near or below your dark-adapted eye pupil (often 6–7 mm for younger observers and 4–6 mm for many adults) to avoid light loss and vignetting by the eye.
Resolution and Light Gathering
- Aperture: 203 mm collects about (203/7)^2 ≈ 840 times as much light as a dark-adapted 7 mm pupil, and roughly (203/60)^2 ≈ 11 times that of a 60 mm refractor.
- Dawes limit: θ (arcseconds) ≈ 116 / D(mm). For 203 mm, θ ≈ 0.57″. The Rayleigh criterion gives ≈ 0.68″. These are theoretical limits; atmospheric seeing often dominates, typically limiting practical resolution to 1–2″ on many nights.
- Maximum useful magnification: A common guideline is 25–50x per inch of aperture. For 8 inches, that’s 200–400x. In practice, 200–250x is frequently usable; higher powers demand steady seeing, precise collimation, and well-cooled optics.
Optical Quality and Collimation
Most commercial 8-inch Dobsonians feature parabolic primary mirrors designed to a standard sufficient for sharp visual performance. Sample-to-sample variations exist, but with accurate collimation and cooled optics, these telescopes are capable of crisp planetary detail and deep-sky contrast. Mechanical stability of the focuser, mirror cell, and spider also helps maintain collimation through altitude changes.
Weight, Size, and Ergonomics
Typical 8-inch solid-tube Dobsonians weigh roughly 20–27 kg (45–60 lb) combined for the tube and base, with tube lengths around 1.2 m (4 ft). Most observers carry the tube and base separately. The tube diameter is usually ~235–250 mm, allowing comfortable cradle or strap carries. This balance of aperture and portability is a major reason the 8-inch class is so popular.
Tip: In the store or at a star party, lift the base and tube separately to judge comfort. If you can carry each piece 10–15 meters without strain, you’ll likely find the scope pleasant to handle in routine use.
Planetary, Lunar, and Deep-Sky Observing with an 8-Inch Dob
An 8-inch Dobsonian is a versatile visual instrument, capable of rewarding views across the Solar System and deep sky. The detailed performance depends on seeing, transparency, light pollution, and your eyepiece selection.
Lunar and Planetary Performance

- Moon: Craters, rilles, wrinkle ridges, and domes pop at 150–250x on steady nights. Neutral-density or variable polarizing filters can moderate glare near full Moon.
- Jupiter: Cloud banding, festoons, the Great Red Spot (when visible), and moon shadow transits are well within reach. A 8-inch mirror can show subtle color shadings when seeing is good and optics are cooled and collimated.
- Saturn: Cassini Division, multiple belts, and several moons show nicely at 150–250x. On excellent nights, Encke’s Minima may hint at the inner ring structure, but seeing often limits this.
- Mars: During favorable apparitions, polar caps and dark albedo features like Syrtis Major are visible. Atmospheric dust events can reduce contrast; patience and careful focusing help.
Planetary observing benefits from steady tracking. While Dobsonians are manual, smooth motions and a comfortable observing stance allow fine control. A chair adjusted to keep your head steady at the eyepiece dramatically increases perceived detail. For additional tracking help, see push-to and digital aids.
Deep-Sky Wonders: Nebulae, Clusters, and Galaxies
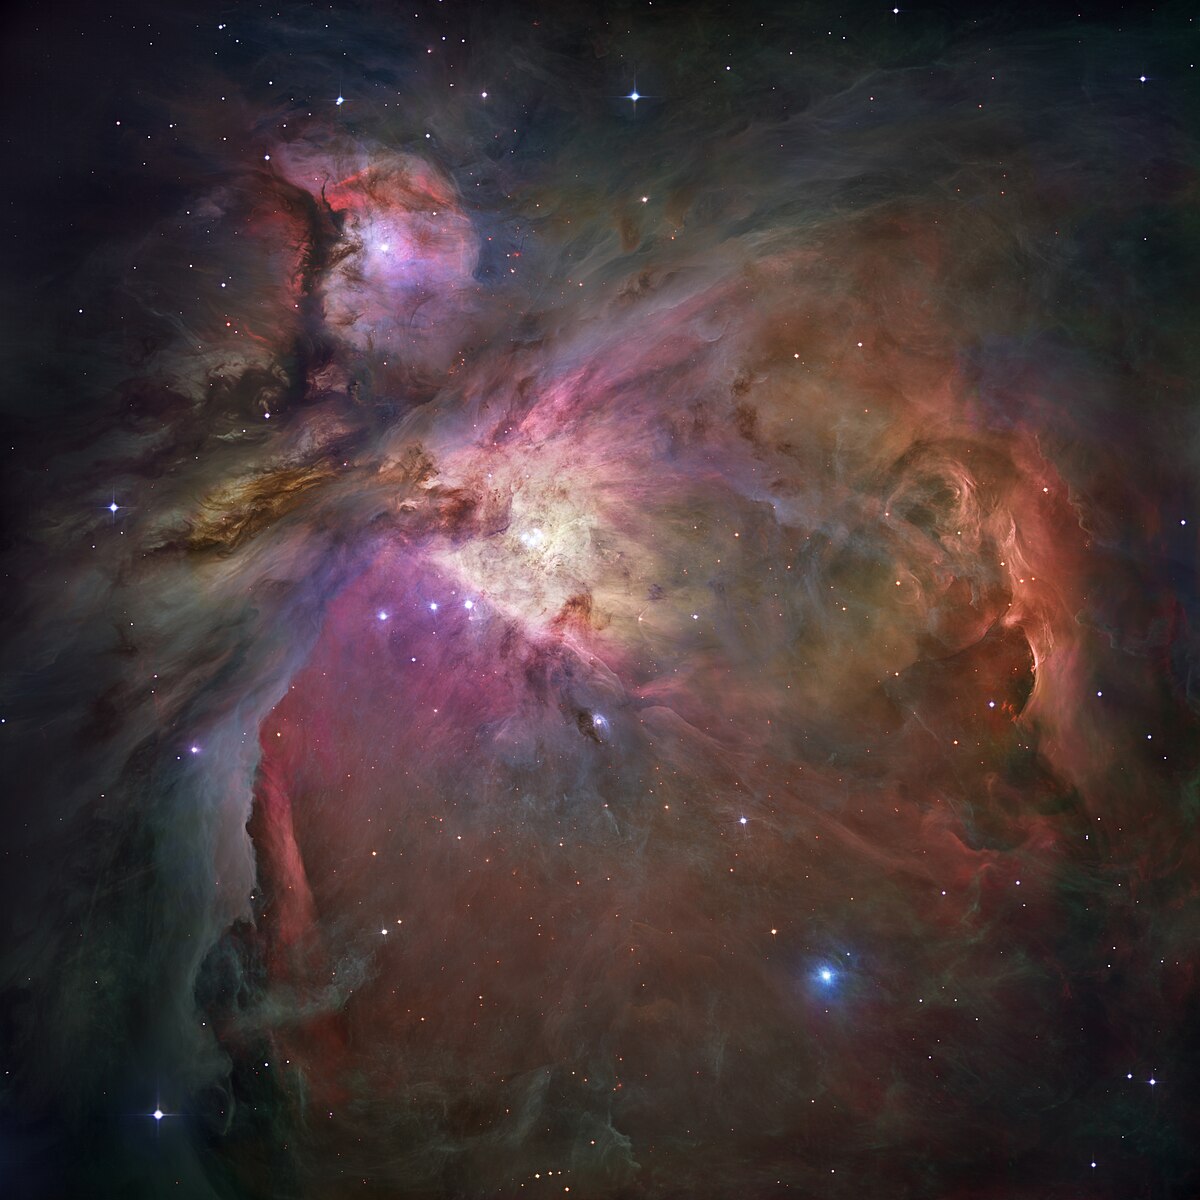
- Emission nebulae: Under dark skies, objects like the Orion Nebula (M42) and the Lagoon (M8) are spectacular. Narrowband filters (UHC-type) can enhance contrast on many nebulae by suppressing skyglow.
- Planetary nebulae: The Ring (M57) and Dumbbell (M27) show their shapes well at moderate power. Higher magnification can reveal structure once you locate them at lower power.
- Globular clusters: M13 and M5 begin to resolve into stars with an 8-inch mirror, especially with good transparency. Averted vision and incremental magnification reveal more stars.
- Galaxies: M31, M81/M82, and many Messier galaxies are accessible. Under light-polluted skies, galaxies can appear faint; dark sites are transformative. Look for bright cores and elongations; spiral arms require darker skies and patient observation.
- Open clusters: From wide, rich fields like the Double Cluster to tighter groupings such as M35 and M37, an 8-inch Dob offers pleasing star color and sharpness.
Deep-sky observing benefits from a range of exit pupils. For many targets, 2–5 mm exit pupils feel bright and contrasty. That corresponds to eyepieces around 12–30 mm at f/6. When hunting faint galaxies, start with lower magnification to spot the target, then increase magnification to darken the background and improve contrast.
If your primary interest is sweeping the Milky Way, consider a wide-angle 2-inch eyepiece as discussed in accessories. For city observing, prioritize filters and an accurate finder as described in digital tools and finding objects.
Mount Mechanics, Motion, and Balance
Dobsonians are defined by their simple alt-az mount. The base generally uses Teflon-on-laminate bearings (or similar low-friction interfaces) for smooth azimuth motion and semicircular altitude bearings or trunnions for controlled elevation movement.

Altitude and Azimuth Bearings
- Azimuth: The ground board and rocker box often ride on three or more PTFE pads against a textured laminate, providing smooth, even resistance.
- Altitude: Large-radius bearings distribute weight and improve balance across different eyepiece loads. Some designs include adjustable clutches or spring tensioners.
Good Dobsonian motion is crucial for manual tracking at high magnification. When testing a scope, try centering a bright star at 200x and see if you can nudge the scope without overshoot or stiction. Smooth starts and stops, with predictable resistance, are ideal.
Balance and Payload
Heavy eyepieces, finder scopes, or cameras can change the scope’s balance. Many owners add magnetic counterweights or use adjustable altitude bearings. If you plan to use 2-inch eyepieces or a heavy binoviewer, ensure your scope can compensate without slipping. Simple solutions include:
- Magnetic weights placed near the rear of the tube.
- Moving the tube forward in its cradle, if the design allows.
- Adding friction with felt or an adjustable clutch.
For best results, keep accessories consistent through a session and rebalance after major changes. Smooth balance makes manual tracking of planets and double stars much easier.
Essential Accessories and Upgrades for 8-Inch Dobsonians
Accessories can significantly influence comfort and performance. Prioritize items that help you find objects, achieve sharp focus, and maintain good collimation.
Finders: Red-Dot, RACI, and Hybrids
- Red-dot finder (RDF): Projects a small red dot on a clear window. Great for initial pointing using both eyes open.
- RACI (Right-Angle, Correct-Image) finder: Optical finder with a diagonal that shows an upright, left-right correct view. Comfortable for star-hopping and matching star charts.
- Hybrid setup: Many observers use both: an RDF for rough pointing and a RACI to finish the hop. This combination is effective with paper atlases or apps detailed in digital tools.
Eyepiece Strategy
A minimal but effective eyepiece set might include:
- Low power, wide field (2-inch, 25–35 mm): For sweeping, finding, and large nebulae. At f/6, a 30 mm wide-field eyepiece gives a 5 mm exit pupil and around 40x.
- Medium power (12–18 mm): Versatile for clusters, galaxies, and nebulae framing.
- High power (5–9 mm): For lunar, planetary, and resolving globular clusters when seeing permits.
A quality 2x Barlow lens can double the utility of a small set. Keep an eye on exit pupil: with an 8-inch f/6, a 40 mm eyepiece yields ~6.7 mm exit pupil; if your eye’s pupil is smaller, you may clip light and not gain brightness. For urban skies, slightly higher magnifications can improve contrast by darkening the background.
Filters for Visual Contrast
- UHC-type narrowband: Enhances many emission nebulae by passing OIII and H-beta lines while suppressing skyglow.
- OIII filter: Especially effective on planetary nebulae and supernova remnants.
- Neutral-density or variable polarizer: Useful on the Moon to reduce glare and improve comfort.
If you’re new to filtering, start with a good narrowband filter for the most general benefit. Complement with an OIII as your interests expand into faint nebulae.
Focuser and Cooling
- Dual-speed focuser: Fine focus helps snap stars to pinpoints and improves planetary detail.
- Cooling fan: A rear-cell fan reduces mirror boundary layer and speeds thermal equilibrium. See cooling tips for usage.
Comfort and Organization
- Adjustable observing chair: Stable head position improves acuity and reduces fatigue.
- Red flashlight: Preserves dark adaptation while reading charts.
- Accessory case: Keeps eyepieces, filters, and tools organized and clean.
Collimation, Cooling, and Maintenance Best Practices
Reflectors reward you when collimation and cooling are under control. Good mechanical alignment and temperature equilibrium can be the difference between mushy images and crisp, high-contrast views.
Fast, Reliable Collimation
Collimation is the alignment of the primary mirror, secondary mirror, and focuser axis. A typical routine uses simple tools:
- Center-spot the primary: Most mirrors are already spotted. If not, use a template to place a paper reinforcement ring at the center—this helps with Cheshire and laser tools.
- Secondary alignment: Use a sight tube or collimation cap to center the secondary under the focuser. Adjust secondary tilt so the primary mirror center spot is under the crosshairs.
- Primary tilt: Use a Cheshire or barlowed laser to align the primary until the center spot reflection is centered.
A Cheshire and a simple collimation cap are affordable and effective. Lasers can be convenient, but ensure they are themselves collimated. Recheck collimation after moving the scope or changing altitude; with experience, the whole process takes just a couple of minutes.
Cooling and Thermal Equilibrium
- Acclimation time: Expect 20–60 minutes depending on temperature differential between indoors and outdoors. Larger differences require more time.
- Rear fan: A gentle fan can break up the boundary layer on the mirror surface and speed cooling. Avoid strong vibrations by using soft mounts or low speed.
- Tube currents: Even after the mirror cools, warm air in the tube can soften images. Observing downwind from the focuser side and keeping the tube shaded can help.
Cleaning and Care
- Mirror cleaning: Clean sparingly. Dust rarely affects visual performance. When needed, use distilled water rinses and gentle soap, avoiding pressure on the coating. Allow to air dry or use clean air to blow off droplets.
- Focuser and bearings: Keep free of grit. Avoid lubricants on Teflon bearings; they are designed to run dry against laminate.
- Storage: Store covered to keep dust off. Ensure ventilation if stored in damp areas to prevent mold and corrosion.
Dialed-in collimation and cooling dramatically enhance planetary views. If you are chasing subtle features on Jupiter or splitting close double stars, revisit this section and the observing tips for power selection.
Setup, Transport, and Storage: Real-World Ergonomics
Ease of use is where the 8-inch Dobsonian shines. Most observers leave the base assembled and carry the tube separately. In small spaces, the tube can stand in a corner and the base can slide under a table.
Setup Routine
- Carry the base outside and place it on stable ground.
- Carry the tube, seat it in the altitude bearings, and attach any springs or clamps.
- Add finder(s), eyepiece tray, and accessories.
- Power on the cooling fan if you use one and begin collimation checks.
- Align the finder on a distant terrestrial object or a bright star.
From door to observing, experienced users can be ready in 5–10 minutes, not including thermal acclimation. The quick start is a major advantage for opportunistic observing during clear windows.
Transport and Carrying

- Vehicle fit: Solid-tube 8-inch Dobs typically fit across a sedan’s back seat or in a hatchback. Use blankets or foam to prevent rolling.
- Straps and handles: A wide strap or handle on the tube helps. For longer walks, a hand truck can move the entire scope and base together.
- Urban observing: If you observe from balconies or small patios, measure doorways and consider a dolly for rolling the scope pre-assembled.
Storage Considerations
- Dust covers: Keep optics capped. A shower cap over the mirror end of the tube is a common, inexpensive solution.
- Humidity: Avoid damp basements without ventilation. Desiccant packs in the eyepiece case help protect coatings and gear.
- Temperature swings: Avoid hot attics where adhesives and coatings can suffer. A closet or interior room with stable temperature is ideal.
When portability is a major concern, revisit the aperture comparison to evaluate whether a 6-inch might serve better, or whether a collapsible 8-inch design would help.
Push-To, GoTo, and Digital Tools for Finding Objects
While the classic Dobsonian ethos is manual star-hopping, technology can reduce the learning curve and expand your observing program. Options range from analog setting circles to fully motorized GoTo systems.
Manual Star-Hopping with Apps and Atlases
- Paper atlases: Still effective and satisfying. Use under a red light and match the orientation with a RACI finder.
- Mobile apps: Many planetarium apps show real-time sky maps and provide star-hopping routes. For manual Dob use, turn on night mode and consider phone screen dimming to preserve night vision.
- Analog setting circles: A degree circle on the base plus an inclinometer on the tube can approximate alt-az pointing. Look up target altitude and azimuth in your app, set the angles, and sweep the area with a low-power eyepiece.
Push-To (Digital Setting Circles)
Push-to systems use encoders on the altitude and azimuth axes to track your telescope’s position and guide you to targets via a handset or app. They preserve the quiet, low-power simplicity of a Dobsonian while accelerating object acquisition. Accuracy depends on encoder resolution, orthogonality, and a good two-star alignment after setup.
GoTo Dobsonians
GoTo systems motorize both axes, enabling automatic slewing and tracking. Benefits include ease of use at high power—planets stay centered longer—and the ability to share views at outreach events without constant nudging. Considerations include power requirements, added weight, and cost. If you value manual simplicity and silent operation, push-to might better fit the Dobsonian philosophy. If tracking is a priority—for example, for sketching or sharing with groups—GoTo is compelling.
Whichever route you choose, maintaining accurate collimation and a well-aligned finder remains essential for quick acquisition and sharp views.
Comparing 6″, 8″, and 10″ Dobsonians: Value and Tradeoffs
Choosing aperture is a balance of cost, weight, cool-down, and the views you seek. Here are practical differences among 6-, 8-, and 10-inch Dobsonians:
6-Inch (150 mm)
- Pros: Light, compact, fastest cool-down, generally less expensive. Easy to carry assembled.
- Cons: About 44% of the light-gathering of an 8-inch. Fainter galaxies and finer planetary detail are less accessible.
- Best for: Beginners with tight storage or frequent stairs, quick sessions, travel scopes.
8-Inch (203 mm)
- Pros: Large step up in light gathering and resolution over a 6-inch, still manageable by one person. Versatile for both Solar System and deep sky.
- Cons: Heavier base and longer tube than a 6-inch; needs collimation and cool-down attention.
- Best for: All-around visual observing from backyard to dark site. A goldilocks option for many amateurs.
10-Inch (254 mm)
- Pros: ~56% more light than an 8-inch; enhanced galaxy and globular cluster performance. Higher resolution potential.
- Cons: Bigger and heavier; longer cool-down; more demanding on mounting and balance; cost increases.
- Best for: Observers prioritizing deep-sky detail who can handle the extra bulk and setup demands.
For many, the 8-inch offers the strongest mix of capability and convenience. If your observing site involves stairs or frequent car travel, the portability difference between 8 and 10 inches can be decisive. If you primarily observe quick planetary sessions from home, a 6-inch may yield more use simply because it’s easier to deploy. For a nuanced decision, tie these tradeoffs back to setup and transport realities and your target list in observing performance.
Budget Planning and What to Buy First
Buying a telescope is the start of a system, not just a single purchase. A thoughtful plan ensures you spend where you gain the most observing benefit.
Core Telescope Package
- Scope, base, and focuser: Most 8-inch Dobs include a 2-inch focuser, finder, and 1–2 basic eyepieces. These are sufficient to start observing immediately.
- Cooling fan: If not included, a simple 12 V fan and battery pack are affordable and valuable for sharper views sooner.
High-Impact Early Additions
- Adjustable chair: The single most cost-effective upgrade for visual observing.
- Cheshire or collimation cap: Ensure fast, precise alignment (collimation).
- Wide-field eyepiece: A 24–30 mm wide-angle transforms star-hopping and Milky Way scanning.
- UHC-type filter: Broad nebula contrast improvement from suburbs to dark sites.
Later, Nice-to-Haves
- OIII filter: For dedicated nebula hunters.
- Push-to kit or GoTo: If star-hopping doesn’t click, technology can help you see more each session.
- Coma corrector (for f/5): Consider if off-axis coma bothers you with wide-field 2-inch eyepieces.
Before purchasing multiple eyepieces, use your basic set over a few sessions to learn your preferences. Your observing targets and sky conditions will guide the most rewarding additions. Keep an eye on exit pupil and magnification ranges from optical metrics when choosing focal lengths.
Frequently Asked Questions
Is an 8-inch Dobsonian too big for a beginner?
Not necessarily. While bigger than starter scopes, many beginners find an 8-inch Dobsonian easy to learn and extremely rewarding because it shows so much more. The key considerations are whether you can comfortably carry the base and tube separately, and whether you have space to store a 1.2 m tube. If portability fits your routine, the 8-inch aperture reveals far more detail on planets and deep-sky objects than smaller instruments, accelerating your learning and enjoyment.
Can I do astrophotography with an 8-inch Dobsonian?
Dobsonians are designed primarily for visual observing. You can capture snapshots of the Moon and bright planets with a smartphone or a simple planetary camera, especially if you have tracking (GoTo Dob or equatorial platform). Long-exposure deep-sky imaging typically requires an equatorial mount for accurate tracking. If imaging is your main goal, consider a setup optimized for that purpose. If visual observing is your priority, an 8-inch Dobsonian excels.
Final Thoughts on Choosing the Right 8-Inch Dobsonian Telescope
An 8-inch Dobsonian telescope balances light-gathering power, resolution, and practicality better than almost any other amateur setup. It is large enough to transform views of the night sky—from detailed lunar landscapes and planetary belts to textured nebulae and star-packed clusters—yet simple and portable enough to use frequently.
To select wisely, focus on how and where you observe. If you value rapid setup and silent, manual control, a classic Dobsonian with smooth bearings may be ideal. If you prioritize quick object acquisition or sharing views at high magnification, a push-to or GoTo option can make sessions more productive. Invest early in comfort and fundamentals: an observing chair, good collimation and cooling habits, and a versatile eyepiece set. As you gain experience, refine accessories to match your favorite targets, using the guidelines in specs and performance and observing by target.
Above all, the best telescope is the one you will use often. If an 8-inch Dobsonian fits your storage, transport, and observing habits, it can be a faithful companion for years—capable of both casual weeknight looks at the Moon and ambitious deep-sky marathons under dark skies. If you enjoyed this guide, consider subscribing to our newsletter to receive future articles on gear tuning, observing techniques, and seasonal targets. Clear skies!
