Table of Contents
- Introduction
- Deep-Sky Processing Workflow Overview
- Calibrating and Stacking Data
- The Linear Stage: What to Do Before Stretching
- Nonlinear Stretching and Tone Mapping
- Color Calibration and Narrowband Combinations
- Noise Reduction and Detail Enhancement
- Controlling Stars: Reduction, Star Masks, Starless
- Gradients, Vignetting, and Background Neutralization
- Advanced Techniques: Deconvolution, HDR, Drizzle
- Software Tools and Suggested Workflows
- Case Studies: Galaxy and Nebula Workflows
- Troubleshooting and Common Pitfalls
- Data Management, File Formats, and Color Spaces
- Repeatable Checklist and Processing Recipe
- Ethical Editing and Scientific Integrity
- FAQ: Equipment and Capture
- FAQ: Processing and Troubleshooting
- Conclusion
Introduction
Deep-sky astrophotography rewards patience and practice. While gathering clean, well-tracked exposures under dark skies is critical, many astrophotographers discover that post-processing is where their data truly comes alive. From calibrating raw frames and stacking, to subtracting gradients, stretching the histogram, reducing noise, and refining color, each step influences the final result. This long-form guide breaks down a modern, repeatable workflow that works with popular software such as PixInsight, Siril, AstroPixelProcessor, DeepSkyStacker, Photoshop, and GIMP.
We will emphasize a science-informed approach—knowing what each step does to your data—so you can make intentional, reversible edits. You will also find a practical checklist you can follow project after project, plus two detailed case studies for both broadband galaxies and narrowband emission nebulae.
If you are starting out, skim the workflow overview to orient yourself, then study the calibration and stacking and linear processing sections. Experienced imagers can jump to advanced techniques or the FAQs for targeted tips.
Deep-Sky Processing Workflow Overview
Successful processing benefits from a consistent, ordered workflow. Think of it as a pipeline that protects signal integrity and manages noise. While there are variations, the following sequence is widely used for both broadband and narrowband projects:

Attribution: ESO
- Calibrate lights with bias/offset, darks, and flats to remove sensor signatures and optical artifacts.
- Register/Align frames to a common reference to correct dither offsets and guiding drift.
- Integrate/Stack the aligned frames to boost signal-to-noise ratio (SNR) through averaging and rejection.
- Linear processing while the image is not yet stretched: gradient removal, color calibration, noise analysis, and sometimes deconvolution.
- Stretch the image (nonlinear) to reveal faint structures, balancing contrast with dynamic range.
- Noise reduction and detail enhancement, often with masks to protect stars and background.
- Star management (reduction or separation), color refinement, local contrast, and final touch-ups.
- Export in appropriate color space and bit depth for web or print.
Keep in mind that some steps (e.g., gradient removal or color calibration) are best done on linear data. Others, such as targeted noise control and local contrast, are often most effective post-stretch. The rest of this article expands on each stage and explains why the order matters.
Calibrating and Stacking Data
Calibration and stacking are the foundation of clean astrophotography. When done correctly, they remove sensor artifacts and dramatically increase SNR.
Calibration frames: what they fix
- Bias (Offset): Captures the camera’s readout pattern at the shortest possible exposure with the shutter closed. Useful for DSLRs and some CCD workflows. Many modern CMOS processes rely on flat-dark frames instead.
- Dark frames: Same exposure time, gain/ISO, and temperature as your light frames, with the shutter closed. They map dark current and hot pixels.
- Flat frames: Taken with an evenly illuminated field at the same focus and optical train orientation as your lights. They correct vignetting and dust motes.
- Flat-darks (Dark flats): Same exposure and gain as flats to calibrate them, especially important for CMOS sensors.
Use matching temperatures for cooled cameras and maintain consistent gain/ISO across lights and calibration frames. Flat frames should be acquired whenever you reconfigure the optical path.
Registration and alignment
After calibration, your images are registered to a common reference using star detection and pattern matching. Good registration compensates for dithers and guiding drift, and it is essential to avoid softening the stack. Tools such as PixInsight’s StarAlignment/Siril’s Register/AstroPixelProcessor’s Align do this effectively.
Integration: how many subframes?
Signal-to-noise improves with the square root of the number of frames, so doubling total integration time increases SNR by roughly 41%. The number of subframes depends on the target’s surface brightness, sky quality, and your camera’s read noise. A practical goal for many targets is 6–12 hours of total integration for broadband galaxies and 10–20 hours for faint narrowband nebulae, split into 2–10 minute subexposures based on sky brightness and tracking performance.
Stacking parameters that matter
- Rejection method: Use sigma-clipping or Winsorized sigma-clipping for outlier removal (satellite trails, planes). Tune low/high sigma values against your data.
- Normalization: Scale subframes to account for transparency changes. Good normalization prevents gradients in the integrated image.
- Weighting: Weight subframes by quality metrics like FWHM, eccentricity, and SNR. Many tools auto-weight; verify outliers aren’t overweighted.
- Drizzle (optional): If you dither adequately and your system is undersampled, consider 2x drizzle integration to recover resolution. See Advanced Techniques.
Tip: Inspect subframes for trailed stars, wind gusts, or passing clouds. Culling the worst 10–30% often improves the final stack more than keeping every frame.
The Linear Stage: What to Do Before Stretching
Many powerful operations are best performed while the image remains linear (unstretched). In this stage the histogram is still compressed to the left; faint detail is present but hidden.
Background modeling and gradient removal
Light pollution, moonlight, and uneven illumination introduce gradients. Linear data preserves a simpler relationship between signal and background, making modeling more accurate. Use dynamic background extraction or automated background modeling tools to sample the background and subtract a model. See Gradients for details.
Color calibration
For broadband images, color calibration sets white balance based on stars of known color or the overall background (assumed to be near neutral). Photometric methods match star colors to catalog values for physically meaningful color. Perform this before stretching; it is harder to get right later. More in Color Calibration.
Deconvolution (optional, linear)
Deconvolution attempts to reverse blur from atmospheric seeing and optical imperfections using a point spread function (PSF). It can add crispness, especially to galaxy cores and small structures. Apply deconvolution carefully on linear data with a robust star/structure mask; overdoing it produces ringing halos. We revisit the method in Advanced Techniques.
Linear noise analysis
Estimate noise characteristics before stretching. Some workflows apply gentle linear noise reduction to suppress background grain without smearing structure. Others postpone most denoise work until after the stretch. Either approach benefits from masks that protect stars and highlights.
Nonlinear Stretching and Tone Mapping
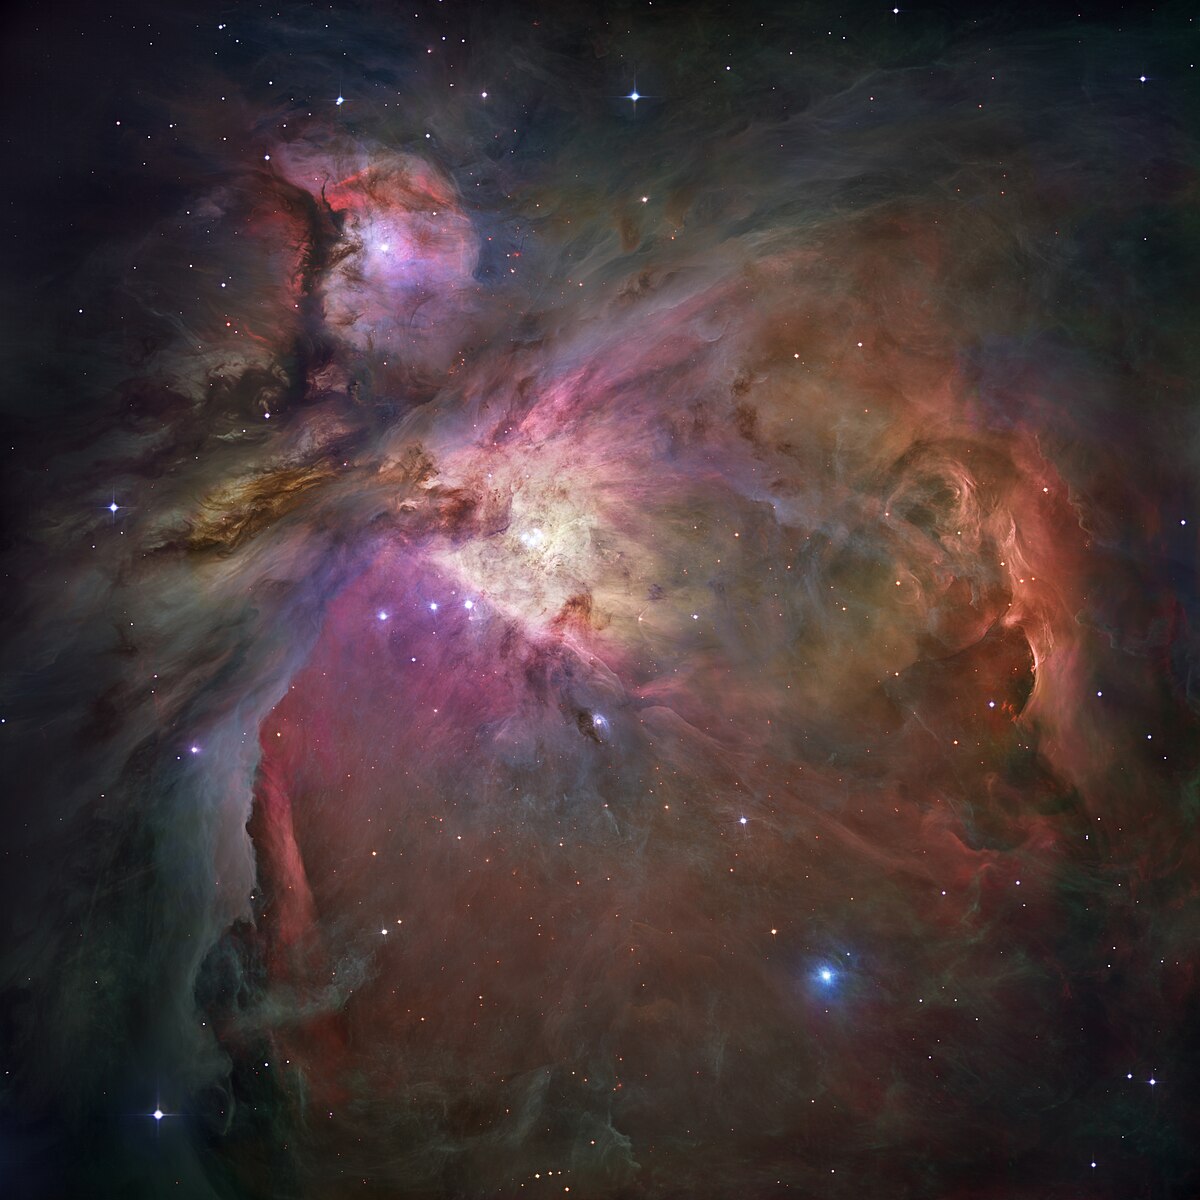
Attribution: NASA, ESA, M. Robberto (Space Telescope Science Institute/ESA) and the Hubble Space Telescope Orion Treasury Project Team
Stretching remaps pixel intensities from a dark, compressed histogram to a visible dynamic range. The goal is to reveal faint dust and nebulosity while preserving highlight details and keeping stars controlled.
Methods for stretching
- Histogram transformation: Move black point just above background noise, raise midtones to reveal detail, and protect highlights. Incremental stretches offer fine control.
- Masked stretch: Automatically protects stars and bright regions with a mask to avoid blowing them out. Useful for star-rich fields.
- Arcsinh/sinh stretch: Preserves star colors while boosting faint structures. Often used for star color retention in dense fields.
- Curves: After an initial stretch, curves adjust contrast in specific tonal regions to shape the image’s visual weight.
Avoid clipping
Monitor black and white clipping during each step. True black clipping eliminates faint data and can create harsh transitions. Similarly, clipped highlights lose structure in bright nebula cores or galaxy centers. Small increments and frequent histogram checks prevent mistakes.
Local contrast controls
Once the global stretch is complete, tools like local histogram equalization or clarity filters can add depth. Keep these adjustments subtle to avoid halos or crunchy textures. Masking helps apply local contrast only to appropriate regions—see Noise and Detail.
Color Calibration and Narrowband Combinations
Broadband color calibration
- Photometric Color Calibration (PCC): Queries star catalogs to match star colors inside your field to their expected color indices. This yields realistic white balance and star hues.
- Background neutralization: Uses sampled background to set a neutral tone. Do this after gradient removal but before stretching to avoid bias.
- Star color protection: During later stretches, use star masks or arcsinh methods to preserve chroma.
Narrowband combinations
When shooting with mono cameras and narrowband filters, you will combine channels into color images. Popular maps include:
- HOO (H-alpha to R, OIII to G and B): Produces natural-looking teal/blush hues emphasizing hydrogen and oxygen regions.
- SHO (SII to R, Ha to G, OIII to B; the “Hubble palette”): Yields golden reds and cyan-blues while separating emission structures.
- Foraxx and other dynamic palettes: Modern transforms that blend SHO channels using pixel math to improve color separation.

Attribution: Astrofalls
After mapping, balance color with curves and selective saturation. Use masks to independently tune nebula versus star color—often stars in narrowband combinations appear desaturated or greenish, so consider replacing narrowband stars with RGB stars or use SCNR/green suppression sparingly. See Star Control for star replacement techniques.
Noise Reduction and Detail Enhancement
Noise reduction is best when targeted and restrained. Aggressive denoise can smear fine structure. Always work with masks and evaluate changes at 100% zoom.
Types of noise you’ll encounter
- Luminance noise: Grainy variation in brightness, most evident in the background sky.
- Chrominance noise: Color speckling, especially in dim areas post-stretch.
- Pattern noise: Banding or walking noise from poor dithering or fixed pattern artifacts; best addressed earlier via calibration and dithering.
Targeted approaches
- Multiscale denoise: Works on wavelet layers to suppress noise while preserving detail. Adjust strength per scale.
- Frequency separation: Treats low-frequency chroma and high-frequency luminance separately for cleaner results.
- Masked denoise: Apply denoise to background-only regions using luminance masks, keeping nebula and galaxies sharper.
Enhancing detail safely

Attribution: SCIENCE: NASA, ESA, CSA, STScI; IMAGE PROCESSING: Joseph DePasquale (STScI), Anton M. Koekemoer (STScI), Alyssa Pagan (STScI)
- Unsharp masking or multiscale sharpening on structures of interest, not the background.
- Local contrast with masks to avoid halos or boosting noise.
- Deconvolution in the linear stage or carefully post-stretch with robust star masks.
Tip: Perform chroma denoise first, then luminance denoise. Preserving luminance detail while smoothing color speckle often looks more natural.
Controlling Stars: Reduction, Star Masks, Starless
Stars set the scale of a deep-sky image. Uncontrolled, they can dominate the frame or hide faint structures. Balanced stars guide the eye without stealing the show.
Star masks
Create masks that isolate stars based on size and brightness. Protect stars when applying strong contrast or saturation to nebulosity, and inversely, protect nebulosity when reducing stars. Accurate masks prevent ring artifacts.
Star reduction
Apply gentle reduction to smaller stars to improve visibility of faint detail. Methods include morphological transforms, minimum filters, or dedicated star reduction tools. Excessive reduction can create dark halos—use soft masks and subtle settings.
Star separation and starless workflows
Star separation algorithms split your image into a starless layer and a stars-only layer. This enables independent processing: aggressively stretch and enhance nebula on the starless layer, then later recombine with softened stars. For narrowband projects, you can also replace narrowband stars with broadband RGB stars to restore natural color. Revisit Color Calibration for star color strategies.
Gradients, Vignetting, and Background Neutralization
Even with flats and dark skies, gradients creep into deep-sky images. Address them early, ideally while linear, and revisit post-stretch if necessary.
Common gradient sources
- Light pollution and skyglow
- Moonlight and twilight
- Lens vignetting, filter tilt, or reflections
- Thin clouds causing uneven transparency
Model and subtract
Use dynamic background extraction: place sample points on empty sky uniformly across the frame, avoiding stars and nebulosity. Inspect the generated model; if it contains real signal, reduce sample size or protect regions. Subtract the model, then neutralize the background to a clean, near-gray tone. As emphasized in The Linear Stage, doing this before stretching yields more accurate results.
Residual gradients and color casts
After stretching, minor casts may reappear. Use subtle, masked corrections with curves or color balance tools. Avoid global green suppression unless truly needed; instead, sample background regions and correct deliberately.
Advanced Techniques: Deconvolution, HDR, Drizzle
When your fundamentals are solid, advanced methods can add refinement. Use them judiciously and watch for artifacts.
Deconvolution
Build a PSF from unsaturated stars and use robust masks to protect bright cores and the background. Regularization parameters limit noise amplification. Apply early (linear) or with care post-stretch. Check for ringing; adding a star mask dilation margin helps.
High Dynamic Range (HDR)
Bright cores (e.g., M42, M31 centers) can clip. HDR tools redistribute dynamic range, revealing core structure without flattening the scene. Combine with gentle local contrast for depth.
Drizzle integration
Drizzle reconstructs undersampled data at higher resolution by leveraging sub-pixel dithers. If your image scale is coarser than seeing-limited resolution and you dither between subs, 2x drizzle may recover fine detail. Be aware: file sizes and processing time increase significantly, and drizzle can amplify noise if SNR is low.
Software Tools and Suggested Workflows
Numerous tools can execute the steps discussed here. Each has strengths; many imagers mix and match. Below are example workflows. Cross-reference with the overview as you plan your edits.
PixInsight-centric workflow
- WeightedBatchPreprocessing or manual: calibrate, register, integrate with rejection and normalization.
- Automatic/ Dynamic Background Extraction (ABE/DBE) while linear.
- ColorCalibration or PhotometricColorCalibration; then BackgroundNeutralization.
- Deconvolution (optional, masked) in linear stage.
- MaskedStretch or HistogramTransformation to go nonlinear.
- MultiscaleLinearTransform/MultiscaleMedianTransform for denoise; then targeted sharpening.
- Star mask and morphological star reduction; optional star separation.
- Curves for contrast and color; SCNR only if necessary.
- Resample/export in sRGB for web; keep a 16-bit TIFF/32-bit for archive.
Siril + GIMP/Photoshop workflow
- Siril: calibrate with flats/darks/flat-darks; register; stack with Winsorized sigma-clipping.
- Siril: background extraction and photometric color calibration (for broadband).
- Siril: initial histogram stretches (including arcsinh for star color).
- Export 16-bit TIFF to GIMP/Photoshop.
- Photoshop/GIMP: masked noise reduction on background; selective color and curves for nebula/galaxy.
- Optional star reduction via minimum filter or dedicated plugin; careful masking.
- Final color balance and export.
AstroPixelProcessor (APP) workflow
- APP: calibrate lights with darks, flats, flat-darks; set normalization and outlier rejection.
- APP: light pollution removal tool with background models.
- APP: combine channels (HOO/SHO), then export to PS/PixInsight for finishing: stretch, denoise, star control.
Regardless of software, the logic is consistent: clean the data, calibrate color, stretch carefully, manage stars, and apply restrained finishing. Refer to the checklist to standardize your process.
Case Studies: Galaxy and Nebula Workflows
Let’s walk through two realistic scenarios: a broadband galaxy and a narrowband emission nebula. These demonstrate decision points and practical settings.
Case 1: Broadband spiral galaxy
Data: OSC camera or DSLR at a dark site; 180-second subs; 8 hours total; calibrated with flats and darks; dithering every 2–3 frames.

Attribution: NASA, ESA, J. Dalcanton, B.F. Williams, and L.C. Johnson (University of Washington), the PHAT team, and R. Gendler
- Stacking: Winsorized sigma clipping; local normalization enabled; weight by FWHM and SNR. Reject 20% soft frames from wind gusts.
- Linear gradient removal: DBE with 30–60 samples, careful to avoid galaxy arms. Subtract the model; evaluate the residual map for over-subtraction.
- Photometric color calibration: Match star colors against a catalog; confirm that galaxy core is neutral, arms show blue tint, and dust lanes are brownish-gray.
- Optional deconvolution: Build PSF from 50–100 small, unsaturated stars; protect bright core with a mask; conservative regularization.
- Stretch: HistogramTransformation in small steps; protect stars with a star mask to avoid excessive growth.
- Noise reduction: Masked multiscale denoise on background; chroma denoise to remove color speckling in faint outer arms.
- Local contrast and detail: Gentle local histogram equalization on arms; subtle unsharp mask on dust lanes. Avoid halos near star-forming regions.
- Star management: Mild star reduction to enhance visibility of the galaxy; keep bright field stars natural.
- Final color tuning: Curves to increase blue in young star regions and add mild saturation; ensure background stays neutral.
- Export: Save a 16-bit TIFF master; export an sRGB JPEG for web.
Case 2: Narrowband emission nebula (SHO)
Data: Mono camera; 3nm filters; Ha, OIII, SII; 20 hours total exposure. Star replacement with broadband RGB optional.
- Channel preparation: Calibrate and stack Ha, OIII, SII separately; remove gradients in each channel independently; linear noise assessment.
- Channel registration: Align channels precisely; resample if necessary to remove any rotation/scale differences.
- Combine: SHO mapping (SII=R, Ha=G, OIII=B). Start with equal weights; adjust to emphasize desired structures.
- Color balance: Use curves to tame green dominance; consider SCNR lightly or use channel mixing to retain natural cyan while reducing excess green.
- Star separation: Generate starless and stars-only layers. Work details and saturation on the starless layer without star bloat.
- Stretch: Apply masked or arcsinh stretches to maintain star color in the stars layer; stronger stretch on starless nebulosity.
- Noise and detail: Multiscale denoise on background; deconvolution targeted to filaments on starless layer; careful sharpening.
- Star management: Reduce star sizes and saturation slightly; consider replacing with RGB stars if available for natural color.
- Final palette tweaks: Subtle saturation and hue shifts for pleasing SHO balance; protect faint OIII shells from over-saturation.
- Export: Archive each intermediate (combined SHO, starless, stars-only), plus final composite.
Troubleshooting and Common Pitfalls
Processing is iterative. When something doesn’t look right, use diagnostics to track the root cause.
Stars look bloated or have halos
- Caused by over-stretching, poor focus, chromatic aberration, or aggressive star reduction.
- Fix by using masked stretches, finer star masks, and mild reduction. Address optical causes in capture: aperture masks, better focus, field correction.
Banding or walking noise
- Usually from insufficient dithering or fixed pattern residuals.
- Dither more frequently during capture; in processing, ensure robust calibration and consider cosmetic correction to remove hot rows/columns.
Color casts that won’t go away
- Revisit background extraction; your model may have sampled nebulosity.
- Use photometric calibration for broadband; for narrowband, manage channel balance rather than forcing green suppression globally.
Crunchy, overprocessed look
- Too much sharpening or local contrast enhancement, especially on noisy backgrounds.
- Back off intensity, use masks, and prioritize denoise before heavy detail work. Compare against earlier versions to avoid overcooking.
Data Management, File Formats, and Color Spaces
Good file hygiene prevents irreversible mistakes and ensures consistency between devices.
File formats
- RAW/FITS/XISF: Use for capture and intermediate processing to preserve linear data and metadata.
- TIFF (16-bit): Ideal for moving between apps while retaining dynamic range.
- JPEG/PNG (8-bit): Final delivery for web; compress only at the end.
Color spaces and profiles
- Working space: Wide gamut (e.g., Adobe RGB, ProPhoto RGB) during processing to avoid clipping saturated colors.
- Export space: sRGB for web to ensure consistent viewing across devices.
- Embed ICC profiles on export; verify appearance in color-managed viewers.
Versioning and archiving
- Save iterative versions: linear master, post-gradient, post-stretch, final.
- Archive calibration masters (master dark, master flat) per session and temperature/gain setting.
- Maintain a processing log: software versions, parameters, and observations for reproducibility. Link notes back to this guide’s checklist.
Repeatable Checklist and Processing Recipe
Use this compact checklist each time you process. Adapt to your tools while honoring the logic described in the overview.
- Calibrate with matching darks and flats (+ flat-darks for CMOS).
- Register to a sharp reference; evaluate FWHM and eccentricity.
- Integrate with robust outlier rejection and normalization; consider drizzle if undersampled and dithered.
- Background model while linear; subtract gradients; neutralize background.
- Color calibrate (photometric for broadband; channel balancing for narrowband).
- Optional deconvolution in linear with masks.
- Stretch (masked stretch/HT/arcsinh) in small increments, avoid clipping.
- Noise reduction: chroma first, then luminance with masks.
- Detail enhancement: local contrast, multiscale sharpening; protect stars and background.
- Star control: reduction or starless workflows; optional RGB star replacement in narrowband.
- Final color: selective saturation and curves; verify neutrality of background.
- Export 16-bit TIFF archive and sRGB JPEG/PNG for sharing; embed profiles.
Ethical Editing and Scientific Integrity
Deep-sky imaging straddles art and science. While aesthetic choices are subjective, certain principles promote transparency and integrity:
- Disclose major manipulations such as star replacement, AI-driven denoise/sharpening, or synthetic luminance.
- Avoid data fabrication: Don’t paint in structures that aren’t present in your data.
- Respect color honesty: In broadband images, aim for plausible color calibration. In narrowband, clarify palette mapping (SHO, HOO, etc.).
- Maintain provenance: Credit any external data sources if you blend them with your own.
Remember: A compelling image doesn’t need extreme processing; careful signal stewardship and thoughtful choices often look more natural and reveal more real structure.
FAQ: Equipment and Capture
How long should my subexposures be?
Choose exposure length so that the sky background peak rises well above read noise without clipping highlights. Under typical suburban skies, 60–180 seconds is common for broadband OSC images. With narrowband filters, longer subs (180–600 seconds) are often used because filters block so much light. Adjust based on sky brightness, mount tracking, and camera characteristics.
Do I need flats every night?
Yes, ideally. Flats correct vignetting and dust motes that change if you refocus, rotate, or remove filters. If the optical train remains untouched and temperature changes are minor, you can sometimes reuse flats, but taking fresh flats is safer for accurate calibration.
How much total integration time is enough?
More integration almost always helps. A starting point is 4–10 hours for many broadband targets and 10–20+ hours for dim narrowband objects. If your background is noisy, prioritize collecting more data over trying to fix everything in processing.
Should I dither?
Yes. Dithering between subs helps average out fixed pattern noise and hot pixels, greatly improving the quality of your final stack. Dither every few frames; more frequent dithers are useful for shorter exposures.
FAQ: Processing and Troubleshooting
When should I remove gradients?
At the linear stage, before stretching. Modeling the background while linear produces better results. You can do a light touch post-stretch if a residual cast remains.
Is deconvolution always beneficial?
No. It can help when seeing limits fine detail and your SNR is adequate, but it can also create ringing and amplify noise. Use a well-constructed star/structure mask and conservative settings. If it introduces artifacts, skip it.
Why does my image look green after stretching?
This can happen due to light pollution gradients or channel imbalances. Revisit background neutralization and color calibration. For narrowband SHO, green dominance is common; balance channels with curves or channel mix rather than heavy-handed green suppression.
How do I keep star colors from washing out?
Use arcsinh or masked stretches that protect star chroma, avoid over-stretching highlights, and apply star masks during contrast and saturation adjustments. In narrowband images, consider replacing stars with RGB data for natural color.
Conclusion
Astrophotography processing is a craft: a blend of scientific method and creative judgment. By following a consistent, linear-to-nonlinear workflow—calibrating and stacking carefully, removing gradients early, stretching thoughtfully, controlling noise and stars, and choosing color strategies aligned with your data—you will produce cleaner, more compelling deep-sky images. Revisit the checklist to standardize your process, explore the advanced techniques as your skills grow, and compare your results across different tools from PixInsight to Siril and Photoshop. If you enjoyed this guide, consider exploring our related topics and future articles on targeted workflows for specific objects and filters.

Attribution: NASA/JPL-Caltech/K. Gordon (University of Arizona)