Table of Contents
- What Is Deep-Sky Astrophotography and Why It Matters
- Essential Gear for Starting Astrophotography
- Optics and Sensor Fundamentals: Focal Length, Aperture, Sampling
- Planning Your Night: Targets, Weather, and Moonlight
- Mounts, Tracking, and Polar Alignment Techniques
- Capture Workflow: Exposure, ISO/Gain, White Balance, and Dithering
- Calibration Frames: Bias, Darks, Flats, and Dark Flats
- Stacking and Preprocessing: DSS, Siril, PixInsight, and More
- Post-Processing: Stretching, Color, Noise Reduction, and Star Control
- Narrowband vs Broadband: Filters for Light-Polluted Skies
- Troubleshooting Common Problems in the Field
- Frequently Asked Questions
- Final Thoughts on Choosing the Right Astrophotography Path
What Is Deep-Sky Astrophotography and Why It Matters

Artist: NASA/JPL-Caltech/K. Gordon (University of Arizona)
Deep-sky astrophotography is the art and science of imaging faint, distant objects beyond our Solar System: emission nebulae rich in ionized hydrogen, star clusters sprinkled across the Milky Way, dust-laden dark nebulae, and galaxies millions of light-years away. Unlike planetary or lunar imaging, which favors extremely short exposures at high magnification, deep-sky work relies on longer exposures, precise tracking, and a combination of signal calibration and image stacking to reveal structures invisible to the naked eye. The goal is to maximize signal-to-noise ratio (SNR), recover faint detail, and present color and structure that reflect the physics of the target—ionization fronts, reflection dust, shock waves, and stellar populations.
For beginners, this subfield can feel technical, but every step is grounded in measurable principles: photon statistics, sensor behavior, optics, and the predictability of celestial motion. The heart of the process is simple: collect as many photons as you can from your target while suppressing noise and systematics—then process the data to bring out real detail. The practical pathway is systematic and repeatable, from careful planning (weather and moon phase) and reliable tracking (polar alignment and guidance) to clean data (calibration frames) and consistent post-processing (stretching and color).
Why it matters: deep-sky imaging turns your camera into a scientific instrument. You can document variable nebula brightness, map dust lanes in nearby galaxies, or preserve faint outer shells around planetary nebulae—records that can be revisited as your skills and tools grow. Along the way, you’ll gain intuition about optics, seeing and transparency, light pollution mitigation, and the physics behind the structures you capture.
Essential Gear for Starting Astrophotography
Artist: HiyoriX
Most beginners already own key components—either a DSLR or mirrorless camera and a tripod. The deep-sky path extends from there. Start simple with a camera and lens, then add a star tracker, and only later progress to telescopes and dedicated cooled cameras. A minimal setup can produce striking wide-field images of the Milky Way, Andromeda Galaxy (M31), the Orion complex (M42, Barnard’s Loop), large nebulae like the North America Nebula (NGC 7000), and extensive dark dust regions.
Core components
- Camera: A modern DSLR or mirrorless camera with manual controls and the ability to shoot RAW. Many successful images are captured with unmodified cameras. Later, a dedicated cooled astronomy camera offers lower thermal noise and fine control of gain and sensor temperature.
- Lens or telescope: Begin with a fast prime lens (e.g., 24–135 mm, f/1.8–f/4). As you progress, short refractor telescopes (roughly 250–600 mm focal length) offer a forgiving field of view and sharp stars. Reflectors can provide larger apertures but demand collimation; catadioptrics offer long focal lengths for smaller targets.
- Mount: A stable tripod is essential; a star tracker or equatorial mount is the next milestone. Tracking allows longer exposures without star trailing, enabling fainter targets and cleaner data.
- Power and storage: External batteries or power stations, plus ample storage. Long sessions can exceed hundreds of frames.
- Intervalometer or tethering: Automate long exposures; many cameras include built-in interval modes, or you can tether to a laptop.
- Focusing aid: A Bahtinov mask or live-view zoom on a bright star helps achieve critical focus. Temperature changes and gear shifts can alter focus; recheck periodically.
Nice-to-have accessories
- Guiding: A guide scope plus guide camera and software reduces tracking error and enables longer sub-exposures. This is most helpful once you move beyond a simple tracker to an equatorial mount.
- Filters: Light pollution filters can improve contrast, and narrowband filters allow imaging emission nebulae under bright urban skies (more in filters section).
- Dew control: Dew heaters prevent lens or corrector plates from fogging, especially in humid climates.
- Field tools: Red flashlight, level, small toolkit, and a foldable chair for long sessions.
Start where you are. With a 50 mm lens, a star tracker, and disciplined calibration, you can capture sweeping nebula complexes and the Andromeda Galaxy with impressive detail. Upgrade only when your data, not your gear, limits your progress—an ethos that keeps the learning curve manageable and the results satisfying.
Optics and Sensor Fundamentals: Focal Length, Aperture, Sampling
Solid results rest on understanding a few optical and sensor concepts. These dictate the field of view, star sharpness, and the balance between exposure time and tracking demands.
Focal length and field of view
Shorter focal lengths (e.g., 50–200 mm) yield wide fields ideal for large nebulae and the Milky Way. They are forgiving of tracking errors and easier for beginners. Moderate focal lengths (300–600 mm) frame targets like M31, the Rosette Nebula, and the Heart and Soul Nebulae while revealing more fine structure. Long focal lengths (800 mm and beyond) magnify small galaxies and planetary nebulae but drastically increase demands on tracking, guiding, and seeing.
Aperture, f-ratio, and speed
The f-ratio (f/number) describes the cone of light reaching the sensor: lower f-ratios gather photons faster, reducing exposure time for a given SNR. In extended objects such as nebulae, SNR per pixel scales primarily with f-ratio, not telescope aperture alone. A 200 mm f/4 lens will gather the same surface brightness per unit area of the sensor as a 100 mm f/4 telescope; the difference is field of view and angular resolution.
Sensor size, pixel size, and sampling
Pixel scale maps sky angle to sensor pixels. Adequate sampling ensures stars are neither bloated nor under-resolved. A commonly used approximation is:
arcsec_per_pixel ≈ 206.265 × (pixel_size_µm / focal_length_mm)
For example, a 3.8 µm pixel with a 400 mm focal length yields roughly 1.96 arcsec/pixel. As a rule of thumb, aim to sample seeing by having 2–3 pixels across the full width at half maximum (FWHM) of star images typical of your site. If your site’s seeing is around 2–3 arcseconds, a sampling near 1–2 arcsec/pixel is reasonable. Oversampling increases read noise impact without adding real resolution; undersampling can cause square stars and loss of detail.
Dynamic range and read noise
Modern CMOS sensors have low read noise and good dynamic range. Dynamic range affects your ability to capture faint nebulosity without blowing out bright star cores. Shoot RAW to preserve full color depth and dynamic range. Dedicated astronomy cameras often let you set gain, allowing trade-offs between dynamic range and read noise. Too high a gain risks clipped stars; too low can bury faint signal in read noise. Test for your camera, informed by your sky brightness and target.
If these terms feel abstract, focus on practical implementation: match focal length and pixel size to conditions, target choice, and mount performance. As you improve tracking (see tracking) and dialing in exposure (see capture workflow), you’ll find a comfortable balance for your rig.
Planning Your Night: Targets, Weather, and Moonlight
Planning transforms an average night into a productive one. The sky does not wait—targets rise and set, the Moon waxes and wanes, and transparency and seeing fluctuate.
Target selection by season and field of view
- Late summer to autumn (Northern Hemisphere): Andromeda Galaxy, Triangulum Galaxy, California Nebula, Heart and Soul Nebulae. Wide fields shine here; longer focal lengths pick out galaxy detail.
- Winter: Orion complex (Orion Nebula, Horsehead and Flame), Rosette Nebula, Pleiades. Rich hydrogen-alpha regions favor shorter to moderate focal lengths; reflection nebulae benefit from broadband skies.
- Spring: Galaxy season—M81/M82, Markarian’s Chain, Whirlpool Galaxy. Longer focal lengths begin to pay off if your mount can handle it.
- Summer: Milky Way core—Lagoon, Trifid, Eagle, Swan/Omega Nebula. Fast lenses capture sprawling structures; narrowband filters can isolate emission lines even in light pollution.
Choose a target that suits your equipment. A 135 mm lens captures the entire Cygnus region; a 400–600 mm refractor frames the Rosette or North America Nebula; 1000–1500 mm telescopes isolate smaller galaxies or planetary nebulae. If you are unsure, start with a larger target and short focal length to maximize success.
Weather: transparency vs seeing
Transparency describes how clear the air is (affected by clouds, haze, smoke, humidity). Seeing refers to atmospheric turbulence that blurs star images. For deep-sky, transparency is often the bigger concern, especially for faint nebulae. Use reliable sky forecasts, and consider humidity and dew points. Even partial clouds can ruin sub-exposures; plan to shoot when the forecast suggests stable, clear skies for several hours.
Moon phase and sky brightness
The Moon’s brightness can easily overwhelm faint nebulosity. For broadband targets (galaxies, reflection nebulae), avoid bright Moon phases; shoot around new Moon. Emission nebulae can be imaged with narrowband filters under a bright Moon, though gradients may increase. If you must shoot with a Moon present, aim well away from it and lower your sub-exposure length to avoid washing out the histogram.
Light pollution and Bortle class
Light pollution is quantified by the Bortle scale (1 is darkest, 9 is inner city). Darker skies raise contrast and reduce gradients, making broadband imaging far more efficient. However, meaningful images are still achievable under urban skies with careful processing and filters (see filters). If traveling is possible, even a moderate improvement in Bortle class markedly improves results.
Meridian timing and framing
Targets culminate near the meridian, offering the highest altitude and least atmosphere. Plan your session so the bulk of your imaging runs while the target is high. Pre-visualize framing with field-of-view calculators, rotate your camera to suit the object’s orientation, and lock down your composition before the long run begins.
Mounts, Tracking, and Polar Alignment Techniques

Artist: Gn842
No element in deep-sky imaging is as crucial as stable tracking. Whether you use a compact star tracker or a full equatorial mount, accuracy is everything. The mount compensates for Earth’s rotation, allowing long exposures without star trails.
Alt-az vs equatorial
Alt-az mounts are intuitive for visual observing but suffer field rotation during long exposures. Equatorial mounts align one axis (right ascension) to the celestial pole, eliminating field rotation when properly set up. For long deep-sky exposures, an equatorial mount (or a star tracker functioning as one) is the standard solution.
Polar alignment
Accurate polar alignment minimizes drift and eases guiding. Techniques include polar scopes, drift alignment, and plate-solve assisted alignment provided by many software packages. For short focal lengths, a careful polar scope alignment may suffice. As focal length and exposure time increase, more precise methods become necessary to keep stars tight across the frame.
Guiding and periodic error
Even good mounts have periodic error from gear imperfections, causing tracking to wobble over a cycle. Autoguiding—monitoring a guide star and sending corrections to the mount—significantly reduces this. The end result is longer, more reliable exposures. Guiding performance is often summarized by RMS error in arcseconds; aim to keep RMS comfortably below your pixel scale (e.g., if your imaging scale is 2 arcsec/pixel, staying near or below that figure helps).
Balance, cables, and rigidity
Balance both axes with a slight bias to keep gears loaded in one direction. Secure cables to avoid tugging that can introduce tracking errors, and ensure the tripod is stable on firm ground. Tiny mechanical details often make the difference between round stars and elongation that ruins an otherwise perfect session.
If you’re new to tracking, begin at short focal lengths where the system is forgiving. As your confidence grows and your exposures lengthen, you can progress to guided imaging and longer focal lengths with confidence.
Capture Workflow: Exposure, ISO/Gain, White Balance, and Dithering
A reliable capture workflow standardizes how you gather data. The aim is reproducibility: consistent sub-exposures, repeatable calibration, and enough integration time to overcome noise.
Sub-exposure length and histogram
Set your exposure so the sky background peak (on the histogram) is separated from the left edge by roughly 10–30% of the histogram width, depending on sky brightness and camera. This ensures you are sky-limited rather than read-noise limited, maximizing efficiency. In heavy light pollution, shorter subs still produce a sky-dominated histogram; under dark skies, longer subs may be needed.
There is no single best exposure. Balance sub length with mount performance, target brightness, and star saturation. If star cores are clipping, reduce exposure time or use lower gain. Many imagers prefer collecting more short subs instead of fewer long ones to protect dynamic range while still accumulating total integration time.
ISO (DSLR/mirrorless) and gain (dedicated cameras)
- ISO: Many cameras have an ISO where dynamic range and read noise reach a good compromise. For modern cameras, mid-range ISOs often work well; excessively high ISOs can clip highlights without materially improving SNR.
- Gain: With dedicated CMOS cameras, moderate gains can reduce read noise while preserving dynamic range. Too high gains limit star core headroom; too low can require overly long subs to become sky-limited. Test under your skies to find a stable setting.
White balance and file format
Shoot RAW and ignore in-camera white balance; it does not affect RAW data but can aid histogram inspection on the camera screen. RAW preserves linear data critical for calibration and stacking. For dedicated cameras, use FITS or other native formats supported by your stacking software.
Dithering to fight pattern noise
Dithering is the intentional, small shift of the pointing between sub-exposures. By moving fixed pattern noise and hot pixels to different parts of the image, you enable stacking algorithms to reject or average them away. If you guide, your capture software can dither every few frames. If you don’t guide, manual dithering is possible but less convenient.
Focus and temperature
Refocus as temperatures change; optics contract and expand with temperature, shifting focus. Check star FWHM periodically. A Bahtinov mask or autofocus routine (if your system supports it) can keep stars consistently tight.
Sequencing and session management
Plan your sequence: start with focusing, test exposures, and a short run of subs to confirm tracking. Once stable, begin the main sequence and incorporate dithers. Leave time near the end for flat frames if you plan to shoot twilight flats. Keep a written checklist and record settings for repeatability; small habits yield reliable results session after session.
Calibration Frames: Bias, Darks, Flats, and Dark Flats
Calibration frames remove systematics from your data: fixed pattern noise, hot pixels, amp glow, vignetting, and dust motes. Proper calibration can be the single most important upgrade you make at any skill level.
Bias frames
Bias frames capture the camera’s readout pattern at the shortest possible exposure with the lens cap on (no light). They measure read noise and electronic offsets. Some modern CMOS workflows use dark flats instead of bias frames to better match electronic behavior at longer readout times; consult your camera’s behavior and stacking software recommendations.
Dark frames
Dark frames are exposures of the same length, temperature, and gain/ISO as your light frames, but with the lens or telescope capped. They capture thermal noise and hot pixels. With dedicated cooled cameras, you can build a reusable dark library at common temperatures and exposures. With uncooled cameras, darks taken during the session at similar temperatures are best.
Flat frames
Flats correct vignetting and dust shadows (dust donuts). They must be taken with the same optical configuration as the lights: same focus, filters, and orientation. Aim for a uniformly illuminated field. Methods include:
- Twilight flats: Point at a clear, evenly lit sky shortly after sunset or before sunrise.
- Flat panel: A dimmable, uniform light panel placed over the objective.
- T-shirt flats: A white cloth stretched over the lens/telescope pointed at a bright, uniform surface (less ideal but can work).
Expose so the histogram peak sits near the middle to upper-middle. If your camera exhibits unusual bias behavior, dark flats—dark frames that match the flat exposure—can produce more reliable flat calibration than traditional biases.
Calibration workflow tips
- Keep your optical train stable between lights and flats; moving focus or removing the camera can invalidate flats.
- Match temperature, exposure, and gain for darks; library darks are effective with cooled sensors.
- Take enough calibration frames to reduce their own noise; dozens are common. Your stacking software will average them into master calibration frames.
Pairing robust calibration with consistent capture settings is transformative. The same lens that showed corner vignetting and dust donuts can produce beautifully uniform frames once calibrated.
Stacking and Preprocessing: DSS, Siril, PixInsight, and More
Stacking multiple sub-exposures boosts SNR by averaging signal while random noise averages down. Good preprocessing also rejects transients like airplane trails and satellites, and mitigates gradients.
Software options
- DeepSkyStacker (DSS): Popular, free for Windows; handles calibration, registration, and stacking. Good entry point.
- Siril: Free, cross-platform; strong calibration, registration, background extraction, and color calibration tools. Scriptable workflows simplify beginners’ pipelines.
- PixInsight: Commercial, cross-platform; comprehensive toolkit with advanced algorithms for calibration, registration, integration, background modeling, deconvolution, and noise reduction.
- AstroPixelProcessor (APP): Commercial; streamlined interface, strong gradient reduction, mosaic tools.
- Sequator: Simplified Windows tool; useful for wide-field Milky Way with static foregrounds, aligning only the stars.
Registration and integration
Registration aligns stars across all subs. Choose robust star detection settings and ensure subs are not rejected due to too few stars (common in narrowband or very short exposures). Integration combines these aligned subs using algorithms like average (mean), median, or sigma-clipping variants to reject outliers. Dithering improves the effectiveness of rejection. Weighting subs by quality (FWHM, eccentricity, SNR) prioritizes the sharpest, cleanest data.
Drizzle and resampling
Drizzle integration can recover some resolution lost due to undersampling or subpixel shifts, at the cost of increased noise and larger file sizes. Use it when your data is undersampled and sufficiently dithered; otherwise, it may not add value.
Gradient removal and background modeling
Light pollution and moonlight introduce gradients that must be corrected to avoid color casts and uneven backgrounds. Background extraction tools model and subtract large-scale gradients. Use sample points in empty sky regions, avoiding nebulosity and bright stars. Good gradient correction prepares the image for accurate color calibration and stretching.
Color calibration and photometric tools
Color calibration aligns star colors with expected stellar spectra, enhancing realism and making nebula hues more natural. Some software offers photometric color calibration using star catalogs, aligning star color balance based on measured stellar types. This step helps avoid overly green or magenta casts and balances broadband and narrowband data consistently.
At the end of preprocessing, you should have a linear, calibrated, gradient-corrected, color-balanced stack. The next phase is nonlinear post-processing, where curves and masks reveal faint structures while maintaining star quality.
Post-Processing: Stretching, Color, Noise Reduction, and Star Control
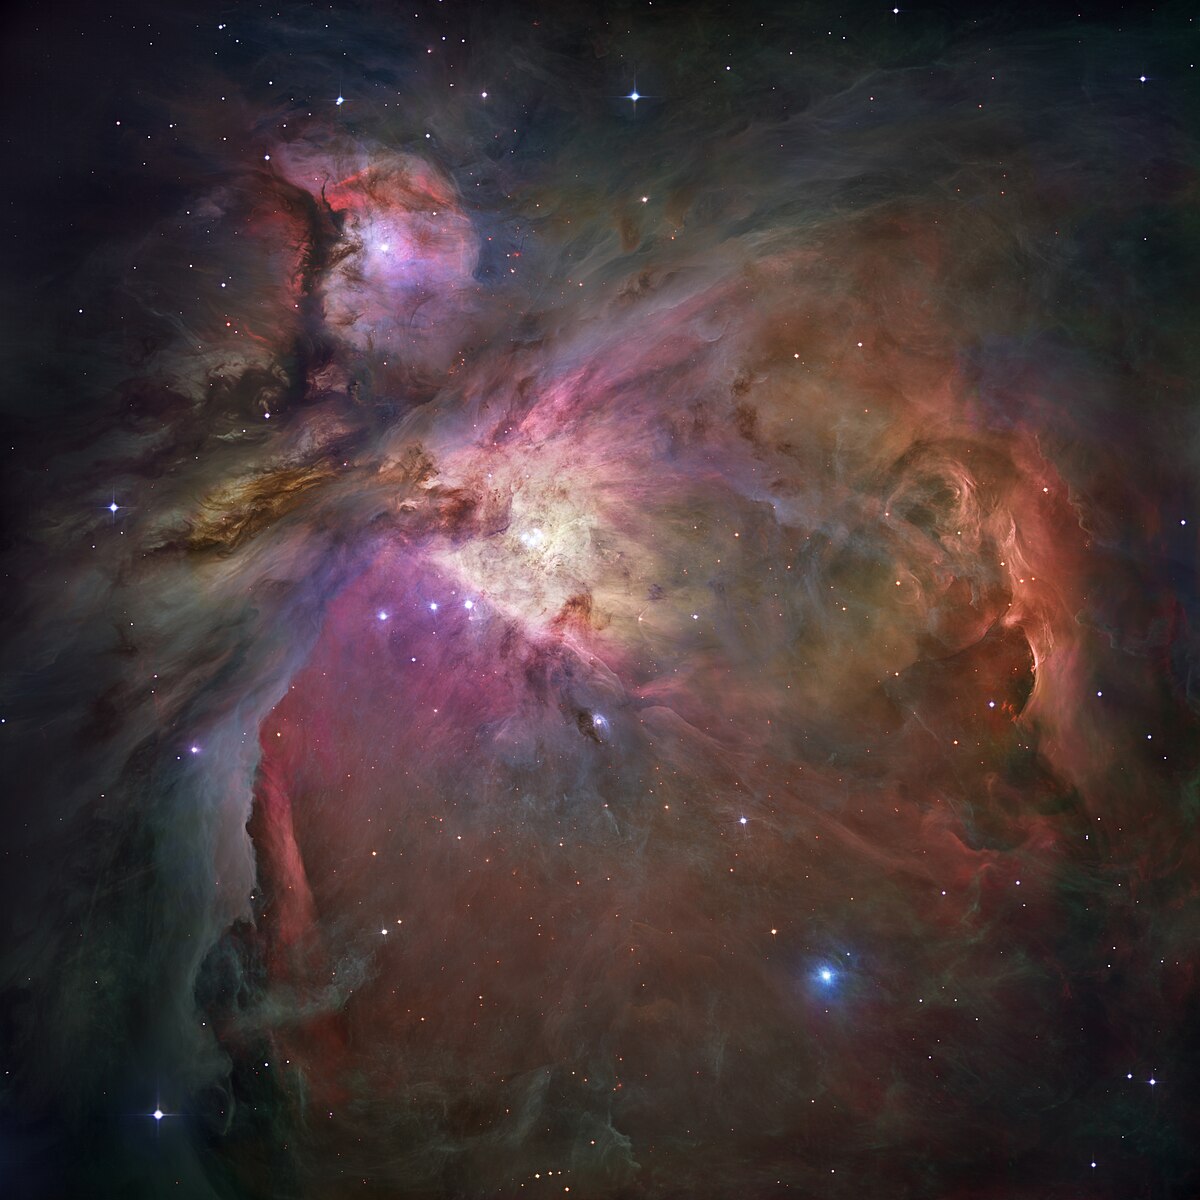
Artist: NASA, ESA, M. Robberto (Space Telescope Science Institute/ESA) and the Hubble Space Telescope Orion Treasury Project Team
Post-processing is where the faint photons you collected become a compelling image. The goal is to stretch the linear data to reveal structure, enhance color in a controlled way, and manage stars so they complement rather than dominate nebulae and galaxies.
Histogram stretch and curves
Initial stretching is delicate. Increase brightness gradually using histogram and curves adjustments, protecting highlights and keeping the background neutral-toned. Avoid clipping blacks—losing real faint signal—and clip highlights only in unavoidable star cores. Some tools provide masked stretch or generalized hyperbolic stretch to retain core details and minimize star bloat during stretching.
Color balance and saturation
After stretching, color often shifts. Revisit white balance or use color calibration tools to achieve natural star colors and plausible nebula hues. Increase saturation modestly; pushing too far can exaggerate noise and posterize gradients. For narrowband combinations, decide on your palette (e.g., SHO mapping sulfur-hydrogen-oxygen to RGB) and fine-tune to maintain local contrast and legible color separation.
Noise reduction strategies
Noise reduction is most effective when masked to protect high-frequency detail. Apply mild chrominance noise reduction in low-signal areas and lighter luminance noise reduction to preserve fine texture. Stacking more subs remains the best noise reducer; software cannot replace insufficient photons. Use multi-scale approaches to treat noise differently across structural scales.
Star control and star masks
Stars grow during stretching. Star masks let you reduce star sizes slightly (morphological transformations or specific star-reduction tools). The aim is not to erase stars but to prevent them from overwhelming nebula detail. Some workflows separate stars from the nebula background using specialized tools, process each independently, then recombine.
Local contrast and detail
Carefully applied local contrast enhancements (wavelets, unsharp mask, multi-scale transforms) bring out dust lanes and shock fronts. Use masks to target structures while keeping noise under control. Deconvolution can improve slightly blurred detail if applied early in the nonlinear process and supported by good star masks and point spread function estimation.
Color artifacts and halos
Differential refraction, filters, and optics can cause star halos or color fringing. Some software provides halo reduction tools. When possible, reduce the underlying cause (e.g., correct focus, use quality filters, avoid fast optics that exacerbate chromatic issues). Gentle corrections are more natural than aggressive halo removal that leaves unnatural edges.
Good post-processing respects the data. If you feel tempted to push harder, first revisit earlier steps: better calibration (flats and darks), improved dithering (capture workflow), and longer total integration time. Data quality is cumulative; the cleaner the input, the easier it is to produce elegant, credible results.
Narrowband vs Broadband: Filters for Light-Polluted Skies

Artist: Astrofalls
Filters tailor the wavelengths of light that reach the sensor. Selecting the right filter depends on your target, sky conditions, and camera type.
Broadband imaging
Broadband filters pass a wide range of wavelengths, capturing true-color views of galaxies, star clusters, and reflection nebulae. Under dark skies, broadband excels: dust lanes in galaxies, blue reflection nebulae, and star colors appear naturally. Under light pollution, broadband gradients and sky glow increase; background extraction can help, but efficiency drops. Some light pollution filters notch out common streetlight wavelengths; results vary with modern LED lighting, which is often broad-spectrum and less filterable.
Dual-band and multi-band filters
For emission nebulae under light-polluted skies, dual-band filters isolate strong emission lines (typically hydrogen-alpha and oxygen-III) and can be used even with one-shot color cameras. They significantly improve contrast in bright skies and under the Moon. Multi-band filters add sulfur-II or different bandpasses to enhance color separation.
Monochrome and narrowband
Monochrome cameras with individual narrowband filters (Hα, OIII, SII) offer the cleanest emission-line data. This approach is powerful in urban environments since it rejects most sky glow and allows imaging during bright Moon phases. Narrowband data supports a range of palettes; the classic SHO mapping reveals structural differences between ionized regions, offering both scientific and aesthetic insights.
Reflection nebulae and continuum sensitivity
Reflection nebulae shine by reflecting starlight over a broad continuum; narrowband filters suppress much of their signal. For these targets, broadband under dark skies—or careful broadband under suburban skies with strong gradient control—is best.
Choose filters to match your goals: dual-band for city emission nebulae, pure broadband for galaxies at dark sites, and monochrome narrowband when you want maximum control over emission lines. Avoid mixing mismatched calibrations (e.g., flats through different filters) and keep your optical train consistent across sessions to simplify calibration and stacking.
Troubleshooting Common Problems in the Field
Every imager encounters setbacks. A small checklist and a calm approach can salvage a night and prevent repeat issues.
Trailing stars
- Cause: Poor polar alignment, long subs for the mount’s capability, wind, or cable drag.
- Fix: Improve polar alignment, shorten exposures, secure cables, reduce sail area, or enable guiding. Check balance and tripod rigidity.
Bloated or soft stars
- Cause: Slight defocus, high humidity, poor seeing, chromatic aberration, or over-aggressive stretching.
- Fix: Refocus periodically, use a focusing aid, allow optics to thermally equalize, and apply gentle stretching. Consider a UV/IR cut filter if using a system that is sensitive to out-of-band light.
Banding and pattern noise
- Cause: Sensor readout artifacts, insufficient dithering, or extreme stretching.
- Fix: Dither between subs, use calibration frames, and consider stacking algorithms with robust rejection. Ensure proper shielding from stray light and electromagnetic interference.
Dust motes and vignetting
- Cause: Dust on the sensor window or filters; optical vignetting.
- Fix: Proper flat frames matched to the optical train; careful cleaning of external surfaces where appropriate.
Severe gradients or color casts
- Cause: Light pollution, Moon glow, airglow, or uneven flats.
- Fix: Gradient extraction in preprocessing, aim away from the Moon, and refine flat technique. Consider timing your session for better sky position or using appropriate filters.
Saturated star cores
- Cause: Long sub-exposures or high gain/ISO.
- Fix: Reduce exposure length or gain, blend shorter exposures for bright cores (HDR), and keep an eye on the histogram.
Field rotation on trackers
- Cause: Alt-az movement or incorrect polar alignment on an equatorial tracker.
- Fix: Re-check polar alignment; ensure the tracker is in equatorial mode. Shorten subs if minor rotation persists.
Debugging is easiest when you change one variable at a time. Keep a log of settings and outcomes. Over time, your rig will become more predictable, and your troubleshooting will shift from firefighting to refinement.
Frequently Asked Questions
How much total integration time do I need for a good deep-sky image?
More integration time almost always improves results by lowering noise and revealing faint details. For bright emission nebulae, a few hours can already produce satisfying images. For faint dust or broadband galaxies, aim for many hours across multiple nights. Even incremental additions—another hour here or there—stack constructively. If your background remains noisy after processing, the most effective next step is to gather more data.
Can I get good results from a light-polluted city?
Yes. Narrowband filters with emission nebulae are very effective under city skies. Broadband targets like galaxies are more challenging but still feasible with careful gradient removal and longer integration. Dithering, robust calibration (flats and darks), and precise processing help a lot. If you occasionally travel to darker skies, save broadband targets for those trips and use city time for narrowband or dual-band projects.
Final Thoughts on Choosing the Right Astrophotography Path

Artist: Lviatour
Deep-sky astrophotography rewards patience, planning, and incremental learning. Start with a camera and lens, then add a tracker. Master the essentials: polar alignment, exposure control, and calibration frames. As your skills and ambitions grow, expand into guiding, longer focal lengths, and more advanced processing. Each improvement builds on the last, and your images will reflect the compounding effect of better data and cleaner workflow.
There is no single perfect setup—there’s a setup that matches your sky, your time, and your targets. Keep notes, test methodically, and refine. Revisit early targets with new skills and watch them transform. If this guide helped you plan your next session or clarify your upgrade path, consider subscribing to our newsletter to get future deep-dive articles, seasonal target guides, and science-backed techniques delivered to your inbox. Clear skies and good data!