
Table of Contents
- What Is Milky Way Astrophotography and Why It Matters
- Planning a Milky Way Photo: Season, Moon, and Light Pollution
- Essential Gear for Milky Way Photography: Cameras, Lenses, Tripods
- Dialing In Camera Settings: ISO, Aperture, Shutter, and White Balance
- Nailing Focus and Composition Under the Stars
- Reducing Noise and Star Trails: Tracking, Stacking, and Blending
- Milky Way Post-Processing Workflow: From RAW to Print
- Field Safety, Access, and Ethical Night Photography
- Common Milky Way Photography Mistakes and How to Fix Them
- Advanced Techniques: Panoramas, Mosaics, and Time-Lapse
- Frequently Asked Questions
- Final Thoughts on Choosing the Right Milky Way Photography Approach
Milky Way astrophotography combines science, art, and patience to reveal our galaxy’s star fields, dust lanes, and glowing nebulae. Whether you’re just starting out or refining your technique, the goal of this guide is to help you plan, shoot, and process Milky Way images with confidence. You will learn how to choose a location, set your exposure, focus accurately in the dark, reduce noise through tracking or stacking, and polish your results in post-processing. Along the way you’ll find practical tips and internal references to jump between sections—if you’re looking for technical exposure advice, head to Dialing In Camera Settings, and if you want to address noise, skip to Reducing Noise and Star Trails.
What Is Milky Way Astrophotography and Why It Matters
Milky Way astrophotography is the practice of photographing the band of the Milky Way galaxy as seen from Earth. The most visually dramatic area for wide-field photographers is the Galactic Center—located in the direction of the constellations Sagittarius and Scorpius—where star density, dust clouds, and emission nebulae appear richest to cameras. In a single frame, you can capture the interplay of starlight, interstellar dust, and faint airglow, often paired with a terrestrial foreground for a sense of place.
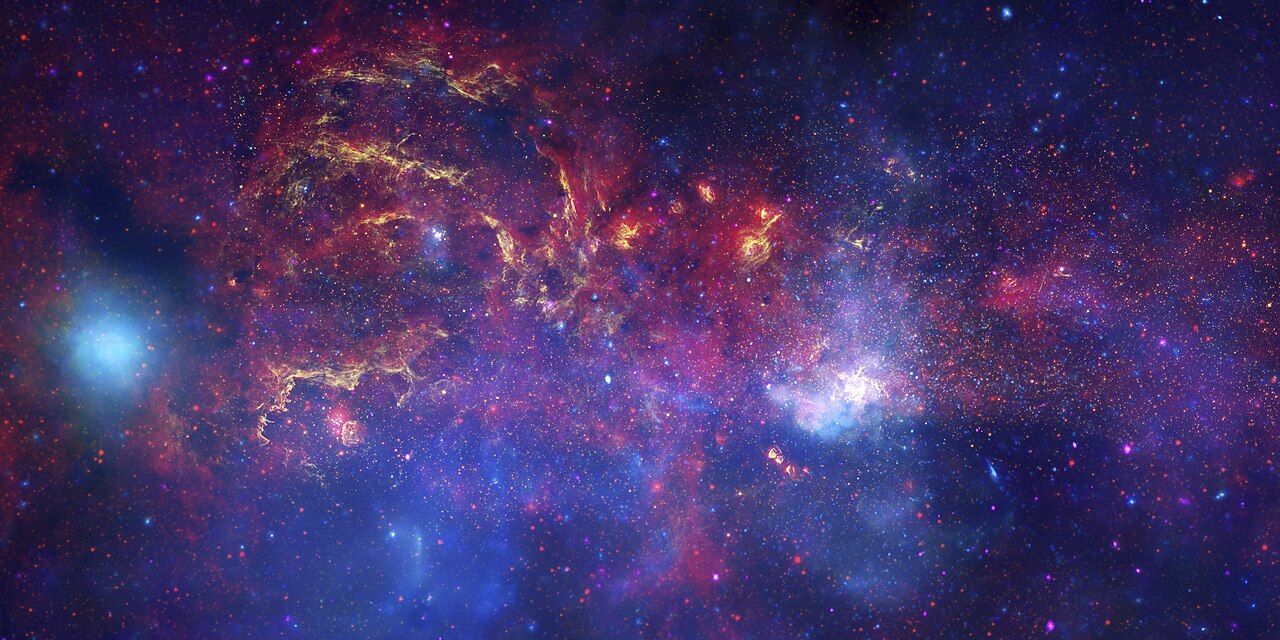
Artist: NASA/JPL-Caltech/ESA/CXC/STScI
Astrophotographers often differentiate between two approaches:
- Single-exposure nightscapes that capture sky and foreground in one frame without tracking.
- Composite techniques such as stacking or tracked-sky plus static-foreground blends to reduce noise and preserve detail without visible star trails.
Both approaches are valid and creative. The choice depends on your goals, conditions, and gear. If you’re new, start with a solid tripod, a fast wide-angle lens, and the exposure guidelines in Dialing In Camera Settings. As you advance, consider the options in Reducing Noise and Star Trails: Tracking, Stacking, and Blending for cleaner, deeper images.
Milky Way images matter because they reconnect us with a night sky that light pollution has dimmed for much of the world. On a technical level, these photos also encourage a deeper understanding of celestial motion, sensor performance, optics, and atmospheric behavior—skills that translate to other forms of night and landscape photography.
Planning a Milky Way Photo: Season, Moon, and Light Pollution
Great Milky Way photos begin with planning. The sky’s rhythm—seasonal visibility, the Moon’s phase, and local light pollution—will make or break your session. You can dramatically increase your keeper rate by addressing each of these variables before you leave home.
Galactic Center visibility by location and season
The Milky Way is visible all year, but the Galactic Center isn’t. At mid-latitudes in the Northern Hemisphere, the core is typically visible in the night sky from about March through October, with the brightest, most photogenic windows often from late spring through summer. In the Southern Hemisphere, the core rides higher and can be especially prominent from roughly February through October, with longer, better-placed viewing windows.
- Northern Hemisphere (mid-latitudes): Prime months are May–August; the core is best seen late evening to early morning. Early in the season it rises after midnight; later, it appears soon after dusk.
- Southern Hemisphere (mid-latitudes): The core appears higher in the sky; March–September often provides excellent opportunities across a wider portion of the night.
For specific timing on a given date, use an astronomy planning app that displays the Milky Way arch and the altitude/azimuth of the Galactic Center. Check your local latitude, as the height of the Milky Way above the horizon depends strongly on it. If you want to prioritize a high, contrasty core with less atmospheric extinction, aim for a night when the Galactic Center is well above the horizon during astronomical darkness.
Moon phase and sky darkness
The Moon is the biggest factor after clouds. For core shots with rich dust lanes, you generally want a new Moon or nights very close to it. If some Moon is present, its light can bleach faint structures. That said, a thin crescent or quarter Moon can add gentle illumination to the foreground without overpowering the Milky Way, allowing shorter exposures and lower ISOs while preserving some contrast in the sky.
- Avoid nights when the Moon is above the horizon during your planned shooting window, unless you intentionally want moonlit foregrounds.
- Use a lunar calendar to confirm moonrise and moonset relative to your target time.
Light pollution and the Bortle scale
Light pollution is graded on the Bortle scale from Class 1 (pristine, darkest skies) to Class 9 (inner-city skyglow). For Milky Way structure and color, seek Bortle 3 or darker if feasible. Bortle 4–5 locations can still yield good results with careful exposure and post-processing, especially if you compose away from the brightest domes. If you are limited to brighter skies, consider techniques from Stacking and Blending to improve your signal-to-noise ratio.

Artist: NOIRLab/NSF/AURA
Weather, transparency, and seeing
Astrophotography favors transparency—the clarity of the air—over seeing (the atmospheric steadiness that primarily matters for telescopic work). Thin high clouds can brighten the sky by reflecting city glow. Watch forecasts for: total cloud cover, high thin cloud layers, humidity, and smoke/aerosols that scatter light.
Scouting and composition planning
Arrive before dark to scout foregrounds, note hazards, and set up safely. Use a compass or planning app to predict the Milky Way’s orientation and decide if you want the arch, a vertical core, or a diagonal sweep. Try multiple options—the look of the Milky Way changes quickly over the night.
Before you head out, confirm your battery charge, memory space, and that you have a wide-angle lens with a fast aperture. For a concise rundown of field equipment, see Essential Gear.
Essential Gear for Milky Way Photography: Cameras, Lenses, Tripods
You don’t need exotic gear to make a strong Milky Way photo, but some choices will make the process easier and the results cleaner.
Cameras: full-frame, APS-C, and modern sensors
- Full-frame cameras often provide lower noise at high ISO, wider fields of view with the same focal length, and larger photo-sites that can handle long exposures more gracefully.
- APS-C (crop-sensor) bodies are highly capable. Just account for the crop factor when planning focal length and calculating exposure limits (see Settings).
- Micro Four Thirds and other formats can work well too; pair them with bright lenses and consider stacking to reduce noise.
Prioritize a camera that offers manual exposure control, good high-ISO performance, RAW capture, and a responsive live view for focusing on stars.
Lenses: speed and field of view
- Focal lengths from 14–28 mm (full-frame equivalent) are popular for capturing the arch and foreground. Wider lenses allow longer shutter times before trailing becomes noticeable.
- Fast apertures like f/1.4–f/2.8 collect more starlight, letting you keep ISO lower and shutter speed shorter. Many f/2.8 zooms are excellent; fast primes offer even more light but watch corner performance and coma.
- Coma and astigmatism matter: test your lens wide open. If corners are messy, stop down a third to a full stop. The trade-off in exposure can be offset with ISO or stacking.
Tripods and heads
- Use a sturdy tripod that resists wind. Extend the thickest leg sections first.
- A simple ball head or a geared head is fine. Ensure the camera is solidly locked to avoid motion blur.
Focusing aids and accessories
- Remote release or use the camera’s self-timer to prevent vibrations.
- Headlamp with a red mode to preserve night vision.
- Spare batteries—cold drains batteries faster.
- Lens heater or hand warmers plus a rubber band to prevent dew.
- Bahtinov mask (optional for wide-angle) can aid focus on bright stars; it’s more common with telephoto or telescopes but can still help at wider focal lengths in some setups.
Tracking mounts and alignment tools (optional)
If you plan to track the sky, a portable star tracker with a polar scope or digital alignment aid can extend your exposure times, enabling lower ISO and finer detail. For landscape work, you can track the sky and shoot the foreground separately untracked, then blend. For details on this workflow, jump to Tracking, Stacking, and Blending.
Dialing In Camera Settings: ISO, Aperture, Shutter, and White Balance
Milky Way exposures are a balancing act between gathering enough photons and controlling noise and star trailing. Use the guidelines below as a starting point, then refine on location.
Aperture: collect light while managing aberrations
- Start wide open (e.g., f/1.4–f/2.8). If star shapes suffer in the corners, stop down one-third to one stop.
- For many modern wide-angle lenses, f/2–f/2.8 offers a good compromise between sharpness and light.
Shutter: 500 rule vs. NPF rule
To avoid star trailing, you need to limit shutter time. Two common approaches are:
- 500 rule: Maximum shutter (seconds) ≈
500 / (focal length × crop factor). Example: 24 mm on full-frame → ~20–21 s. It’s simple but conservative sensors and high resolutions can reveal trailing sooner. - NPF rule: A more refined calculation that considers aperture and pixel pitch. A commonly used formulation is:
Max shutter (s) ≈ (35 × aperture + 30 × pixel pitch) / focal length
Here, pixel pitch is in micrometers. This usually yields shorter times than the 500 rule for high-resolution sensors, reducing noticeable trailing when viewing at 100%.
If you don’t know your pixel pitch, use the 500 rule as a baseline and review a 100% crop on your camera’s LCD. If stars look like dashes, shorten the shutter by a few seconds or reduce your focal length.
ISO: balancing signal and noise
- Typical starting points for modern cameras: ISO 1600–6400. Full-frame cameras often do well around ISO 3200. Crop sensors may prefer ISO 3200–6400, depending on the lens and sky brightness.
- Expose so the sky histogram rises off the left edge without clipping highlights in bright stars. A slightly underexposed RAW that is stacked later can outperform an overpushed single frame.
White balance and color management
- Set a fixed Kelvin white balance—commonly between 3800 K and 4400 K—for a neutral starting point. You can fine-tune in RAW processing.
- Avoid Auto WB; it can shift between frames, complicating stacking and blending.
Noise reduction, long exposure NR, and in-camera settings
- High-ISO NR and long-exposure NR are best left off when you plan to stack or when you need continuous shooting without long dark-frame delays. If you’re only taking a few single frames, long-exposure NR can help by subtracting a dark frame, at the cost of time.
- Turn off stabilization if your camera is tripod-mounted (unless your system specifically supports tripod mode that improves micro-vibrations).
Field-tested starting settings (adjust to taste)
- 14–20 mm, f/1.8–f/2.8, 10–20 s, ISO 3200
- 24–28 mm, f/1.8–f/2.8, 8–15 s, ISO 3200–6400
These depend heavily on lens speed, sky brightness, and sensor performance. After a test shot, check star sharpness at 100% and adjust shutter and ISO. If you need more exposure but can’t extend the shutter, consider stacking (see Tracking and Stacking).
Nailing Focus and Composition Under the Stars
Autofocus will usually hunt at night, so plan for manual techniques to secure critically sharp stars and an engaging composition.
Manual focus on a bright star or distant light
- Switch to manual focus and enable live view.
- Find a bright star (or a distant light) and magnify live view to 5–10×. Adjust focus until the star is as small and crisp as possible.
- Lock the focus ring with tape if your lens has a loose throw. Recheck focus after temperature changes or if you bump the setup.
If stars are too faint for live view, pre-focus during twilight on a distant object at infinity and note that position. You can also use a Bahtinov mask to create diffraction spikes that cross at perfect focus, though this is more convenient for telephoto or telescopic systems than for ultrawides.
Depth of field and hyperfocal myths
At night, hyperfocal distance charts often mislead if you require tack-sharp stars and close foregrounds. Depth of field at f/2–f/2.8 can be razor-thin. Two practical alternatives:
- Focus on the stars for maximum sky sharpness and place the foreground far enough away to remain acceptably sharp.
- Focus stack for meticulous foreground sharpness—one frame focused on the sky and one (or more) on the foreground, blended later as described in Post-Processing.
Composition: leading lines, silhouettes, and scale
- Use leading lines like rivers, fences, or roads to guide the eye toward the Galactic Center.
- Silhouette strong shapes—trees, rock formations, arches—against the Milky Way.
- Add scale cues such as a person with a low-intensity light, but avoid over-brightening the foreground.
- Consider the rule of thirds and leave negative space for the sky when the Milky Way is the hero.

Artist: Poljua
Foreground illumination
Soft, low-level lighting can separate foreground from sky. A dim, diffused light source positioned off-axis minimizes harsh shadows. Be mindful of the location’s rules and the impact on others at the site. If the Moon is a crescent or quarter, it can provide beautiful, natural fill light. Otherwise, you can capture a separate, longer exposure of the foreground and blend later (see Blending).
Reducing Noise and Star Trails: Tracking, Stacking, and Blending

Artist: NASA/JPL-Caltech
As you push for cleaner detail, noise becomes the primary obstacle. Two methods—tracking and stacking—help you gather more signal without increasing star trailing.
Tracking the sky with a portable mount
A star tracker rotates your camera opposite Earth’s spin, keeping stars sharp for longer exposures. Benefits include lower ISO, richer color, and finer structure in dust lanes. For nightscapes, a common workflow is:
- Set up your tracker and perform a precise polar alignment using the built-in polar scope or a digital alignment routine.
- Shoot a series of tracked sky exposures at lower ISO and longer shutter (e.g., 1–2 minutes, depending on focal length and tracking accuracy).
- Turn off tracking and capture a static foreground exposure (or exposures) to prevent foreground blur.
- Blend the tracked sky and static foreground in post using masks, as outlined in Post-Processing.
Even with a tracker, wide-angle lenses remain easiest. At longer focal lengths, perfect alignment and balance become critical. Watch for field rotation if you drift from accurate polar alignment.
Stacking multiple untracked frames
If you don’t want to track, you can stack a sequence of short, untracked frames of the same composition. Specialized software can align the stars and average the noise, substantially improving the signal-to-noise ratio. This works well for Milky Way close-ups and entire arches alike.
- Capture a burst of 10–30 frames with identical settings and no tripod movement.
- Software can reject outliers such as airplane trails using median or sigma-clipping methods.
- For a landscape composition, you can stack separate sets for the sky and the foreground (or a single long foreground exposure), then composite them.
Blending tracked sky and static foreground
When you track the sky, the foreground blurs if exposed at the same time. The common solution is to shoot two sequences—one tracked for the sky and one untracked for the ground—and blend them:
- Develop the sky and ground separately to similar white balance and contrast.
- Use a soft mask along the horizon to merge the two. Pay attention to light domes or clouds intersecting the horizon; a gentle gradient mask often looks most natural.
- Check that the direction and intensity of any foreground light matches the sky’s appearance to avoid a cut-and-paste feel.
Calibration frames (optional)
Deep-sky imagers rely on calibration frames—darks, flats, and bias—to remove fixed-pattern noise and vignetting. For wide-field Milky Way shots, these are optional but can help when pushing data hard. If you pursue more advanced stacks or mosaics, consider capturing these frames to improve uniformity.
Tip: If your sky isn’t perfectly dark, stacking 15–30 short frames often outperforms a single high-ISO long exposure on both color fidelity and detail retention.
Milky Way Post-Processing Workflow: From RAW to Print
Post-processing translates your RAW data into a compelling image without pushing artifacts. The general approach is to improve signal-to-noise, balance color, and enhance structure while maintaining a natural look. The following workflow assumes you’re working in non-destructive RAW editors and, if needed, a layer-based editor for blending.
Ingest and cull
- Back up your files before editing. Night shoots often produce many similar frames; keep the sharpest and cleanest.
- Check focus with 100% inspection on star fields—reject frames with motion blur or dew haze.
Base RAW adjustments
- White balance: Start around 4000 K and adjust by eye. Aim for neutral star colors—some stars should appear slightly warmer, others slightly cooler.
- Exposure: Raise overall exposure until the Milky Way appears; avoid clipping stars.
- Black point: Lower blacks gently to add contrast without crushing faint dust lanes.
- Contrast and curves: Use an S-curve to increase midtone contrast where the Milky Way’s dust lanes sit. Keep highlights under control.
- Noise reduction: Apply modest luminance NR to tame grain; leave fine details intact for later sharpening.
Local contrast and structure
- Apply local adjustments (e.g., masks) over the Galactic Center and dust lanes to boost clarity and texture selectively. Avoid global clarity that can make the sky look gritty.
- Target the blue and cyan channels sparingly to prevent halos around stars.
Color balance and star color
- Use HSL controls to fine-tune the balance between warm star fields and cool airglow/sky. Keep a natural gradient; if the sky turns uniformly teal or magenta, reduce saturation and revisit white balance.
- Preserve star color diversity—a realistic Milky Way includes warm yellow/orange stars and cooler white/blue stars.
Blending sky and foreground
If you captured separate sky and foreground frames, move to a layer-based editor:
- Place the sky and ground in one document with the sky on top.
- Create a gradient mask along the horizon. Refine with a soft brush to accommodate trees or uneven terrain.
- Match color temperature and contrast between layers for a cohesive look. The blend should be invisible at first glance.
Noise reduction and sharpening (final pass)
- After blending, perform a subtle luminance NR pass on the sky only. Protect stars from becoming mushy by masking them or limiting NR to the darkest sky pixels.
- Apply selective sharpening to dust lanes and foreground textures, not the entire frame.
Gradient management
Light pollution can create color and brightness gradients. Use gradient removal tools or masked curves to even out the sky. Work gradually—overzealous corrections can invert the natural brightness falloff near the horizon.
Preparing for web and print
- For web, export to sRGB, resize reasonably (e.g., 2000–3000 px on the long edge), and apply modest output sharpening.
- For print, soft-proof in the target color space and adjust midtones to ensure the Milky Way remains distinct on paper, which has lower dynamic range than screens.
Workflow shortcut: If you plan to stack, keep white balance and tone consistent across the input frames. Consistency makes alignment and rejection algorithms more reliable.
Field Safety, Access, and Ethical Night Photography
Milky Way sessions often mean remote locations, late hours, and unfamiliar terrain. A bit of preparation keeps you safe and preserves the places you photograph.
Personal safety
- Tell someone your plan and expected return time. Bring a basic first-aid kit, extra water, and layers for changing temperatures.
- Use a red headlamp to preserve night vision and avoid blinding others at the site.
- Know local wildlife and any hazards such as cliffs or tidal zones. Scout in daylight when possible.
Access and permissions
- Confirm public access hours; some parks close at night or require permits for after-hours entry.
- Respect private property. If in doubt, ask for permission.
Leave No Trace and considerate lighting
- Pack out what you pack in. Avoid trampling vegetation to set up a tripod.
- Minimize light painting. Bright or constant lighting can disturb wildlife and spoil others’ exposures. Coordinate with nearby photographers and use the dimmest practical light levels.
Ethical practices maintain the night environment for everyone and protect the credibility of your images. If you composite elements, disclose the technique when sharing in contexts where representation matters.
Common Milky Way Photography Mistakes and How to Fix Them
Here are frequent pitfalls with quick remedies. If you hit one of these, revisit earlier sections like Settings or Post-Processing for deeper guidance.
- Soft stars from missed focus: Re-focus using live view magnification on a bright star and recheck periodically. Tape the focus ring.
- Star trailing: Use the 500 rule or NPF rule to shorten the shutter; reduce focal length; or adopt stacking/tracking in Reducing Noise and Star Trails.
- Excessive noise: Reduce ISO if you can lengthen shutter; stack multiple frames; shoot under darker skies; apply targeted noise reduction.
- Flat, low-contrast Milky Way: Improve local contrast with masked curves and clarity in Post-Processing. Ensure you shot under dark conditions with the Moon down.
- Harsh foreground lighting: Use dim, diffused light or a separate longer, low-ISO exposure for the ground and blend gently.
- Color casts from light pollution: Set a neutral white balance, then fine-tune HSL. Use gradient tools to neutralize horizon glow.
- Dewed lens: Use a lens heater or hand warmers; shield the lens from the open sky; periodically check for fogging.
Advanced Techniques: Panoramas, Mosaics, and Time-Lapse
Once you’re comfortable with single-frame nightscapes, advanced methods open creative and technical possibilities. These require more planning and careful execution but can yield dramatic results.
Milky Way panoramas and mosaics
To capture the full arch or ultra-high-resolution detail, build a panorama or mosaic:
- Overlap: Aim for 30–50% overlap between frames to help stitching algorithms.
- Level rotation: Keep the nodal point in mind to reduce parallax when including nearby foreground elements. A panoramic head helps, but careful technique with a ball head can suffice for distant foregrounds.
- Consistency: Lock exposure, focus, and white balance across all panels. If stacking, stack each panel before stitching for best results.
- Vertical mosaics: Consider multi-row mosaics to capture the arch and foreground with high resolution and less distortion.
Tracked panoramas
For maximum sky detail, you can track each sky panel and shoot a separate untracked set for the foreground, then stitch and blend. This is the most demanding approach but produces exceptionally clean skies.
Time-lapse sequences
Time-lapse condenses hours into seconds, showing the Milky Way’s rotation and the dance of airglow and clouds.
- Interval: Every 15–30 seconds is common, depending on shutter speed. Keep a consistent exposure, and avoid flicker by using manual settings.
- Duration: 300–600 frames yield a 10–20 s clip at 30 fps.
- Stability: Ensure the tripod won’t shift as temperatures change; consider a weight on the center column.
Foreground focus stacking
If you want a close foreground crisp at night, capture multiple exposures at different focus distances (foreground, midground, infinity) and blend them. Mark focus positions and use live view to confirm each plane. In post, align and mask carefully to avoid halos along edges against the sky.
Star color emphasis and selective reduction
Subtle star reduction can make dust lanes stand out, while preserving the color variety of brighter stars. Apply reductions selectively and avoid turning the sky into a smooth paint-like texture.
Frequently Asked Questions
What shutter speed should I use at 24 mm on a full-frame camera?
As a starting point, the 500 rule suggests around 500 / 24 ≈ 20–21 s. To be more precise—especially on high-resolution sensors—the NPF rule often yields shorter times, typically around 10–15 s depending on your lens aperture and pixel pitch. Take a test shot and zoom to 100%. If stars show streaking, reduce the shutter by a few seconds. For the cleanest results without trailing, consider stacking several 10–15 s frames, as outlined in Stacking.
Can I photograph the Milky Way with a smartphone?
Modern smartphones with night modes can record the Milky Way under dark skies, but image quality and dynamic range are limited compared with larger sensors and fast lenses. For best results, mount the phone on a tripod, use a manual or pro mode if available (set a high ISO, wide aperture, and a shutter of several seconds), and capture multiple frames to stack. Results improve dramatically under Bortle 3 or darker skies. If you’re serious about Milky Way detail, a camera with a larger sensor and a fast wide-angle lens remains the most effective choice.
Final Thoughts on Choosing the Right Milky Way Photography Approach
There is no single “correct” way to photograph the Milky Way—there are strategies that fit different goals, conditions, and gear. If you want speed and simplicity, use a solid tripod, a fast lens, and the baseline exposures in Settings. When you’re ready to reduce noise and increase detail, add stacking to your toolkit—or take the next step with a portable tracker and sky/foreground blending. As your technique grows, advanced methods like panoramas and time-lapse in Advanced Techniques will expand your creative range.
Whichever path you choose, the fundamentals remain the same: plan carefully for season, Moon, and light pollution; focus precisely; expose thoughtfully; and process with a light touch. With practice, your images will reveal more of the galaxy’s texture and color, and your field craft will make each outing safer and more productive.
If you enjoyed this guide, consider subscribing to our newsletter. You’ll receive future articles on planning strategies, gear testing, and field techniques delivered straight to your inbox—so you can spend less time guessing and more time under the stars.

Artist: Credit: NASA/JPL-Caltech/S. Stolovy (Spitzer Science Center/Caltech)