Table of Contents
- What Is Narrowband Astrophotography?
- Why Narrowband Shines Under Light Pollution and Moonlight
- Equipment and Filter Choices for Narrowband Imaging
- Hα, OIII, SII and Dual-Band Filters: Types and Configurations
- Choosing Targets and Seasons for Narrowband Success
- Acquisition Strategy: Exposure Lengths, Gain/ISO, and Sub Counts
- Calibration Frames and a Clean Preprocessing Workflow
- Polar Alignment, Guiding, and Dithering Best Practices
- Stacking and Preprocessing: From Raw Subs to a Master
- Post-Processing and Color Mapping: SHO, HOO, and Beyond
- Managing Moonlight, Weather, and Seeing Conditions
- Field Craft and Troubleshooting: Halos, Tilt, and Gradients
- Advanced Techniques for OSC/Dual-Band and Mono Workflows
- Frequently Asked Questions
- Final Thoughts on Choosing the Right Narrowband Astrophotography Setup
Narrowband astrophotography lets you image emission nebulae with striking contrast, even from bright, urban skies. By isolating specific wavelengths like hydrogen-alpha (Hα), doubly ionized oxygen (OIII), and singly ionized sulfur (SII), you can cut through light pollution and moonlight while revealing fine structure—shock fronts, filaments, and ionization boundaries—that broadband imaging often struggles to show. This guide brings together practical field techniques and processing insights so you can plan, capture, and process narrowband images with confidence.
Attribution: Mikael Svalgaard (Homepage: http://www.leif.org/mikael/ )
What Is Narrowband Astrophotography?
Narrowband astrophotography is a method of imaging deep-sky objects using filters that pass very narrow slices of the spectrum centered on specific emission lines. The most common lines for amateur imaging are:
- Hα (Hydrogen-alpha) at approximately 656.3 nm
- OIII (Doubly ionized oxygen) near 500.7 nm
- SII (Singly ionized sulfur) at roughly 672.4 nm
These wavelengths are emitted by ionized gases in emission nebulae, planetary nebulae, and supernova remnants. Because the filters are narrow—often 3–12 nm wide—they strongly reject continuum skyglow (including many forms of light pollution) while transmitting the target signal. Unlike broadband imaging, which captures a broad swath of the visible spectrum (e.g., RGB), narrowband focuses on lines where nebulae emit most of their light.
Two main camera approaches are common:
- Mono camera with individual Hα/OIII/SII filters: maximum flexibility and efficiency per channel; typically used with a filter wheel.
- One-shot color (OSC)/DSLR with multi-band filters: a dual- or tri-band filter isolates specific lines for color cameras, supporting narrowband-like imaging with a single device. See Advanced Techniques for OSC/Dual-Band for extraction workflows.
In narrowband, color is often assigned via “mapping” rather than natural color. Popular schemes include the Hubble palette (SHO) mapping SII to red, Hα to green, and OIII to blue, and the HOO palette mapping Hα to red, OIII to green and blue.
Key idea: By imaging specific emission lines and rejecting most other wavelengths, narrowband boosts signal-to-noise ratio (SNR) of nebular details under bright skies. This is why it’s a favorite for urban astrophotography.
Why Narrowband Shines Under Light Pollution and Moonlight
Light pollution elevates the background across broad wavelength ranges, reducing contrast in broadband imaging. Narrowband filters transmit only a tight spectral window around the target’s emission line, suppressing much of the skyglow produced by city lights and the Moon. Practical implications include:

Attribution: Dylan O’Donnell, deography.com
- Higher contrast on emission nebulae relative to broadband approaches.
- Extended imaging windows across lunar cycles: Hα is particularly resilient to moonlight; OIII is more sensitive but still workable near quarter Moon if the target is well separated in the sky from the Moon.
- Better tolerance to mixed lighting: Many modern LED streetlights have broad spectra, but narrowband’s tight passbands diminish their impact.
That said, narrowband is not a cure-all. Reflection nebulae, galaxies, and star clusters benefit less from narrowband because their light largely spans a broad continuum or dust-reflected starlight; broadband or multi-band continuum methods are more suitable there. For emission nebulae, however, narrowband is a powerful tool.
When planning sessions, consider the Bortle scale (a qualitative scale describing sky brightness). Narrowband techniques can produce excellent results even from Bortle 7–9 zones, though total integration time typically needs to be longer than from dark sites. See Acquisition Strategy for guidance on sub-exposure and total time scaling.
Equipment and Filter Choices for Narrowband Imaging
Your setup choices shape both capture efficiency and processing complexity. The basic system consists of a telescope, a mount, a camera, and filters, with optional guiding equipment. Consider the following:
Telescope Characteristics
- Focal ratio: Faster systems (lower f-number, e.g., f/3–f/5) deliver more photons per unit time, allowing shorter sub-exposures. Very fast systems can shift interference filter bandpasses; see Filter Types and Configurations.
- Aperture and focal length: Larger apertures and longer focal lengths can reveal finer details at the expense of field of view and tracking difficulty.
- Optical design: A good apochromatic refractor offers tight stars and low maintenance. Newtonians provide speed and aperture but require careful collimation. SCTs and RCs add focal length for small targets but need precise backfocus.
Mount and Tracking
- Equatorial mounts are preferred for long exposures. Capacity and periodic error influence guiding performance.
- Harmonic drive mounts save weight but still benefit from guiding for multi-minute subs.
Camera: Mono vs. OSC/DSLR
- Mono CMOS: Highest narrowband efficiency; no Bayer matrix. Enables separate Hα, OIII, SII channels.
- OSC/DSLR: Convenient single-camera capture using dual- or tri-band filters. Modern cooled OSC sensors can yield excellent narrowband-like results, especially in Hα + OIII. For uncooled DSLRs, temperature-varying dark current necessitates careful calibration; see Calibration Frames.
Filter Hardware
- Filter wheel or drawer for mono systems; drawers are convenient for OSC dual-band filters.
- Filter size and vignetting: Choose a size that avoids severe vignetting given your sensor’s diagonal and backfocus constraints.
With these components in place, the filter selection itself determines how you’ll balance capture speed, contrast, and color mapping. Continue to Hα, OIII, SII and Dual-Band Filters for line-specific options and trade-offs.
Hα, OIII, SII and Dual-Band Filters: Types and Configurations
Narrowband filters vary by bandwidth, central wavelength tolerance, and whether they are single-line or multi-band. Understanding their behavior is crucial, especially at fast focal ratios and when imaging near the Moon.
Single-Line Narrowband (Mono Workflows)
- Bandwidth: Typical full width at half maximum (FWHM) ranges from ~12 nm down to 3 nm or less. Narrower filters (e.g., 3–5 nm) reject more skyglow and improve contrast, especially for OIII under moonlight. Wider filters (7–12 nm) collect more continuum and are more forgiving of bandpass shift.
- Line placement: The central wavelength must closely match the target line (e.g., 656.3 nm for Hα). Small deviations can reduce throughput.
- Fast systems: On very fast optics (e.g., f/2), the effective bandpass shifts to shorter wavelengths, potentially clipping the emission line. Some filters are optimized for fast optics to mitigate this.

Attribution: Jose A Mtanous
Multi-Band Filters (OSC/DSLR Workflows)
- Dual-band filters pass Hα in the red and OIII in the green/blue channels. They deliver HOO-like data in a single exposure.
- Tri-band filters add a separate band that approximates SII or expands OIII/Hβ response. True SII separation is often limited; synthetic SII is sometimes constructed from Hα or OIII with caveats. See Advanced Techniques.
- Star colors: Multi-band filters suppress broad continuum; to recover natural star colors, many imagers blend in short RGB exposures without the filter, discussed in Post-Processing and Color Mapping.
Halos, Reflections, and Orientation
- Halos around bright stars can arise from internal reflections. Filter design, coatings, and the optical train contribute.
- Orientation: Some filters are directional (telescope side vs. camera side). Following manufacturer orientation guidance can reduce reflections.
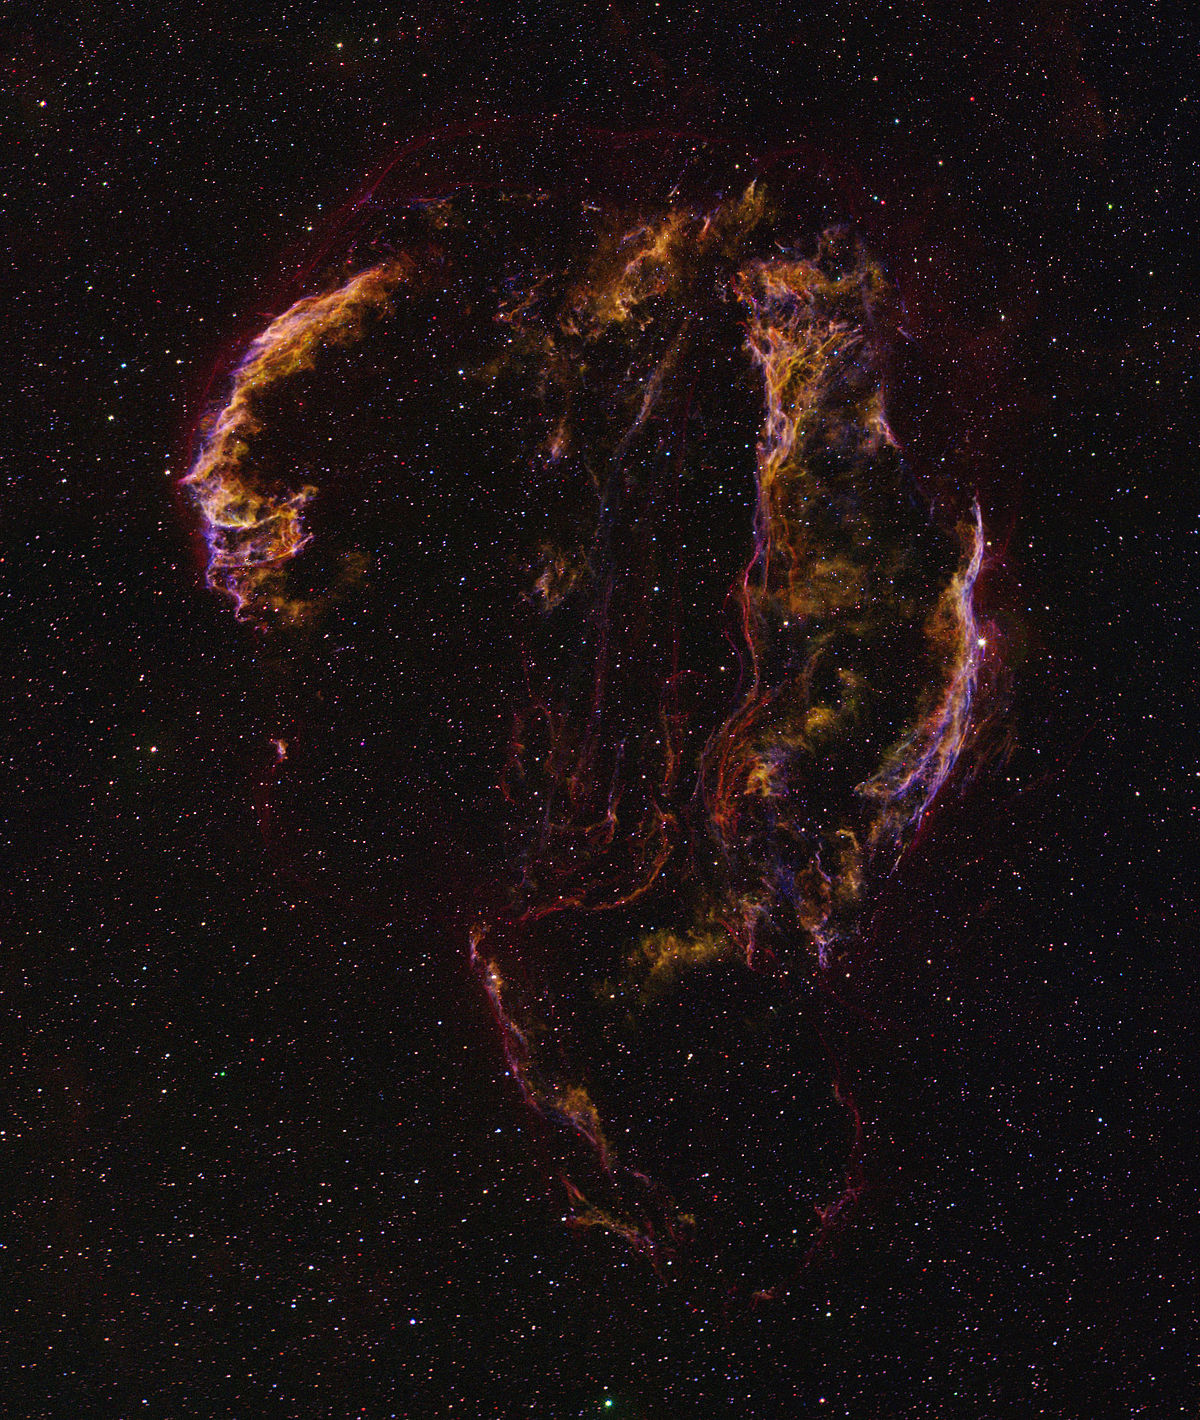
Choosing Targets and Seasons for Narrowband Success
Narrowband excels on emission-line dominated targets. Classic choices include:
- Star-forming regions (HII regions): Rich in Hα, often with OIII structures. Examples by constellation include regions in Cygnus, Cassiopeia, Auriga, and Orion.
- Planetary nebulae: Often strong in OIII with delicate shells and filaments.
- Supernova remnants: Filamentary shock fronts visible in Hα and sometimes SII and OIII.

Attribution: IPHAS Collaboration (prepared by Nick Wright, UCL)
Target visibility depends on season, latitude, and time of night. Planning tools and star charts help identify when targets reach high altitude and transit near the meridian, improving seeing and reducing atmospheric extinction. As a broad guide:
- Late spring: Planetary nebulae and supernova remnants begin to dominate late-night skies.
- Summer: Cygnus is prime, packed with HII regions; OIII-rich structures also abound.
- Autumn: Cassiopeia and Perseus offer abundant nebulae and SNRs.
- Winter: Orion and Monoceros deliver high signal in Hα with iconic emission complexes.
When the Moon is bright, select targets far from it and prioritize Hα. Save OIII-rich targets for darker portions of the lunar cycle or nights with the Moon below the horizon, as described in Managing Moonlight, Weather, and Seeing.
Acquisition Strategy: Exposure Lengths, Gain/ISO, and Sub Counts
Choosing exposure settings is a balance between sky background, read noise, dynamic range, and mount performance. Narrowband filters significantly dim the background, allowing longer exposures before the background reaches the camera’s full well or before read noise dominates.
Setting Gain (CMOS) or ISO (DSLR)
- Unity gain on CMOS cameras balances dynamic range and read noise. Many imagers start near unity, then adjust based on target brightness and sky conditions.
- DSLR ISO: Choose an ISO where the camera’s read noise is reasonably low without excessively compressing dynamic range. Many modern DSLRs perform well in the mid-ISO range; bracket to verify star saturation levels.
Sub-Exposure Length
A common starting heuristic for narrowband with cooled CMOS:
- Hα: 180–600 seconds
- OIII: 180–600 seconds (shorter if moonlit)
- SII: 300–900 seconds (often dimmer)
These ranges depend on focal ratio, filter bandwidth, sky brightness, and mount tracking quality. Check histograms: aim for the sky background peak to be clearly separated from the left edge, but avoid pushing bright stars to saturation. Under heavy light pollution, narrowband still allows longer exposures than broadband, yet the optimal value is usually where background-limited noise dominates over read noise without blowing out highlights.
Total Integration Time and Channel Ratios
- Integration time matters more than sub length once you’re background-limited. Accumulate hours per channel, e.g., 2–6+ hours for Hα and OIII, and often more for SII.
- Channel balancing: Since SII is frequently weaker, plan extra time on SII to improve SHO color balance. For HOO, ensure sufficient OIII to avoid noisy teal/cyan areas.
Dithering and Sub Count
Dither between exposures to suppress pattern noise and enable stacking algorithms to reject hot pixels and banding. See Polar Alignment, Guiding, and Dithering for amplitude and cadence guidelines.
Rule of thumb: Once you’re background-limited, SNR increases roughly with the square root of total exposure time. Doubling SNR takes roughly four times the integration.
Calibration Frames and a Clean Preprocessing Workflow
Calibration frames remove artifacts and normalize your data for stacking. The three pillars are:
- Darks: Same exposure time, temperature, and gain/ISO as your lights. They remove dark current signal and hot pixels.
- Flats: Correct for vignetting and dust motes. Capture at a mid-histogram level, through the same optical path, filter, focus, and orientation as your lights.
- Flat-darks or bias: Calibrate your flats by removing their own dark signal. Flat-darks are shorts at the same temperature and gain; bias frames are very short exposures used in some workflows (depending on camera behavior).
Best practices:
- Build master darks at the exact exposure times you use for each narrowband channel.
- Take fresh flats whenever you change the optical path (e.g., rotate the camera, change filters). Flat quality strongly influences gradient removal.
- Keep a consistent sensor temperature for cooled cameras to reuse dark libraries effectively.
Consistent, well-matched calibration frames simplify downstream processing and reduce the need for heavy-handed fixes during stacking and integration. Poor flats will force aggressive background modeling later; it’s better to fix the source at capture time.
Polar Alignment, Guiding, and Dithering Best Practices
Long narrowband exposures require stable tracking. Three elements work together:
Polar Alignment
- Use iterative alignment tools or drift alignment to reduce declination drift. Small misalignments are often tolerable if guiding is solid, but improving alignment reduces field rotation in long sequences.
Guiding
- Multi-star guiding is robust against seeing variations. RMS error should be comfortably below your image scale (arcseconds per pixel) for pinpoint stars in 5–10 minute subs.
- Balance aggressiveness and exposure time of guide frames to avoid over-corrections while still responding to periodic error.
Dithering
- Dither every 1–3 frames for long subs; larger dither amplitudes help combat residual pattern noise and walking noise.
- Enable settling before the next exposure to prevent smearing.
If your mount struggles with long subs, lower the sub length and increase the number of frames to maintain total integration. This strategy works well in narrowband where background is subdued, as discussed in Acquisition Strategy.
Stacking and Preprocessing: From Raw Subs to a Master
After calibration, align and integrate your subs per channel. The broad sequence is similar across stacking software:
- Calibration: Apply master dark, flats, and flat-darks/bias. Cosmetic correction can mitigate residual hot pixels and columns.
- Registration (alignment): Use star alignment with distortion correction if available. Choose a high-quality reference frame.
- Normalization: Local or global normalization helps match background and signal across frames affected by gradients or transparency changes.
- Integration: Sigma-clipped or Winsorized rejection suppresses outliers (satellites, cosmic rays). Weighted integration prioritizes higher-quality subs.
- Drizzle (optional): If your data are undersampled and dithered, drizzle integration can recover some resolution, at the cost of increased noise and file size.
Repeat for each channel (Hα/OIII/SII). For OSC dual-band data, you’ll often split the master into Hα and OIII representations using channel extraction or more advanced spectral separation, covered in Advanced Techniques.
Quality control: Inspect FWHM, eccentricity, star count, and background statistics to cull poor subs. Better input makes stacking outputs easier to process.
Post-Processing and Color Mapping: SHO, HOO, and Beyond
With integrated channel masters, you’re ready to combine and enhance the data. A typical narrowband workflow includes:
Linear-Stage Corrections
- Background modeling: Remove gradients using dynamic or automatic background extraction. If calibration and flats were solid, this step is minimal.
- Deconvolution (optional): Requires a good PSF model and masks. Improves small-scale detail but can introduce ringing if overdone.
- Noise reduction: Apply gentle, masked noise reduction while the data are still linear.
Channel Combination and Color Mapping
- SHO (Hubble palette): SII→R, Hα→G, OIII→B. Often requires color calibration to manage green dominance due to strong Hα. Techniques like selective color transforms or channel mixing can harmonize hues.
- HOO: Hα→R, OIII→G and B. Produces a red-to-cyan aesthetic with relatively natural-looking star colors if RGB stars are blended.
- Custom mixes: Blend Hα and SII into red at different ratios; use OIII for both green and blue with varying weights. Experiment with channel math to emphasize structures.

Attribution: Ken Crawford
Nonlinear Stretching
- Use gentle stretching tools that control highlights and protect star cores. Incremental stretches preserve color while preventing banding.
- Apply masking to stretch the nebula more than stars. Starless techniques can separate stars for independent processing.
Star Color and Star Reduction
- RGB star blend: Capture short broadband exposures (without narrowband filters) to replace star colors in your narrowband composite. Align and replace stars with appropriate scaling. This can be especially effective with HOO.
- Star size control: Use mild morphological or convolution-based methods to reduce star bloat. Avoid over-sharpening which can accentuate halos.
Green Management and Balancing
- Hα dominance in SHO can create strong green/yellow casts. Use channel mixing or targeted adjustments to balance the palette while preserving signal relationships.
- Global green suppression tools can help but use sparingly to avoid removing real OIII signal in teal regions. Targeted masks are more surgical.
Final Touches
- Local contrast enhancement to emphasize filaments and shock fronts.
- Color calibration guided by nebular physics (e.g., keep OIII structures coherent in cyan-blue).
- Noise reduction on background only; protect the nebula with masks to preserve detail.
Keep a non-destructive, iterative mindset. Revisit steps if artifacts appear. If you plan to share a processing recipe, document the key parameters so you can reproduce the result or adapt it to future targets.
Managing Moonlight, Weather, and Seeing Conditions
Environmental conditions shape both data quality and workflow decisions:
- Moonlight: Prioritize Hα when the Moon is bright or nearby; OIII is more sensitive to moonlight. Aim for targets at large angular separation from the Moon and image OIII when the Moon is low or absent.
- Transparency: High thin clouds increase background and scatter; narrowband helps but cannot eliminate thin cloud effects. Monitor histograms and FWHM to cull compromised subs.
- Seeing: Atmospheric turbulence broadens stars and softens detail. Shorter focal lengths and multiple nights of data can average over poor seeing episodes.
- Humidity and dew: Use dew heaters and shields. Dew on filters or optics causes halos and contrast loss; address at the source rather than in processing.
Narrowband’s resilience lets you schedule productive sessions even when conditions are not ideal for broadband imaging. Plan channels around the Moon phase and use dithering to mitigate sensor-related noise in extended runs.
Field Craft and Troubleshooting: Halos, Tilt, and Gradients
Refining your rig and capture habits reduces artifacts and saves processing time.
Halos and Reflections
- Bright-star halos can originate from filters, sensor cover glass, or the optical train. Slightly adjusting tilt or spacing sometimes changes halo severity, aiding diagnosis.
- Check filter orientation if specified. Internal reflections can be asymmetric depending on optical path.
Sensor Artifacts
- Amp glow on some cameras requires well-matched darks. Residual glow can be further reduced by robust background modeling during preprocessing.
- Microlens diffraction patterns may appear around very bright stars. These are sensor-dependent and best managed by framing or exposure control.
Backfocus, Tilt, and Collimation
- Uneven star shapes across the field indicate tilt or spacing errors. Use star eccentricity maps to quantify and address tilt.
- Newtonians require precise collimation; SCT/RC systems demand accurate backfocus for reducers/correctors.
Gradients and Vignetting
- Strong vignetting is a sign of undersized filters or spacers. Flats should correct moderate vignetting; severe shading reduces SNR in the corners even after calibration.
- Residual gradients from local lights can be mitigated with targeted background models. Avoid direct light sources in the field of view.
Data Management
- Organize subs by filter, exposure, and night. Consistency accelerates preprocessing and color mapping later on.
Advanced Techniques for OSC/Dual-Band and Mono Workflows
As you gain experience, these techniques expand the quality and flexibility of your narrowband imaging.
Separating Hα and OIII from Dual-Band OSC Data
- Channel extraction: Split the integrated RGB image and treat the red channel as Hα and the green/blue combination as OIII. Use a weighted combination of G and B for better OIII representation.
- Spectral separation tools: Some software can mathematically disentangle Hα and OIII contributions more accurately than simple channel splits, accounting for the filter’s transmission curves and the camera’s color matrix.
Synthetic SII Considerations
- When a tri-band filter does not provide a clean SII band, some imagers create a synthetic SII by scaling Hα or combining Hα and OIII. This is a compositing choice for aesthetics and should be labeled as such; it does not represent a true SII measurement.
Starless Processing and Star Replacement
- Removing stars allows aggressive stretching and contrast enhancement on the nebula without bloating stars. Later, stars (narrowband or RGB) can be blended back using masks.
Continuum/RGB Integration for Natural Star Color
- Capture short, unfiltered or broadband-filtered exposures for star color and blend into the narrowband image. This maintains nebular contrast while restoring stellar hues.

Attribution: Luc Viatour
Deconvolution and PSF Modeling
- Build a representative PSF using unsaturated stars and apply masked deconvolution conservatively to sharpen fine nebular structures. Check for ringing and adjust iteratively.
Oversampling, Drizzle, and Resolution
- If your image scale is coarse and data are well dithered, drizzle integration may recover detail. Evaluate SNR trade-offs; drizzle increases noise per pixel and file size.
Documentation and Reproducibility
- Keep notes: filter bandwidths, exposure times, gain/ISO, guiding RMS, seeing, and processing steps. This accelerates improvement and helps diagnose issues later.
Frequently Asked Questions
Can I do narrowband with an unmodified DSLR?
Yes, but with caveats. Many stock DSLRs include an internal filter that attenuates Hα strongly, reducing sensitivity to Hα emission. You can still image OIII with a suitable dual-band filter, and some targets will show Hα, but results are generally better with a camera that has higher red sensitivity—either a modified DSLR, a dedicated OSC astro camera, or a mono camera with individual narrowband filters. Regardless, careful calibration, longer integration, and good processing can yield pleasing images with a stock DSLR.
How long should I expose at f/2 versus f/5?
Faster optics deliver more photons per unit time. If all else is equal, the exposure time at f/2 required to reach a given background level is much shorter than at f/5. In practice, fast systems can shift filter bandpasses and may saturate stars quickly. For example, if 300 seconds at f/5 yields a suitable background in Hα, a fast system might need far less time (e.g., under 120 seconds), but exact values depend on your filter, camera, and sky. Start shorter at fast f-ratios, check histograms and star saturation, and adjust. Also note that specialized filters designed for fast systems help maintain throughput by compensating for bandpass shift.
Final Thoughts on Choosing the Right Narrowband Astrophotography Setup
Narrowband astrophotography unlocks emission nebulae from backyards and city balconies by isolating Hα, OIII, and SII with surgical precision. Choose equipment to match your goals: a mono camera with single-line filters for maximum flexibility and efficiency, or an OSC/DSLR with a dual-band filter for speed and simplicity. Plan targets around the Moon, use robust calibration, and keep your guiding and dithering consistent. In processing, build a repeatable workflow—linear cleanup, careful stretching, channel mapping (SHO or HOO), and restrained noise reduction—to reveal structures that broadband overlooks.
The most important “secret” is not exotic gear but total integration time and clean technique. Accumulate hours per channel, manage gradients at the source, and iterate with intent. If you found this guide useful, explore related articles on capture strategy and processing workflows, and subscribe to our newsletter to get future deep dives on astrophotography delivered to your inbox.