
Table of Contents
- What Are Microscope Slides, Cover Glasses, and Mountants?
- Standard Slide Formats and When to Use Each
- Understanding Cover Glass Thickness and Optical Compatibility
- Choosing the Right Mountant: Refractive Index, Hardening, and Compatibility
- Preparing Clean, Artifact‑Free Slides: Practical Workflow
- Preventing Bubbles, Rings, and Crystals: Common Mounting Artifacts
- Storage, Labeling, and Long‑Term Stability of Prepared Slides
- Safety, Handling, and Environmental Considerations
- Frequently Asked Questions
- Final Thoughts on Choosing the Right Slides, Covers, and Mountants
What Are Microscope Slides, Cover Glasses, and Mountants?
In light microscopy, clarity rarely depends on the objective lens alone. The way a specimen meets the optical path—its mechanical support, the glass above it, and the medium filling the space—strongly influences image quality. Three accessories define this interface: the microscope slide, the cover glass (often called a coverslip), and the mountant (mounting medium). Used well, they minimize optical errors, protect your sample, and make imaging more repeatable across sessions. Used poorly, they introduce stray reflections, spherical aberration, blur, and distracting artifacts like bubbles or Newton’s rings. This guide explains how to choose and use these components with confidence.

Attribution: Witia
At a glance:
- Slides are rigid, flat substrates—typically glass—that support the specimen. They set the geometry for focusing, protect the stage, and provide a surface for labeling.
- Cover glasses are thin glass sheets that flatten and protect the specimen while providing a controlled optical boundary between the sample and the objective front lens.
- Mountants are liquids, gels, or resins that fill the space between specimen and cover glass, reduce refractive index mismatch, and sometimes preserve samples for long‑term storage.
These three parts interact. The slide and cover glass are both usually made of soda‑lime or borosilicate glass. The mountant’s refractive index (RI) determines how light bends at interfaces; choosing an RI that works with your cover glass and specimen type helps maintain contrast and reduces blur. Cover glass thickness also matters: many high‑performance objectives are designed for a specific coverslip thickness over the sample. We will unpack these dependencies in Understanding Cover Glass Thickness and Optical Compatibility and Choosing the Right Mountant so you can avoid common pitfalls.
This article focuses on broadly useful, educational guidance for students, educators, and hobbyists. It avoids medical or diagnostic protocols and does not recommend brand‑specific products. Where numbers appear—such as typical sizes or refractive indices—they are presented as commonly referenced values rather than prescriptive specifications. For exact tolerances and chemical handling, always consult the documentation provided by your instrument and consumable manufacturers.
Standard Slide Formats and When to Use Each
Microscope slides seem simple—flat, rectangular pieces of glass—but their format can save you hours of effort or undermine your entire preparation if mismatched to the task. Understanding sizes, materials, surfaces, and special features will help you select the right slide before you reach for a specimen.

Attribution: Waughd
Common slide sizes and thicknesses
In teaching and general research, the most common slide size is approximately 25 × 75 mm (often described as 1 × 3 inches). Slide thickness typically falls around ~1 mm, though exact values vary by manufacturer and product line. This size supports compatibility with standard stage clips, slide holders, and storage boxes. Regional variants exist; if you work with legacy equipment or specialized stages, verify the size your holder accepts.
Glass types: soda‑lime vs. borosilicate vs. quartz
- Soda‑lime glass: Widely used and economical, suitable for most brightfield and fluorescence applications in the visible spectrum. Thermal shock resistance is modest.
- Borosilicate glass: Offers improved chemical and thermal resistance. Useful if your protocol involves temperature changes or solvents that tend to etch softer glass formulations.
- Quartz (fused silica): Transmits deeper ultraviolet and exhibits low autofluorescence compared to common glass. Consider quartz when imaging at short wavelengths that soda‑lime attenuates; it is more costly and often reserved for specialized optical needs.
For general teaching microscopy and most routine imaging, soda‑lime or borosilicate slides are adequate. If you plan to work with UV excitation or require minimal autofluorescence from the substrate, consider quartz slides and match them with appropriate cover glasses and mountants that do not fluoresce significantly in your detection bands.
Surface options and adhesion enhancements
- Plain slides: Smooth surface on both sides. Appropriate for quick mounts, wet mounts, and specimens that naturally adhere or are immobilized by the mountant.
- Frosted or etched ends: A matte region on one end designed for labeling with pencil or solvent‑resistant marker. This simple feature prevents labels from rubbing off.
- Positively charged or silanized slides: Modified surfaces increase adhesion of certain specimens, such as thin sections, films, or delicate materials that tend to detach during rinses. While commonly used in histology, they can be valuable in educational settings to keep fragile preparations on the slide, especially if you plan to reimage over days or weeks.
- Coated slides: Some slides carry polymer or protein coatings to encourage specific interactions. Use coatings where surface chemistry is central to your application, and ensure the coating does not interfere with your imaging modality (e.g., background fluorescence).
Specialty geometries
- Concavity (well) slides: A shallow depression holds a larger drop for observing motile organisms or thicker specimens that would be crushed by a cover glass. They are useful for demonstrations but limit resolution when the specimen extends far from the cover glass.
- Multiwell slides: Slides divided into several regions by raised barriers, allowing side‑by‑side comparisons or small‑volume tests. Ensure your stage or adapter can accommodate the height of barriers.
- Chambered slides: Integrated chambers with covers enable enclosed environments; again, verify the working distance and field of view with your objectives.
When in doubt, default to a standard 25 × 75 mm plain or frosted slide. As your needs grow, match material and surface to the particular sample type and imaging method. For example, for delicate film fragments that you do not want to lose during gentle rinsing, a charged slide can be helpful; for thick pond samples with living organisms, a well slide allows more volume without compression.
Understanding Cover Glass Thickness and Optical Compatibility
The cover glass (coverslip) serves two missions: it mechanically protects and flattens the specimen, and it defines an optical layer between sample and objective. Thinness is not simply an aesthetic preference; cover glass thickness interacts with objective design. Many high‑magnification objectives are optimized for a specific coverslip thickness above the specimen. Using the wrong thickness, or omitting the coverslip entirely for objectives that expect one, can reduce contrast and sharpness.
Nominal thickness numbers and tolerances
Cover glasses are sold by nominal “numbers” that correspond to thickness ranges. Typical groupings you may encounter include:
- No. 0: roughly ~0.085–0.13 mm
- No. 1: roughly ~0.13–0.16 mm
- No. 1.5: roughly ~0.16–0.19 mm (nominal around 0.17 mm)
- No. 2: roughly ~0.19–0.25 mm
Manufacturers may specify tighter or broader tolerances; check datasheets when exactness matters. The widely used “No. 1.5” corresponds to a nominal thickness near 0.17 mm, the value many high‑performance objectives are designed to accommodate. Some sources offer high‑precision coverslips graded close to 0.170 mm with narrow tolerances; these can improve consistency for demanding imaging tasks.

Attribution: Witia
Why thickness matters to image quality
In an objective corrected for a specific cover glass thickness, the glass layer is part of the optical path. If you replace it with a thinner or thicker layer, or use a mountant with a markedly different refractive index than assumed, light rays refract differently on their way to the objective. The result is a wavefront error that manifests as spherical aberration and loss of contrast and detail. You might observe a focus that seems “soft” across the field or a gradual drop in sharpness toward depth.
Practical implications:
- For objectives labeled for 0.17 mm coverslips, use No. 1.5 (≈0.17 mm) covers when possible. This applies across many high‑NA objectives designed for biological imaging and other thin‑sample work.
- Some objectives feature a correction collar—a rotating ring that lets you tune compensation for small deviations in coverslip thickness and sample medium. If your objective has one, you can refine sharpness by adjusting it while focusing on fine detail on your specimen.
- Long‑working‑distance (LWD) objectives, some low‑magnification objectives, and certain metallurgical objectives are designed to be used without a cover glass. Check the objective’s marking; it often notes “0” (no coverslip), “0.17,” or a range.
Thickness selection cannot be separated from mountant choice. The refractive index of the mounting medium relative to glass alters the effective optical path through the coverslip region. See Choosing the Right Mountant for RI guidance and how it relates to thickness corrections.
Material and autofluorescence considerations
Most coverslips are soda‑lime or borosilicate glass. For fluorescence imaging where background signal matters, consider the glass’s inherent autofluorescence under your excitation bands. Many users find standard glass sufficient for visible‑light fluorophores, but if background limits sensitivity, low‑autofluorescence glass or quartz coverslips may help. Keep in mind cost and the need to pair the coverslip material with compatible mountants and slides for consistent optical behavior.
Choosing the Right Mountant: Refractive Index, Hardening, and Compatibility
Mountants (mounting media) fill the volume between specimen and cover glass. They serve multiple roles: stabilizing or preserving the specimen, matching refractive index to reduce reflections at interfaces, and preventing dehydration or oxidation. Choosing the right mountant is about balancing these needs with your imaging modality and the practicalities of preparation and storage.
Key selection criteria
- Refractive index (RI): Common glass is around 1.52. Water is ~1.33. Glycerol is ~1.47 and increases with concentration when mixed with water. Resinous permanent mountants often approach glass (~1.52). Closer RI matching between specimen, mountant, and coverslip typically reduces reflection and scattering at interfaces, improving contrast. However, your specimen’s optical properties matter, and a perfect match is not always ideal or necessary.
- Hardening behavior: Aqueous mountants (e.g., water, buffered saline, glycerol solutions) remain liquid or gel‑like and are common for temporary mounts and live or delicate samples. Semi‑permanent media gel or set over time (e.g., water‑soluble polymers). Permanent resinous media harden to a stable solid, ideal for archive‑grade slides of dried or fixed specimens.
- Chemical compatibility: Some dyes or labels are sensitive to solvents or pH. Ensure the mountant does not quench your signal or dissolve the specimen. If you are using fluorescence, verify that the medium has low autofluorescence in your detection bands and consider an antifade component when appropriate.
- Viscosity: Low viscosity helps eliminate bubbles in fine structures; higher viscosity can immobilize motile organisms in wet mounts. A compromise is often needed.
- Thermal and photostability: For long‑term storage and repeated illumination, choose media that resist yellowing, crystallization, or photodegradation.
Categories of mounting media
While trade names vary, most mountants fall into a few functional categories:
- Aqueous mountants (e.g., water, buffered saline, glycerol‑water mixtures):
- Pros: Compatible with live or unfixed specimens and water‑soluble dyes; easy to apply and remove; low toxicity relative to many organic solvents.
- Cons: Evaporation and osmotic effects can alter concentration and thickness; lower refractive index than glass means larger RI mismatch; temporary without sealing.
- Notes: Glycerol‑water mixtures (e.g., 50–80% glycerol) raise RI relative to water and increase viscosity. They are widely used for delicate and fluorescence samples, balancing ease with improved optical matching compared to pure water.
- Semi‑permanent, water‑soluble media (e.g., polymer‑based gels):
- Pros: Gel on the slide, reducing flow; useful for classroom or outreach settings where slides need to last days to weeks; water cleanup.
- Cons: Sensitivity to humidity; some can crystallize or contract; still not ideal for archival storage.
- Notes: Choose formulations compatible with any dyes used. Check for background fluorescence if imaging faint signals.
- Permanent resinous media (e.g., synthetic resins; classic natural resins like Canada balsam):
- Pros: Harden to a durable, optically clear solid; refractive indices often close to glass; excellent for long‑term storage of fixed, dehydrated specimens.
- Cons: Typically require dehydration and clearing with organic solvents prior to mounting; not reversible without solvents; some resins chemically interact with dyes or cause fading.
- Notes: When using permanent resins, ensure slides and coverslips are exceptionally clean. Avoid trapped solvent pockets by allowing adequate evaporation of clearing agents before sealing. Work in well‑ventilated spaces and follow local chemical safety guidance.
Refractive index matching in practice
Why care about RI? Every boundary where light passes from one index to another (e.g., sample to mountant, mountant to coverslip) partially reflects and refracts light. Large mismatches increase reflections and scattering, reducing image contrast. Approximate benchmarks:
- Glass coverslip: ~1.52
- Water: ~1.33
- Glycerol: ~1.47 (varies with concentration and temperature)
- Resinous permanent media: often near ~1.52
If your goal is maximum stability and optical clarity for a fixed, dehydrated specimen, a permanent medium with RI close to glass often yields uniform optical behavior across the slide. For living or water‑containing samples, aqueous media are the natural choice despite higher mismatch; using a modest fraction of glycerol can improve contrast and slow evaporation while staying compatible with biology‑friendly conditions.
Remember that objective design interacts with this choice. Some objectives are specifically corrected for imaging through a 0.17 mm glass/air boundary with aqueous specimens. Others are designed for oil immersion and assume an oil/glass interface of similar RI. Always check the markings on the objective and, if present, use a correction collar to fine‑tune imaging when your coverslip thickness or medium deviates from assumptions (see thickness guidance).
Preparing Clean, Artifact‑Free Slides: Practical Workflow
While this article avoids clinical procedures, a clean, repeatable preparation workflow benefits every observer—from hobbyist to educator. The following guidance focuses on fundamentals that prevent common optical artifacts without prescribing specialized lab steps.
Handling and cleaning before use
- Handle by the edges: Fingerprints introduce oils that scatter light and are difficult to remove completely. Consider disposable gloves to reduce contamination.
- Start with clean glass: Many new slides and coverslips are ready to use. If dusty or smudged, gently wipe with a lint‑free tissue lightly moistened with distilled water or isopropyl alcohol. Avoid abrasive motion.
- Inspect under oblique light: Tilt the glass under a desk lamp. Streaks and dust become visible; a quick re‑wipe can save time later.
Mounting without introducing bubbles

Attribution: Sarah Greenwood
- Use appropriate mountant volume: Too little volume traps air; too much floods beyond the coverslip edge causing mess and possible leakage onto the objective. A small central drop is usually sufficient for standard coverslips.
- Lower the coverslip at an angle: Touch one edge of the cover glass to the mountant, then gently lower the opposite side. This allows air to escape ahead of the advancing liquid front. For thick or viscous media, very light tapping can help bubbles migrate.
- Avoid pressing hard: Excess pressure can squeeze out mountant and create Newton’s rings or crush delicate specimens.
Edge management and sealing
For aqueous mounts, evaporation is the main enemy of stability. Gentle edge sealing slows drying and reduces drifting focus over time.
- Edge sealants: Simple, accessible options include solvent‑based clear nail lacquer applied around the coverslip perimeter once the preparation is stable. For sensitive samples, inert wax‑based mixtures can be used. Test compatibility with your mountant on a spare slide before sealing valuable samples.
- Timing: Allow bubbles to migrate out and the sample to settle before final sealing. For permanent resins, seal once the medium has substantially set to avoid solvent entrapment.
Labeling for traceability
- Use the frosted end: Pencil marks are durable and avoid solvent smearing. For marker use, choose solvent‑resistant inks and allow to dry fully.
- Record the mountant: Note the medium, approximate concentration (for glycerol mixtures), date, and any dyes used. This context helps interpret optical behavior (e.g., RI effects) and replication later.
If you find that a particular preparation consistently yields blur or low contrast, revisit your choices from cover glass thickness and mountant refractive index. A small change—such as moving from water to a slightly higher‑RI aqueous mixture—can materially improve consistency.
Preventing Bubbles, Rings, and Crystals: Common Mounting Artifacts
Artifacts distract from the specimen and can mislead beginners into attributing optical problems to the microscope rather than the slide. Recognizing their causes and simple preventive measures will help you troubleshoot confidently.
Air bubbles
Appearance: Bright circular disks in brightfield, often with dark edges; in fluorescence, bubbles may appear as dark voids. Small bubbles can migrate slowly; larger ones usually stay put.
Causes: Entrapment during coverslip placement, shaking mountant bottles, or rough manipulation. High viscosity media accentuate bubble persistence.
Prevention:
- Let mountants rest before use to release dissolved gases.
- Apply the coverslip with a controlled tilt, as described in Preparing Clean, Artifact‑Free Slides.
- Warm very viscous media slightly (within safe limits for your sample and medium) to lower viscosity before mounting; allow to return to imaging temperature to avoid focus drift.
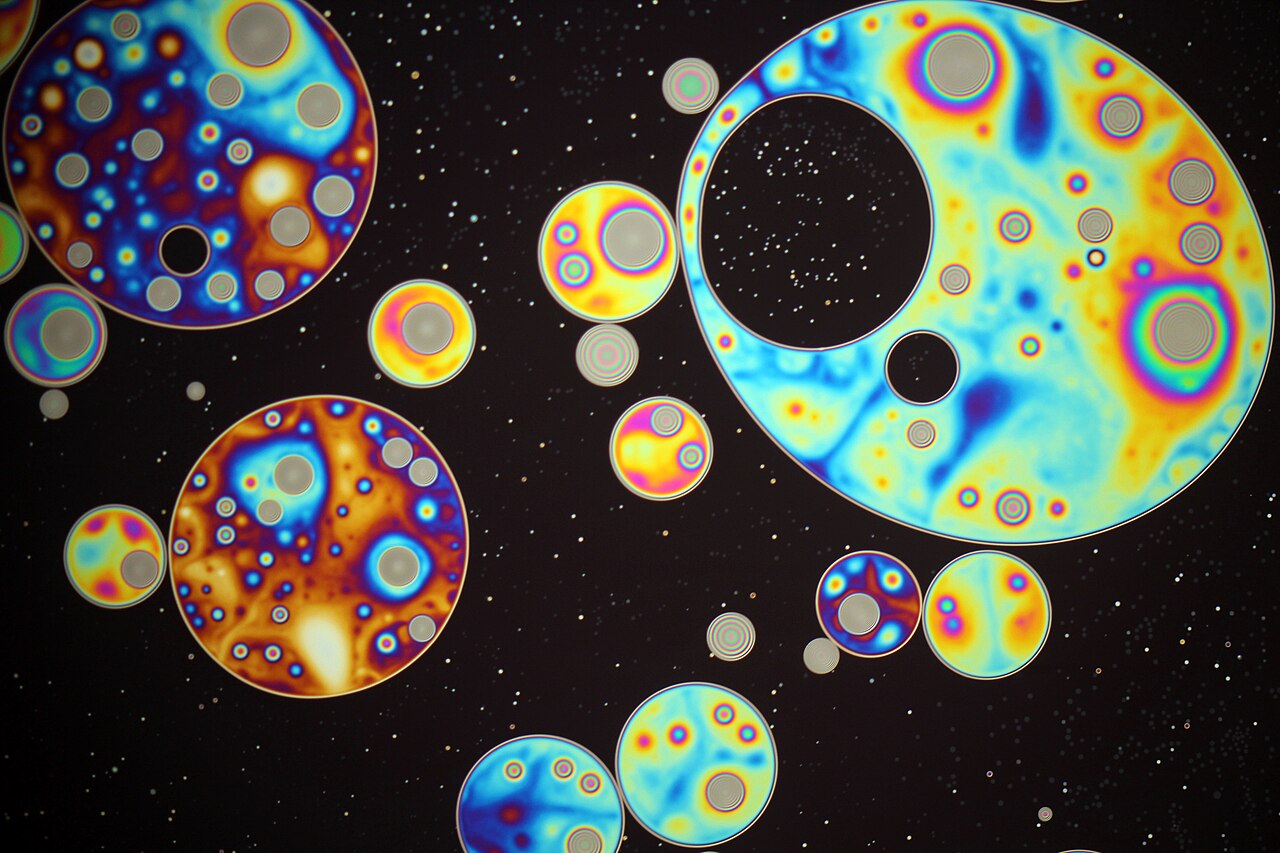
Newton’s rings
Appearance: Concentric colored or gray fringes, often near the coverslip edge or over flatter regions of the specimen. The effect is a classic thin‑film interference pattern created by a minute air gap of varying thickness between the coverslip and the surface below.
Causes: Insufficient mountant locally, a warped coverslip, or pressing out too much medium during placement.
Attribution: Anatoly Mikhaltsov
Prevention:
- Use adequate mountant volume and avoid excessive pressure.
- Replace visibly warped coverslips. Store coverslips flat in their case to reduce mechanical stress.
- For persistent problems, a slightly more viscous medium can help maintain continuous contact.
Crystallization, shrinkage, and haze
Appearance: Needle‑like crystals, granular haze, or edge gaps where the mountant has contracted.
Causes: Some water‑soluble media can crystallize on drying; certain resins can shrink as solvents evaporate. Rapid solvent loss encourages voids and crystalline deposits.
Prevention:
- Allow sufficient time for solvent equilibration before final sealing of permanent mounts.
- For water‑based media, reduce air drafts and avoid over‑warm conditions that speed evaporation.
- Choose formulations known for stable drying behavior for long‑term storage tasks, or consider permanent resins when appropriate for fixed, dehydrated specimens (mountant selection).
Autofluorescence and background
Appearance: High background glow in fluorescence channels not attributable to the sample.
Causes: Intrinsic fluorescence of glass, mountant, or contaminants; impurities in solvents or wipes can also contribute.
Prevention:
- Use low‑autofluorescence glass if signal levels are near detection limits.
- Verify that the mountant and any antifade agents are compatible with your fluorophores and filters.
- Maintain cleanliness in reagents and handling (see cleaning guidance).
Storage, Labeling, and Long‑Term Stability of Prepared Slides
Even beautifully mounted specimens degrade if stored improperly. Careful labeling, appropriate orientation, and controlled environment conditions preserve usability and reduce maintenance.
Orientation and mechanical protection
- Store flat: Keep slides horizontal in slide boxes or drawers that support the entire slide. Vertical storage can promote mountant creep if not fully cured.
- Avoid compression: Do not stack loose slides directly; friction scratches coverslips. Use separators or fitted boxes.
- Protect from vibration: Permanent resins take time to fully harden. Minimize movement during early curing to avoid bubble formation.
Humidity and temperature
- Moderate, stable humidity: Excess humidity encourages condensation and mold growth in long‑term aqueous mounts. Extremely dry conditions can accelerate solvent loss and shrinkage in semi‑permanent media.
- Room‑temperature storage: Many prepared slides fare well at typical room temperatures. Avoid heat sources or direct sunlight, which can yellow resins and accelerate photobleaching.
Light exposure
- Dark storage: Especially for fluorescent specimens, store in opaque boxes or drawers. Prolonged light exposure can bleach dyes and induce background changes in some media.
Labeling and records

Attribution: Waughd
- Durable labels: Use the frosted area for pencil or solvent‑resistant ink. Include sample description, date, mountant, and any additives.
- Metadata cards or logs: Keep a separate notebook or digital record linking slide IDs to preparation details. This is invaluable when comparing results across different mountants or cover glass thicknesses.
With careful storage, permanent mounts can remain optically clear for extended periods. Temporary aqueous mounts are best viewed promptly; sealing extends longevity but is still not equivalent to permanent resin mounts for archival purposes.
Safety, Handling, and Environmental Considerations
Microscope slides and cover glasses are inert materials, but mounting sometimes involves solvents or adhesives. Sensible precautions keep your workspace safe and your results consistent.
- Glass safety: Slides and coverslips are fragile with sharp edges when broken. Handle with care, discard damaged pieces safely, and avoid exerting force that could snap thin coverslips.
- Ventilation: If using solvent‑borne media or sealants, work in a well‑ventilated area. Avoid inhalation of solvent fumes.
- Chemical compatibility: Check that your wipes, sealants, and mountants are mutually compatible. Some solvents can craze plastics or dissolve certain adhesives and labels.
- Disposal: Follow your local regulations for chemical and glass waste. Keep solvent‑contaminated materials separate from regular trash if required in your jurisdiction.
For educational and hobbyist contexts, many projects can be completed with water or glycerol mixtures and simple sealants, avoiding more hazardous chemicals. When your goals include archival storage and you choose permanent resin media, learn the safety data of those products and plan your workspace accordingly.
Frequently Asked Questions
Do I always need a cover glass, or can I image directly on the slide?
It depends on your objective. Many objectives—especially those used at higher magnifications—are designed to image through a thin glass layer above the specimen, typically a cover glass around 0.17 mm thick. Omitting the coverslip for such objectives can reduce sharpness due to changes in the optical path. Conversely, some long‑working‑distance or low‑magnification objectives, and certain metallurgical objectives, are designed to be used without a cover glass. Always check the objective’s marking: it will usually indicate the expected coverslip thickness (e.g., “0.17”) or “0” if none is expected. If your lens has a correction collar, you may be able to compensate for small deviations, but starting with the intended configuration yields the most predictable results. See Understanding Cover Glass Thickness for more detail.
What mountant should I start with for general, non‑permanent observations?
For general educational observations where long‑term storage is not essential, a simple aqueous medium works well. Water or a glycerol‑water mixture offers easy handling and low toxicity. A modest glycerol fraction increases refractive index relative to water, improving optical matching and reducing evaporation compared to pure water. Apply the coverslip at a tilt to minimize bubbles and consider a light edge seal if you wish to observe over several hours or days. If you later need durable archiving of a fixed specimen, consider transitioning to a permanent resin medium. For selection criteria and trade‑offs, see Choosing the Right Mountant.
Final Thoughts on Choosing the Right Slides, Covers, and Mountants
When your image looks unexpectedly dull or soft, the culprit is not always the optics or illumination. The humble slide, coverslip, and mountant set the stage for the microscope to perform. Choosing a standard slide that fits your holder, a cover glass with thickness matched to your objective’s design, and a mountant with sensible refractive index and hardening behavior creates predictable, repeatable imaging conditions.
Key takeaways:
- For objectives designed for a 0.17 mm cover glass, use No. 1.5 coverslips when possible, and consider precision‑graded options when consistency matters.
- Match your mountant to your needs: aqueous media for short‑term and live imaging; permanent resin for long‑term, fixed specimens; semi‑permanent gels in between.
- Minimize artifacts with clean handling, correct mountant volume, and angled coverslip placement. Seal edges when appropriate to reduce evaporation.
- Label and store slides thoughtfully to preserve clarity and context. Keep good records of cover glass thickness and medium; these two choices strongly influence image quality.
Armed with these fundamentals, you can troubleshoot more effectively and plan preparations that get the most from your microscope. If you enjoyed this practical deep dive into accessories that quietly make or break your images, explore our other articles linked in the Table of Contents above and consider subscribing to our newsletter for future weekly guides on microscopy practice and technique.


