
Table of Contents
- What Do NA, Resolution, and Magnification Really Mean?
- Numerical Aperture Explained: Geometry, Medium, and Limits
- How Optical Resolution Works: Abbe and Rayleigh Criteria
- Magnification vs Detail: Avoiding Empty Magnification
- Wavelength, Contrast, and Coherence Effects on Detail
- Depth of Field, Depth of Focus, and Working Distance
- Pixel Sampling, Nyquist, and Matching Cameras to Objectives
- Condenser NA, Köhler Illumination, and Image Brightness
- Common Misconceptions and Practical Trade-offs
- Frequently Asked Questions
- Final Thoughts on Choosing the Right NA and Magnification Strategy
What Do NA, Resolution, and Magnification Really Mean?
In light microscopy, three terms appear in every specification sheet and in nearly every discussion about image quality: numerical aperture (NA), resolution, and magnification. Although they are often mentioned together, each describes a different—yet interconnected—aspect of imaging performance. Understanding their meanings and relationships is the fastest way to improve your microscope results, whether you are a student, an educator, or a hobbyist building competence in optical science.

Artist: Anaqreon
Here is a concise framing to anchor the rest of this guide:
- Numerical Aperture (NA): A dimensionless number that captures the light-gathering and angular resolving power of an optical system. Higher NA generally means greater resolving power and better light collection.
- Resolution: The smallest separation at which two points can be distinguished as separate. In conventional widefield imaging, diffraction sets a physical limit that depends strongly on NA and wavelength.
- Magnification: How large the image appears. Magnification by itself does not add detail; it only spreads the available detail over a larger image. Too much magnification without sufficient NA produces empty magnification.
This article develops these ideas carefully and quantitatively, drawing on standard optical microscopy theory. We will clarify concepts like the Abbe and Rayleigh criteria, Nyquist sampling for cameras, and how condenser NA and Köhler illumination affect contrast and resolution. If you are new to the physics, start with the basics in Numerical Aperture Explained. If you already understand NA, skip ahead to How Optical Resolution Works or Pixel Sampling and Nyquist to connect optics to digital imaging.
Numerical Aperture Explained: Geometry, Medium, and Limits
Numerical Aperture (NA) quantifies the range of angles over which an objective (or a condenser) accepts or emits light. In simple terms, it tells you how much of the diffracted light from a specimen the lens can capture. NA is defined as:

Artist: Happie1Soul
NA = n · sin(θ)
where:
nis the refractive index of the medium between the objective front lens and the specimen (for air objectives,n ≈ 1.00; for water immersionn ≈ 1.33; for standard immersion oiln ≈ 1.515–1.518).θis the half-angle of the largest cone of light that can enter (or exit) the objective.
Key implications of the NA definition
- Higher NA captures higher-angle diffracted orders, which carry fine spatial detail. This improves lateral resolution and signal collection efficiency.
- Immersion media enable NA > 1.0. Because
nappears directly in the definition, oil or water immersion objectives can achieve higher NA than air objectives, supporting finer resolution and improved brightness for dim specimens. - Working distance usually decreases as NA increases. Lenses designed for very high NA must sit closer to the specimen and often have thinner coverslip requirements. See Depth of Field and Working Distance for the practical trade-offs.
Objective NA vs. Condenser NA
Both the objective and the condenser have NAs. The objective NA primarily determines resolution and collection efficiency in imaging. The condenser NA determines the angular range of illumination in transmitted-light techniques and influences contrast and resolution. For best performance, the condenser NA should be matched to the objective NA (or slightly less), as discussed in Condenser NA and Köhler Illumination.
How Optical Resolution Works: Abbe and Rayleigh Criteria
In conventional light microscopy, the smallest resolvable spacing between two point features is limited by diffraction. Two widely cited criteria capture this limit under standard assumptions:
- Abbe criterion (lateral): For incoherent or fluorescence imaging in widefield microscopy, a commonly used estimate of lateral resolution is
d ≈ 0.61 · λ / NA, whereλis the wavelength in the medium (often approximated by vacuum wavelength divided by refractive index of the medium). - Rayleigh criterion (lateral): A related criterion gives
d ≈ 0.61 · λ / NAfor the minimum center-to-center separation of two Airy patterns to be seen as distinct peaks.
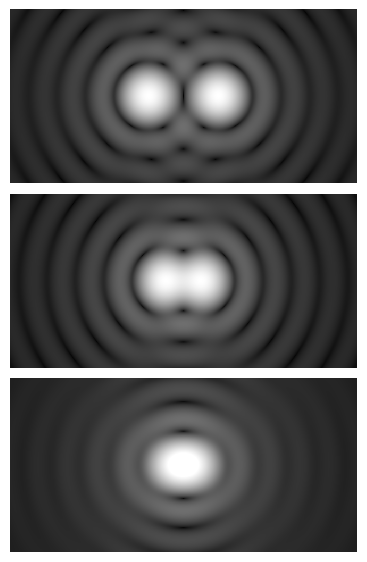
Artist: Spencer Bliven
Different imaging conditions (e.g., partial coherence in brightfield) lead to slightly different numerical prefactors, but the governing dependence on λ and NA is preserved. Two essential takeaways:
- Resolution improves when you increase NA. Capturing higher-angle diffracted light brings in higher spatial frequencies from the specimen.
- Resolution improves at shorter wavelengths. Blue light can resolve finer details than red light, all else equal.
Axial (z) resolution
Axial resolution in widefield microscopy is typically poorer than lateral resolution and depends more steeply on NA. Approximate expressions vary by modality, but a widely used estimate for widefield (incoherent) axial resolution is on the order of:
Δz ∝ n · λ / NA²
Here n is the refractive index of the immersion medium. The quadratic dependence on NA means that increasing NA significantly sharpens the optical sectioning capability in the axial direction, although widefield microscopy remains limited compared with confocal or other advanced methods. The main point is qualitative: higher NA dramatically reduces axial blur.
Resolution vs. visibility
Even when a feature is nominally “resolvable” by a diffraction criterion, it may be difficult to see without sufficient contrast or signal-to-noise ratio. This is why matching illumination, contrast method, and exposure settings to your specimen matters. We revisit these practicalities in Wavelength, Contrast, and Coherence and Condenser NA and Köhler Illumination.
Magnification vs Detail: Avoiding Empty Magnification
Magnification is the ratio of image size to object size. While it determines how large details appear on the screen or through the eyepiece, magnification does not create new detail—only resolution and NA can do that. Therefore, a key concept in microscopy is avoiding empty magnification: scaling the image larger than what its underlying optical resolution can justify.

Artist: Romuello
Useful magnification (rule-of-thumb)
For visual observation, a common guideline (not a strict limit) is that useful magnification is roughly 500× to 1000× the objective NA. For example, a 0.65 NA objective supports on the order of 325× to 650× “useful” magnification for viewing by eye. Going much beyond that may make the image look larger, but not sharper.
When imaging to a camera, the notion of useful magnification shifts to sampling adequacy and field of view. The key is to match the optical resolution to the camera pixel size, which we quantify in Pixel Sampling, Nyquist, and Matching Cameras.
Total magnification vs. objective magnification
- Objective magnification (Mobj): Set by the optical design. In infinity-corrected systems,
Mobj = ftube / fobj. It does not directly guarantee resolution. - Total magnification: Includes the eyepiece (for visual) or the camera adaptor magnification. High total magnification without sufficient NA yields empty magnification.
Field of view and field number
Eyepieces are specified by a field number (FN), the diameter (in mm) of the intermediate image circle they pass. The specimen field of view (FOV) diameter is approximately:
FOV ≈ FN / Mobj
Thus, for a given FN, higher objective magnification reduces the FOV. This matters when you need to see context around a feature or survey a specimen before zooming in.
Wavelength, Contrast, and Coherence Effects on Detail
Resolution is not the whole story. Two images can have the same diffraction-limited resolution but differ in visibility if their contrast and signal-to-noise ratio differ. Wavelength and the type of illumination also affect the appearance of detail.
Wavelength dependence
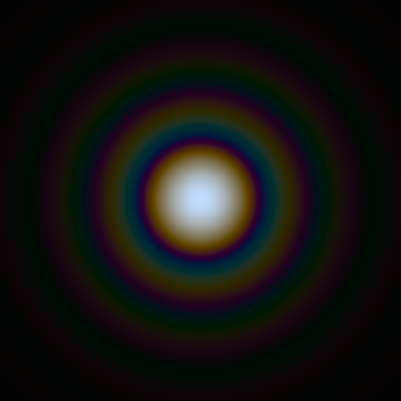
Artist: SiriusB
- Shorter wavelengths improve resolution: As summarized in How Optical Resolution Works, the lateral limit scales with
λ / NA. Switching from red to blue illumination narrows the point spread function (PSF). - Chromatic effects: Objectives corrected for chromatic aberrations (e.g., achromat, fluorite, apochromat) maintain focus and magnification consistency across wavelengths better than simpler designs. This matters when you mix colors or use broadband illumination.
Coherence and contrast methods
- Brightfield (transmitted, partially coherent): Contrast arises from absorption and phase-to-amplitude conversion via defocus or condenser aperture settings. Resolution estimates may differ slightly from the incoherent formula, but the
λandNAdependencies remain similar. - Darkfield: Improves visibility of small scatterers by excluding the unscattered beam. It can reveal features smaller than the conventional resolution limit as bright points, but does not violate diffraction limits on resolving two points separately.
- Phase contrast and DIC: Convert phase variations into intensity differences without staining. They often reveal fine structures at low absorption, improving visibility while remaining subject to diffraction limits on spatial resolution.
- Polarization contrast: Sensitive to birefringence; invaluable for crystals, polymers, and stresses in transparent materials.
The common thread: contrast methods enhance visibility, not the fundamental diffraction limit. But because real imaging is constrained by signal and noise, good contrast often yields a more informative image than a purely higher NA with poor contrast.
Depth of Field, Depth of Focus, and Working Distance
Depth of field (DOF) describes the axial range in object space over which the specimen appears acceptably sharp. Depth of focus refers to a related range in image space around the image plane that still produces an acceptably sharp image on the detector or retina. Although related, they are not the same.
How NA affects DOF
Higher NA improves lateral and axial resolution but reduces DOF. A commonly used widefield approximation for the diffraction-limited contribution to DOF is proportional to n · λ / NA², indicating that as NA increases, the in-focus thickness shrinks rapidly. This is why high-NA objectives reveal thin optical sections but demand precise focusing and stable samples.
Other contributors to DOF
- Wavelength: Longer wavelengths increase DOF; shorter wavelengths reduce it.
- Detector/visual circle of confusion: Acceptance criteria for “sharpness” (e.g., pixel size for cameras, eye acuity for visual) add a geometric term to DOF. On cameras, for a given pixel size and magnification, this term can be significant at low NA.
- Refractive index: The immersion medium’s refractive index influences both NA and axial imaging properties.
Working distance trade-offs
Working distance is the physical clearance between the objective front element and the specimen when the image is in focus. As NA increases (for a given objective class and magnification), working distance typically decreases. High-NA oil-immersion objectives can have very short working distances and may require careful coverslip thickness control. If you need to image thick or uneven samples, consider moderate NA with longer working distance objectives, and use contrast methods to maintain visibility.
Pixel Sampling, Nyquist, and Matching Cameras to Objectives
Modern microscopy frequently involves a digital sensor. Matching optical resolution to pixel sampling is essential to preserve detail without introducing aliasing or wasting resolution.
Nyquist sampling criterion for microscopy
To capture the highest spatial frequency that the optics deliver, the camera must sample at least twice that frequency. In spatial terms, the effective pixel size in the specimen plane should be about half the expected resolution limit or smaller. For widefield imaging, combining Nyquist with the Abbe/Rayleigh estimate yields a practical guideline:
- Specimen-plane pixel size s:
s = p / M, wherepis the camera pixel size (µm) andMis the total magnification from specimen to sensor (objective × camera adaptor). - Nyquist condition:
s ≤ d / 2, withdthe lateral resolution estimate (e.g.,0.61 · λ / NAfor widefield incoherent imaging).
Combining the two:
M ≥ 2p / d
This gives a target magnification to match optics and camera. If you sample much coarser than Nyquist, fine features may alias or disappear; if you sample much finer, you gain little additional information while spreading photons over more pixels (reducing per-pixel signal-to-noise, all else equal).
Practical example
Suppose you use a 0.65 NA objective at 550 nm and a camera with 6.5 µm pixels. The widefield incoherent estimate is d ≈ 0.61 · 0.55 µm / 0.65 ≈ 0.516 µm. Nyquist sampling at the specimen requires s ≤ d/2 ≈ 0.258 µm. Therefore:
M ≥ 2p / d ≈ 2 · 6.5 µm / 0.516 µm ≈ 25.2×
So a total magnification of around 25× to 40× at the sensor is adequate. If your objective is 40×, using a 1× camera adaptor already oversamples slightly (which is acceptable). If your objective is 20×, a 1.5× to 2× camera adaptor might be appropriate to meet Nyquist.
Rule-of-thumb targeting
- For brightfield/fluorescence widefield: Aim for specimen-plane sampling around 0.5× the lateral resolution estimate. Slight oversampling (e.g., 2–3 pixels per resolution element) is usually fine.
- Balance SNR and exposure: Finer sampling spreads photons thinner per pixel. If signal is limited, you may prefer modest oversampling rather than extreme magnification at the sensor.
- Use exact wavelengths: If you image in the green, compute with ~550 nm; for blue or red, adjust accordingly. For immersion objectives, consider the medium’s refractive index when estimating effective wavelength in medium if you need higher precision.
Quick calculator snippet
You can estimate camera matching with a simple calculation like this:
# inputs: lambda_um (e.g., 0.55), NA, pixel_um (e.g., 6.5)
# widefield lateral resolution (Abbe/Rayleigh estimate)
d = 0.61 * lambda_um / NA
# Nyquist sampling (2 pixels across d): required total magnification at the sensor
M_required = 2 * pixel_um / d
print(M_required)
Use the result to choose a suitable camera adaptor for your objective, as summarized in Magnification vs Detail.
Condenser NA, Köhler Illumination, and Image Brightness
Illumination quality and geometry directly affect contrast and, indirectly, your ability to perceive the resolution that the optics can deliver. In transmitted-light microscopy, two elements are especially important: the condenser NA and the alignment of Köhler illumination.
Condenser NA and resolution/contrast
- Match condenser NA to objective NA (or slightly below): For brightfield, setting the condenser aperture diaphragm so that the condenser NA is close to the objective NA typically optimizes resolution and contrast. A very small condenser aperture increases depth of field and overall contrast but sacrifices high-frequency detail.
- Darkfield and oblique illumination: Specialized condenser stops or high-NA condensers can provide darkfield or oblique contrast. These enhance the visibility of small scatterers but follow the same fundamental diffraction limits discussed in How Resolution Works.
Köhler illumination
Proper Köhler illumination delivers even, controllable illumination and decouples light source structure from the image. While details of setup are procedural, the concept is straightforward:

Artist: ZEISS Microscopy (Germany)
- The light source is focused at the condenser aperture plane, not at the specimen.
- The specimen is evenly illuminated by a uniform field diaphragm image.
- Köhler allows independent control of field diaphragm (field size) and condenser aperture (illumination NA), letting you tune contrast versus resolution consistently.
In practice, aligning Köhler illumination and correctly setting the condenser aperture are two of the fastest ways to improve brightfield image clarity without changing optics. Doing so helps you realize the resolution predicted in diffraction theory.
Image brightness and NA
- Collection efficiency: Higher objective NA increases the solid angle of collected light, improving signal for dim specimens (e.g., fluorescence).
- Excitation and emission (epi-fluorescence): In epi-fluorescence, higher NA can increase irradiance at the specimen and improve collection. The net signal depends on multiple factors (quantum efficiency, filters, sample), but NA strongly influences both excitation and detection efficiency.
- Exposure trade-offs: If brightness is limited, you may need to increase exposure time or illumination intensity. Always consider specimen safety and photobleaching risks for sensitive samples.
Common Misconceptions and Practical Trade-offs
Microscopy involves balancing constraints. Below are frequent misconceptions and the underlying physics to resolve them.
“More magnification equals more detail.”
Not necessarily. Without sufficient NA, higher magnification simply spreads the same blur over more pixels. Detail is limited by diffraction (and by aberrations, alignment, and sampling), not by how large you display the image. Use the guidelines in Magnification vs Detail and Sampling and Cameras to choose sensible magnification.
“High NA is always better.”
High NA improves lateral and axial resolution but reduces depth of field and working distance, can be more sensitive to coverslip thickness and alignment, and typically costs more. If you need long working distance, thicker samples, or robust tolerance, a moderate-NA objective with appropriate contrast might yield more informative images.
“Resolution is the same as contrast.”
Resolution is about the smallest separations you can distinguish; contrast is about how visible they are. You can have high nominal resolution with poor visibility or, conversely, excellent visibility of larger features with moderate resolution. Adjust condenser NA and Köhler illumination to optimize both.
“Cameras always benefit from the highest possible magnification.”
Camera systems benefit from matching magnification to pixel size, not simply maximizing magnification. See Nyquist sampling to set magnification so that pixel size at the specimen plane is about half the optical resolution limit.
“The Rayleigh/Abbe limit is exact for every setup.”
These are well-established criteria under standard assumptions, but real systems can deviate due to partial coherence, aberrations, sample-induced scattering, and spectral bandwidth. The formulas remain excellent guides for planning, but expect practical variance.
Frequently Asked Questions
Is a 100× objective always better than a 40× for resolving fine detail?
Not automatically. Resolution depends primarily on NA and wavelength, not on magnification alone. A 40×/0.95 NA dry objective can deliver finer lateral resolution than a 100×/0.80 NA objective at the same wavelength because the 40× lens has higher NA. The 100× will make the image larger, but if its NA is lower, the smallest resolvable spacing may actually be worse. Choose based on NA and the camera sampling you need, not just the magnification label.
What NA do I need to resolve 1 µm features with green light?
Using the widefield incoherent estimate d ≈ 0.61 · λ / NA and λ ≈ 0.55 µm (green), set d ≈ 1.0 µm. Solving gives NA ≈ 0.61 · 0.55 / 1.0 ≈ 0.34. So an objective with NA around 0.34 or higher is a reasonable starting point, assuming adequate contrast and alignment. To leave margin for practical factors, choosing a somewhat higher NA (e.g., 0.40–0.50) is often beneficial.
Final Thoughts on Choosing the Right NA and Magnification Strategy
To get consistently sharp, informative microscope images, anchor your decisions in the physics:
- Start with NA: It sets the ceiling on resolvable detail. Choose immersion media when needed to reach higher NA, and be mindful of coverslip and working distance constraints.
- Respect diffraction: Use the
0.61 · λ / NAheuristic to estimate lateral resolution and an∝ n · λ / NA²trend for axial blur. These provide realistic expectations for what is optically possible in widefield imaging. - Match magnification to resolution and pixels: Avoid empty magnification. For cameras, apply Nyquist: make specimen-plane pixels ≤ half the optical resolution. Adjust camera adaptor magnification accordingly.
- Tune illumination: Align Köhler illumination, and match condenser NA to objective NA (or slightly lower) to balance contrast and high-frequency detail.
- Optimize SNR and contrast: Higher NA improves light collection, but exposure, noise, and contrast methods matter too. Use brightfield, phase contrast, DIC, or polarization thoughtfully to reveal the structures you care about.
By grounding your workflow in these fundamentals, you can diagnose image issues quickly, choose sensible optics for your specimens, and make informed trade-offs when constraints (budget, sample geometry, or light level) inevitably arise. If you found this guide useful, explore our other fundamentals articles, and consider subscribing to our newsletter for future deep dives into microscope optics, imaging physics, and practical setup tips.


