Table of Contents
- What Is Köhler Illumination in Light Microscopy?
- Understanding Conjugate Planes and Optical Components
- Step-by-Step: Setting Up Köhler Illumination Correctly
- How Köhler Illumination Improves Resolution, Contrast, and Uniformity
- Choosing and Adjusting the Condenser and Aperture Diaphragm
- Köhler Illumination Across Contrast Techniques: Brightfield, Phase, DIC, and Fluorescence
- Troubleshooting Uneven Illumination and Common Artifacts
- Quantitative Relationships: NA, Wavelength, and Image Quality in Köhler
- Frequently Asked Questions
- Final Thoughts on Mastering Köhler Illumination
What Is Köhler Illumination in Light Microscopy?
Köhler illumination is the standard method for achieving even, high-quality illumination in transmitted and reflected light microscopy. It separates control over the illumination field (the area you see) from the illumination aperture (the angular spread of rays entering the objective), enabling uniform brightness, optimal resolution, and adjustable contrast without imaging the light source structure into the specimen plane.
Artist: ZEISS Microscopy from Germany
At its core, Köhler illumination aligns the microscope so that the lamp or LED source is not imaged at the specimen. Instead, the light source is focused at the condenser aperture and at the objective’s back focal plane—locations that are not directly visible in the image of the specimen. This prevents filament patterns, LED chip structure, or diffuser grain from imprinting on your field of view.
Two diaphragms are central to Köhler illumination:
- Field diaphragm: Defines the illuminated field size. It is imaged onto the specimen plane. Proper adjustment limits stray light and improves contrast by illuminating only the region of interest.
- Aperture diaphragm: Sets the illumination cone angle into the objective. It is conjugate to the objective’s back focal plane. Proper adjustment balances resolution, contrast, and depth of field.
Getting Köhler right is foundational. Whether you are doing brightfield, phase contrast, DIC, or fluorescence, correct Köhler illumination—or its epi-fluorescence equivalent—improves uniformity, reduces glare and flare, and lets your optics perform near their designed capabilities.
Key idea: With Köhler illumination, the specimen sees an evenly lit field, while the objective receives a well-defined cone of light. This independent control is what makes the method robust and reproducible.
Understanding Conjugate Planes and Optical Components
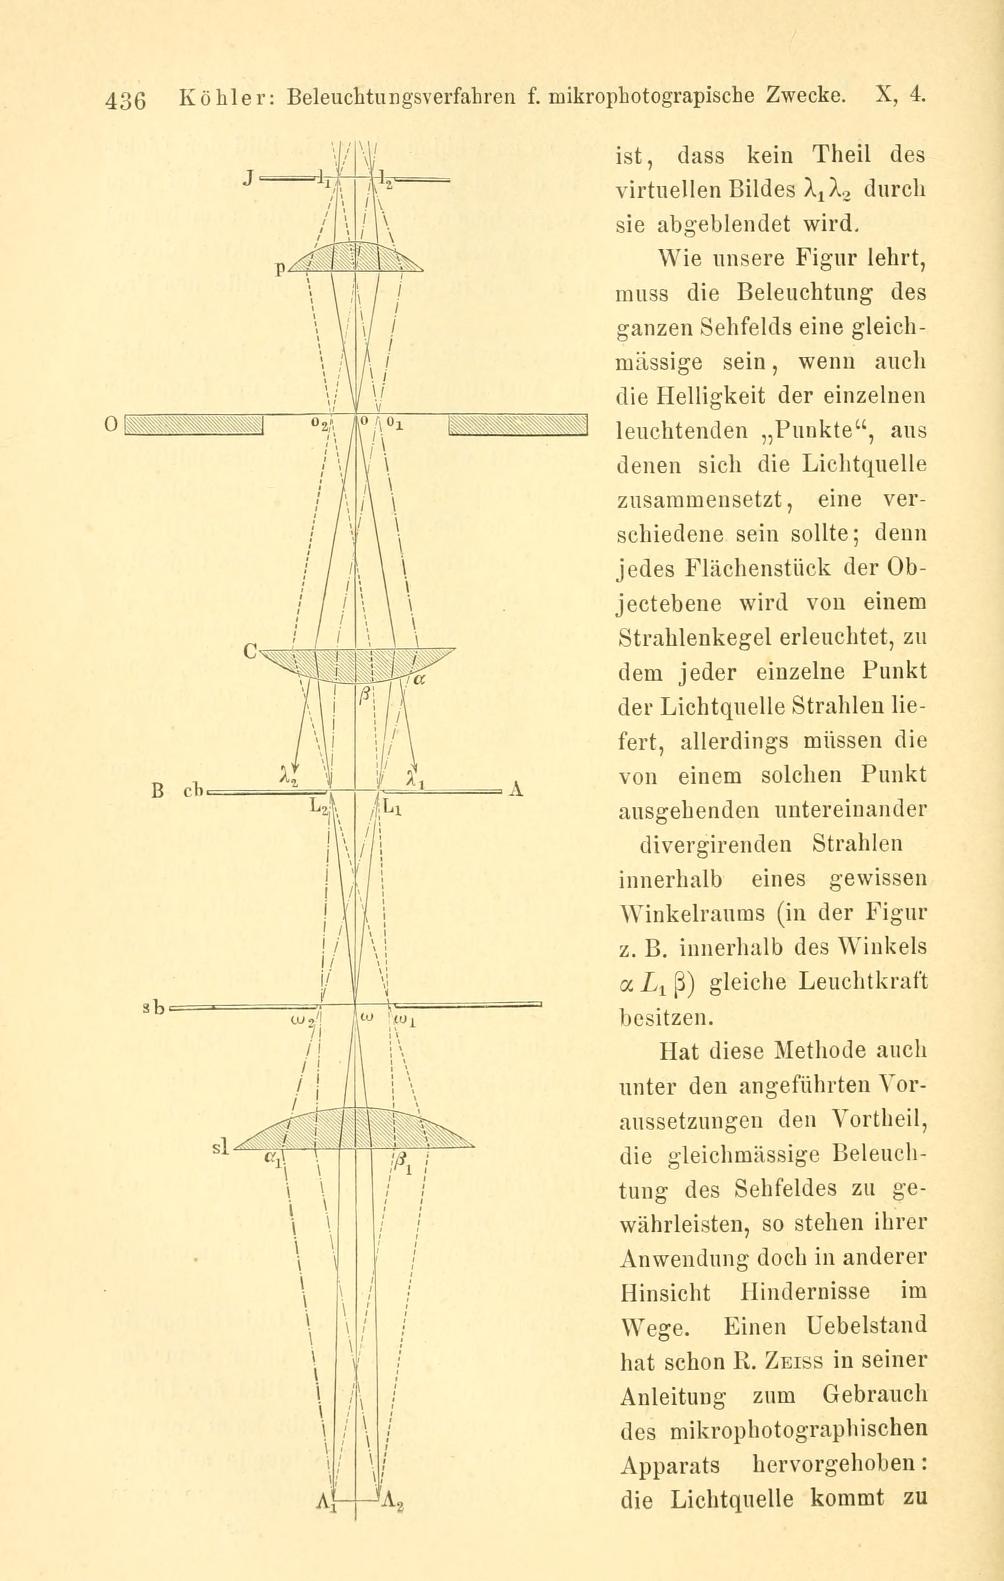
Köhler illumination works because specific optical planes are made conjugate (imaged onto each other) through the condenser and objective optics. Knowing these conjugate relationships helps you diagnose issues and optimize settings quickly.
Two sets of conjugate planes
There are two parallel stacks of conjugate planes in a transmitted-light Köhler setup:
- Field (image) conjugates: lamp field (or field diaphragm), specimen plane, intermediate image plane, eyepiece field plane, and the camera sensor plane (if present). The field diaphragm edges are in focus at the specimen when the condenser is focused.
- Aperture (pupil) conjugates: light source (filament/LED), condenser aperture diaphragm, and the objective back focal plane. The aperture diaphragm is in focus at the objective pupil (not at the specimen plane).
This means adjustments of the field diaphragm change what portion of the specimen is illuminated, while adjustments of the aperture diaphragm change the angular distribution of illuminating rays—crucially affecting resolution and contrast.
Where the source is imaged—and where it is not
In Köhler illumination, the source is not imaged in the specimen plane. Instead, the light source is imaged to the condenser aperture and objective pupil, avoiding structures from the source appearing in the final image. This is why out-of-focus speckle from an LED or a filament coil does not appear as a sharp pattern in a properly adjusted Köhler setup.
Role of the condenser and objective
- Condenser: Collects and focuses illumination onto the specimen. Its numerical aperture (NA) and position determine the achievable resolution and contrast in transmitted light. The condenser should be focused so the field diaphragm edges are sharp at the specimen.
- Objective: Forms the image of the specimen. Its NA sets the resolving power in conjunction with the illumination NA. In Köhler illumination, the objective’s back focal plane is conjugate to the aperture diaphragm.
Field conjugates:        Aperture conjugates:
[Field diaphragm]  ↔  [Specimen]  ↔  [Intermediate image]  ↔  [Eyepiece/camera]
[Light source]     ↔  [Condenser aperture]  ↔  [Objective back focal plane]
For a deeper dive into how NA and wavelength affect resolution and contrast, see Quantitative Relationships: NA, Wavelength, and Image Quality.

Artist: ZEISS Microscopy from Germany
Step-by-Step: Setting Up Köhler Illumination Correctly
While microscopes vary in controls and labels, the practical setup sequence for Köhler illumination follows a reliable pattern. The steps below assume a brightfield transmitted-light configuration with an adjustable field diaphragm and aperture diaphragm.
Preparation and initial focusing
- Place a specimen on the stage and select a mid-NA objective (e.g., 10× or 20×) to make alignment easier.
- Ensure the condenser is installed and centered. Raise or lower the condenser until it is near the correct height for the objective (often just below the stage for transmitted light).
- Focus the specimen using the coarse and fine focus controls until it appears sharp in the eyepieces or on the camera.
Adjust the field diaphragm
- Close the field diaphragm down to a small aperture. You should see its polygonal or circular edge in the field of view.
- Focus the condenser so that the edge of the field diaphragm is in sharp focus at the specimen plane. This establishes the correct condenser height for this objective.
- Use the condenser centering screws to center the field diaphragm image in your field of view.
- Open the field diaphragm until its edge just disappears beyond the field of view. This maximizes the illuminated area while minimizing stray light.

Artist: ZEISS Microscopy from Germany
Set the aperture diaphragm
- Open the aperture diaphragm fully, then gradually close it while observing contrast, depth of field, and resolution.
- A practical starting point is to set the aperture diaphragm to approximately 60–80% of the objective’s numerical aperture. For example, if the objective NA is 0.65, set the condenser aperture to around 0.4–0.5 NA and then fine-tune for your specimen.
- Re-adjust slightly as you change objectives; optimal settings vary with specimen opacity, scattering, and desired contrast.
Check: uniformity and glare
- Scan the field for uniform brightness. If the field is uneven, recheck condenser centering and the lamp/collimator alignment (if adjustable).
- If a bright vignette or hotspot is visible, verify that the conjugate planes are properly established—particularly the condenser focus and field diaphragm centering.
Tip: Repeat these steps each time you change objectives. The condenser height may remain similar, but the optimal aperture setting should track the objective NA for the best balance of resolution and contrast.
Quick-reference setup script
# Köhler quick-setup
1. Focus specimen with mid-NA objective.
2. Close field diaphragm; focus condenser until edge is sharp.
3. Center condenser so field diaphragm edge is centered.
4. Open field diaphragm to just beyond field of view.
5. Adjust aperture diaphragm to ~60–80% of objective NA.
6. Fine-tune for contrast/resolution; verify uniformity.
If you intend to use phase contrast or DIC, follow the above steps for base alignment, then make the additional adjustments specific to those techniques.
How Köhler Illumination Improves Resolution, Contrast, and Uniformity
Why does Köhler illumination produce superior images? The answer lies in separating the control of illumination area from the illumination aperture, ensuring an evenly lit field and an optimized angular distribution of light that matches your objective’s capabilities.
Uniform field brightness
With the field diaphragm conjugate to the specimen plane, you can control exactly how much of the specimen is illuminated—no more and no less. This reduces flare from off-axis regions and improves contrast, especially in low-contrast brightfield samples.
Resolution and angular illumination
The aperture diaphragm governs the illumination NA, which in transmitted light acts through the condenser. The resolution you achieve is fundamentally linked to the objective NA and the effective illumination NA. In brightfield, resolution improves as the illumination NA approaches the objective NA, up to the objective’s limit. Beyond a certain point, closing the aperture increases depth of field but reduces fine-detail resolution. This is consistent with the well-known relationship between NA, wavelength, and resolving power discussed in Quantitative Relationships.
Contrast and stray light control
Two diaphragms tame stray light: the field diaphragm trims the illuminated area, and the aperture diaphragm restricts high-angle rays that can reduce contrast in weakly absorbing specimens. The combination lowers veiling glare and enhances apparent contrast without artificially altering the specimen’s optical properties.
Avoiding source structure in the image
Because the light source is not imaged at the specimen plane, structures like filaments or LED chip boundaries remain invisible in the final image. The result is a smooth, uniform background that supports accurate visualization of specimen features.
Reproducibility
Köhler provides a repeatable, objective basis for illumination setup. Once learned, the steps in Step-by-Step Setup can be reproduced across sessions and instruments, supporting consistent results and comparability over time.
Choosing and Adjusting the Condenser and Aperture Diaphragm
The condenser and aperture diaphragm form the heart of Köhler illumination in transmitted light. Selecting the right condenser and learning how to meter its NA against the objective NA are crucial.
Condenser numerical aperture (NA) and type
- NA matching: In brightfield, the condenser NA should be capable of approaching the objective NA. For example, a 40×/0.65 objective benefits from a condenser that can deliver illumination NA up to ~0.65. If the condenser NA is substantially lower than the objective’s, you will not reach the objective’s theoretical resolution in transmitted light.
- Dry vs. oil condensers: Oil immersion condensers enable higher illumination NA (> 1.0 when using immersion oil with refractive index near 1.515), supporting high-NA objectives. Dry condensers are convenient and adequate for most mid-NA work.
- Specialized condensers: Phase, darkfield, and DIC condensers include additional optics (annuli, prisms, or stop arrangements). For Köhler alignment, start with brightfield and then add technique-specific elements.
Setting the aperture diaphragm relative to objective NA
The aperture diaphragm controls the effective illumination NA. A widely used guideline is to set it to about 60–80% of the objective NA for general brightfield observation. This range often balances resolution, contrast, and depth of field for many specimens.
- More open (higher illumination NA): Improves resolution and reduces diffraction blur but may lower contrast and depth of field.
- More closed (lower illumination NA): Increases contrast and depth of field, but reduces resolution and can introduce diffraction artifacts (e.g., apparent sharpening halos or loss of fine detail).
To verify illumination NA empirically, use a Bertrand lens or a phase telescope (if available) to inspect the objective back focal plane. The aperture diaphragm should appear centered and the opening matched to the objective pupil according to your contrast and resolution goals.
Field diaphragm size and vignetting
After focusing and centering the condenser, open the field diaphragm until its edge just disappears from view. Overly opening it brings in unnecessary stray light; overly closing it may vignette the field and reduce uniformity. Adjustments here are straightforward but impactful for clean imaging.
Illumination sources: halogen, LED, and more
- Halogen lamps: Broad, smooth spectra with adjustable brightness via voltage control. Filament structure is inherently removed from the image by Köhler geometry.
- LED illuminators: Efficient and stable intensity. Many modern LEDs have optics to create an even field; Köhler alignment ensures the LED die is not imaged in the specimen plane.
- Neutral density vs. aperture: To reduce brightness, prefer neutral density filters or source intensity changes rather than excessively closing the aperture diaphragm, which alters resolution/contrast.
For how these adjustments affect theoretical limits, refer to Quantitative Relationships.
Köhler Illumination Across Contrast Techniques: Brightfield, Phase, DIC, and Fluorescence
Köhler illumination principles extend to multiple imaging modalities, each with technique-specific elements layered onto the base alignment. This section provides a high-level overview of what changes—and what does not—across standard methods.
Brightfield
Brightfield is the default mode. Follow Step-by-Step Setup. Fine-tune the aperture diaphragm to align with the objective NA and specimen characteristics. Most of the discussion in How Köhler Illumination Improves Image Quality applies directly.
Phase contrast
Phase contrast requires a condenser annulus and a matching phase ring built into the objective. After basic Köhler alignment:
- Insert the phase annulus (in the condenser turret or slider) corresponding to the objective in use.
- Use a phase telescope or Bertrand lens to bring the objective back focal plane into view, then center the annulus so it coincides with the phase ring in the objective.
- Adjust the aperture diaphragm as needed to optimize contrast while maintaining adequate resolution for your objective NA.

Artist: Catfaster
The Köhler condition still holds: the source is imaged in the pupil plane, and the field diaphragm is conjugate to the specimen. The additional ring structures modulate phase and amplitude relationships to enhance contrast for transparent specimens.
Differential interference contrast (DIC)
DIC uses polarizers and Nomarski/Wollaston prisms to convert small optical path gradients into intensity differences. After brightfield Köhler alignment:
- Insert and align polarizers and the DIC prisms according to your instrument’s controls (objective-specific prisms are common).
- Ensure that the aperture diaphragm is set to support the objective’s NA and that the condenser is properly centered.
- Adjust DIC shear/bias controls to achieve desired contrast without saturating highlights or crushing shadows.
Köhler provides the even, glare-free illumination that DIC relies on to convert phase gradients into signal without introducing spurious artifacts from the source.
Darkfield
Darkfield illumination uses a condenser stop (or special objective) that blocks central rays and admits only oblique illumination. For transmitted darkfield with a stop:
- Perform a base Köhler alignment in brightfield to center and focus the condenser.
- Insert the darkfield stop sized for your objective and specimen.
- Confirm that only scattered light from the specimen enters the objective—background should be dark, with bright features arising from scattering.
While the aperture diaphragm is less central here (the stop controls the illumination geometry), proper centering and field control from Köhler reduce stray light and improve background uniformity.
Epi-illumination and fluorescence
In epi-illumination, including epi-fluorescence, the objective serves as the condenser, and illumination travels through the objective onto the specimen. The principles of Köhler still apply, but the field and aperture diaphragms are located within the epi-illuminator optics rather than below the stage.
- Field diaphragm in epi is adjusted to define the illuminated field at the specimen. It should be opened to just beyond the field of view to minimize stray excitation light.
- Aperture diaphragm in epi controls the angular distribution of the excitation beam at the back focal plane of the objective. Tuning it can help balance resolution, contrast, and out-of-focus background in reflective or fluorescent imaging.
- Excitation and emission filters are inserted in appropriate filter cubes. These filters define the wavelength bands but do not alter the fundamental Köhler geometry of field and aperture conjugates.
Uniform excitation illumination improves quantitative fluorescence by reducing gradients that can bias intensity measurements. See Quantitative Relationships for wavelength-dependent resolution considerations that are especially relevant in fluorescence.
Troubleshooting Uneven Illumination and Common Artifacts
Even with careful setup, issues can arise. The checklist below maps symptoms to likely causes grounded in the conjugate-plane logic of Köhler illumination.
Uneven brightness across the field
- Condenser not centered: Re-center using the condenser centering screws while viewing the field diaphragm edge. This is the most frequent cause of shading.
- Field diaphragm off-center: Ensure the field diaphragm image is centered and opened to just outside the visible field.
- Illuminator misalignment: If your lamp or LED has adjustable collimation, verify that the collector lens and source are correctly centered and spaced.
- Inhomogeneous diffuser or dirty optics: Dust, smudges, or nonuniform diffusers in conjugate planes can create gradients. Clean cautiously following manufacturer guidance for optical components.
Glare, flare, or low contrast
- Field diaphragm too open: Close it to just beyond the field of view to reduce stray light.
- Aperture diaphragm too open: Slightly close it to restrict high-angle rays that may wash out low-contrast details.
- Specimen thickness or mounting medium: Strong scattering increases background. Adjust aperture for more contrast, or consider a contrast technique suitable for your sample (see Köhler Across Techniques).
Vignetting (bright center, dark corners)
- Field diaphragm too closed: Open it until the edge just leaves the field.
- Condenser too high/low: Refocus the condenser while observing the field diaphragm edge sharpness.
- Objective or eyepiece mismatch: Check that the illumination field covers the camera or eyepiece field number; extreme fields may exceed the designed field size of the condenser.
Apparent filament or LED structure in the image
- Source imaged at specimen: This indicates non-Köhler alignment. Verify that the collector lens and field diaphragm are correctly positioned, and redo the Köhler steps in Setup.
- Dirty or patterned optics in field conjugate: Artifacts on the field diaphragm or near the intermediate image plane can appear in focus. Clean or replace as appropriate.
Phase contrast ring misalignment
- Annulus not centered: Use a phase telescope/Bertrand lens to center the condenser annulus to the objective’s phase ring (see Phase Contrast subsection).
- Wrong annulus: Ensure the annulus matches the objective designation.
Non-uniform fluorescence excitation
- Epi field diaphragm mis-set: Adjust the epi field diaphragm so it just exceeds the field of view.
- Aperture diaphragm mis-set: Fine-tune epi aperture (illumination pupil) to balance brightness and resolution.
- Filter cube alignment: Verify that filter cubes are seated and centered to avoid partial beam clipping.
Diagnostic habit: When in doubt, return to basics: close the field diaphragm, focus and center it, then set the aperture diaphragm. This sequence resolves many issues quickly.
Quantitative Relationships: NA, Wavelength, and Image Quality in Köhler
Köhler illumination gives you control over the illumination NA, which interacts with the objective NA and specimen properties to determine resolution, contrast, and depth of field. This section summarizes standard relationships used in optical microscopy.
Numerical aperture (NA)
Numerical aperture is defined as NA = n · sin(θ), where n is the refractive index of the medium between the front lens and the specimen (e.g., ~1.0 for air, ~1.515 for immersion oil) and θ is the half-angle of the maximum cone of light that can enter or exit the lens.
- Objective NA sets the potential resolving power and light-gathering ability of the objective.
- Condenser (illumination) NA determines the angular spread of illumination. In brightfield, imaging fine details benefits when the condenser NA approaches the objective NA, within practical limits.
Lateral resolution
Two common expressions describe lateral resolution limits in incoherent or partially coherent imaging:
- Rayleigh criterion (point objects):
d ≈ 0.61 · λ / NA_obj, where d is the smallest resolvable separation, λ is the wavelength of light, and NA_obj is the objective NA. This gives a practical estimate for isolating closely spaced point features. - Abbe limit (periodic structures):
d ≈ λ / (2 · NA_obj)for incoherent illumination of periodic patterns. This is derived from diffraction considerations of spatial frequency support.
In brightfield transmitted light, the effective resolution also depends on the illumination NA. When the condenser NA is substantially smaller than the objective NA, high spatial frequencies may not be efficiently transmitted, and apparent resolution suffers. This is why the aperture diaphragm setting matters.
Depth of field and contrast
Closing the aperture diaphragm (reducing illumination NA) increases depth of field and apparent contrast for low-absorption specimens, but at the expense of resolving the finest details due to increased diffraction blur. Opening it increases resolution and brightness but may reduce contrast and depth of field.
Wavelength dependence
Resolution improves at shorter wavelengths according to the formulas above. In fluorescence, the relevant wavelength for resolution is typically the emission wavelength captured by the objective. In transmitted light brightfield, it is the illumination wavelength. Blue light can improve resolution relative to red, though detector sensitivity and specimen photostability are practical considerations.
Illumination coherence
Köhler illumination provides partially coherent illumination that is well suited for high-resolution brightfield imaging. Fully coherent illumination (e.g., laser) interacts differently with specimen spatial frequencies and can create interference patterns; Köhler’s partially coherent approach is preferred for general-purpose transmitted imaging.
Matching condenser NA to objective NA
As a practical guideline, for brightfield imaging of fine details, set the condenser (illumination) NA to be close to—but not exceeding—the objective NA. If unsure, start at ~70% and adjust while observing the trade-off between fine detail visibility and contrast.
For phase contrast and DIC, the effective use of high NA illumination is constrained by the technique-specific optics (annuli, prisms). However, the principle of balancing illumination angle for optimal detail while suppressing spurious glare still applies.
Frequently Asked Questions
Do I need to repeat Köhler illumination every time I change objectives?
It is good practice to at least verify the key steps each time you change objectives. The condenser focus (set by focusing the field diaphragm edge at the specimen) and the aperture diaphragm setting ideally track the new objective’s NA. In routine work, you may only need minor tweaks, but for critical imaging, recheck the full sequence in Step-by-Step Setup.
How can I tell if my illumination NA matches the objective NA?
If your microscope has a Bertrand lens or allows insertion of a phase telescope, you can directly inspect the objective back focal plane. There, you should see the aperture diaphragm as an adjustable opening. Matching its apparent size to approximately 60–80% of the objective pupil is a reliable starting point. Otherwise, adjust while observing image changes: open for higher resolution and brightness, close for higher contrast and depth of field, as discussed in Condenser and Aperture Adjustments.
Final Thoughts on Mastering Köhler Illumination
Artist: ZEISS Microscopy from Germany
Köhler illumination is not a mere setup ritual—it is a principled framework that lets your microscope optics operate near their intended performance limits. By independently controlling field size and illumination aperture, Köhler alignment delivers uniformity, optimizes resolution, and elevates contrast without introducing artifacts from the light source itself.
Mastery comes from repetition and from understanding the logic behind the steps. When the field diaphragm image is focused at the specimen and centered, and when the aperture diaphragm is tuned to the objective NA and your specimen’s needs, you have established the foundational conditions for high-quality imaging. From there, technique-specific refinements—phase alignment, DIC prism bias, epi-fluorescence field and aperture settings—become straightforward extensions of the same conjugate-plane thinking.
As you continue to explore microscopy, revisit the quantitative side in Quantitative Relationships to connect your intuitive adjustments with the physics of NA, wavelength, and resolution. And remember the always-useful reset: close the field diaphragm, focus and center it, then adjust the aperture. This simple sequence solves more problems than almost any other in day-to-day imaging.
If you found this guide helpful, consider subscribing to our newsletter for future deep dives on microscope fundamentals, contrast techniques, and practical optimization tips. Explore related topics in our ongoing series to keep building a strong foundation in optical microscopy.

