Table of Contents
- What Is a Dobsonian Telescope and Why It Matters?
- Aperture, Focal Length, and f/ratio for Visual Observing
- Dobsonian Mount Designs: Classic, FlexTube, and GoTo
- Optical Quality: Mirrors, Collimation, Cooling, and Coatings
- Eyepieces, Finders, and Essential Accessories
- What You Can See with 6″, 8″, 10″, and 12+ Inch Dobsonians
- Portability, Storage, and Light Pollution Considerations
- Budget and Recommended Configurations
- Observing Techniques: Star-Hopping, Sketching, and Logs
- Maintenance and Troubleshooting for Long-Term Performance
- Frequently Asked Questions
- Final Thoughts on Choosing the Right Dobsonian Telescope
What Is a Dobsonian Telescope and Why It Matters?
A Dobsonian telescope is a Newtonian reflector mounted on a simple, ground-based, alt-azimuth mount—often built from plywood and Teflon or modern equivalents. Its design, popularized by amateur astronomer John Dobson in the 1960s and 70s, emphasizes affordability, large aperture, ease of construction, and user-friendly operation. The core idea is straightforward: spend the most you can on aperture (mirror diameter) and support that mirror with a mount that is stable but inexpensive.

For beginners and seasoned observers alike, the Dobsonian has become synonymous with maximum light grasp per dollar. If your main goal is visual observing of the Moon, planets, nebulae, galaxies, globular clusters, and open clusters, it is hard to beat a Dobsonian in terms of simplicity and performance. Compared to many tripod-mounted scopes, Dobsonians offer:
- Large apertures at relatively low cost
- Stable, low center-of-gravity mounts that dampen vibrations quickly
- Intuitive, push-to pointing: just nudge the scope in altitude and azimuth
- Fast setup and takedown; minimal fussing with polar alignment or electronics
Dobsonians come in a wide range of sizes: from compact 4.5–6 inch models up through 8–10 inch “sweet spot” instruments, and on to 12, 14, or 16 inch (and larger) scopes that reveal deep-sky objects in impressive detail under dark skies. The ideal size for you depends on your storage space, lifting ability, car capacity, local sky quality, and budget—each of which we cover in detail in upcoming sections like Portability, Storage, and Light Pollution Considerations and Budget and Recommended Configurations.
In visual astronomy, light is everything. Aperture doesn’t just brighten views—it resolves finer detail, separates close double stars, and helps tease out structure in faint galaxies and nebulae.
Before you purchase, it helps to understand the optical terms that shape your observing experience. In the next section, we’ll unpack aperture, focal length, and f/ratio and explain how they interact with eyepieces to set magnification, true field, and exit pupil.
Aperture, Focal Length, and f/ratio for Visual Observing
Aperture (the diameter of the primary mirror) is the most important specification in a Dobsonian telescope. Larger apertures collect more light, which makes faint objects visible and increases their resolution. But aperture isn’t the only factor—it interacts with focal length and focal ratio (f/number) to influence your field of view, magnification, and the ease of achieving sharp focus across the eyepiece.
Aperture: Light Grasp and Resolution
Common Dobsonian apertures for beginners include:
- 6 inch (150 mm): Portable, budget-friendly, quick to cool down.
- 8 inch (200 mm): A classic all-rounder with a significant step-up in deep-sky performance.
- 10 inch (250 mm): Brighter, more detailed deep-sky views; heavier but manageable for many observers.
- 12 inch (300 mm) and larger: Outstanding deep-sky reach; more challenging transport and storage.
Resolution—your scope’s ability to split close double stars or show planetary detail—scales with aperture. Under steady atmospheric seeing, a larger mirror can reveal finer features like festoons in Jupiter’s belts or the Cassini Division in Saturn’s rings. However, local seeing (atmospheric turbulence) and thermal equilibrium (mirror cooling) can limit real-world resolution; we address this explicitly in Optical Quality.
Focal Length and f/ratio: Magnification, Field, and Coma
Focal length is the distance over which the telescope brings light to focus. In Newtonian reflectors, it’s usually specified alongside the f/ratio (f-number) as f/5, f/6, etc. The f/ratio equals focal length divided by aperture. For example, an 8 inch (203 mm) f/6 has a focal length of approximately 1200 mm.
- Shorter f/ratios (f/4–f/5) are called “fast.” They offer wider fields at a given eyepiece focal length, but they show more off-axis aberrations like coma without a corrector and can be more demanding on eyepieces.
- Moderate f/ratios (f/5–f/6) are common in mass-market Dobsonians and strike a good balance between portability and optical performance.
- Longer f/ratios (f/7–f/8) are common in smaller scopes and can provide easier collimation tolerances and better off-axis performance with inexpensive eyepieces, at the cost of a narrower maximum field of view for a given eyepiece.

Key relationships to know:
- Magnification = Telescope focal length / Eyepiece focal length
- Exit pupil (mm) ≈ Eyepiece focal length (mm) / Telescope f/ratio
- Approximate true field of view ≈ Apparent field of eyepiece / Magnification
As a working example: an 8 inch f/6 Dobsonian (1200 mm) with a 25 mm eyepiece gives 48× magnification. If the eyepiece has a 60° apparent field, the true field is roughly 1.25°. The exit pupil is ~4.2 mm (25/6), which is excellent for bright, wide-field deep-sky sweeping. Swap in a 10 mm eyepiece, and you get 120× magnification and a ~2 mm exit pupil, great for planetary observing on steady nights.
Choosing f/ratio has practical implications that echo throughout this guide—from the eyepiece set you’ll want (Eyepieces, Finders, and Essential Accessories) to your tolerance for collimation and coma (Optical Quality), to the cables and leverage of a longer tube in the wind (Dobsonian Mount Designs).
Dobsonian Mount Designs: Classic, FlexTube, and GoTo
The Dobsonian mount is simplicity incarnate: a lazy-susan style azimuth bearing for left-right rotation and altitude bearings for up-down movement, all riding in a wooden or composite rocker box. Yet, modern variations add capability and portability while keeping the user experience intuitive.
Classic Solid-Tube Dobsonian
These are the archetypal scopes many people picture: a single metal tube cradled in a wooden base. The advantages are:
- Excellent stability with low vibration
- Easy setup—carry base and tube separately, drop tube into cradle, done
- Minimal light leaks, straightforward collimation
Potential drawbacks include tube length (especially in f/6–f/8 models) and bulk for storage or transport. An 8 inch solid-tube is manageable for most; a 10 inch remains reasonable; 12 inch solid-tube starts to push the limits of many car trunks and doorways. If space and portability are top of mind, see the Portability section.
Collapsible and Truss Designs (FlexTube/Truss)
Collapsible “FlexTube” designs use sliding struts that reduce the scope’s body length for storage and transport. True truss Dobsonians employ rigid struts and detachable upper ring assemblies. Their advantages include:
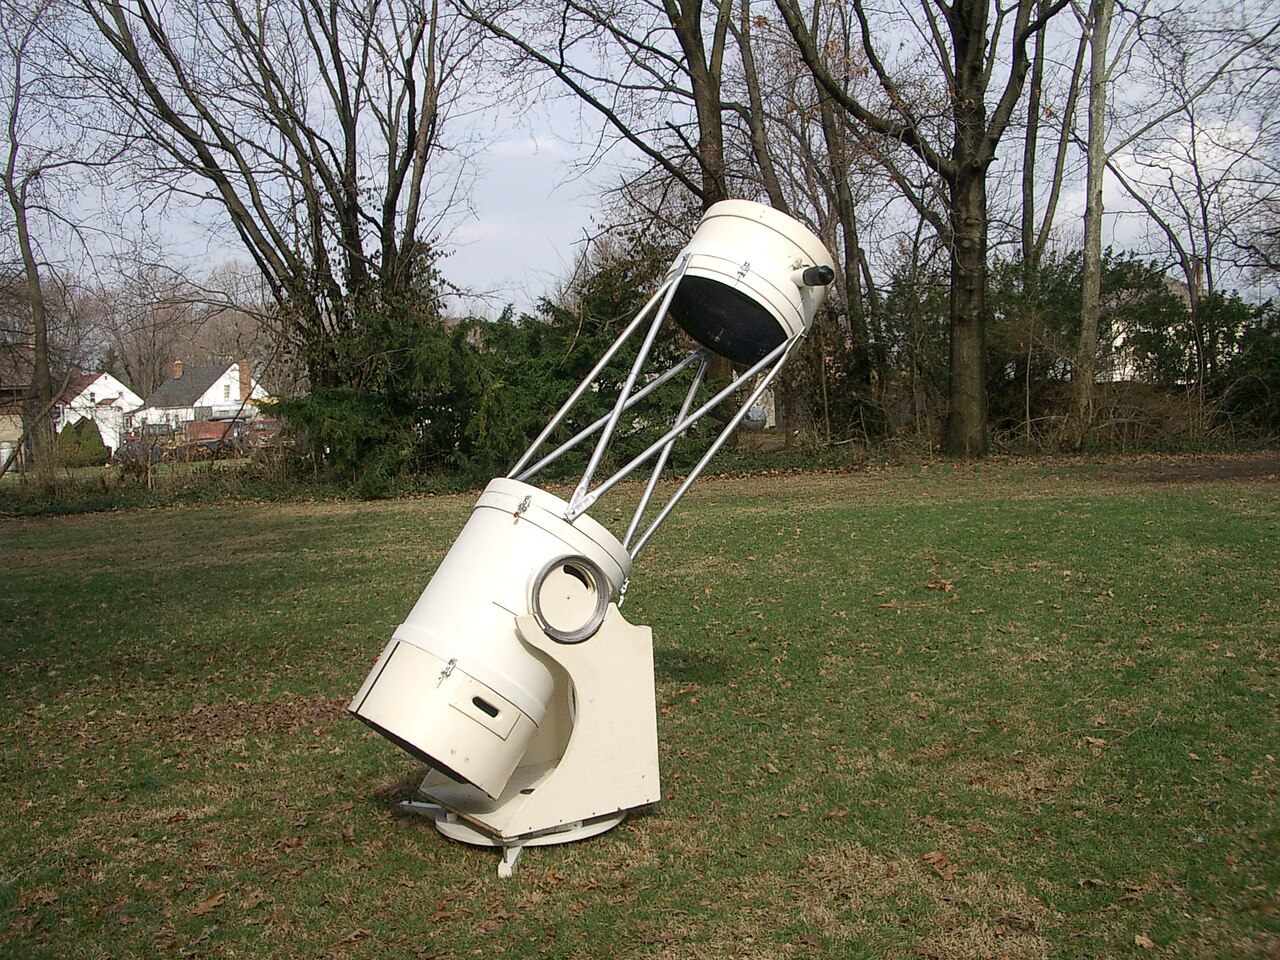
- Significantly improved portability for larger apertures (10–16+ inch)
- Ability to fit into smaller cars
- Often lighter weight per component for easier lifting
Trade-offs include greater setup time, potential for light leaks (mitigated with shrouds), and more frequent collimation checks due to mechanical complexity. Many observers happily accept these for the aperture gains they enable.
Push-To and GoTo Dobsonians
People sometimes conflate “Push-To” and “GoTo,” but they’re distinct:
- Push-To (Digital Setting Circles): Encoders and a controller (or app) tell you where to push the scope. You supply the nudges; the computer provides directions. This enhances star-hopping with minimal complexity.
- GoTo (Motorized): Motors slew to targets and can track them, keeping objects centered as Earth rotates. This can be great for public outreach or when sharing the eyepiece, and it reduces the need to re-center at high power.
Both systems add cost and weight. Push-To keeps the classic Dobsonian feel while accelerating learning. GoTo adds convenience, especially for urban observers who may struggle to see guide stars for star-hopping. If you’re on the fence, read Observing Techniques for tips that make manual navigation rewarding—and consider Push-To as a middle path.
Optical Quality: Mirrors, Collimation, Cooling, and Coatings
A Dobsonian’s performance lives or dies with its optics and how well they are aligned and thermally stabilized. Three factors to get right: mirror quality, collimation, and cooling. A fourth, mirror coatings, matters for long-term durability and throughput.
Mirror Figure and Materials
Most mass-market Dobsonians today use parabolic primary mirrors made from borosilicate glass (e.g., Pyrex-like) or plate glass. Parabolic mirrors eliminate the on-axis spherical aberration of spherical mirrors at faster f/ratios. Quality control has improved substantially in recent years; many budget scopes can deliver crisp planetary views when collimated and cooled.
Premium mirrors from specialty makers can improve contrast, reduce scattered light, and offer tighter star images, but they come at a higher price. If you’re starting out, a mass-market mirror often provides excellent value. As you gain experience, you may choose to upgrade or recoat.

Secondary Mirror and Obstruction
The secondary mirror redirects light 90° to the focuser. Its size introduces a central obstruction, reducing contrast slightly compared to unobstructed designs. Dobsonians typically have 20–25% linear obstruction, which is a reasonable compromise for wide-field illumination and focus position. Correct secondary positioning and alignment are critical for even field illumination; we cover adjustment basics in the collimation checklist below.
Collimation: Alignment for Optimal Sharpness
Collimation is the alignment of the primary and secondary mirrors with the focuser axis. At slower f/ratios (f/6–f/8), tolerances are more forgiving; at faster f/ratios (f/4–f/5), precision is essential. Tools include collimation caps, Cheshire/sight tubes, and laser collimators (preferably barlowed). Here’s a concise, repeatable process:
# Quick Newtonian Collimation Checklist
1) Center the secondary under the focuser:
   - Use a sight tube or collimation cap.
   - Ensure the secondary appears circular and concentric with the focuser drawtube.
2) Aim the secondary at the primary:
   - Adjust the secondary tilt screws to center the primary mirror’s center-spot under the crosshairs/laser.
3) Adjust the primary tilt:
   - Using a Cheshire or barlowed laser, tweak the primary knobs to center the reflected spot/donut.
4) Star test (final check):
   - Defocus a bright star at high power; in- and out-of-focus patterns should be concentric.
Take your time. Practice on a cloudy night so there’s no rush. After a few sessions, collimation becomes quick and almost automatic. For more on how f/ratio impacts collimation tolerance, revisit Aperture, Focal Length, and f/ratio.
Cooling and Boundary Layers
Thermal equilibrium is critical for sharp images. A warm mirror creates a shimmering boundary layer that blurs fine detail. Solutions include:
- Allow 20–60 minutes for cooldown (longer for larger/thicker mirrors or big temperature deltas)
- Use a small, quiet fan behind the primary to accelerate equilibrium
- Store the scope in a garage or shed to reduce temperature differences between storage and ambient
On nights of good seeing—steady, slow-moving star images—collimated, cooled Dobsonians deliver planetary views that surprise newcomers. If your images never sharpen up, double-check collimation, cooldown, and local seeing (rooftop heat plumes, pavement, or winds across the tube).
Mirror Coatings and Maintenance
Aluminized mirrors typically receive a protective overcoat (e.g., SiO2) that preserves reflectivity. With sensible care and occasional cleaning, coatings often last many years. Recoating is a routine service for well-used mirrors that have developed significant oxidation or pinholes. For gentle cleaning guidance, see Maintenance and Troubleshooting.
Eyepieces, Finders, and Essential Accessories
An eyepiece set tailored to your Dobsonian’s f/ratio and your observing goals will unlock the telescope’s potential. Complement that with a suitable finder and a few practical accessories, and you’re set for years of exploration.
Eyepiece Strategy: Three Tiers
Think in terms of low-, medium-, and high-power eyepieces plus a Barlow lens. For an 8 inch f/6 (1200 mm), a sensible starting kit might include:
- Low power (4–6 mm exit pupil): 30–40 mm eyepiece for wide-field sweeping and large nebulae
- Medium power (~2–3 mm exit pupil): 15–20 mm for many galaxies, clusters, and framing planetary nebulae
- High power (~1–1.5 mm exit pupil): 8–12 mm for lunar/planetary detail and tight double stars
- Barlow lens (2×): Extends the range of each eyepiece for flexible magnification
Exit pupil matters for brightness and perceived contrast: larger exit pupils give bright views but can wash out under light pollution; smaller exit pupils increase magnification and contrast on small targets but dim the image. Planetary detail often pops around 1–2 mm exit pupil on steady nights.
Apparent Field and Edge Performance
At fast f/ratios (f/4–f/5), premium wide-field eyepieces often maintain sharp edges better than budget designs. If you have a fast Dob, consider budgeting for eyepieces that handle steep light cones gracefully. At moderate f/ratios (f/5–f/6), many mid-priced eyepieces give excellent performance. Eyepieces with 60–82° apparent fields feel immersive and can reduce nudging frequency when tracking manually.
Finders: Red-Dot, RACI, and Reflex Sights
Pairing a unit-power finder (red-dot or reflex like a Telrad) with a right-angle, correct-image (RACI) optical finder is a powerful combination. The unit-power finder helps you align on naked-eye stars; the RACI lets you hop from that star to fainter guide stars and deep-sky targets using a star chart. This workflow synergizes with tips in Observing Techniques.
Filters: Planetary, Lunar, and Nebular
- UHC and O III filters can significantly improve contrast on emission and planetary nebulae by passing key wavelengths and suppressing background skyglow.
- A neutral density or variable polarizing filter can make the Moon more comfortable at high phases.
- Colored planetary filters are optional; seeing and collimation improvements often yield bigger gains.
Other Essentials
- Comfortable observing chair or adjustable stool: steadier, longer, more detailed views
- Planisphere or app-based charts; analog or digital red light for preserving night vision
- Dew prevention: simple dew shield and, if needed, gentle heat on the secondary/finder
- Collimation tools: cap, Cheshire, and/or laser
What You Can See with 6″, 8″, 10″, and 12+ Inch Dobsonians
What will the sky look like through your Dobsonian? While conditions vary with sky quality and seeing, there are consistent patterns as aperture increases. The following is a practical, experience-based overview—use it as a guide to set expectations and goals.
Moon and Planets
- 6 inch: Crisp lunar detail; maria, rilles, craterlets. On steady nights, Jupiter’s main belts, festoons, Great Red Spot timing permitting; Saturn’s rings with Cassini Division; Mars’ polar cap and major albedo features at opposition; Venus’ phases. Uranus and Neptune visible as tiny disks with color hints.
- 8 inch: Adds finer planetary belts and zones, subtler albedo features on Mars, improved resolution of Saturn’s ring structure. Lunar rilles and domes pop under low Sun angles.
- 10–12 inch: Noticeably more micro-contrast on planets in good seeing; additional Jovian belt details, Saturnian ring shadows, and smaller lunar craterlets are accessible.
High-power planetary work benefits most from proper collimation and cooling, steady seeing, and patient observing. Magnification should be adjusted dynamically to match conditions.
Deep-Sky Objects (DSOs)
Deep-sky performance is strongly tied to sky darkness, commonly framed by the Bortle scale. Under suburban skies, galaxies can be challenging; under rural skies, even moderate apertures put on a show.
- 6 inch: Emission nebulae (Orion Nebula, Lagoon) show structure; globular clusters like M13 resolve partially into stars with averted vision; bright planetary nebulae (Ring Nebula, Dumbbell) are distinct; dozens of open clusters sparkle.
- 8 inch: Galaxies become more rewarding; spiral hints in M51 or M101 under dark skies; better globular resolution; planetary nebulae show brighter rims and, with a filter, subtle internal structure.
- 10 inch: More galaxies become accessible from suburban sites; under dark skies, brighter spirals reveal arms more readily; fainter nebulae and dwarf galaxies appear; globulars often resolve strongly across their cores.
- 12+ inch: A step change in faint galaxy groups, smaller planetary nebulae, and low-surface-brightness objects; the reach into the NGC/IC catalogs deepens substantially.
If your main interest is galaxies and faint nebulae, aperture pays dividends. For lunar and planetary observing or double stars, smaller scopes can still be highly satisfying under steady skies. Keep this balance in mind as you consider Budget and Portability.
Portability, Storage, and Light Pollution Considerations
The best telescope is the one you use often. Balance ambition (aperture) with realism (weight, bulk, and your observing environment). Here’s how to think about fit and frequency of use.
Dimensions and Weight
Approximate figures (these vary by brand/model):
- 6 inch solid-tube: tube ~24–30 lb (11–14 kg) and base ~15–20 lb (7–9 kg)
- 8 inch solid-tube: tube ~20–25 lb (9–11 kg) and base ~20–25 lb (9–11 kg)
- 10 inch solid-tube: tube ~28–35 lb (13–16 kg) and base ~25–30 lb (11–14 kg)
- 12 inch truss/collapsible: components split into lighter pieces; total system weight increases but per-lift weight can be similar to a 10 inch solid-tube

Measure your car doors, cargo space, and storage route (stairs, narrow doors). Many observers choose 8 inches as the largest they’ll routinely move solo without hesitation. 10 inches and up may benefit from a dolly, hand truck, or wheely bars for backyard setup.
Light Pollution and the Bortle Scale
Light pollution reduces contrast, making faint galaxies and nebulae harder to see. Under brighter skies, prioritize high-contrast targets: the Moon, planets, double stars, and bright clusters/nebulae with filters. A UHC or O III filter helps; however, no filter can restore the lost faint outer regions of galaxies under severe light pollution. A periodic drive to dark skies is the single best upgrade for deep-sky viewing.
Thermal and Storage Considerations
- Garage or shed storage reduces cooldown time.
- Use breathable covers to prevent dust while avoiding trapping moisture.
- In humid climates, consider mild desiccants or airflow to deter mold on optics.
Observing comfort strategies—like an adjustable chair, a stable observing platform, and organized accessories—have an outsized return on enjoyment. See Eyepieces, Finders, and Essential Accessories for a short list of high-impact items.
Budget and Recommended Configurations
Dobsonian pricing varies with aperture, features (collapsible tubes, Push-To/GoTo), mechanical refinements, and brand. Exact prices fluctuate, but general ranges for mass-market models are:
- 6 inch: roughly low hundreds of dollars; among the most affordable routes to serious visual astronomy
- 8 inch: typically mid to high hundreds; excellent performance-to-price ratio
- 10 inch: upper hundreds to around a thousand+; larger, brighter, and heavier
- 12 inch: around a thousand into a couple thousand, especially for truss/GoTo variants
Here are example configurations to match common goals and constraints:
Urban Explorer (Light-Polluted Backyard)
- 8 inch f/6 solid-tube for balanced aperture and portability
- Push-To encoders to speed finding targets in washed-out skies
- Eyepieces clustered around 1–2 mm exit pupil for planetary/double stars
- UHC/O III filter for bright nebulae; comfortable chair for longer planetary sessions
Dark-Sky Weekender
- 10 inch f/5 solid-tube or 12 inch truss for galaxy and nebula performance
- RACI + reflex finder combo for efficient star-hopping at remote sites
- Mid-power wide-field eyepiece (e.g., 20–24 mm, 68–82°) for framing DSOs
- Basic fan behind primary to minimize cooldown time after the drive
Outreach and Family Nights
- 6 or 8 inch Dobsonian with GoTo tracking to keep objects centered for many viewers
- Wide-field eyepiece (low magnification) for easy “wow” targets
- Moon filter; laminated star charts for quick target swaps
When comparing models, consider the smoothness of the bearings, altitude tension systems (springs or adjustable clutches), focuser quality (2 inch dual-speed Crayfords are a nice upgrade), and the robustness of the base. For deep dives into mount variants, jump back to Dobsonian Mount Designs.
Observing Techniques: Star-Hopping, Sketching, and Logs
Even without electronics, a Dobsonian is an efficient sky explorer. With a good finder pair and a plan, you’ll locate objects quickly and see more detail by observing more skillfully.
Star-Hopping Workflow
- Choose a target and chart (paper atlas or app). Identify a bright naked-eye star near your target.
- Use the red-dot/reflex finder to align on the bright star. Center it in a low-power eyepiece.
- Switch to the RACI finder. Using your chart, hop to a pattern of fainter stars that points toward the target. Keep movements small and deliberate, matching scale to the finder’s field.
- Once near, scan the low-power eyepiece field slowly. Use averted vision and gentle sweeping; many DSOs pop with motion.
- Confirm the object’s orientation relative to nearby stars. Increase magnification to reveal structure.
With practice, this becomes second nature. If your skies are bright, Push-To can be a major help; see Dobsonian Mount Designs for the differences.
Seeing More at the Eyepiece
- Dark adaptation: preserve night vision with red lights and patience (20–30 minutes).
- Averted vision: look slightly off-target to engage rod cells more sensitive to faint light.
- Field motion: gently nudge the scope or tap the tube; transient movement can reveal low-contrast details.
- Magnification bracketing: try different eyepieces to optimize exit pupil and contrast for the object.
- Use filters selectively: UHC/O III for emission nebulae, not for galaxies.
Sketching and Observing Logs
Sketching forces deeper observation. Simple outlines of nebular shapes or galaxy orientations help highlight details you might otherwise miss and create a personal record of the night. Observing logs—written or digital—capture conditions, equipment settings, and impressions, making it easier to compare future observations and track skill growth.
Public Outreach Tips
- Use a low to medium power to keep targets centered longer and ease eye placement.
- Have an alignment target ready (e.g., the Moon or a bright planet) if your mount has tracking.
- Coach first-timers to relax their eye and avoid touching the eyepiece.
- Keep a step stool for kids and a lens cloth handy for unexpected smudges.
Maintenance and Troubleshooting for Long-Term Performance
Dobsonians are mechanically simple, which makes them reliable and easy to maintain. A few habits keep them performing at their best for years.
Routine Care
- Dust and Debris: A little dust on the primary has negligible impact. Avoid excessive cleaning; when you do clean, use gentle methods.
- Mirror Cleaning: If you see obvious films, fingerprints, or pollen, a careful rinse can help. Remove the mirror cell if your design allows; rinse with distilled water; float gentle, clean cotton with diluted mild soap if needed; rinse thoroughly; allow to air dry on edge. Do not rub abrasive particles across the surface.
- Secondary Mirror: Clean less often; it is more delicate and easier to scratch.
- Focuser: Keep drawtube clean. Very light lubrication and tension adjustments maintain smooth motion.
- Bearings: Wipe altitude and azimuth surfaces occasionally; check for debris that causes stiction or jerky motion.
Troubleshooting Common Issues
- Soft or Mushy Focus: Check collimation and cooldown. Ensure seeing isn’t the culprit by testing on a higher-altitude star.
- Astigmatism-like Images: Verify you’re not pinching the primary with overtight mirror clips; ensure your eye/eyepiece isn’t introducing aberrations (rotate to test).
- Jerky Motions: Clean bearing surfaces, inspect Teflon pads or laminate. Consider adding an ebony star laminate or adjusting tension springs/clutches.
- Balance Issues: Heavy eyepieces can cause nose-diving. Counterweights, adjustable altitude bearings, or friction adjustments can help.
Safety Note on Solar Observing
Never point a Dobsonian (or any telescope) at the Sun without a safe, full-aperture solar filter securely mounted on the front of the telescope. Do not rely on eyepiece filters alone. Double-check the filter’s integrity before each use and secure the finder or cap it to prevent accidental exposure.
Frequently Asked Questions
How much magnification can I use with a Dobsonian?
A common rule of thumb is that a telescope can support up to roughly 50× per inch of aperture under excellent seeing, but real-world limits are often lower. For an 8 inch, 200–300× is feasible on steady nights; for a 6 inch, 150–250×. Practical magnification depends on atmospheric steadiness, thermal equilibrium, collimation, and target brightness. Often, 100–200× provides sharp, contrasty views more consistently than pushing higher.
Is a Dobsonian good for astrophotography?
Dobsonians are optimized for visual observing. While you can take casual snapshots of the Moon or planets with a smartphone or planetary camera, long-exposure deep-sky astrophotography typically requires an equatorial mount with accurate tracking. Some observers place a Newtonian optical tube on an equatorial mount for imaging, but that’s beyond the classic Dobsonian approach. If imaging is your primary goal, consider starting with an equatorial-mounted refractor or a camera tracker; if visual observing is your priority, a Dobsonian excels.
Final Thoughts on Choosing the Right Dobsonian Telescope
A Dobsonian telescope offers a uniquely powerful combination of aperture, simplicity, and value—qualities that have introduced generations of observers to the night sky and kept veterans enthralled. To choose wisely, begin with honest constraints: how much you can lift and store, where you’ll observe, and how far you’re willing to travel for dark skies. Then match those realities to a classically balanced design: an 8 inch for unbeatable versatility, a 10–12 inch for deeper reach if you can transport it comfortably, or a 6 inch if compactness and ease of use are paramount.

Build your eyepiece set thoughtfully around exit pupils, invest in a comfortable observing chair, learn collimation without fear, and embrace observing techniques like averted vision and deliberate star-hopping. With these fundamentals, even a modest Dobsonian becomes a portal to lunar rilles, planetary storms, star clusters glittering like frost, and the faint whispers of distant galaxies.
As you gain experience, you may add Push-To encoders, a coma corrector for fast mirrors, premium eyepieces, or even step up in aperture. But remember: the biggest improvements often come from darker skies and better observing habits. If this guide helped you chart a path, explore our related articles, share your experiences with fellow observers, and subscribe to our newsletter to get future in-depth guides and observing tips delivered to your inbox.