Table of Contents
- What Is an 80mm Refractor Telescope?
- Aperture, Focal Length, f/ratio, and Resolution Explained
- Achromats vs ED Doublets vs APO Triplets
- Choosing a Stable Mount: Alt-Az, Equatorial, and GoTo
- Eyepieces, Diagonals, and Focusers that Unlock Performance
- What You Can Realistically See with 80mm Glass
- Astrophotography with Small Refractors: Pros, Limits, Workflows
- Setup, Alignment, Collimation, and Maintenance
- Ergonomics, Travel, and Observing Plans
- Feature Checklist and Decision Framework
- Frequently Asked Questions
- Final Thoughts on Choosing the Right 80mm Refractor Telescope
What Is an 80mm Refractor Telescope?
An 80mm refractor telescope is a small, portable telescope that uses lenses to gather and focus light, with an objective (front) lens diameter of 80 millimeters. Refractors are prized for their crisp, high-contrast views, low maintenance, and closed-tube design that keeps dust and air currents at bay. Because of their modest aperture and stable optical design, 80mm refractors are exceptionally popular for visual observing of the Moon, planets, double stars, open clusters, and wide-field sweeps of the Milky Way. Many astrophotographers also start with an 80mm refractor due to its forgiving field (especially at shorter focal lengths) and manageable demands on tracking mounts.

Comet 17P/Holmes image from Montreal-Nord (Québec, Canada) by Pierre Paquette (user CielProfond) on 2007-10-29 at 04:45 UT Telescope: SkyWatcher 80mm f/5 refractor, motorized German equatorial mount Imager: Meade DSI Exposure details: Automatic settings, probably less than 1 second exposure
Typical 80mm refractors come in a range of focal lengths and focal ratios. Common focal ratios include:
- f/5 to f/6: Short, wide-field “rich-field” refractors optimized for large swaths of the sky, ideal for star fields and large nebulae under dark skies.
- f/6.5 to f/7.5: Balanced, general-purpose instruments that do well on both wide-field targets and lunar/planetary detail.
- f/8 or slower: Designed to tame chromatic aberration further in achromats or to provide excellent contrast in well-corrected apochromats—better for high-power viewing.
Within the refractor family, you’ll encounter three broad optical categories, discussed in detail in Achromats vs ED Doublets vs APO Triplets:
- Achromats: Two-element lens assemblies that reduce but do not eliminate chromatic aberration (false color). Affordable and great for wide-field viewing.
- ED doublets: Two-element designs that include an extra-low dispersion (ED) glass element (e.g., FPL-51 or FPL-53 class) to significantly reduce color fringing.
- APO triplets: Three-element objectives designed to bring three wavelengths to a common focus for excellent color correction and contrast; usually more costly.
For many observers, the 80mm refractor hits a sweet spot between portability and capability. It’s light enough to mount on a compact alt-az or small equatorial mount, and small enough to ride in airline-friendly cases, yet powerful enough to reveal meaningful planetary detail and a trove of deep-sky objects from darker sites. If you’re deciding among apertures, see Aperture, Focal Length, f/ratio, and Resolution Explained for the physics that set realistic expectations.
Aperture, Focal Length, f/ratio, and Resolution Explained
Choosing the right 80mm refractor—or deciding whether 80mm is the right size for you—starts with a firm grasp of a few key concepts: aperture, focal length, focal ratio, and resolution. These parameters shape everything from the brightness of your view to the field of view and the maximum useful magnification.
Aperture: The Light Bucket
Aperture is the diameter of the primary lens, and it sets the light-gathering power. In simple terms, larger apertures collect more light and can resolve finer details. Compared with a 60mm scope, an 80mm gathers (80/60)^2 ≈ 1.78 times as much light—enough to make fainter stars visible and reveal a bit more texture on planets and the Moon. However, aperture is only one part of the performance equation; sky conditions and optical quality matter tremendously.
Focal Length and Focal Ratio
Focal length (FL) is the distance over which the lens focuses incoming light. A typical 80mm refractor may have a focal length around 400–600 mm (f/5–f/7.5), though some run longer. The focal ratio (f/number) is FL divided by aperture. For an 80mm f/7 instrument, FL ≈ 560 mm. Shorter f/ratios (e.g., f/5–f/6) give wider fields and lower magnification with a given eyepiece; longer f/ratios help control chromatic aberration in achromats and can be friendlier to high-power planetary work.
Exit Pupil and Eye Pupil
Exit pupil links telescope optics to your eye. It’s the beam of light leaving the eyepiece that enters your pupil. It’s computed by either:
Exit Pupil (mm) = Eyepiece focal length (mm) / Telescope f-ratio
                 = Aperture (mm) / Magnification
General guidelines:
- ~5–6 mm exit pupil: Bright, wide-field views (great for star fields, large nebulae).
- ~2–3 mm exit pupil: Sweet spot for many deep-sky objects—good balance of brightness and contrast.
- ~1 mm exit pupil: Planetary detail and double stars—where the eye’s resolving power kicks in.
- < 0.7 mm exit pupil: High magnification; dimmer image; limited by seeing and optics.
Example for an 80mm f/7 (560 mm FL) with a 25 mm eyepiece:
Magnification = 560 / 25 ≈ 22×
Exit Pupil = 25 / 7 ≈ 3.6 mm
That 22× view is bright and excellent for open clusters and sweeping the Milky Way. Swap to a 7 mm eyepiece:
Magnification = 560 / 7 ≈ 80×
Exit Pupil ≈ 1.0 mm
At ~80×, lunar and planetary features become pop-out crisp in steady seeing.
Resolution: Dawes and Rayleigh Criteria
Theoretical resolution for a circular aperture can be estimated with the Dawes or Rayleigh criteria. A handy rule of thumb for Dawes limit is:
Dawes limit (arcseconds) ≈ 116 / Aperture(mm)
For 80 mm: ≈ 116 / 80 ≈ 1.45 arcseconds
Real-world seeing conditions often limit resolution more than the optics do. If atmospheric seeing hovers around 2 arcseconds, an 80mm scope is already at or near the limit imposed by the air. On great nights, tight double stars near 1.5″ can be split in a well-collimated, thermally stabilized 80mm refractor with refined focus and appropriate magnification. For more on magnification planning, see Eyepieces, Diagonals, and Focusers that Unlock Performance.
True Field of View and Field Stops
True field of view (TFOV) depends on the eyepiece’s apparent field of view (AFOV) and magnification. A rough estimate:
TFOV (degrees) ≈ AFOV / Magnification
For more precise TFOV, use the eyepiece field stop and telescope focal length. An 80mm f/6 refractor with a 32 mm Plössl (AFOV ~50°) yields ~15× and TFOV ≈ 3.3°. That’s wide enough to frame the Pleiades or the Andromeda Galaxy’s core region with room to spare. Wider eyepieces and 2-inch diagonals can push TFOV even further; details in Eyepieces, Diagonals, and Focusers.
Rule of thumb: “The best telescope is the one you use often.” An 80mm refractor’s fast setup and easy handling often mean you’ll have it under the stars more nights each month—leading to more observing skill and more joy.
Achromats vs ED Doublets vs APO Triplets
All refractors use lenses, but the glass types and the number of elements profoundly affect image quality, color correction, weight, and cost. Choosing between an achromat, ED doublet, or APO triplet depends on your observing goals and budget.
Achromatic Refractors
Achromats combine two lens elements of different glass types to bring two wavelengths (typically red and blue) to a common focus, reducing but not eliminating chromatic aberration. The residual color error appears as a violet or purple fringe around bright objects, particularly at shorter f/ratios. Slower achromats (e.g., f/10) suppress false color more effectively than fast ones (e.g., f/5), but at the cost of longer tubes and narrower fields.
Strengths:
- Lower cost; good value for wide-field scanning and casual lunar/planetary views.
- Lightweight; usually simple mechanics and easy to mount.
- Fast cooldown due to small glass mass.
Trade-offs:
- Residual chromatic aberration, especially on Jupiter, Venus, and bright stars.
- High magnification planetary viewing is serviceable but not the achromat’s forte, unless f/ratio is longer.
ED Doublets
ED doublets introduce one element made from extra-low dispersion glass (e.g., FPL-51, FPL-53, or similar). These designs substantially reduce chromatic aberration versus achromats, often delivering near-APO performance in visual use, especially at moderate f/ratios (f/6–f/7.5).
Strengths:
- Excellent value-to-performance ratio; minimal color fringing on bright targets.
- Compact and lightweight; easy to mount on small alt-az or equatorial mounts.
- Versatile for both visual use and entry-level astrophotography (often with a field flattener).
Trade-offs:
- Residual color is small but can be detectable in imaging or under critical scrutiny.
- Typically more expensive than achromats.
Apochromatic Triplets
APO triplets employ three elements, often with one ED or super-ED element, to bring three wavelengths to focus and control spherical aberration and coma alongside color correction. The result is superb contrast and minimal false color—useful for high-power planetary observing and serious imaging.
Strengths:
- Outstanding color correction and contrast; sharp star images across the field with appropriate correctors.
- Preferred for demanding imaging tasks where star color and shape fidelity matter.
Trade-offs:
- Heavier objective assemblies; may require more robust mounts.
- Higher cost; diminishing returns for casual visual-only use compared with good ED doublets.
If you’re leaning toward astrophotography, the added color correction of a triplet can be worthwhile. If your emphasis is visual observing and portability, a high-quality ED doublet often strikes the best balance. For the deeper analysis that ties these decisions to performance metrics like exit pupil and magnification, see Aperture, Focal Length, f/ratio, and Resolution.
Choosing a Stable Mount: Alt-Az, Equatorial, and GoTo
A great optical tube is only as good as the mount beneath it. For an 80mm refractor, you want a mount that damps vibrations quickly and allows smooth motion at both low and high magnifications. There are three broad categories to consider: manual alt-azimuth, equatorial (EQ), and computerized GoTo variants of either type.
Manual Alt-Azimuth Mounts
Alt-az mounts move up-down and left-right. They’re intuitive, quick to set up, and ideal for casual sessions or travel. Quality manual alt-az mounts feature slow-motion controls for fine tracking and better high-power stability. Photo tripods with fluid heads can work for lighter 80mm tubes, but purpose-built astro alt-az mounts typically offer improved rigidity and ergonomics.
Considerations:
- Payload rating: Look for a payload comfortably above your fully equipped scope’s weight, including diagonal, finder, and heaviest eyepiece.
- Damping time: After a focus knob tap, vibrations should settle in ~2 seconds or less for pleasant high-power use.
- Moment arm: Longer tubes (f/7–f/8) need stiffer mounts than shorter tubes (f/5–f/6) of the same weight.
Equatorial Mounts (Manual or Motorized)

Astro-Physics German Equatorial Mount carrying a Takahashi Fluorite doublet 128mm f/8.1 refractor, aftermarket moonlite focuser; all supported by an ATS portable pier
EQ mounts align one axis (right ascension) with Earth’s rotational axis, enabling smooth tracking of celestial objects across the sky with a single slow-motion control or motor. For visual use, a small EQ (with or without a single-axis motor) can keep planets centered at high power—ideal for extended lunar or planetary sessions.
Considerations:
- Polar alignment: For casual visual use, a rough alignment is often sufficient. For imaging, more precise polar alignment is necessary.
- Load capacity: Like alt-az mounts, ensure a comfortable margin above your telescope’s fully loaded weight.
- Balance: Counterweights permit precise balance, improving motion and minimizing strain on gears.
GoTo and Tracking Mounts
Computerized mounts can locate and track objects automatically. For an 80mm refractor, a GoTo alt-az or a small GoTo EQ can be very convenient for urban observers who want to hop quickly among targets. If you plan to try astrophotography, a GoTo EQ with guiding capability will be more suitable. Keep in mind that electronics add weight, complexity, and battery considerations.
To match your mount decision with how you plan to observe—quick grab-and-go vs longer sessions—see Ergonomics, Travel, and Observing Plans.
Eyepieces, Diagonals, and Focusers that Unlock Performance

Galileoscope. At the front, left: The four-lens main eyepiece. Middle: Barlow tube. Right: The two lens auxiliary eyepiece. Background: The focus tube and main telescope tube containing the achromatic doublet objective lens.
An 80mm refractor’s optics can only shine if the supporting accessories are up to the task. Eyepieces shape your magnification and field of view; diagonals affect contrast and ergonomics; focusers determine how precisely you can reach focus at high power or with cameras.
Selecting Eyepieces: A Practical Set
Build a small, complementary set rather than chasing many near-duplicate focal lengths. A common trio for an 80mm f/6–f/7 refractor might include:
- Low power wide-field (e.g., 24–32 mm in 1.25″ or 30–40 mm in 2″): Large swaths of star fields and big nebulae; exit pupil ~4–6 mm.
- Medium power (e.g., 12–14 mm): General use for clusters, bright nebulae, Moon detail; exit pupil ~1.7–2.3 mm.
- High power (e.g., 5–7 mm): Planets, Moon’s smallest craters, double stars; exit pupil ~0.7–1.2 mm.
A Barlow lens (2×) or focal extender can multiply your options without buying many eyepieces. For example, a 14 mm plus a 2× Barlow behaves like a 7 mm when needed.
Apparent Fields and Eye Relief
Eyepieces vary in apparent field of view (AFOV) from ~40° (orthoscopic) to 68°/82° or more in widefields. Wider AFOV can make manual tracking more pleasant by keeping targets in view longer at high power. If you wear glasses, look for ample eye relief (often ≥ 17 mm) so you can see the full field.
Diagonal Choices: Prism vs Mirror
Star diagonals redirect the light path for comfortable viewing. Choices include:
- Prism diagonals: Often excellent in slower refractors (f/7–f/10) and can slightly improve color correction in some systems. Lightweight and durable.
- Mirror diagonals: Common in faster instruments; dielectric coatings can deliver high reflectivity (~99%) and durability.
- 2-inch diagonals: Enable the use of longer focal length, wide-field eyepieces with larger field stops for maximum TFOV.
For an 80mm refractor, consider a quality 1.25″ diagonal initially and upgrade to 2″ only if you plan to pursue maximum wide-field views. For more about maximizing TFOV, see True Field of View and Field Stops.
Focusers: Rack-and-Pinion vs Crayford
Modern 80mm refractors often ship with capable 2″ dual-speed focusers. Two common mechanisms:
- Rack-and-pinion: Geared teeth engage a rack on the drawtube; robust and less prone to slip under heavy loads. Quality varies with machining.
- Crayford: Friction-based; exceptionally smooth when built well. Dual-speed (fine focus) is a big advantage for critical planetary focus and imaging.
Look for features like compression rings (to avoid marring barrels), rotation (for framing in imaging), and solid tension/lock controls. A good focuser can make or break high-power observing—tiny tweaks at 150× matter.
Filters for an 80mm Refractor
- Lunar neutral density/polarizing filters: Tame glare and improve comfort on bright Moon.
- Narrowband (UHC-type) filters: Improve contrast on emission nebulae under light pollution or even dark skies; effectiveness varies with target and sky conditions.
- Color filters: Some observers use them to enhance planetary contrast subtly; results are personal and target-dependent.
Solar safety note: Never observe the Sun without a certified, securely mounted front-aperture solar filter or a dedicated solar telescope. Diagonal or eyepiece filters alone are unsafe for direct solar viewing.
What You Can Realistically See with 80mm Glass
Setting honest expectations is essential to enjoying any telescope. An 80mm refractor offers delightful views when applied to the right targets and matched to the night’s conditions. Below are realistic outcomes for visual observers, assuming decent optical quality, stable collimation/tilt, and reasonable sky conditions.
The Moon
With an 80mm refractor, the Moon is a showpiece. Even at 40–100×, craters, rilles, and mountain shadows leap from the eyepiece. You can trace the Alpine Valley, explore the Apennine Mountains, and watch the changing illumination of craters across the terminator night to night. At higher magnifications (120–160× when seeing allows), small craterlets inside Plato may sometimes be glimpsed, and the fine terracing of prominent craters becomes more apparent. A variable polarizing filter can help preserve comfort during gibbous and full phases.

Waxing gibbous moon seen from southern hemisphere, through an 80mm aperture refractor telescope
Planets
- Jupiter: Equatorial belts are unmistakable, with festoons and polar shading visible in steady seeing. The four Galilean moons are obvious; their shadows produce striking transits when conditions line up. Fine detail improves with higher magnification and excellent focus.
- Saturn: Rings are easy; the Cassini Division is often glimpsed in very steady air with high magnification, though it may not be a continuous dark line in an 80mm. A few moons can be detected as faint points near the planet.
- Mars: Near opposition, a bright polar cap is generally visible; dark albedo features like Syrtis Major can be glimpsed in steady seeing at high power.
- Venus: Phases are clear; surface detail is not visible in white light. A violet fringe may appear in achromats due to chromatic aberration.
- Mercury: Phases are possible under excellent seeing and low atmospheric dispersion, but Mercury is a challenge given its low altitude and glare near the Sun.
Double Stars
Double stars are a sweet spot for 80mm refractors. Albireo’s contrasting colors are gorgeous. Epsilon Lyrae (the Double Double) can be split into pairs under steady seeing around 120–150×. Many tighter pairs near the Dawes limit require patience and perfect focus. For practical advice on achieving and holding high magnification, review Eyepieces and Focusers.
Open Clusters and Asterisms
From the Pleiades (M45) to the Beehive (M44) and the Double Cluster in Perseus, open clusters are luminous in an 80mm. Their wide angular size rewards shorter focal lengths and 2-inch eyepieces. Rich-field scanning of Cygnus and Scutum under dark skies can be mesmerizing.

Total exposure was 3 hours (iso 400). I used Canon 1000D without IR-filter and telescope-refractor Sky-Watcher ED-80 (F=510mm, D=80mm, f/6.4).
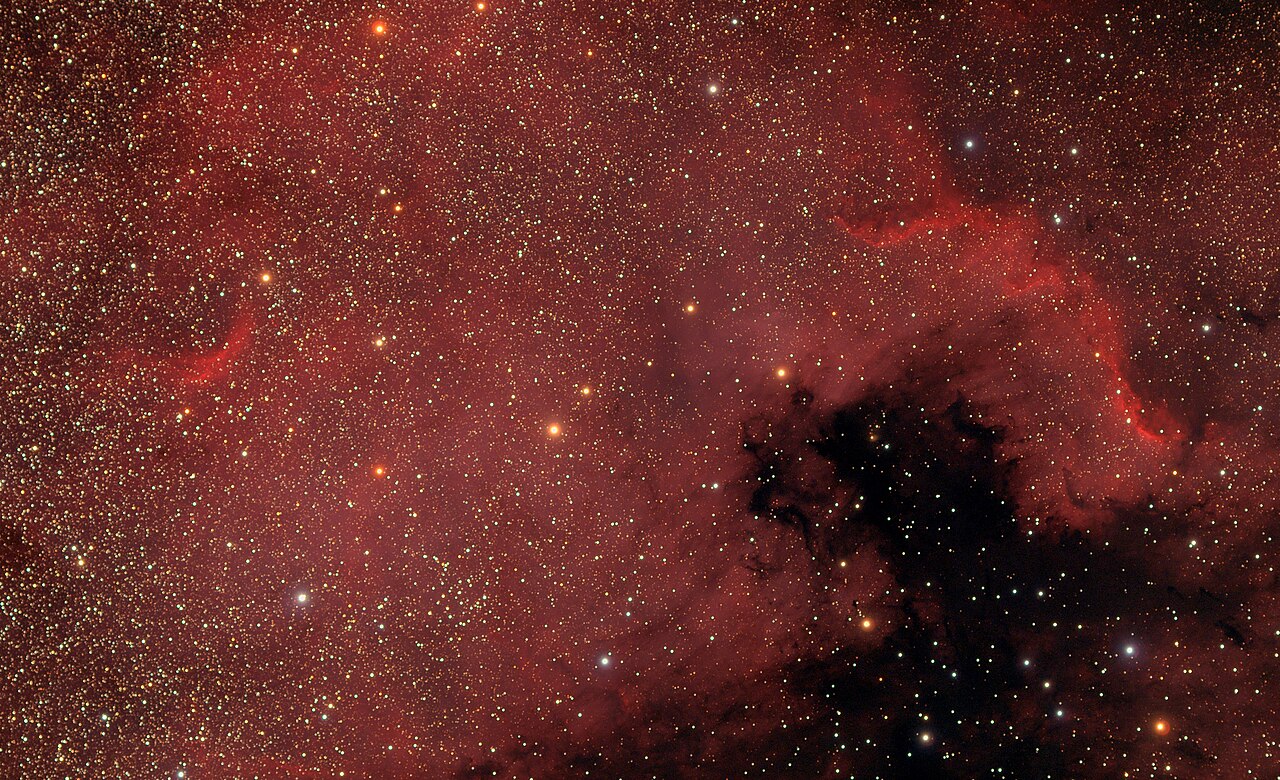
Nebulae and Galaxies
- Bright emission nebulae like M42 (Orion) show structure, especially with a narrowband filter. The Lagoon (M8) and Swan (M17) are rewarding under dark skies.
- Planetary nebulae such as the Ring (M57) appear as smoke-ring disks; small planetaries can handle high power and remain bright.
- Galaxies: Expect faint smudges and brighter cores of larger galaxies like M31. Dark skies (see Bortle scale notes in Ergonomics, Travel, and Observing Plans) are crucial; spiral arms are generally out of reach visually in an 80mm except as hints in exceptional conditions.
- Globular clusters: M13 and M5 show granulation and some edge stars, but an 80mm won’t fully resolve the core like larger apertures.
Terrestrial Viewing
An 80mm refractor doubles as a high-quality terrestrial spotter. With an erect-image diagonal, shorebirds, ships, and distant landscapes are crisp during the day. Heat shimmer and atmospheric turbulence can limit daytime magnification.
Astrophotography with Small Refractors: Pros, Limits, Workflows
Many imagers begin their deep-sky journey with an 80mm refractor because the combination of short focal length, reasonable weight, and good color correction (especially in ED and APO models) forms a forgiving platform. Still, there are important considerations before you attach a camera.
Total exposure was 8 hours 20 minutes at iso800. I used Canon 1000D without IR-filter and telescope-refractor Sky-Watcher ED-80 (F=510mm, D=80mm, f/6.4).
Strengths of 80mm Imaging
- Short focal length: Larger pixels and tracking errors are more forgiving. Wide fields accommodate big targets (e.g., North America Nebula region) and mosaics.
- Lightweight: Pairs with modest equatorial mounts, easing setup and transport.
- Color correction: ED/apo optics minimize star halos and chromatic aberration, improving star shape and color fidelity.
Limitations to Plan Around
- Field curvature: Many refractors benefit from a field flattener to produce sharp stars to the corners of your sensor.
- Backfocus spacing: Flatteners/reducers demand precise sensor spacing; read the optical corrector’s specification for the required distance.
- Mount performance: Even at short focal lengths, unguided exposures are limited by the mount’s periodic error and polar alignment; guiding extends exposure length and consistency.
Basic Imaging Workflow
- Set up a sturdy equatorial mount and perform a careful polar alignment.
- Attach a field flattener (or reducer/flattener) if needed; set correct backfocus spacing.
- Mount the camera (DSLR/mirrorless or dedicated astro camera) and achieve accurate focus using a Bahtinov mask or a focus aid.
- Acquire calibration frames (darks, flats, and bias or flat-darks) to correct sensor and optical artifacts.
- Guide with an autoguiding solution for longer exposures if your mount supports it.
- Gather sufficient integration time; stack and process with common tools to improve signal-to-noise and bring out faint detail.
If imaging is a major goal, choose a refractor with a robust focuser and consider a package that includes a matched flattener or reducer. For visual-only use, keep things simple and invest in eyepieces and a stable mount as discussed in Eyepieces, Diagonals, and Focusers and Choosing a Stable Mount.
Setup, Alignment, Collimation, and Maintenance
One of the great joys of refractors is their minimal maintenance. Still, a few best practices will keep your 80mm performing at its peak.
Thermal Equilibration
Refractors usually reach thermal equilibrium quickly due to their relatively small mass of glass and enclosed tubes. Give your scope 15–30 minutes to acclimate when moving from a warm house to cool outside air. Fine planetary detail is easier to see once tube currents settle.
Collimation and Star Testing
Refractors rarely need collimation, but mechanical tilt in the focuser or diagonal can mimic miscollimation. Verify with a star test:
- Point at a bright star at high magnification (e.g., 100–150×).
- Defocus slightly inside and outside focus; symmetrical diffraction rings indicate good alignment.
- If asymmetry persists across multiple diagonals/eyepieces, check the focuser alignment; some focusers have tilt adjustments.
For imaging, star shapes across the field can also reveal tilt or spacing issues, especially when using a flattener; this ties back to Astrophotography Considerations.
Cleaning Optics
Clean only when necessary. Dust seldom affects views. If cleaning is required:
- Blow off loose particles with a hand air blower (not compressed canned air placed too close).
- Use a soft brush if needed.
- Lightly wipe with lens tissue or microfiber and a suitable lens solution, using gentle strokes from center outward.
Avoid frequent cleaning; coatings are durable but unnecessary cleaning risks scratches. Keep caps on when not in use to minimize contamination.
Dew Control
Refractors include a dew shield, but in humid conditions, the objective can still fog. Solutions:
- Dew heater straps powered by a controller; set the lowest temperature that keeps dew at bay.
- Dew shield extensions and observing strategies that avoid pointing into radiant heat sinks for long periods.
Storage and Transport
- Use a padded case; secure caps; store in a dry space to prevent fungus in humid climates.
- Avoid rapid temperature swings when possible.
- For air travel, check airline carry-on dimensions; a compact 80mm ED often qualifies as cabin baggage in a protective case.
Ergonomics, Travel, and Observing Plans
Comfort and planning dramatically improve observing quality—arguably as much as extra aperture on many nights. The 80mm refractor’s portability makes it a natural companion for spontaneous sessions, road trips, and dark-sky excursions.
Observing Chair and Posture
An adjustable observing chair is one of the highest-value accessories. Sitting comfortably stabilizes your body, improves fine motor control for focusing, and adds precious minutes to your patience at the eyepiece—translating into more detail seen.
Red Lights, Charts, and Apps
Preserve night vision with a dim red light. Familiarize yourself with paper charts or a planetarium app and prepare a short target list. Logging observations helps you track progress and refine technique. If you’re exploring targets sensitive to sky darkness, learn the Bortle scale and compare results from your backyard to a darker site.
Seeing vs Transparency
Seeing (steadiness of the air) influences planetary detail and double-star splitting. Transparency (clarity of the air) governs how faint you can see and nebular contrast. An 80mm refractor excels on nights of great seeing—when you can push magnification—and under transparent, dark skies for deep-sky wide fields. Choose targets that complement the night’s conditions.
Travel and Quick Sessions
The ease of carrying an 80mm refractor makes quick sessions realistic: a lightweight mount, a small eyepiece kit, and a dew plan. Even 20–30 minutes under the stars can be satisfying. On longer trips, prioritize a stable mount; you’ll see more by reducing vibrations than by adding one more eyepiece. For mount guidance, revisit Choosing a Stable Mount.
Light Pollution Strategies
- Use narrowband filters on emission nebulae to improve contrast.
- Focus on doubles, open clusters, and the Moon/planets when urban skyglow is severe.
- Schedule dark-sky trips around new Moon for galaxy season and large nebulae.
Feature Checklist and Decision Framework
With many 80mm refractors on the market, it helps to apply a structured decision framework. Use the checklist below to align your purchase with your goals and constraints.
Define Your Primary Use
- Visual only, wide-field emphasis: Consider a shorter f/ratio; 1.25″ diagonal is fine; 2″ optional for max TFOV.
- Visual planetary/lunar emphasis: Consider ED or APO with f/6.5–f/8; prioritize a smooth, dual-speed focuser.
- Imaging emphasis: Prefer ED or APO; check availability of a matched flattener/reducer; ensure focuser load capacity and camera backfocus solution.
Optical Tube Features
- Lens design: Achromat (budget visual), ED doublet (balanced), APO triplet (imaging/high-end visual).
- Coatings: Fully multi-coated optics are standard for good transmission and contrast.
- Dew shield: Fixed or retractable; retractable eases storage and travel.
- Focuser: 2″ dual-speed is ideal; check rotation and tilt adjustment for imaging.
- Backfocus: Ensure sufficient focus travel and spacing options for diagonals, eyepieces, and cameras.
Mount Considerations
- Payload and stiffness: Overmatch the load for better damping (< 2 s target).
- Manual vs GoTo: Simplicity and speed vs convenience in object finding and tracking.
- Tripod: Metal or wood legs with solid spreader; avoid extended center columns at high power.
Eyepiece and Diagonal Plan
- Start with 2–3 eyepieces covering low, medium, and high power; add a Barlow for flexibility.
- Quality 1.25″ diagonal initially; upgrade to 2″ if wide-field TFOV is a priority.
- Consider a prism diagonal for slower refractors; dielectric mirror diagonal for faster ones.
Budget and Value
- Achromat package: Lowest cost; prioritize mount stability and a decent diagonal.
- ED doublet kit: Mid-tier; excellent all-rounder for visual and basic imaging.
- APO triplet setup: Highest cost; geared toward imaging or critical visual observers.
Used Market and Quality Control
- Inspect for scratches, fungus, and mechanical play in the focuser.
- Star test if possible; evaluate diffraction ring symmetry.
- Confirm return policy and seller reputation.
Decision Flow (At-a-Glance)
- Set your main goal (wide-field visual, planetary visual, imaging).
- Pick lens type accordingly (achromat, ED, APO).
- Choose focal ratio range to suit use (f/5–f/6 wide, f/6.5–f/8 balanced/planetary).
- Match a mount with headroom for weight and length.
- Assemble a minimal, high-quality eyepiece trio and a reliable diagonal.
- Plan dew control, storage, and a simple observing workflow you’ll actually use.
Frequently Asked Questions
Is an 80mm refractor enough for planets?
Yes—within realistic expectations. On Jupiter, you can see multiple cloud belts, polar shading, and moon transits. Saturn’s rings are clear, with the Cassini Division often glimpsed in steady seeing. Mars reveals a polar cap and dark features near opposition. The key is matching magnification to the night’s seeing, nailing focus with a fine focuser, and giving the scope time to acclimate. On nights of poor seeing, even large apertures struggle; on steady nights, an 80mm can deliver rewarding planetary views. For tips on selecting eyepieces and maximizing high-power performance, see Eyepieces, Diagonals, and Focusers.
Do I need a 2-inch diagonal for an 80mm refractor?
No, it’s not required, but it can be beneficial if you want the widest possible true field of view. A 2-inch diagonal allows long focal length eyepieces with larger field stops, useful for framing very large targets (e.g., the full extent of certain nebula complexes or open clusters) and for easy star-hopping. If you mainly observe the Moon, planets, and compact deep-sky objects, a quality 1.25″ diagonal and eyepieces will serve you very well. Consider upgrading later if you develop a passion for sweeping wide fields. For the math behind TFOV, revisit True Field of View and Field Stops.
Final Thoughts on Choosing the Right 80mm Refractor Telescope
An 80mm refractor is a remarkably capable and enjoyable telescope class. Its strengths—fast setup, sharp contrast, and genuine portability—make it a perfect companion for beginners and seasoned observers alike. Whether you’re chasing lunar shadows, splitting delicate doubles, or sweeping through star clouds under dark skies, an 80mm refractor delivers a high return on time invested.
To get the most from your purchase, focus on fundamentals: match the optical design (achromat, ED, APO) to your observing goals; choose a stable mount that damps vibrations quickly; and build a small, thoughtful eyepiece set that covers low, medium, and high power. Add practical comforts—an observing chair, dew control, and a simple target list—and you’ll repeatedly experience what makes refractors such beloved instruments.
If astrophotography is on your horizon, an ED or APO 80mm on a competent equatorial mount offers a forgiving, rewarding path into imaging. For visual purists, the same scope on a smooth alt-az mount is a grab-and-go marvel that keeps you under the stars more often.
Summing up the key takeaways:
- Choose lens type based on use: achromat (budget wide-field), ED (balanced all-rounder), APO (premium correction, imaging).
- Prioritize a stable mount and a fine focuser; they elevate every observing session.
- Plan magnification around exit pupil and seeing; comfort and ergonomics reveal more detail than specs alone.
Ready to dive deeper? Explore our related guides on eyepiece selection, mounts, and observing strategies in the coming weeks, and subscribe to our newsletter to get future articles—covering everything from planetary techniques to travel-friendly setups—delivered straight to your inbox.